Divided: Computer Science
Comment for the teacher: Right 1-2 to hang around with those “Shari”. To the right 1 is indicated in the stepwise mode (the skin action is described in detail in the assignment), to the right 2 is indicated for the analogy with the first. Right 3-5 to go to those “Ball Styles”. Also, the right 3 is given in the side-by-side version, the right 4 and the 5 end is similar to the third. The programs are given output files (jpg) and text as specified.
Right 1
Task 1. Add new parts of other documents to the image
Open file Chess.jpg.
- Vibrati panel Shari.
- Increase the size of the canvas (so that there is enough space for adding other fragments of the image):
Malyunok - Size of the contour;
Set the width of the dialog box to 16 div.
Return respect to those who panel Shari take revenge on one ball in the background Background.

Open file Koshenya.jpg.

- See the image of the kochen.
- Viconati team Edit - Copy.
- Turn to document chess.jpg ta viconati team Edit - Paste.
- Without releasing the mouse button, move the view fragment near the document window chess.jpg.
- Release the mouse button.
At the document chess.jpg a new ball has appeared Ball l, which depicts a kochenya.

Open file Misha.jpg.
- See pictures of the mouse.
- Copy and paste the file chess.jpg.

Directory 2. Rename document shares
Task 3. Move and scale the image within the ball
Respect. The scaling will be proportional, as when moving the edges, press the key Shift.
Respect. When the key is pressed Ctrl The images are blurred and not scaled, so the cursor appears as a gray arrow.
- See the ball Doshka.
- See images of the chess player, vikorist and tool Magic wand.
- Invert the video.
- Keys Delete remove the white background from the shakhivnitsa.
- Invert the video.
- Change the image of the shahivnitsa who crowned the team
Setting 4. Change the order of re-stirring the balls
The image is placed on the foreground (background).

Management 5. Saving the file
To the right 2. Robot with balls
Tenge.psd, wikirist files: Frame.jpg, 10000 tenge.jpg, 5000 tenge.jpg, 2000 tenge.jpg, 1000 tenge.jpgі 100 tenge.gif.

Right 3. Robot with balls
Management 1. Addition and adjustment of photographs.
Open file baiterek.jpg.
Open file Embankment.jpg.

- Nalashtuvati style sharu Embankment in the dialog box Ball style, after clicking on the ball on the panel Sl about V.
- Similar operations with files 011.jpg, intercon.jpg.

Zadannya 2. Creation of a ball from the sunflowers.
Open file Pattern.jpg.

To the right 4. Robot with balls. Ball styles
Create a multi-ball document Nomad.psd, wikirist files: 01.jpg, 02.jpg, 03.jpg, p46a.gifі Camera.jpg. The shadows are adjusted at the top of the balls.

To the right 5. Robot with balls. Ball styles
Create a multi-ball document Aldar Kose.psd, vikoryst files: 03_ 01.jpg, CD 1.jpg.. The shadows are adjusted at the top of the balls.

Sevastopol station of young technicians
Department of Information Technologies
Collection
practical work
behind the graphics editor Photoshop
m. Sevastopol
2015
Purpose - Provide an educational collection of practical work that allows you to effectively consolidate theoretical knowledge in practice.
A guide to revenge robots from a graphic editorPhotoshop.
All the robots in the collection are described in order of increasing their complexity. The collection has a modular structure.
Collection of practical work sklav methodologist SUT:Shatrov A. A.
Practical robot No. 1
Copy it into a text editor, point the tool and sign the order of each of them, the method of registration.


![]()
![]()
![]()
![]()
![]()

![]()


![]()


![]()

Practical robot No. 2
In a graphics editorPhotoshop

Practical robot No. 3
In a graphics editorPhotoshopcreate 5 files (1.8 by 3). Each of them has the same signs painted, vikory tools and paintings.

Practical robot No. 4
In a graphics editorPhotoshopView the next photo. Using visualization tools, viewing frames, pencils and palettes, edit the images so that only a few elements are visible. The background is a white color.

It is necessary to align the ensigns horizontally and move the ensigns of the other row symmetrically in the center of the 1st row.
Practical robot No. 5
Scan the image. Find additional tools in the graphic editor and select additional palettes.

Practical robot No. 6


Practical robot No. 7
The graphics editor Photoshop requires editing images.

Create a new ball. Name it "Fon". Fill it with a gradient. Place the "Background" ball under the main ball with images. Go to the ball with the outline, see and delete all applications. Add contour lines where necessary (if you don’t do this, the fill and gradient won’t be able to settle to the image element).
Vikorist tools: fill and gradient fill the image. When preparing the preparation, use a few more than three colors. It is necessary to choose colors so that the stench appears harmoniously on the cooked aphids.
Practical robot No. 8
The graphics editor Photoshop requires editing images.

Create a new ball. Name it "Fon". Fill it with a gradient. Place the "Background" ball under the main ball with images. Go to the ball with the outline, see and delete all applications. Add contour lines where necessary (if you don’t do this, the fill and gradient won’t be able to settle to the image element).
Vikorist tools: fill and gradient fill the image. When preparing the preparation, use a few more than three colors. It is necessary to choose colors so that the stench appears harmoniously on the cooked aphids.
Practical robot No. 9

Practical robot No. 10

Practical robot No. 11
Using vikorist one of the prepared blanks, create a frame for the arch in A-4 format. During the course of your work, try out the copy or stamp method (you can combine both methods).

You may see a frame of reference:

Practical robot No. 12
The graphic editor needs to produce a black and white photograph.


When editing a photo, use filters and adjust the balance of colors and curves depending on what you prefer.
Practical robot No. 13
Scan (take a photo) of your photo, vikorist and balls, transform it exactly to the point of the little one.

Practical robot No. 14
Output material:


Create a background and place it on a new main figure, sign the robot.
Butt of the finished composition:

Practical robot No. 15
In the graphic editor Photoshop, edit the image.
Output material:

Possible robot option:

Practical robot No. 16
Changing color channels check the color transmission. Create a table of appearances in a text editor.

Practical robot No. 17
Using the following templates, create a calendar using the graphics editor Photoshop.

Change canvas size to formatB-5.
Practical robot No. 18
Edit the photo with a graphics editor.


Practical robot No. 19
Create a composite (stock image). Drain the filter. Create ashes. Add text to the selected composition.

Practical robot No. 20
Use a graphics editor to create images.

Practical robot No. 21
Use the graphics editor Photoshop to create a picture. When registering a robot, use frame No. 9.
A possible robot option.

Shanovna Zoya Vasylivno!
Happy People's Day!
From day to day you are born,
See the heart of a pure person
Good health for many years to come,
May you have a companion in life forever
Cohanna and tenderness, kind word.
The earth is happy, bright, great.
Success, sanity,
Among friends, colleagues - knowledge.
May our hopes and dreams come true,
And what day is this day – a quiz for you!
The team of LLC "Neptune"
Sevastopol
2004
Practical robot No. 2 2
In the Photoshop graphics editor you need to create a vignette. On the first side there is a large photograph, placed in an oval frame. On the other side there are small photographs of groups with inscriptions. I'm very interested in photographs of depositories. Place offending pages in A-4 format.
Practical robot No. 2 3

Unlock the ball from the images and create a copy of the ball. Press the right mouse button on the new ball and select the “Overlay Options” item. In the window, you need to set the “Lightening” value in the “Mode” field. Using the “Opacity” parameter, adjust the strength of the effect.
With the help of other instruments you can see the sky. With the help of the Brightness and Contrast tool, maximum clarity is achieved.
You can enter:

Stop mixing the balls and save your work.
Practical robot No. 2 4
Correct the color of the photo (it is necessary to lighten it).

Practical robot No. 2 5
Edit the portrait.
You first need to frame the portrait so that you end up with the same image as for baby 2. Small 2
Convert images to black and white mode. For this purpose we are working with you “Image” -> “Correction” -> “Mixing channels”.
Check the "Monochrome" box. The “Red” channel has 30, and the “Greens” channel has 70. If you set other parameters, the total value for all channels must increase to 100.
Vikorist parameters. You have a butti image for baby 3.
 Small 3
Now let's take care of the ochima. The eyes are very dark in the photograph and need to be lightened. To do this, take the “Illuminating” tool and change the pen. You will need a rosette brush. Set the size of the pencil according to the size of the letters, aligned with the size of the iris. Additionally, for the pencil, set “Diapason” – midtones and “Exposure” – 10-12%.
Now the decal clicks on the eyes illuminate them. So that there would be no need to edit the teeth. For this purpose, we need to darken a little using the additional tool “Darkening.” The adjustment of the instrument is selected based on the analogy with the previous one.
Now let's take care of the blues under the eyes. Behind the help of Laso's instrument you can see the blues closely. Press CTRL + H to capture the video line - but avoid editing.

Small 4
To use the “Curves” or “color balance” tool, select the shade of the visible plot.
After which we see a smaller plot, we carry out similar manipulations with it.

Small 5
The result may be an image similar to baby 6.

Small 6
Now it is necessary for two people to hollow out our ball. This can be done on the palette of balls.
For the top copy of the ball, the following parameters are indicated: “Darkness” and obscurity – 35%.
For the bottom copy of the ball, the following parameters are specified: “Lightening” and opacity – 55%.
On baby 7 and 8 the adjustment for balls is shown.
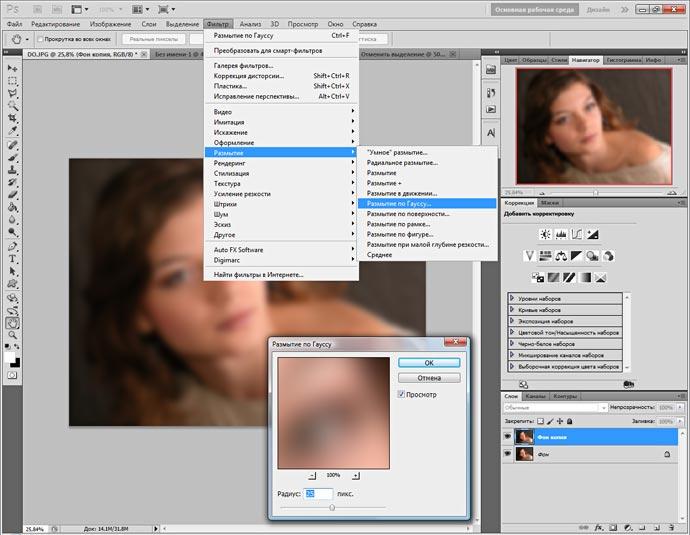
Now you need to apply the Gaussian Rosmit filter to the top ball. With the "Radius" parameter 15 pixels.
The same filter is blocked up to the bottom ball. Only with the "Radius" parameter of 20 pixels.
See Figure 9 and 10 for sure.
Let's create a new ball.
Turn off the visibility of the output ball, press the Alt key and simultaneously press the combination shift + Ctrl + E. Turn off the output ball and simultaneously turn on the light and dark copies of the balls. As a result, we can get a photo like the baby is 11.
 Small 11
Now let’s select the “opacity” parameter of the top ball, so that the tone of the skin is smoothed out, and at the same time, so that it does not look over-smoothed, uneven. The parameter value is approximately 30-40%.
Little 12 presents those that may come out of us as a result:
 Small 12
Now you need to add a mask to the top ball. For this you select “Ball” - “Ball-mask” - “Pick up everything”. Select a medium-sized brush with soft edges and set it to a white color. The image is drawn with a pencil in these places where it is necessary to smooth the skin (clothes, eyes, lips, eyebrows, etc. are skipped).
The result of the mask is shown to baby 13.
 Small 13
Now you need to pick up your balls. For whom we choose “Shari” - “Vikonati zvedenya”. If necessary, using the additional “Curve” tool, you can lighten all the images a little. To increase the sharpness of the image, it is necessary to set the “Contour Sharpness” filter (filter – sharpness – contour sharpness). Filter with parameters for views of baby 14.
 Small 14
The residual result of the robotic representations of the baby 15.
 Small 15
Practical robot No. 2 6
Edit the photo and insert it into the frame.
Output photo (div. Figure 1).
Use the Crop tool to create interesting elements in your photo. The result of framing the readings of baby 2. Small 2
Let's add a twisted ball. To do this, unblock the ball in the balls panel, and then copy the ball.
Convert images to black and white mode. For this purpose we are working with you “Image” -> “Correction” -> “Mixing channels”.
Check the "Monochrome" box. At the Chervoniy channel – 100.
Vikorist parameters. After the transformation, you may end up preparing like a baby 3.
Now you need to add a new ball. For a popped ball, the following parameters can be set:Zmіshuvannya – darkening;
Obscurity – 50%.
We take a penzlik of black color of great radius with soft edges. We set the “Opacity” parameter for it - 10-11%. Everything is being tarred, except the pipe and the fallen birch tree in the foreground.
You have a bottle on your new ball, like a baby 4.
 Small 4
Dodamo is another crooked ball. The order in which the corrigible ball was added is marvelous. Copy the trace of the cob ball.
For this ball the following parameters can be set: - Mixing - lightening;
Opacity – 25-45%.
We create a ball-mask.
For this ball we create a mask. For this you select “Ball” - “Ball-mask” - “Pick up everything”. Select a medium-sized brush with soft edges and set the parameters for it:
White color;
Obscurity – 10%.
I draw a picture of a pencil in these places, where there is a birch tree.
We create another ball using the same parameters. We create a ball-mask.
We add a twisted ball and stagnate to a new “balance of colors.” Adjustment of indications for baby 5, 6, 7.
 Small 5
 Small 6
 Small 7
It’s up to you to put the palette of balls in the same order as for baby 8.
 Small 8
After all the manipulations, our product may look like a baby 9.
 Small 9
Now you can eat the shari.
Set the filter “Contour sharpness” (Filter – sharpness – contour sharpness). You can set parameters for the filter, like Malyunku 10.
 Small 10
You can set the “Add noise” filter (Filter - noise - add noise). You can set parameters for the filter, like Malyunku 11.
 Small 11
Now we create a file with larger dimensions, the blank is cut out below. Fill it with black color. We copy our workpiece onto this black sheet and verify it.
The robot is ready to look at baby 12.

Instructional and technological map
Practical robot No. 11
Subject: Technologies for processing graphic information on a personal computer
Robot name: Photo retouching.
Meta robots: learn the basic techniques of image retouching using the additional tools “Stamp”, “Dot Pencil”, “Patch”.
Time to come: Create and edit graphic objects using additional programs for processing raster and vector graphics.
Safety precautions: instructions No. 2
Robotic hour: 2nd year
Get started:
Possession and materials:PC, projector, interactive whiteboard, photo display
Technical specifications (TZN):raster editor Adobe Potoshop, text editor MS Word.
Power supply for self-verification:
What is retouching?
What types of retouches are there?
What tools are used for technical retouching?
What tools and techniques can be used for artistic retouching?
The theoretical part
Retouch- This is a change in corn photography in order to capture imperfections, for example, imperfect skin, unwanted objects in the photograph, or various kinds of rags and much more.
Retouching is a technical art:
1. Technical retouch– it allows you to remove the technical shortcomings of the photographs from the appearance of scuffs and wear.
2. Artist retouch– allows you to remove some unnecessary elements from a photograph, as well as make various cosmetic corrections.
Practical part
Viconati retouch artist
Hid Vikonannya robots
Open the original photo.
Create a new ball, which allows you to carefully use the retouching tools, so that if something goes wrong, you can easily fix the problem areas by simply erasing the area nearby with a rubber brush, and then retouching again. In addition, for this ball you can change the overlay mode, change the opacity, blur, etc. etc.
To create a new ball, just click on the other right-hand icon on the “Balls” panel.

Take the tool “Penzel, what’s new.” Adjustment of the lens, which is updated (with the mouse active and right click on the image): the cut value is set to about 135 degrees, and the shape is set to about 80%. We set the hardness to approximately 50-60%, if you set the hardness to zero, then the work of the brush, which is new, will be noticeable. Obov'yazkovo tick the box. Virivnyuvnya"And in the field" Zrazok" - "Usi balls Now, after polishing the brush, we carefully remove all the imperfections on the skin. Holding down the key Alt, click the handle on the skin (take the mark), and then click the tool on the skin itself. The more often you take the image of the skin, the better the retouch will be, and the image you need to take from both sides is not enough, in which the size of the brush is responsible for a little more for the shortness itself. Let me remind you that you can easily change the size of the pencil using the square arms ( [ - The size of the pencil can be changed, ] - Exceedingly). With a new pencil you can use it on any patches of skin, behind the crown of the area, close to contrasting cordons. In these places, when the penalty is removed, what comes out is not a retouch, but some kind of brusqueness. Here it is necessary to use the tool. Stamp» ( S). The technique of this vicoristan is in no way different from the technique of the vikoristan, which is innovating.

To remove large imperfections, it is better to use a tool. Patch"Since the patch on an empty ball does not work, we create a copy of the main ball by dragging its right-handed icon on the panel to the other" Shari".

Select " patch"in mode" Dzherelo".

Let's circle the great vada. Moreover, it is not necessary to work smooth edges, so the less smooth the edges you create, the less noticeable the retouch will be.

We click the left mouse button in the middle of the image and, without releasing it, we drag it onto a piece of smooth skin, so that there are no shortcomings. The mouse button is released.

Axle such a skin must come out after working with a pencil, which is renewed, and a patch.

Check out the before and after pictures of the girl photo processing in photoshop.

Note: To move from one instrument to another that is in the same group, you must hold down the key Shift Then press the hot key to change the tool. For example, to move from the pencil to the patch, you need to hold down the key Shift then press the hot key J. You can also do it yourself, or without a key Shift. For this, let’s move on to tweaking Photoshop - Editing - Adjusting - Basics or press the keys Ctrl+K.

On the deposit " Main"uncheck" Changing a tool with the Shift key"I'm pressing" So". That's it, now you can change tools using a hot key without using a vikoristan Shift.

Zavdannya 2
Glamorous retouch
Glamorous retouch- one of the methods of processing photographs by professional designers and retouchers, which allows you to capture little details on the model’s appearance, as well as give it a special charm, added value and “glamor”.
The secret of successful glamorous retouching is that defects are not visible, smoothed out (blurred), and, most importantly, the texture of the skin is preserved. The sense is that if you simply remove the shortness and shortness, the glamor effect will not be achieved. Once exposed, you will become lyalkovim and inanimate. Therefore, you need to turn the pores behind one of the image channels, as they will remind you.

Image 1: Before and after glamorous retouching in Photoshop
Express retouching from photoshop from two shares.
ROZMIVAIMO. Duplicate the Backgrownd ball. Now it is accelerated by the Rosmittya group filter – Gaussian Blur (Gaussian Blur) with a radius of 25-30 pixels, so that the outlines become fuzzy. Don't worry, the image is blurry. This will be the basis for smoothing the short skins. It’s true that you really don’t know the texture of the skin and pores. The denunciation becomes lame, but we don’t need anything. Go ahead and grab the image behind the mask: Shar Shar mask Get everything...

TURNING THE SKIN TEXTURE. Go to Background Ball in the Channels tab. See (Select all) red and green channel. Select the channel you can see on it. Go to the Balls tab and copy the background, pasting it onto a new ball larger than the one you opened. Now apply the Other High Pass filter to the ball with a radius of 3-5 pixels to see the pores of the skin and other texture elements. Assign the mixing mode to the ball Soft Light, and you will see how the contour sharpness has increased. Attach the ball to the ball with the mask, rotated lower, by pressing Alt + click between the balls. The sharpness effect appears behind the mask.

BRING GLAMOR. Take a soft white pencil - hardness 0%, opacity 30% and begin to carefully move the mask in the necessary places. The structure will appear, and the attachment channel will reveal the texture and weaken it, revealing the gray color in the shadows. The distribution effect can be changed by adjusting the visibility of the ball. And increase the sharpness of the texture, for example, using the mixing mode (Perfect).
Independent robot
Create your own portrait and glamorous photo retouch (file: retouch1 and glamorous retouch).
Directions for calling: It shows all stages of the research process in the form of screenshots.
Zavdannya home: Viconati glamorous retouching of a hairless photo.
Divided: Computer Science
Comment for the teacher: Right 1-2 to hang around with those “Shari”. To the right 1 is indicated in the stepwise mode (the skin action is described in detail in the assignment), to the right 2 is indicated for the analogy with the first. Right 3-5 to go to those “Ball Styles”. Also, the right 3 is given in the side-by-side version, the right 4 and the 5 end is similar to the third. The programs are given output files (jpg) and text as specified.
Right 1
Task 1. Add new parts of other documents to the image
Open file Chess.jpg.
- Vibrati panel Shari.
- Increase the size of the canvas (so that there is enough space for adding other fragments of the image):
Malyunok - Size of the contour;
Set the width of the dialog box to 16 div.
Return respect to those who panel Shari take revenge on one ball in the background Background.

Open file Koshenya.jpg.

- See the image of the kochen.
- Viconati team Edit - Copy.
- Turn to document chess.jpg ta viconati team Edit - Paste.
- Without releasing the mouse button, move the view fragment near the document window chess.jpg.
- Release the mouse button.
At the document chess.jpg a new ball has appeared Ball l, which depicts a kochenya.

Open file Misha.jpg.
- See pictures of the mouse.
- Copy and paste the file chess.jpg.

Directory 2. Rename document shares
Task 3. Move and scale the image within the ball
Respect. The scaling will be proportional, as when moving the edges, press the key Shift.
Respect. When the key is pressed Ctrl The images are blurred and not scaled, so the cursor appears as a gray arrow.
- See the ball Doshka.
- See images of the chess player, vikorist and tool Magic wand.
- Invert the video.
- Keys Delete remove the white background from the shakhivnitsa.
- Invert the video.
- Change the image of the shahivnitsa who crowned the team
Setting 4. Change the order of re-stirring the balls
The image is placed on the foreground (background).

Management 5. Saving the file
To the right 2. Robot with balls
Tenge.psd, wikirist files: Frame.jpg, 10000 tenge.jpg, 5000 tenge.jpg, 2000 tenge.jpg, 1000 tenge.jpgі 100 tenge.gif.

Right 3. Robot with balls
Management 1. Addition and adjustment of photographs.
Open file baiterek.jpg.
Open file Embankment.jpg.

- Nalashtuvati style sharu Embankment in the dialog box Ball style, after clicking on the ball on the panel Sl about V.
- Similar operations with files 011.jpg, intercon.jpg.

Zadannya 2. Creation of a ball from the sunflowers.
Open file Pattern.jpg.

To the right 4. Robot with balls. Ball styles
Create a multi-ball document Nomad.psd, wikirist files: 01.jpg, 02.jpg, 03.jpg, p46a.gifі Camera.jpg. The shadows are adjusted at the top of the balls.

To the right 5. Robot with balls. Ball styles
Create a multi-ball document Aldar Kose.psd, vikoryst files: 03_ 01.jpg, CD 1.jpg.. The shadows are adjusted at the top of the balls.

- New document 500x500 pixels.
- New ball. To use an elliptical view (use the settings button "Add to view") and paint the penguin toolbar on the fill tool. Know the vision.
- Painting the forehead. The most elliptical image is filled with a gradient (tool in the group with fill), the colors are black and white.
- This is exactly how he lives:
- Painting the eyes on the new ball (elliptical visible area, fill, outline of the visible area, move tool). Make a ball out of the eye using the command Layer - DuplicateLayer (Ball - Tan the ball). Combine all the balls against the background.
- Mouth. New ball. I paint a red oval. The rectangular view shows the upper half of the oval. Edit - Transform - Scale (Editing - Transformation - Scaling). Deform by the upper middle square (pull it down), confirm the transformation by checking the box on the parameters panel. Viconati outlined with yellow color. Transfer it to the penguin's head and combine it with the ball of the tulub.
- Lapi ta krila. The new ball is lower than the ball with the tube. On the new ball there is an oval view, fill it with yellow or black. Transform by turning: Edit – Transform – Rotate. Drill the balls and roll them horizontally:Edit - Transform - Flip Horizontal, stick it to the tube, eat the balls, cream the background.


