Most often, we only think about the BIOS (Basic Input/Output System) when we need to reinstall the operating system and need to re-install data from a disk or flash drive. I often wrote about this in articles such as: , and others. Now I want to take it all together and pay an extra amount for consumption. This article is valid for all versions of BIOS and for different companies. Such a unique witness
The first thing you need to know is that the BIOS is divided into different versions.
Shchob change the login method in BIOS- You need to leave right away.
You can, of course, find out what the version and version of your BIOS is, from the server that comes with your computer.
You can also find out by marveling at the row of mountains on the black screen under the hour of attraction (the selection will be indicated there).
Well, then go to bios, knowing what your VIN is.
Some versions of the bios do not have such a screen showing rows. There is simply a logo there and at the bottom it says “Press F2 to enter SETUP” which means press F2. If there is just a logo and no writing - press ESC, and then del or f2
There is a small list of options and a key to enter the BIOS:
Also at the bottom of the black screen there are keys for entering the BIOS and for displaying a list of available devices for attachment and so that you can engage with it. Let's talk about new statistics.

As you learn, you most often need to press the key F2 or else Del.
Now you need to install a flash drive or disk in your car.
Let's take a look at a number of applications that differ from the BIOS driver.
Setting up Award Bios for downloading a flash drive or disk:
The head is obviously such a look, for which we need another point:

Then keep track of the firmware version. In one step you will need to go to an item similar to Boot Seq & Floppy Setup

In any other case, there is no need to go anywhere - everything will be so in front of your eyes

Click on First Boot Device(First Vantage Device), embossed Enter and show up like this at the end

Anyone who needs to select a disk or flash drive to start first. You can specify another attractive device, for example, otherwise the bios itself will remember this data.
Note:
Once you get the flash drive, you also need to go to the “Hard Disk Boot Priority” item and transfer our flash drive to the very top using the “+” and “-” or “PageUp” and “PageDown” buttons:

Also varto pamyatati - scho In order for the BIOS to load the flash drive, you need to connect it before turning it on or before restarting it
Then press “F10” (the exact key will appear at the prompt at the bottom of the screen with the name “Save”, “Exit”) or go to the main Bios menu and select the “Save and Exit Setup” item. In the red window, select Yes using the Y button on the keyboard and press Enter

The computer will reboot and, when logged in from the installation disk with Windows, may crash for a few seconds.

What it translates to is “Press any button to enjoy a CD or DVD.”
This means that if you do not press any button on the keyboard at this moment, the computer will continue to search for the next device on the list.
More different types of bios:
I've only played so much on old computers that were ten years old before 2003. The main menu looks like this:

To set up order, you need to go to the menu BIOS FEATURES SETUP:

At this point, you can select it using the PageUp and PageDown buttons (or Enter and the arrows) and then insert first – a CDROM or a flash drive. DON'T forget about the other and third device
I also:


How to vibrate why bother in AMI BIOS
If you upgraded to Bios, you see such a screen, which means you have AMI BIOS:

Use the "right arrow" button on the keyboard to navigate to the Boot tab:

Go to “Hard Disk Drives” and in the “1st Drive” row (may be called “First Drive”), select a disk or flash drive:

Next we go to “Boot Device Priority”, go to “1st Boot Device” and select from the list those that you selected in the first tab (if you selected a flash drive in Hard Disk Drives, then you need to indicate it here. This is important!)

To get hold of a CD/DVD disc, you need to select “ATAPI CD-ROM” (or simply “CDROM”) in this menu, but there is no need to go to the front “Hard Disk Drives” menu.
Now we save the results using the “F10” button or go to the BIOS Exit section and select Exit Saving Changes.
Another AMI BIOS, but here everything has become clearer:

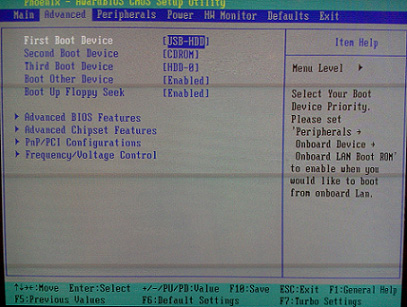
Setting up Phoenix-Award Bios for flash drive acquisition
If you have upgraded to BIOS and see a screen like this, it means you have a Phoenix-Award BIOS:

We go to the "Advanced" tab and in the "First Boot Device" section we install what is needed (flash drive or disk):

Save with the F10 key

Setting up EFI (UEFI) Bios with a graphical interface for connecting flash drives
Nina doesn’t see anyone anymore. Almost all new computers have such a shell. You can read a report about her from the statistics.
If you are interested in the lower part of the screen, there is a “Boot Priority” section, where you can use the additional mouse (drag) of pictures to set the required order of attraction.
You can also press the “Exit/Advanced mode” button in the upper right corner and select Advanced mode from the window.

Next, go to the “Boot” tab and in the section Boot Option Priorities In the "Boot Option #1" field, you can install a flash drive, DVD-ROM, hard drive, or other available device using your device.

How to get addicted to flash drives or disks without entering the BIOS
This is what I wrote about on the cob of the article.
If you only need to press it once and appear in the window with the choice of attraction. This method does not change the setup of the bios.
Zazvichay Award BIOS I suggest pressing F9 to click on the advanced menu, and ask AMI to press F8. Notebooks may have the “F12” key.
In the search bar - look at the bottom row and look for the items on the command "Press F8 for BBS POPUP" or "Press F9 to Select Booting Device after POST".

Why don't you get interested in flash drives in the BIOS?
Possible reasons: 
On older computers there is no way to use USB flash drives. If you don’t have a new BIOS, you can help with the project.
1) Please download the latest version of "Plop Boot Manager" and unpack it.
2) The archive contains the following files: plpbt.img – floppy disk image, and plpbt.iso – CD image.
3) We write the image to disk and save it from it (or from a floppy disk).
4) A menu will appear in which you select a flash drive and connect with it.
Small decryption of disk values depending on the hour of choice:
Don’t forget, after you’ve done what you wanted (and you’ve also changed the settings in the BIOS), turn back the settings so that the computer is backed up from the hard drive.
Hello everyone! Today I want to tell you, How to set the BIOS to flash drives. Why might you need it, for example, you have created a fancy flash drive and want, for example, to install Windows 10. You can also benefit: if necessary, install the DVD and CD backup in the BIOS. There are a lot of administrators who are new to this, for example, with an updated system, they can, through ignorance, say for a lot of time, without understanding that they should not work correctly. I am confident that the instructions have been given to you to show yourself clearly and that you will understand the principle of this action,
Via the Boot Menu to acquire a flash drive
In most cases, you will need to install data from a flash drive in the BIOS for any one-time task: installing Windows, checking your computer for viruses using LiveCD, resetting your Windows password.
In all these cases, it is not necessary to change the settings of the BIOS or UEFI, just click the Boot Menu when the computer is turned on and select the flash drive once as the storage device.

For example, when Windows is installed, you press the required key, select the USB drive connection from the system distribution kit, begin the installation - setup, copying files, etc., and after you first restart the computer itself remove the hard drive and continue the installation process in normal mode.
I wrote in detail about logging into this menu on laptops and computers of different brands in the article How to get to the Boot Menu.
How to go to the BIOS to select options

In some cases, in order to enter the BIOS setup utility, you need to enter essentially the same thing: immediately after turning on the computer, when the first black screen appears with information about the installed memory or logo computer generator or motherboard, press the required button on the keyboard - the most advanced options are Delete and F2. See this information at the bottom of the main screen: Press Del to enter Setup, Press F2 for Settings and similar. After pressing the required button at the required moment (before, and more briefly, you need to work before starting to install the operating system), you will go to the setup menu - BIOS Setup Utility. The appearance of this menu may vary, but we will look at some of the most extensive options.
I would like to give you a table of all the keys for entering the BIOS of various devices.

Change the order of implementation in the UEFI BIOS
On modern motherboards, the BIOS interface, or more precisely, the UEFI interface, is usually graphical and, perhaps, more reasonable in that there is no need to change the order of the hardware devices.

With most options, for example, on Gigabyte (not all) or Asus motherboards, you can change the order of display by simply dragging the drive images behind the appropriate one.

Since there is no such possibility, look in the BIOS Features section, in the Boot Options item (the remaining item can be in another place, but the order of installation is set there).
Adjusting the settings for flash drives in AMI BIOS

Please note that in order to try all the steps that are described, the flash drive must be connected to the computer at the back, before entering the BIOS. To install a flash drive into the AMI BIOS:
- In the menu, press the “right” key and select “Boot”.
- After this, select the item Hard Disk Drives and in the menu, press Enter on 1st Drive.
- From the list, select the name of the flash drive - on another small one, for example, this - Kingmax USB 2.0 Flash Disk. Press Enter, then Esc.

Menu for setting up BIOS settings

Stepping speed:
- Select the item "Boot device priority"
- Select the item "First boot device", press Enter,
- I'll tell you, bring in the flash drive.

If you need to download from a CD, you need a DVD ROM drive. Press Esc, in the menu from the Boot item, scroll down to the Exit item and select Save changes and exit or “Exit saving changes” - ask about those you have entered in that If you want to save money, you will need to select Yes or type Y on the keyboard, then press Enter. After that, re-enable your computer and again select the selected flash drive, disk or other device to re-enable.
Wanting a flash drive in Bios AWARD or Phoenix

To select a boot device in the Award BIOS, select Advanced BIOS Features from the main setup menu, then press Enter with the First Boot Device item selected.

A list of devices that can be attached will appear - HDD-0, HDD-1, etc., CD-ROM, USB-HDD and others. To use a flash drive, you need to install a USB-HDD or USB-Flash. To download a CD DVD or CD - CD-ROM. Then go one level up the hill, press Esc, and select the “Save & Exit Setup” menu item.
Adjusting the external version of the H2O BIOS

To install a flash drive in the InsydeH20 BIOS, which is common on rich laptops, in the main menu, using the right-hand key, you need to go to the Boot item. Set the External Device Boot item to the Enabled position. Below, under the Boot Priority section, using the F5 and F6 keys, set External Device to the first position. If you need to download from DVD or CD, select Internal Optic Disc Drive.
Then go to the Exit item in the menu and select Save and Exit Setup. The computer will be re-engaged as needed.
Access to USB without BIOS input (only for Windows 8, 8.1 and Windows 10 with UEFI)
If your computer has one of the remaining versions of Windows installed, and the motherboard has UEFI software, then you can download from a flash drive without entering the BIOS parameters.

For this: go to the settings - change computer settings (via the right-hand panel in Windows 8 and 8.1), then open “Updates and updates” - “Update” and click the “Re-update” button under the “Special options for upgrading”.

On the “Select Actions” screen, select “Victory Devices.” USB device, connection to video or DVD."

On the next screen you will see a list of devices that you can use, including your flash drive. If it’s not available, click “Look at other devices.” After selecting your computer, restart from the USB storage device you designated.
In the previous article, I showed how to exit the BIOS on various computers and laptops. Is it okay to go there? In 90% of cases, it is necessary to change the backup disk, install a portable operating system or print a new installation of Windows. In fact, the principle is completely new, you only need a little respect and logic. And to better understand this, I’ll show you a bunch of videos recorded on different computers.
Two ways to own a computer
There are two options. The first one is to put in the BIOS (also known as SETUP) the device for cleaning. This means that in case of skin inflammation, the computer is required to be located in this device. If you appear unavailable or not attractive, you will try to attract someone else for a list of devices that you can also specify. If you don’t ask, the computer will follow the list.
Another way to support all daily computers and laptops. When starting the computer, you need to click on the menu to select the desired device. So you can vibrate one-time, which is even easier.
To select the desired device from the BIOS in the first way, you need to go into it and look at its interface. If it's blue, then it's all the same Award, if it's gray, it's AMI, and if the graphical interface means UEFI. Other options. Please, just look at the screenshots and videos, and share them with your friends.
How to get attracted to the annex without entering the BIOS
For this, it is enough to press the button when starting the computer or laptop. For example, this BIOS Award encourages pressing F9 to click on the advanced menu:

There it will be written something similar to Press F9 to Select Booting Device after POST, then. Press “F9” to select your favorite device. We press and step forward:

This is a list of identified devices. Select a flash drive, CD/DVD disk or anything else and press “Enter”. In AMI bios it may be different:

It says "Press F8 for BBS POPUP". This means that you need to press “F8” for the selection menu to appear. On laptops, you can use the F12 key, and the menu will look like this:

We simply choose what we want and check for attraction. Video axis with this moment:
And this is the final example of a Bios EFI (UEFI) with a graphical interface and be a working bear! If you have a UEFI computer, then when you get into the BIOS you will see the following picture:

At the bottom of the screen there is a Boot Priority section, where you can use the mouse to set the required boot order. You can also:
- Press the “Exit/Advanced mode” button on the top right corner
- select Advanced mode from the window
- go to the "Boot" tab
- In the Boot Option Priorities section, in the “Boot Option #1” field, install the desired device behind a flash drive, DVD-ROM, hard drive, or other available device.

The owners of Hewlett-Packard computers can clearly see the following picture in Bios:

In the "Storage -> Boot order" menu, select the required device, press "Enter", then move it to the very top and press "Enter" again. Save the settings in the menu "File -> Save and Exit".
Let's take a look at the option from the Award bios
How to vibrate why you should be interested in AMI BIOS
AMI bios look different, no Award. After entering SETUP, go to the Boot section for the additional right-hand button. There you will find two important points:

Hard Disk Drives - you need to install a flash drive or hard drive. Go there and select your USB device (flash drive) in the “1st Drive” row (it can be called “First Drive”) and exit the front menu with the “ESC” button


Remember that if we had chosen a hard drive in the first place, then on this list instead of a flash drive there would be a hard drive!
To access a CD/DVD disc, you need to select “ATAPI CD-ROM” (or simply “CDROM”) in this menu, without going to the “Hard Disk Drives” menu. Now we save the results using the “F10” button or go to the BIOS Exit section and select Exit Saving Changes

The power supply indicates “OK” and the axis is used by the AMI Bios, which looks like Award. Here it’s just an analogy, you need to go to the Hard Disk Drives submenu

and select your flash drive in the “1st Drive” item, and then select it in the “1st Boot Device” row in the front screenshot instead of the hard drive

On computers and laptops everything is approximately the same. For example, on a basic Lenovo laptop, the “Boot” section has all the devices redone, which is quite easy. There is no confusion with the priority of additional menu items. It is enough to simply set the order of attachments using the F5/F6 buttons. So, to get hooked on USB, you just need to slide the flash drive to the very top:

I’ll give you an explanation of every mishap:
- USB HDD: flash drive or external hard drive
- ATAPI CD: either CD or DVD-ROM
- ATA HDD or simply HDD: hard disk
- USB FDD: external floppy drive
- USB CD: external drive for discs
Watch the video on how to enter the Bios AMI and install your favorite device https://www.youtube.com/watch?v=WojKPDi6a74
On some laptop models, such as the Lenovo G500, you need to press the OneKey Recovery key while the laptop is turned on.
Problems with access to USB devices
Where would we be without them? Why bother if the computer is not attracted to flash drives? Let's look at the main problems. Make sure that the USB controller is not enabled in the BIOS. In Award you can check the Advanced Chipset Features or Integrated Peripherals sections. Look for the USB Controller option, it must be in the Enabled setting

In AMI, in the “Advanced” section, the “USB 2.0 Controller” option is “Enabled” and “USB 2.0 Controller Mode” is in the “HiSpeed” setting

There may also be problems with the sockets on the front panel of the system unit - try connecting to USB behind the computer.
If you have SETUP as in the photo, then on the “Startup” tab switch the “UEFI/Legacy Boot” value to the “Legacy Only” position

Then the reason may lie with the flash drive itself. The stench is blazing, but it's definitely vandalizing! You can check this on another computer, where everything works.
Even on older computers there is no possibility of using USB flash drives. If you don’t have a new BIOS, then the PLOP project will help you. You need to download the remaining version of Plop Boot Manager and unpack the archives. There are files: plpbt.img – an image for a floppy disk and plpbt.iso – an image for a CD.
Apparently, if you have a floppy disk, you write an image for the floppy disk on it, and if you have a CD-R/RW disk, then you write an image for the disk. It is not possible to simply rewrite the file on the device; you will need to use special programs. Next, select this disk and select your USB device in the menu. In this way, you can get addicted to using flash drives on even old computers.
Today we will find out how to remove data from a flash drive in the BIOS of various devices. It doesn’t matter what version you have, the order of body ruins will be:
1. We insert our fancy flash drive into the USB port of your computer. I recommend inserting them into the port directly in the middle of the motherboard. From the back side of the system unit.
2. Turn on the computer and press the key Delete(or F2), then go to the BIOS. Depending on the version of the BIOS, other keys (Esc, F1, Tab) may be jammed, so you need to carefully read the on-screen prompts.
In Bios, you can switch tabs using an additional keyboard.
Below I will briefly describe this process using the most recent BIOS versions.
Respect! Remember that if you are installing the operating system from a flash drive or CD and have selected the desired device in the BIOS, and not in the desired menu, after the first automatic re-installation of Windows, you must enter the BIOS again and turn back hard disk storage. If you can’t do anything, you’ll need to auto-enable again from a flash drive or CD, and Windows will start the first stage of the procedure again. installations.
Setting up Award Bios for acquiring a flash drive
Award Bios:
Let’s check now that the USB controller is installed. Demo up to “Integrated Peripherals”. Use the arrow on the keyboard to navigate to the USB Controller item. Press the “Enter” key and select “Enable” from the window (also follow “Enter”). The “USB Controller 2.0” checkbox may also be “Enable”.
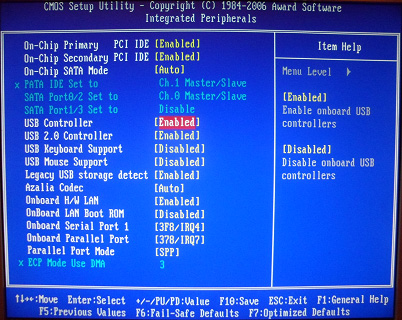 You can exit from this tab by pressing Esc.
Then we'll go to “Advanced BIOS Features” – “Hard Disk Boot Priority”.In my case, I initially have a hard drive, and maybe a flash drive.
 Place it in a row with the name of our flash drive (Patriot Memory) and move it up using the additional “+” key on the keyboard.
 You can exit by pressing Esc.
Setting up AMI Bios for acquiring a flash drive
If you upgraded to BIOS and see such a screen, it means you have AMI Bios:
 Let’s check now that the USB controller is installed. Go to the "Advanced" - "USB Configuration" tab.
 Opposite the items “USB Function” and “USB 2.0 Controller” may be “Enabled”.
 If this is not the case, stand on this row and press the “Enter” key. From the list, select “Enabled” (also use “Enter”).
Then exit from all tabs by pressing Esc.
Idemo in the tab "Boot" - "Hard Disk Drives".
 Right now I have a hard drive in my first place, and I need to put a flash drive here. We stand on the first row, stamp “Enter” and in the window that appears, select our Patriot Memory flash drive.
 Please act like this:
 You can exit via “Esc”.
Select "Boot Device Priority". Here, the first most exciting device is a flash drive.
 Embossed Esc.
Then we exit the Bios, saving all the settings. For whom go to Exit - Exit & Save Changes - OK.

Setting up Phoenix-Award Bios for flash drive acquisition
If you upgraded to BIOS and see such a screen, it means you have Phoenix-Award BIOS :
 Let’s check now that the USB controller is installed. Go to the “Peripherals” tab - opposite the “USB Controller” and “USB 2.0 Controller” items are “Enabled”.
 Then we go to the Advanced tab and under First Boot Device, install the USB-HDD.
 After this, exit the Bios, saving the changes. For this, go to “Exit” - “Save & Exit Setup” - press the “Y” key - “Enter”
 The axis is practical and everything you need to know in order to become interested in flash drives. In my article, I described the process of adjusting the BIOS to the most popular versions: Awardі AMI. The third one has ideas Phoenix-Award Bios, which is becoming more common.
For different versions of BIOS descriptions, the order of actions may vary. Alas, let’s make sure you understand the very principle of adjustment.
One more thing we would like to add: in order to select which device to use on your computer, do not necessarily change the settings in the BIOS. You can immediately, after opening your computer, click on a special menu for selecting accessories (you can use the additional keys F8, F10, F11, F12 or Esc). So as not to guess about the keys, pay attention to the monitor immediately after turning it on. We need to be able to write on the icon: “Press Esc to select boot device”. My option required pressing “Esc”.
Let's look at how to use flash drives to install Windows or update the system.
Insert the original flash drive into the USB port and restart the computer. Your main task at this stage is to change the priority of the drive so that the flash drive starts up right away, not the hard drive. There are two ways to fight:
- I will select the device via the Boot Menu (click the F8, F11, F2 or Esc key pressed after starting the computer).
- Changing the priority of attraction BIOS BIOS is a program built into the motherboard that allows you to change various boot parameters (for example, disk priority) on the hardware level..
The first method is much simpler, because it does not require further removal from the hard drive. You just need to select a device (DVD or USB) from the list to launch the program and press Enter. It looks something like this:
Press F10 and scroll down to the desired menu:

However, on some older computers the Boot Menu does not start, so let’s take a closer look at how to change the boot priority through the BIOS. Open the Start menu and restart your computer. Behind the logo you need to imprint a song key.

On some models of motherboards, the key used to enter the BIOS is not Delete, but another key – F1, Esc, F10, Ctrl+Alt+S. Reasonable nutrition is at fault - how do you recognize the required button? There are many ways:
- Find information on the Internet about entering the BIOS for your motherboard.
- Read the instructions from the motherboard manufacturer.
- Please pay attention to the information that appears immediately after the computer is turned on. This information looks like “Press…. to run setup". Instead of the checkmark, a specific key (Del, F1, Esc) will be indicated, which, when pressed, launches the BIOS.
Keys for entering BIOS
Axis table of keys for entering the BIOS for most types of motherboards:

Before speaking, you will need to press the button a lot of times until you see the end of the BIOS, otherwise you may skip the startup step.
Apply it
Respect!
During the development period, the BIOS interface is seriously damaged. However, you don’t have to say: the order of actions remains unchanged in all versions.
Unfortunately, the mouse does not work in Bios, so navigation is done only using an additional keyboard: the arrows are used to move around, and the Enter key is used to select a specific parameter. For a quick understanding of the BIOS operating principle, let’s see how to change the priority of settings on two different interfaces.
If you have an old BIOS interface, then to change the priority you need to go to the section "Advanced BIOS Features".

- Find a row "Hard Disk Boot Priority" or else "First Boot Device".
- Press Enter and use the additional arrow keys to select a value "USB-Flash"(“Removable”, “USB-HDD0”, “Flash drive name”).
- To save adjustments, press "Safe and exit SETUP" at the main menu.
After successfully installing Windows, you will need to repeat this operation, turning the HDD first.
The computers have a BIOS version installed from the AMI company (although more and more often, motherboard manufacturers install BIOS-based versions).

The robotic principle is lost by this:
- Go to tab "Boot" on the top panel.
- Open the section "Boot Device Priority".
- Stand in a row "1st Boot Device" then press Enter.
- Use the arrow keys on the keyboard to set values "USB"(or "CDROM", which is installed from the disk. In the picture above there is a CD/DVD-ROM, because there is none on that computer).
- Press F10 and select an option "OK" To save changes, exit the BIOS.
Don’t worry, you have a BIOS with a different interface, and there are no descriptions of the names of the tabs and sections. Just find the tab that has the word Boot in its name. In the middle, you will definitely see the priority of storage, which can be changed by installing a USB-flash device from the Windows distribution first.