Routery
Instructions Connect the modem to the intermediate cable or to telephone monitoring
, and then connect the computer via the USB input, or through the card slot. Immediately after this, the DSL connection and LAN indicators are activated. Then proceed to configure the modem.
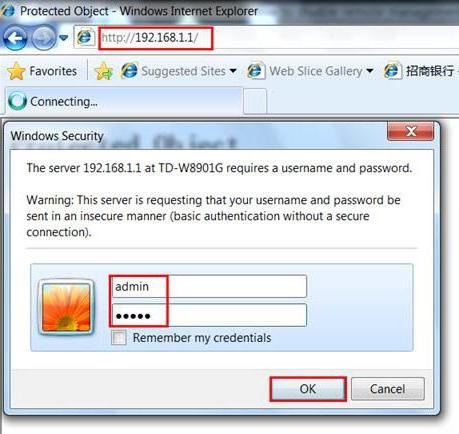
Open your browser and enter the address in the address bar: 192.168.1.1, the browser must open you to the page with the login field.
In the “Koristuvach’s name” column, enter: admin, and then enter in the “Password” column, press Enter.
Therefore, you must open access to the page with the configured modem.
- If nothing happened, it means that it is necessary to adjust the boundary map.
Routery
This may also result in the fact that some modems will not work as well as the required IP.
This can be done by setting up the modem. Go to “Settings” for IP connection, then to “Vlastivost” and “TCPIP Internet Protocol”. Fill in the fields. desktop computers.
Connect life to ownership. Using a vicor splitter, connect the telephone line cable to the DSL channel of the router. Find any Ethernet (LAN) port on the device and connect it to border map computer, vikoristovuyuchi for tsyogo
twisted pair
.
Close the PC selection and launch any other browsers.
Open the instructions to your Wi-Fi router and find out what IP address it has.
Enter your value in the browser URL field to enter the device settings menu.
Read the menu that has opened.
Find the WAN (Internet) item and open it.
Set up this point in the same way as you would have done it with a regular DSL modem in your possession.
It is also recommended to activate the DHCP and NAT functions.
With ADSL, you simply connect to the telephone socket through a special device that serves as a frequency range - a splitter, then the modem and telephone are connected, and the device connects directly to the telephone line. 
The splitter can be plugged into the modem, and you will still be able to connect. Now I'm working on getting it installed on your PBX. Tse DSLAM (DSL Access Multiplexer) -
hardware complex
There is also a large number of foldable electronics, including modems and splitters. We have now reached the telephone exchange for servicing the DSL connection. You establish a connection with it, and after you have passed authorization, you deny access to the Internet. 
Choose your possession You need to check that your PBX can give you a box with an ADSL modem, and you won’t have any problems with the connection. The provider himself is responsible for taking care of the food - it is necessary to check his phone number Submit an application, and after a positive result, you can receive additional funds. U present moment available ADSL modems with interfaces Ethernet connections
і USB, і dartless device- With Wi-Fi interface.
The choice is to suit your needs - the difference here is in the features of the connection and in the capabilities: modems that are connected to edge structures, demonstrate their more, lower USB-analogues. For example, in order to connect one computer to Merezha, you need to install a simple model, or there are two or more of them, you need to use a device with a router function - a modem is used at the same time Ethernet interface
or Wi-Fi. You can find options for Ethernet models with or without a built-in hub (in this case, you will need to install an additional hub when connecting several computers). What is needed
security has been improved
, then you can admire the model with Firewall functions,
For example, we got a D-Link modem.
Let's unpack it.
I'll start by connecting the modem to the phone via a splitter (a small box with telephone inputs). One side of the splitter has two inputs (Phone and DSL), the DSL input goes in the telephone cord from the modem, and there is no one in the Phone. A splitter is a frequency separator, or, to put it simply, it allows you to surf the Internet and use your phone without any changes.
Now we need to turn off the modem itself and look at the new one.
It's your fault to burn out the light bulbs because they're dimming.
The main indicator is the DSL light, which stays on and does not come on after the modem is restarted.
If the light is on correctly, you can connect the modem to your laptop or computer for help
edge cable
Ethernet RJ45.
It turns out that the light bulb is shining brightly or simply won’t light up.
You can resolve the problem by calling your provider.
Setting up a modem is more trivial for access to at least one machine and is unlikely to be difficult, especially since the connection process is clearly described by the provider itself.
What should you do if you want to connect two computers connected by an Ethernet cable, or a whole network connected by a hub?
And there are a number of ways out of the situation. The first and the simplest - for koristuvachh measures to develop a connection with the other. It’s like this: you need to click on the authority of your ADSL connection and from the window that has opened, go to the “Additional” tab. There, it is necessary for other koristuvachs to take measures to vikorist This is the connection
depress allowed (a number of points are still active, they can be deprived of meanings).
This will be assigned to the address 192.168.0.1 of the machine's edge card - other computers configured with TCP-IP
intermediate connection
It is necessary, of course, to assign addresses 192.168.0.2, 192.168.0.3 and others, enter 255.255.255.0 in the “Address mask” field, and set the system with a connected modem as a gateway to 192.168.0. 1.
The menu can be configured via the WEB, or through the not so “kind” Telnet.
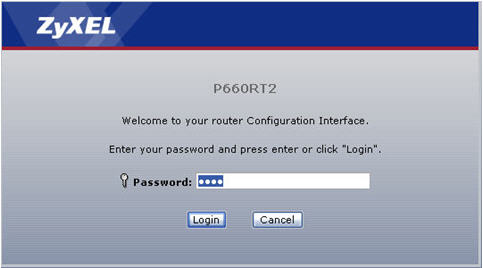
Of course, it is better to use the first method; you will have to open the browser and type the IP address of the modem in the address bar.
It is easy to find out from the documentation that is supplied; there we also take the login and password, which you need to enter immediately in order to enter it into your device.
Before speaking, before speaking, make sure that the system, for which setup is carried out, has an IP address in the same range as the modem - for example, if the modem address is 10.20.0.2, then the “car” needs to be set to 10.20.0.1 – Otherwise, you won’t be able to get it right.
Now I’ll add a service menu, you’ll definitely see a number of different unintelligible items in front of you, among them there may be a configuration wizard – Setup Wizard.
I’ll explain the process using Zyxel modems – models of other transmitters can be configured almost identically with the difference in configuration configuration. Let’s take the popular “Tochka.Ru” and “Stream” as an example of a provider. Having launched the master, you will learn the basic setup of the connection in the first window.
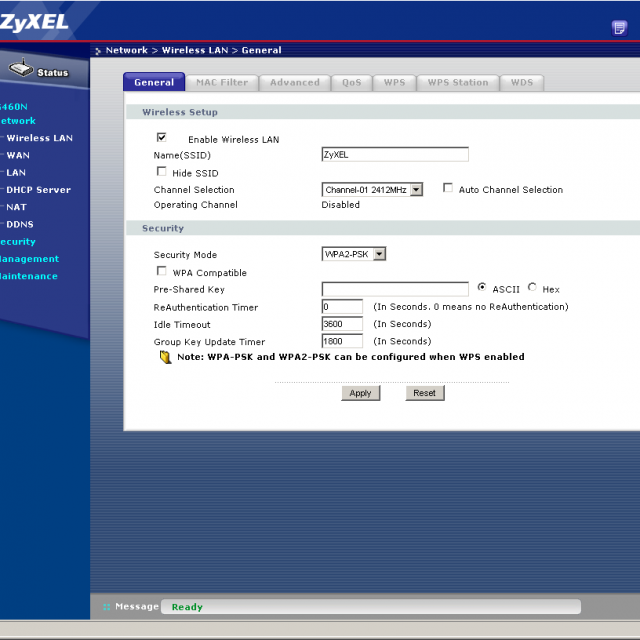
Click “Next” and go to the next window, there is a “Change LAN Configuration” button, followed by another important menu - network settings.
We need to set up the settings: enter the modem’s IP address in the “LAN IP Address” field, then the network mask is 255.255.255.0, and the DHCP setup group.
A report about it: since NAT is responsible for broadcasting the internal IP address of the modem to the external one, then DHCP is responsible for providing internal addresses to connecting computers. Apparently, we need the DHCP Server in the ON position, and the Client IP Pool Starting Address, the starting address from which they will be seen by their clients, can be set next to the modem address (for example, with the device IP = 10.20.0.2, Enter 10.20.0.3) . The parameter “Size Of Client IP Pool” = 32 is set, and the DNS servers are apparently registered by the provider.
Click “Finish” and reinstall the modem, and you can start accessing the Internet from any computer!
This can be configured in the menu of the modem additional “chips”: firewall or they are not difficult to configure, they can create a stink
garnu service
, ensuring the internal space is safe. Possible problems If you cannot install a modem connected to the DSLAM or it is unstable, turn over the splitter - this device is connected to the beginning of the line.
If you spend serious money, there may be problems with DSLAM or the channel is incorrectly configured.
Which one will get the better of the technical boost.
Some ADSL modems/routers can have their firmware updated, and better yet, corrected, updated and upgraded
Features have been added to new versions. That's all for now and until new learning experiences with you, dear friends A lot of providers today work on ADSL technology. Therefore, in order to make a successful connection to own this type, visibility is required
special devices
- ADSL modems. The only disadvantage of such a connection lies in the fact that only one PC can be connected to each modem via a multi-conductor cable connection. A way out of this situation can be to add a Wi-Fi router that works well with a modem of this type. There are also router models that include a router and an ADSL modem. When choosing a router, you need to know exactly what it supports
sleepy robot

with an ADSL modem.
The easiest way to set up a robot modem of this type is
D-Link router
DIR 320. If you are setting up an ADSL modem in router mode, you must set up the modem properly.
It can also cooperate with Wi-Fi.
One of the simplest configured modems of this type is ZyXelP-660RT2.
Video: Installing and setting up a Wi-Fi router Preparing the modem To successfully establish a connection between an ADSL modem and a Wi-Fi router, it is necessary to properly prepare the modem itself before operation. This model is to blame but has been switched to “mist” mode.
- When configured, this mode is called “Bridge”.
- This mode allows the modem to establish a connection with the provider - the provider of Internet services - and then disconnect itself, simply passing all traffic through itself.
In fact, the device acts as an adapter between the global network and the router. The setup is completed in the following manner: After completing the setup of the modem, the PC itself is setup.

If the setup is already configured, you can connect the Wi-Fi router and start the robot.
Connecting the ADSL router and computer to the limit
There are routers that can handle ADSL connections directly without an intermediary like a special modem.
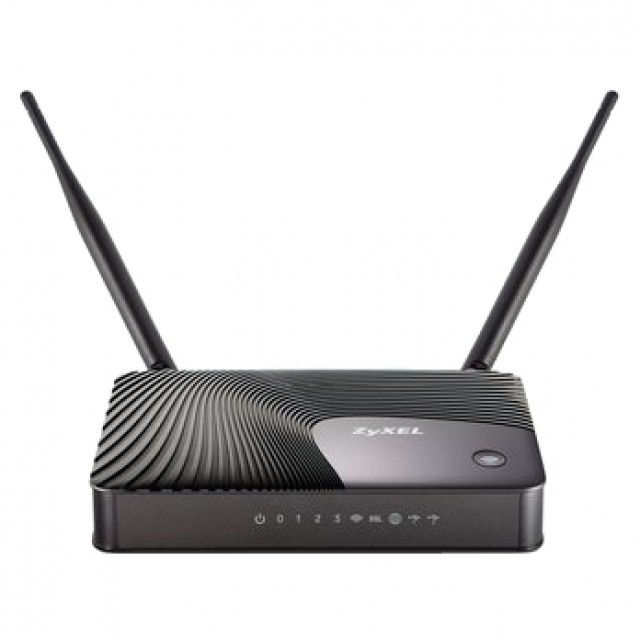
Of course, the price of such a device is an order of magnitude lower than that of a basic router.
- For example, Zyxel Keenetic DSL will cost you 2,400 rubles.
- To connect, you need the following data as may be provided by your provider:
- IP addresses, which are static;
- login and password for connecting to the line;
type of encapsulation (LLC and VC); Dani shodo VPI. Connecting your computer and Keenetic DSL router to the limit can be configured as automatic mode, for further help special programs, so in manual mode.
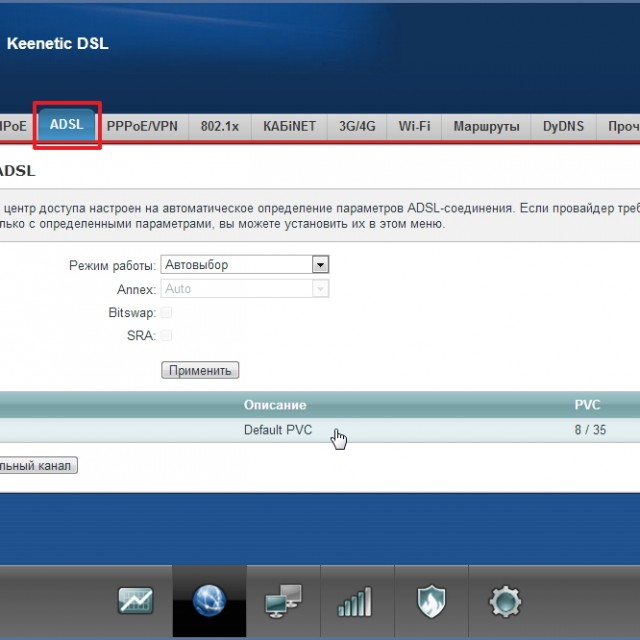
How Possible
automatic adjustment
is turned off, then manual adjustment is configured as follows:

At this stage, setting up the ADSL router is completed.
How to set up a router via an ADSL modem
- If you need to configure the router via an ADSL modem, the following scheme is implemented:
- Robot modes for ADS modem
ADSL modems can operate in two modes:
router mode; bridge mode. Setting up an ADSL modem in router mode requires changing the mode via the WEB interface. This mode transforms the device connection into an independent small server. This robot includes saving authorization data and various parameters required when connecting.
Also, in this mode, the modem automatically maintains connection, and if the connection is broken, without outside help reconnects.
Particularly
given the regime
and those whose modem has a firewall function.
When the modem switches to bridge mode, it is simply an intermediate device between the network and the network.
Wi-Fi today is one of the most advanced technologies available for accessing the Internet.
However, a lot of operators work with ADSL technology, and the availability of an Internet center (which includes a router and an ADSL modem) is high.
That’s why the topic of setting up and vikorizing the ADSL modem->PC-> Wi-Fi router connection is extremely relevant.
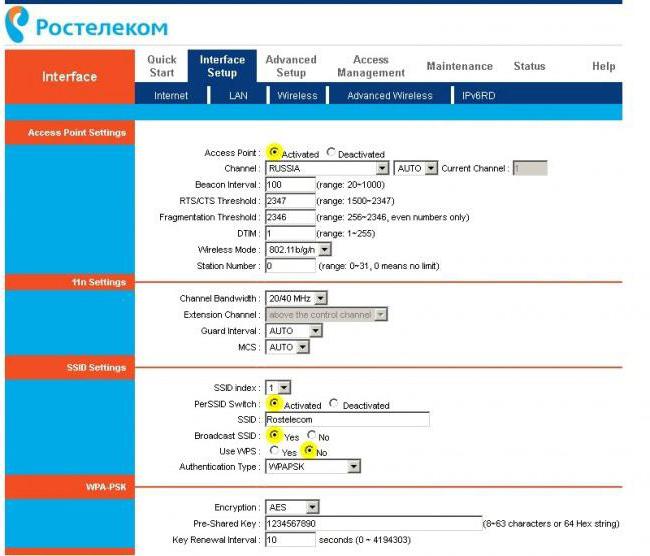
The Russian national provider Rostelecom has long been providing clear services to the communications sector, including organizing high-speed Internet access at home or in offices.
One of the connection options is to add a Rostelecom modem with WiFi. The price, depending on the model, averages between eight hundred and one thousand rubles. True, business owners are grappling with the problem of setting up ADSL devices.
However, once you get married, there is nothing particularly complicated about it.
This instruction will help any person to install the correct parameters across several lines.
ADSL modem for Rostelecom: what and what is needed?
- Well, let's sort it out.
- First, a few words about what is an ADSL modem for Rostelecom and how it works in practice.
- Herself
ADSL technology
is based on local telephone lines that are available in the most remote and accessible locations.
The Rostelecom Internet modem uses asynchronous data transmission when the received speed is a priority and outweighs the output speed.
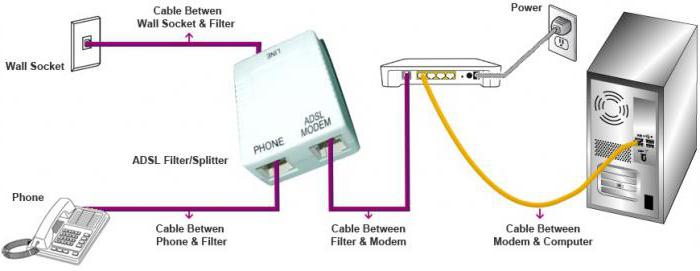
The standard connection scheme looks like this: the computer terminal is connected to the modem through a LAN port, the modem is connected with a cable to the splitter, and the splitter is connected to the telephone line socket. Once you get stuck, you can immediately access the Internet or make calls to your landline phone. If the entire circuit is assembled, the modem must be powered
electrical lines
, after which you must keep the light on and do not let the indicator light shine to indicate that the connection has been made correctly. If not, then you need to check the connection, and possibly replace the cables or replace the splitter. How to set up a Rostelecom modem: installing drivers
Everything became clear to the connections. Now it is necessary to initialize the device computer system . For this you need to install drivers. Yakshcho operating system

After attraction, you can’t earn it automatically, you can quickly
install disk
, which is standardly supplied with any device that can be bathed.
If a disk has been lost or damaged, the appropriate drivers can be found directly on the company’s official website (however, you can download them from another computer and copy them somewhere else
great nose
These situations can be unpredictable.
It is possible that a user who needs to connect the modem to Rostelecom and proceed to the setup stage does not have a disk, as well as access the Internet to download the automatic setup program.
In this case, you have to enter parameters manually, using the web interface for your modem.
Access to this is possible from any browser in the system, where the combination 192.168.1.1 is entered in the address bar. After this, a standard login and password will be required, as indicated on the nameplate on the back side of the device. As a rule, admin is used for both login and password.
If for any reason the modem shows a problem, you can reset it by pressing the Reset button for a long time.
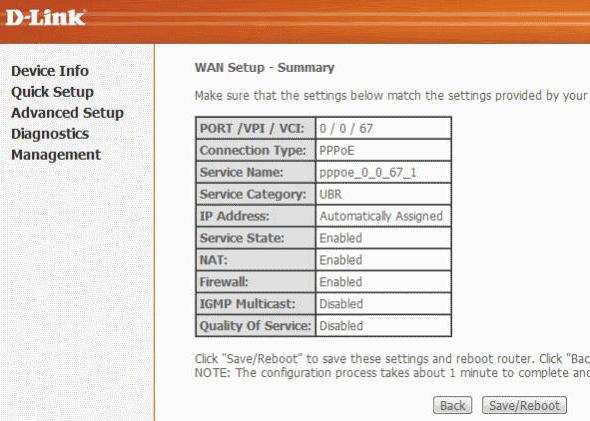
Setting Internet parameters on the D-Link 2640U application model
By the way, we have finally come to the practical conclusion of the problem of how to configure the Rostelecom modem.
We look at the web interface like a butt
D-Link modem
2640U.
The value set for the connection type is PPPoE, which, compared with the Bridge method, looks shorter, because through this you can access the Internet via Wi-Fi when the computer is turned on.
Next, you need to manually enter the values of the VPI and PCI parameters, which indicate the region in which the user is located.
Upon completion of these steps, you must go to the Maintenance tab and then Firmware.
When you press the button, you need to look at the file for adjusting the configuration parameters of ready-made extensions, which is responsible for saving on the hard drive.
Typically it is called romfile.cfg.
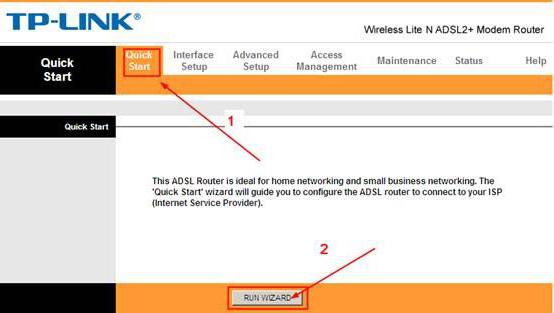
Save the changes. Finally, the adjustment is completed. Steps to set up the TP-Link modem
If we are talking about devices from the TP-Link series, then there is nothing particularly complicated in setting parameters.
In the browser, enter the same address, login and password, after which you will need to go to the section
Swedish start (Quick Start), for whom the special “Master of Adjustment” is activated. Next, you need to complete all the settings: set the correct time zone, select PPPoE/PPPoA mode for the router, then enter the VCI and VPI values and fill in the login and password fields for access to the Internet.