Review of domestic constructors and scripts of social media buttons for websites, as well as foreign analogues. Briefly, understandably and clearly.
Social media button designers for website
2. An easy way to get links to the site - QIP.RU
Place the button on the site and give visitors the opportunity to add their favorite site materials to bookmarks, blogs and social networks. Three steps: where to mark up the button (site, Blogger or WordPress), style of the buttons (ready-made options) and get the button.

3. Buttons for adding content to social networks - Pluso
Place the buttons and give visitors the opportunity to share the pages they like on social networks, as well as print, send an email and add bookmarks.

4. Service of social activity - UpToLike
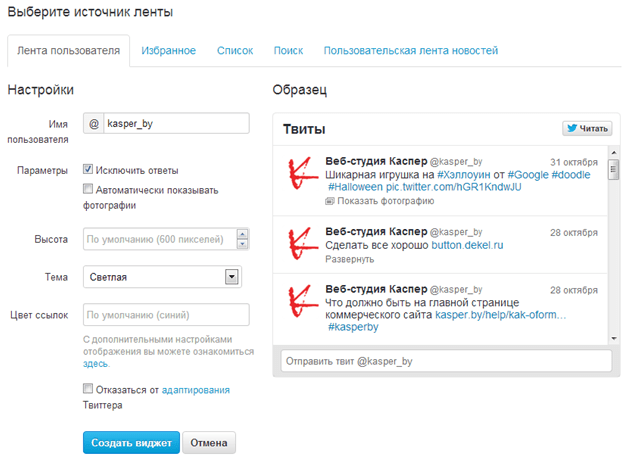
Customized social media buttons with the ability to set color, shape, size and special effects. Additional features are the PicShare picture sharing widget, the Quote function and the customized Following function.

5. One button! - for all services of bookmarks and social networks
Select the kind button. Where the button will be installed: website, Blogger or WordPress. Add a button.

Social media button scripts for the site
1. Beautiful social buttons for the site - goodshare.js
Display buttons on almost any device. Clean code. Brief documentation. SEO friendly.

2. Script buttons for social bookmarks and networks - Share42
Select the size and mark the icons of the services you want to use on the site. Select the options you want. See how it will look and / or download a ready-made script. Install the script on your WordPress site, Drupal, etc.

3. Beautiful social media like buttons using jQuery - Social Likes
A script of "like" buttons with counters in the same style for social networks: Facebook, Twitter, VKontakte, Odnoklassniki, Moi Mir, Google+ and Pinterest.

Foreign analogues of social media buttons for a website
1. Share Buttons - AddThis
Sharing buttons will help you increase your site's audience by attracting visitors from other resources and social networks, through the distributed content.


4. Social Sharing - Po.st
Get more value from social media sharing. The service will facilitate the process of sharing in social networks for visitors, which will increase the organic traffic of the site.

5. Share Buttons for Any Website - AddToAny
Get social media buttons code for any website. Choose the type and style of buttons, specify email and other options, or choose one of the platforms: WordPress, Drupal, Tumblr, Joomla, Elgg, WordPress.com, Blogger, TypePad or FeedFlare. Get the button code.

| at 8:00 | Change message | 6 comments |
All of us, engaged in our project, want to convey information to our readers as quickly and as fully as possible. Therefore, we try to place all this where it will always be before our eyes - in the sidebar. And therefore, there is constantly not enough space. And we also need to place the widgets of all social networks there. That's why you need to use social Carousel service - all social media widgets in one... We will talk about all its advantages and customization features below.
Often we are faced with the problem of placing various advertising banners, partner information, our subscription, our information products, information about headings, articles and comments on the blog. And, of course, placement, so popular now, social widgets. And all this avalanche of information must be placed in a prominent place. And more often than not, this place is exactly the sidebar.
Classically, everyone uses two-column templates (margin and sidebar on the right side). I think that increasing the number of columns is not entirely correct, because it greatly clutters up the space and negatively affects the behavioral factors of visitors.
By the way, the title says Part 1, because this is the first post in a series on saving sidebar space. In the next posts I will look at using the banner rotation feature and using tabs to improve the usability of the site. Therefore, subscribe to blog updates.
There is no need to prove that engaging and promoting your brand on social media is very important right now. Therefore, it is extremely important that they are presented on the site. And so I wondered how to implement the combination of all social widgets in one place. And lo and behold, I came across a solution to this question. Meet ...
Social carousel - all social media widgets in one "bottle". Save space in the sidebar
it free service, thanks to which there is an opportunity to significantly save space in the sidebar of our project. I want to note that this service makes it possible to place a widget not only on the WordPress engine, but also on handwritten sites by inserting the html-code. All widgets of such popular networks as: , Facebook, Google+, YouTube and Twitter - implemented in one widget as tabs. Visually, it looks like this:

Let's get down to familiarization. The widget service is located.
I won't talk a lot about the settings, its developer took care of a high-quality explanation of how it needs to be configured. The instruction is presented in videos, where they familiarize us in sufficient detail with the features of its installation on the site. There are some peculiarities, but they are not critical and can be easily solved. Most importantly, you hardly have to edit the code. The service will do everything for you.
We go through the standard registration procedure. We go to the service. Click - My widgets (point 1), then - Create a new widget (point 2). We fill in the field, as it will be called and enter the address of our website (point 3). We save (point 4).
 We get to the next tab, where the design is already taking place. Our widget is assigned an identification number. If you plan to install it via a WordPress plugin, then you need to check the box (point 1). We put down the dimensions we need and set the auto-switching of its tabs (they will alternately scroll through at a given time interval) (point 2). In the form of a widget, below, there will be a link to the developer and we are offered to remove it for money (point 3).
 We proceed directly to the social networks themselves. The arrows can be used to set the order of finding the tabs (point 4). Click on the red button to go to setting up the social networks themselves (point 5). You can choose which of them will participate in the display (there are different situations - problems with your Google account or the VKontakte page is frozen).
Check the box that we will use a WordPress plugin (point 1). Check the box Enable auto-switching tabs and set the time of their display (after how many seconds there will be scrolling to the next) (point 2). Then comes the fun part, because this information is not so obvious. Groups and communities from social networks can be placed in the widget, and not personal pages. We fill in these fields (point 3). We check the correctness of the installation by pressing the Preview button (point 4).
 To lookID Vkontakte groups, go into it, move the mouse to the Participants, then right-click Copy link and paste it into the address bar. The last digits in the address are the group ID. There is. We put it down in our VKontakte field.
Setting upID widget forTwitter. We go to our page. Then go to the upper right corner - Settings. From the pop-up menu, select - Widgets. We set up the widget necessary in style and size, and in the new generated code in the window we find the line with the ID. The numbers after it are our Twitter widget ID.
To view your username onYoutubechannel, auto-login to Google+ and follow this link ... We take the ID and paste it into the form.
To lookID onGoogle+ , log in there, go to the Profile and in the address bar you can see the numbers. They also need to be inserted into the field in the form.
ForFacebook (important!), we copy not the profile link, not the group link, but the page link. My Facebook page looks like this:
 Everything. The form was filled out. Push Generate code... Here's the code we got. We copy it. Now we have 2 options for installing it on the site.
 1
Option... Via a WordPress plugin. To copy it, go to Plugin for WordPress, we like on any of the social bookmarks and download it.
1
Option... Via a WordPress plugin. To copy it, go to Plugin for WordPress, we like on any of the social bookmarks and download it.
 Then we install it on the engine as standard and activate it. Then Settings - Social Carousel... We insert our code, register its ID, set the size of the widget and save.
 Go to Appearance - Widgets (point 1-2). Drag the Text widget to the sidebar and place the following code for displaying the social media widget into it:
Done. We admire and enjoy the results of our labors.
 2
Option ... This plugin began to conflict with some of the already installed ones. Moreover, the recent trend is getting rid of excess and saving space. Therefore, I demolished the plugin, and put our generated code in my theme file header.php before the closing tag ... It turned out something like this:
2
Option ... This plugin began to conflict with some of the already installed ones. Moreover, the recent trend is getting rid of excess and saving space. Therefore, I demolished the plugin, and put our generated code in my theme file header.php before the closing tag ... It turned out something like this:
The sidebar widget with the output is left. You can see the resulting result here on the blog on the right side. It is quite high-quality and has a huge plus - it saves our space.
That's all. Excellent service, the main thing FREE, which allows you to significantly improve the usability of the site. I think you will like it. Today we saved a place in our sidebar by installing the Social Carousel service widget - all social media widgets in one. If you have any questions, please contact us and do not forget to leave reviews. Subscribe to blog updates. See you soon.
Finally, watch a video about the service:
Read more interesting on the blog
Want to be in the TOP? The uniqueness of the picture will help. We use the TinEye service
2 commentsIn parallel with a website or blog, it is useful to have a group on social networks. There you can post announcements of your new articles, share information on related topics and just write your thoughts. And in return, you will receive an additional influx of visitors.
Social media widgets for your website will help you link these two projects. After a simple setup, links to your groups will appear in the sidebar, and people can immediately subscribe to them.
This will mainly focus on how to link a social media group to your website. And place the subscription form in the sidebar to make it easier for people to subscribe to updates. But beyond that, some social media offers other useful features that are worth mentioning. So, in addition to this, I considered the creation of polls, and likes, and reposts, and comments from social networks - there is a lot of information and all useful.
But here again it is worth knowing when to stop, because the more different widgets, the longer the site will load and problems may arise.
VKontakte group widget on the site
I really like the social network VKontakte, so I'll start with it. I only wanted to tell you how to add a group widget, but at the same time I will consider the rest - what if something else interests you.
To get access to all widgets, you need to go to the Settings section and at the bottom of the page click on the Developers button.

On the next page, select the middle icon with the inscription Connecting sites and widgets.

And here you can see all kinds of widgets for your site:

Comments widget - you can place a block with comments from VK on your site, as I have done. It is more convenient and faster for people to leave an entry in this form than to enter a name and mail in the standard one. And even with such comments, a repost is automatically made to the commentator's wall, which will be a big plus for you.
The settings are not complicated. You need to enter the name of the site, the address, select the topic - this is the registration of your site in the system. Add once, then you can simply choose from the list.
Then the settings of the form itself: select the number of comments that will be displayed on the page (the rest will be under the spoiler "show other comments"). Press more details next to Media, and you can turn off some functions. Specify the width of the comment margin so that it is not too short and does not go over the edges. If you haven't guessed right with the width, you can correct it right in the code - replace the numbers in "width:" 665 ".

Copy the code and place where you want on the page. You can delete comments, blacklist some users, or hire a moderator to view comments - there is a lot of spam.
If you have any difficulties with the placement of this code, you can add comments using the special plugin VK Comments. You can find out the ID in the same section for developers, just select My applications in the top menu and open the desired site. The numbers at the end of the link will be your ID (for example, vk.com/editapp?id\u003d123456).
Wall Post Widget - rarely used, but it may be useful to someone. With it, you can insert a post from VKontakte into an article. All likes are saved and displayed on the entries in the group. Another method of use is to quote important information verbatim, immediately linking to the source.
Open the desired post by clicking on its date, copy the link from the address bar. Paste in top margin, set width. After that, copy the code, paste it into the article in Text / Html mode. On the right, you can immediately see how it will look.

Communities widget Is a great way to connect your group and website so that people are more active subscribing. Add this widget to your sidebar and it will always be in front of your eyes.

Below you can customize the color if the standard colors do not suit you. After that copy the code and paste into the Text widget to add it to the sidebar. Or to any other place on the site, as it is convenient for you.
Like widget is designed so that users can like your articles and share links to them with friends. It is enough to customize the appearance of the button at your discretion, and then copy the code and paste it into the site.
In the "Button with text counter" option, you can independently select the label for the button.

Recommendations widget works only in conjunction with the previous one. It analyzes the number of likes on articles, and displays a list of the most popular posts. The settings are all intuitive: the number of records, for what period the data is displayed (day, week, month) and the text above the section (Like / Interesting…. People).
Polls widget allows you to quickly and easily launch a survey on your site. In the field with the subject, enter a question, and below you list all the answer options, adding new ones using the button Add to... Choose the size to fit the width of the sidebar or page, copy the text and paste where you want.

Follow user widget displays a separate button that allows you to become your VKontakte subscriber with one click. It's not about the group, but about your account. Provide a link to a user to follow, and then choose the appearance of the button from 4 options.
That's all the widgets VKontakte widgets that can be placed on the site.
Classmates widget on the site
We go to the section for developers. To do this, go to Settings, then go down and find Developers. In the next window, select Social Widgets.

There are not very many settings here, so you can easily figure it out:

- Choose the Width and Height according to your wishes.
- Group ID - go to your group, and look at the address bar. The numbers in the line will be your ID (for example, http://ok.ru/group/50582132228315). Replace the numbers with your own.
Copy the code, then go to the Design - Widgets admin area, drag the Text widget to the left area and paste this code.
Facebook widget to website
Go to the page for developers: under the right section "you may know them" there is a list of various links, but you need to click on "more", and in this drop-down list select For developers.

Then go to the top menu to the Docs section and here find the Social Plugins in the listings.
Go to the Page Plugin section and then fill in the information about your group: page link, widget width and height, and appearance.

When you are satisfied with the result, just click "Get Code" and then you will be offered two codes.
Make a backup copy of the site in order to quickly restore in case of an error.
- Insert the part above which it is written Include the SDK JavaScript on your page once, ideally right after the opening body tag - go to the admin area, select Design - Editor and find footer here. Run a search box (ctrl + F) and search for body. We need exactly the closing -< /body >... And on the line above, right above it, we paste the code from the top window. Save.
- The second part needs to be inserted in the widgets. To do this, go to Design - Widgets and drag the Text widget to the left area and paste this code. Check the functionality and that everything is displayed correctly.
Twitter widget to website
Finally, I will consider adding Twitter, although it is added quite rarely.
Go to Settings and select Widgets.

After that, click on the big Create button and customize the appearance of the widget.
Recently, every second (if not the first) customer in the requirements for the development of the site asks to be sure to link it with social networks. "Social" buttons on the site are the number 1 tool for attracting target audience, distribution of content and PR in general. And it's completely free!
Social networks provide codes for their buttons and widgets for placement on the site, and attach instructions for installing them in the content management system. Any CMS (operating systems) allows you to install them, the main thing is to harmoniously fit them into the design of your site.
What are the features and functions?
If your site is aimed at people who communicate with popular social. networks, for example, Vkontakte, Twitter, Instagramm, Facebook, Google+, Pinterest, etc., and you want to cover all of them, so as not to set the buttons for each of them separately, given that they may differ in size and design, we recommend using aggregator services. These are simple and convenient tools that will allow site visitors to quickly share information with their friends, regardless of which social network they use. Below we will analyze the most popular services.
Social Media Buttons Share Pluso
![]()

The social media widgets on the site can be used for different purposes. Most often, the site is embedded community widgetsso that visitors can subscribe to updates or follow company news, and comment widgets - since the majority of Internet users are registered in one or another social network, this does not require filling in additional fields, which is convenient when commenting on materials. We will talk about how to insert them into the site in this article.
1. Group widgets
VK group widget
To get the widget code, go to page for developers Vkontakte ... Here we carefully fill out the proposed form. Change the default link to the link to your group, select the type of community display, adjust the block width and colors. Below is a preview for all changes made. It is better not to change the colors, even if they do not fit the site design - everyone is already accustomed to such group design and changing the color can cause confusion. Next, copy the generated code and paste it into the desired place on the site.
Facebook Community Widget
The embed code for the Facebook community widget can be obtained from the developer page. Here we fill in the form with the widget settings:
After the settings, click the Get code button and copy both fields to the desired location on the site.

Twitter feed widget
To add a twitter feed to the site, go to the page (Settings-\u003e Widgets-\u003e Create New). If you are logged in from the profile of the account whose widget you want to create, then you will already have a ready-made version of it, which can be adjusted if necessary. The width of the block is adaptive, that is, the widget will adjust to the width of the block in which it will be placed, only the height can be adjusted. Then click the "Create Widget" button and copy the code that appears.
If your company is represented in several social networks, then it is most convenient to make a block with tabs, on each of which place a widget of the corresponding social network.
2. Comment widgets
For Runet, the most popular are Vkontakte comment widgets, the reason for this is obvious.
Vkontakte comments widget
Go to the developer page in block of comment widgets ... Here you need to fill out a form indicating the site on which the widget will be placed, specify the number of comments, the width of the block, allow or disallow attaching media files.

In this case, several administrators can be added to the group. To do this, just go to settings page and in the administered applications select the "Edit" item for the required one. Next, in the "Management" tab, add the person you need.
Second method: after inserting the block on the site, click on the Administration -\u003e Assign administrators link, which will transfer you to the desired VK page.
Facebook comment widgets
On the comment block settings page, set the required parameters (the url does not need to be changed) and click the “Get code” button.
.png)
To add administrators to comments, you additionally need to register a meta tag, into which instead of YOUR_FACEBOOK_USER_ID you need to insert your profile ID.
property \u003d "fb: admins" content \u003d "(YOUR_FACEBOOK_USER_ID)" /\u003e
If there should be several administrators, it is enough to list their IDs separated by commas.
If you have any problems or questions, ask them in the comments or contact our specialists for help. We work with almost any content management system!