Oh, those iPhones! It seems that they are easy to use and there are a lot of applications in the AppStore, but as soon as it comes to downloading music or installing our own ringtones, we do not know what to do and what to put in where. And the point here is not that people are stupid, it's just that Apple again beat everything in its own way, and we must "learn to live" by its rules.
In this tutorial I will show you how to create an iPhone ringtone and install it on your device.
The Internet is full of sites with ready-made ringtones for the iPhone. At the same time, there are both free and for money (albeit small). I categorically DO NOT advise you to pay for ringtones, as it is designed for very narrow-minded people.
We can create a ringtone from any mp3 song on our own. This is done quite simply, you don't have to be “ IT guru level 10“.
The essence of the process of creating a ringtone comes down to choosing your favorite song, cutting out the required piece of the song and converting this piece into the format m4r... Files of this format are used by the iPhone as ringtones.
Well, as we already have, I offer you several options for creating ringtones for your choice. Today we will consider the three most likely ways to solve the problem:
How to Create iPhone Ringtone Using iTunes
Not many people like iTunes, and even fewer have mastered it. But without it, nowhere, and the first way to create a ringtone for iPhone will be just with its help.
This method is good because we do not need access to the Internet. This means that no additional software (except iTunes) will need to be downloaded.
A small caveat: your computer must already have an mp3 file with music for a potential ringtone and iTunes must be installed. These are the minimum requirements.
STEP 1 - Open mp3 file in iTunes - Choose something of your choice. Remember that you live with this ringtone and no matter how you have to blush on the trolley when your phone starts ringing.
STEP 2 - Choosing your favorite passage - Listen to the song and decide on the time period for the ringtone. Here is one IMPORTANT condition - you need to limit yourself to 40 seconds.
It is better to choose a segment of a little less than 40 seconds, since you simply cannot transfer long ringtones to iPhone. Remember at what second the required passage begins and ends.

STEP 3 - - Right click on the track name and select Song Details from the context menu.
Click on the tab Options, enter the start and end times of the ringtone in the corresponding "start" and "end" items, and ONLY AFTER check the boxes opposite each of these items. We confirm with OK.

STEP 4 - Create an AAC version of the ringtone - now select in the top menu File - Conversion - Create ACC version.
A trimmed ACC version of the ringtone will appear in your iTunes library.

STEP 5 - Copy the file and delete it from the library - drag the AAC version of the ringtone from iTunes to your desktop. Right click on the AAC version in your iTunes library and select Delete... Confirm the deletion in the window that appears.
STEP 6 - Changing the extension - go to the copied file on the desktop, click on its name and change the extension from m4a on m4r... Confirm the change of the extension in the window that appears.
If you are using Windows and do not see the file extension, uncheck the option "Hide extensions for registered file types" in Control Panels\u003e Appearance and Personalization\u003e Folder Properties\u003e View Tab.
That's it! We've just created an iPhone ringtone! Congratulations! If you want to immediately upload it to your device, go to STEP 7.

STEP 7 - Setting ringtone on iPhone - open iTunes and position its window so that you can see the desktop with the ringtone you just created. Now just drag the m4r ringtone from your desktop to the iTunes window and drop it over your device. It's all!

The ringtone can now be selected from the menu Sounds in Settings iPhone.
How to create iPhone ringtone online
Now let's look at the most, in my opinion, the simplest way to create ringtones for iPhone. It is an online harvester called mp3cut.ru. Everything here is so simple that there is not much to write about. Okay, okay, here's a short step-by-step plan for what, where and why.
STEP 1 - - Go to the site mp3cut.ru and press the big blue button Open file. We select the mp3 file.

STEP 2 - We indicate the beginning and end of the ringtone - By moving the sliders, select the required fragment of the composition.

STEP 3 - - Convert and download ringtone - Press the button Ringtone for iPhone, and then Trim... The program will cut and convert your ringtone. On the next page, click Download.

If you forgot how download ringtones to iPhone, see STEP 7 - previous section.
iOS apps for making ringtones
The AppStore has a huge number of iOS applications for creating ringtones in m4r format. I would divide them all into two categories: the first is for cutting your tracks (similar to the one described above), the second is for downloading ready-made ringtones (created by someone else).
It is a thankless task to highlight and advise one of the applications. I will briefly describe the principle by which all these applications work. Both types of apps save the ringtone in the phone memory, but it still won't be available from the menu Sounds in Settings.
In order for the ringtone to be installed on an iPhone call, you need to make a ritual with a tambourine and your favorite iTunes:
- STEP 1 - Launch iTunes and connect iPhone.
- STEP 2 - -In iTunes, click on your device, and then select the tab Programs.
- STEP 3 - Scroll down to " Common files»And select the application you used to create the ringtone.
- STEP 4 - On the right side of the window, select ringtones and click " Save to ...". Save ringtones to your desktop or another folder.
- STEP 5 - Now you have ringtones in m4r format on your computer. What to do with them is written both above and below. Read attentively!

How to set ringtone on iPhone
No matter how you create your ringtone, a file with the m4r extension should appear on your computer. Now you are probably asking “ And what to do with it now?". Everything is very simple. To install a ringtone on your iPhone, follow three simple steps:
- STEP 1 - Copy the ringtone to your computer desktop. Then, in the iTunes window, click on the iPhone image.
- STEP 2 - Now just drag the m4r ringtone from the desktop to the iTunes window and drop it over your device.
- STEP 3 - On the iPhone, go to the menu Settings\u003e Sounds\u003e Ringtone and choose a brand new ringtone (it will be at the very top of the list).
Learn more about the process of transferring ringtone to iPhone.
Well, what was difficult? I think no! Having mastered this lesson, you will become a guru in the production of ringtones and can put any song on the iPhone ring. Now the main thing is not to overdo it with chanson... Have pity on the ears of at least your loved ones.
Subscribe to our Telegram, Twitter, VK.
note
The M4R format, which is an MP4 container that packs an AAC audio stream, is used as ringtones in Apple iPhone. Therefore, a rather demanded direction of converting is converting the popular music format MP3 to M4R.
You can convert MP3 to M4R using converter programs installed on your computer or specialized online services. In this article, we will just talk about the applications of various conversion applications in the direction indicated above.
Method 1: Format Factory
The universal format converter - Format Factory - can solve our problem.
- Activate Format Factori. In the main window, in the list of format groups, select "Audio".
- In the list of audio formats that appears, look for the name "M4R"... Click on it.
- The window for setting the conversion to M4R opens. Click "Add file".
- The object selection shell opens. Navigate to where the MP3 you want to convert is located. After selecting it, press "Open".
- The name of the marked audio file will be displayed in the M4R conversion window. To specify exactly where to send the converted file with the M4R extension, opposite the field "Destination folder" click on item "Change".
- A shell appears "Browse folders"... Navigate to where the folder is where you want to send the converted audio file. Check this directory and click "OK".
- The address of the selected directory is displayed in the area "Destination folder"... Most of the time, these parameters are sufficient, but if you want to make more detailed settings, click "Tune".
- A window opens "Sound settings"... Click in the block "Profile" by a field with a drop-down list, which is set by default to "Top quality".
- Three options open for selection:
- Top quality;
- The average;
- Low.
The higher the quality is selected, which is expressed in the higher bitrate and sampling rate, the more space the final audio file will take, and the conversion process will take longer.
- After choosing the quality, click "OK".
- Returning to the conversion window and specifying the parameters, click "OK".
- You are returned to the main Format Factor window. The list will display the task of converting MP3 to M4R, which we added above. To activate the transformation, select it and press "Start".
- The transformation procedure will begin, the progress of which will be displayed as percentage values \u200b\u200band visually duplicated by a dynamic indicator.
- Following the completion of the conversion in the task row in the column "Condition" an inscription will appear "Done".
- You can find the converted audio file in the folder that you specified earlier for sending the M4R object. To go to this directory, click on the green arrow in the completed task line.
- Will open Windows Explorer exactly in the directory where the converted object is located.


Method 2: iTunes
Apple has an app called iTunes, which features the ability to convert MP3 to M4R ringtones.
- Launch iTunes. Before proceeding with the conversion, you need to add the audio file to "Mediatheku"if it has not been added there earlier. To do this, in the menu, click "File" and select "Add file to library ..." or apply Ctrl + O.
- The file add window appears. Move to the directory where the file is located and mark the desired MP3 object. Click "Open".
- Then you should go to itself "Mediatheku"... To do this, in the content selection field, which is located in the upper left corner of the program interface, select the value "Music"... In the block "Mediatek" on the left side of the application shell, click on "Songs".
- Opens "Mediatek" with a list of songs added to it. Find the track you want to convert in the list. It makes sense to perform further actions with editing the parameters of the file playback duration only if you plan to use the resulting object in M4R format as a ringtone for the iPhone. If you plan to use it for other purposes, then the manipulations in the window "Intelligence", which will be discussed further, do not need to be produced. So, right-click on the track name ( PKM). Select from the list "Intelligence".
- The window starts "Intelligence"... Move it to the tab "Options"... Check the boxes next to the items "Start" and "The end"... The fact is that in iTunes devices the duration of the ringtone should not exceed 39 seconds. Therefore, if the selected audio file is played longer than the specified time, then in the fields "Start" and "The end" you need to specify the start and end times of the melody, counting from the start of the file. You can specify any start time, but the interval between the beginning and the end should not exceed 39 seconds. After completing this setting, click "OK".
- After that, you return to the track list again. Highlight the desired track again, then click "File"... Select from the list "Convert"... In the supplementary list, click on "Create AAC Version".
- The conversion procedure is in progress.
- After the conversion is complete, click PKM by the name of the converted file. In the list, check Show in Windows Explorer.
- Opens "Conductor"where the object is located. But if the display of extensions is enabled in your operating system, then you will see that the file has an extension not M4R, but M4A. If the display of extensions is not enabled for you, then it should be activated in order to verify the above fact and change the required parameter. The fact is that the M4A and M4R extensions are essentially the same format, but their intended purpose is different. In the first case, it is a standard iPhone music extension, and in the second, it is specially designed for ringtones. That is, we just need to manually rename the file by changing its extension.
Click PKM by audio file with M4A extension. Choose from the list "Rename".
- After that, the file name will become active. Highlight the extension name in it "M4A" and write instead "M4R"... Then click Enter.
- A dialog box opens, in which there will be a warning that when changing the extension, the file may not be available. Confirm your actions by clicking "Yes".
- Converting audio file to M4R is complete.


Method 3: Any Video Converter
The next converter that will help solve the described issue is Any Video Converter. As in the previous case, it can be used to convert a file from MP3 to M4A, and then manually change the extension to M4R.
- Launch Ani Video Converter. In the window that opens, click on the button "Add a video"... Do not be confused by this name, as you can add audio files in this way.
- The add shell opens. Move in it to where the MP3 audio file is located, select it and click "Open".
- The name of the audio file will be shown in the main window of Ani Video Converter. Now you need to set the format into which the conversion will be performed. Click on the area "Select output profile".
- The format list starts up. On the left side of it, click on the icon "Audio files" in the form of a musical note. A list of audio formats opens. Click on "MPEG-4 Audio (* .m4a)".
- After that, go to the settings block "Basic settings"... To specify the directory where the converted object will be sent, click the folder-shaped icon to the right of the pane "Output directory"... Of course, if you do not want the file to be saved in the default directory, which is displayed in the field "Output directory".
- A tool already familiar to us from working with one of the previous programs opens "Browse folders"... Select the directory in it where you want to send the object after conversion.
- Then everything is in the same block "Basic settings" you can set the quality of the output audio file. To do this, click on the field "Quality" and select one of the options presented:
- Low;
- Normal;
- High.
The principle also applies here: the higher the quality, the larger the file will be and the conversion process will take a longer period of time.
- If you want to specify more precise settings, then click on the name of the block Audio Options.

Here you can select a specific audio codec ( aac_low, aac_main, aac_ltp), specify the bit rate (from 32 to 320), sampling frequency (from 8000 to 48000), the number of audio channels. Here you can also turn off the sound if you want. Although this function is practically not used.
- After specifying the settings, click "Convert!".
- The procedure to convert an MP3 audio file to M4A is in progress. Her progress will be displayed as a percentage.
- After the conversion is complete, it will automatically start without user intervention. "Conductor" in the folder where the converted M4A file is located. Now you should change the extension in it. Click on this file PKM... From the drop-down list, choose "Rename".
- Change the extension from "M4A" on "M4R" and press Enter followed by confirmation of the action in the dialog box. As a result, we will get a finished M4R audio file.


As you can see, there are a number of converter programs with which you can convert MP3 to audio ringtone file for iPhone M4R. True, most often the application converts to M4A, and in the future it is required to manually change the extension to M4R by the usual renaming to "Explorer"... The only exception is the Format Factory converter, where you can perform the full conversion procedure.
From the moment of purchase, every iPhone owner wants to make his gadget unique, inimitable, customize it "for himself" and, of course, have the right to do so. The only thing you need to know is what and how can be done to make the device unique in its own way. Today we will talk about how to create ringtone for iPhone with their own hands.
No matter how surprising it may sound, not all owners of mobile phones and smartphones know what a ringtone is. And, for starters, let's define the meaning of the word "ringtone" once and for all. Wikipedia gives a very clear and simple definition of a ringtone.
Ringtone (eng. ring - call, tone - musical accent ) - sound, melody played on the cell phone to notify about an incoming call or incoming text message.
Thus, the ringtone and ringtone are essentially the same as for the iPhone as for any other smartphone.
As part of today's instructions, we will learn how to create ringtones for iPhone in 2 ways at once.
Ways to Create iPhone Ringtones
- Via iTunes;
- Online, or over the Internet.
When creating ringtones for iPhone, you need to know 2 important limitations, namely:
- Ringtones for iPhone are in "m4r" format but only;
- Duration sound track to create ringtone should be no more than 30 seconds.
With the definition and limitations when creating a ringtone for the iPhone, it became clear that now you can proceed directly to the procedure.
Create iPhone ringtone via iTunes
In a few words, the process of creating a ringtone for an iOS device via iTunes is very simple: you need to set the duration of the audio track to 30 seconds, create a version of the source in AAC format, manually change the format of the created file from ".m4a" to ".m4r" and add the received ringtone to your iTunes library. In practice, it looks like this:
- Launch iTunes;

- Add source file from which you want to make a ringtone for iPhone in iTunes. To do this, in the File menu, select "Add File to Library" and open the source. The file will appear in the main program window.

- Right click click on the name of the source and in the appeared context menu select "Details";


- In the opened window with information about the file go to the "Options" tab;


- In the digital field opposite the "Stop time" enter the value "0:30" and click "OK";

- Right-click again on the name of the source for the ringtone and in the context menu that appears select "Create AAC Version"... Another file will appear in the main iTunes window with the same name as the source, with a duration of 30 seconds;

- Call the context menu again by right-clicking on the file name for 30 seconds. and select "Show in Windows Explorer". If a in the folder view settings in the Windows Control Panel checked opposite "", in Windows Explorer file extension will not be specified and it will be impossible to change it using the explorer.

- In order for the file extensions to be displayed in Explorer, you must in the Windows Control Panel go to the section " Folders settings"-\u003e tab" View", Scroll through the list in the field" Extra options"Down, uncheck the box next to the item" Hide extensions for registered file types"And press the button" Apply". File extensions will become available in Windows Explorer;

- In the Explorer window with the ringtone file right-click on the file name, call the context menu and select item " RenameAlt + F2«;

- Change the file extension ringtone with " m4a" on " m4r". Ignore the system warning that "after changing the extension, this file may not be available." Ringtone for iPhone is ready;
- Add the ringtone to your iTunes library by " File -> Add file to library -> Open"Or press the keyboard shortcut" Ctrl + O". If you did everything right, the ringtone will appear in iTunes in the "Sounds" section;

- and as a ringtone.
It can take up to 10 minutes to create your own ringtone the first time, but with each subsequent time, the time spent will be significantly reduced.
Create Ringtones for iPhone faster and easier through the Internet online thanks to the folks at Audioscrobbler. Thanks to the audiko.ru service, creating your own ringtone will take a minimum of steps and only 3 minutes.
How to create iPhone ringtone online?
- Go to audiko.ru and click on the " Download". The service allows you to download the sources directly from the Internet, for this click on " insert link". On the opened page into a text box with "http: //" paste the link to the source... Important: the link must be "direct", i.e. without redirects. You will not be able to download the source from a file hosting service using audiko.ru;

- After you clicked on the Download button, open source from local disk computer. It will be uploaded to the site;


- On the next page, some ringtone settings will become available, namely: change ringtone duration, set the beginning and end of the ringtone on the source music track, thereby determine which part of the track to use as a ringtone, add fade in and fade out to the beginning and end of the ringtone... Determine the required parameters of the future ringtone and click the button " Create ringtone«;


- Wait until the end of the process, usually its duration does not exceed 1-2 minutes. On the page that opens with a link to download the created ringtone click on the download link. Ringtone for iPhone in m4r format will be downloaded to your computer's hard drive;

- Download the received ringtone to iTunes and make sure the ringtone is available in the Sounds section. Done!
Sure, making ringtones online is much easier and faster, especially since there are ready-made solutions for this, and we just brought one of the many services that allow you to create ringtones for iPhone via the Internet. But, as it seems to us, every owner of the device should be able to create ringtones for the iPhone with his own hands.
They often refuse the idea of \u200b\u200bputting their own ringtone on the call, considering the procedure too troublesome and preferring the standard Marimba. However, as iPhones spread among domestic users, the use of built-in ringtones begins to cause inconvenience: when Marimba sounds in a public place, every second person reaches into his pocket for a gadget to check if they are calling him.
The increase in demand for original ringtones has given rise to new opportunities for their creation: now you can put a song on a call not only with iTunes, but also through other software. It is important to remember two rules: the ringtone must have a special permission. .m4rand not exceed 40 seconds.
How to put music on a call via iTunes?
Make ringtone through iTunes you can use the following algorithm:
Step 1. First of all run the program iTunes and call the side menu by pressing CTRL + S.
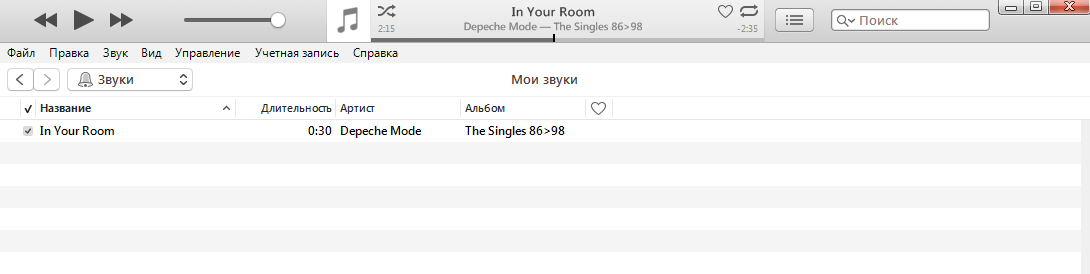
Step 2. Select the track you would like to make a ringtone from and right-click on it. We will make a ringtone from the band's song " Depeche Mode» « In your room". In the menu that appears, select " Intelligence».
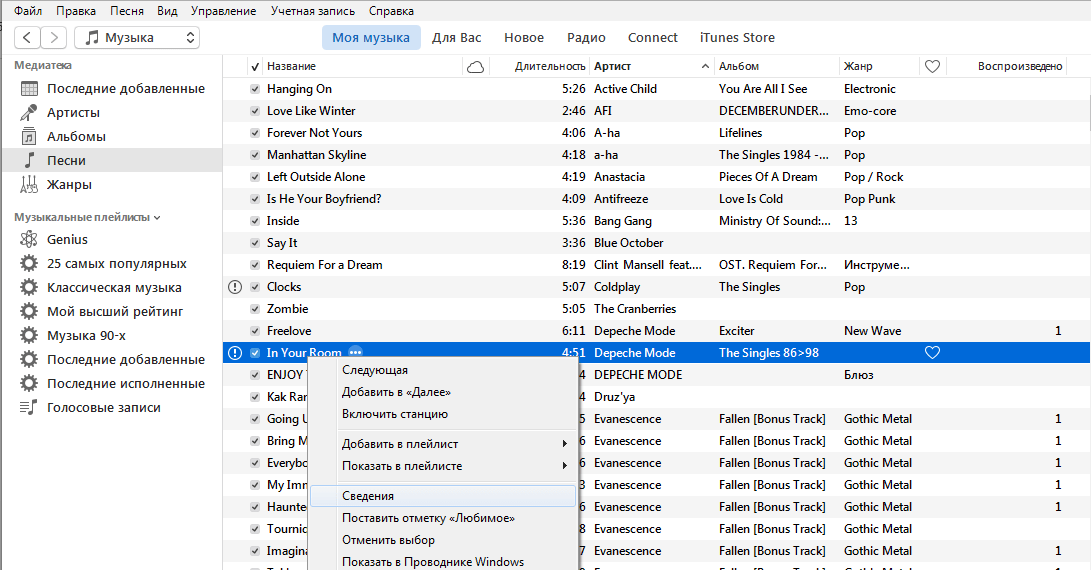
Step 3. In the block " Intelligence"Move from the section" Details"(Which is selected by default) in the section" Options"- you will see a window like this:

Here you can adjust the volume of the ringtone (for example, double the volume of the original song) and select an equalizer preset:

The presets are the same as those available in the settings of the standard application “ Music».
Step 4. Check the boxes next to “ Start"And" the end»And set the interval so that the ringtone does not exceed 40 seconds.
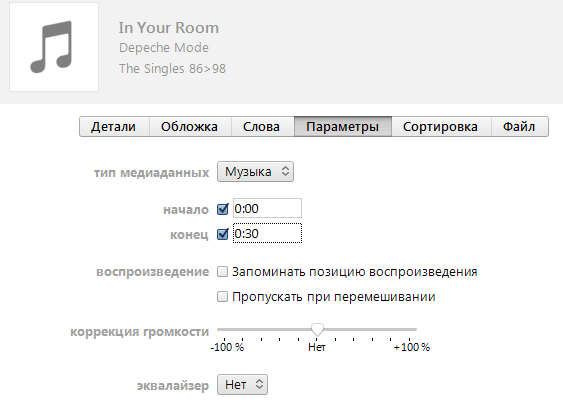
Then press the button " OK»At the bottom of the window.
Step 5. Find the edited track in the list in your library and select it.
Although the music library states that the track is originally 4:51 minutes long, when played in iTunes you will know that the track has been cut to 30 seconds.

Step 6. Follow the path " File» — « Convert» — « Create AAC Version"Without deselecting the selected track:
Next to the original song in MP3 format, a "clone" will appear - a trimmed AAC track half a minute long.
Do not forget to return via " Options»The same duration as the original track.


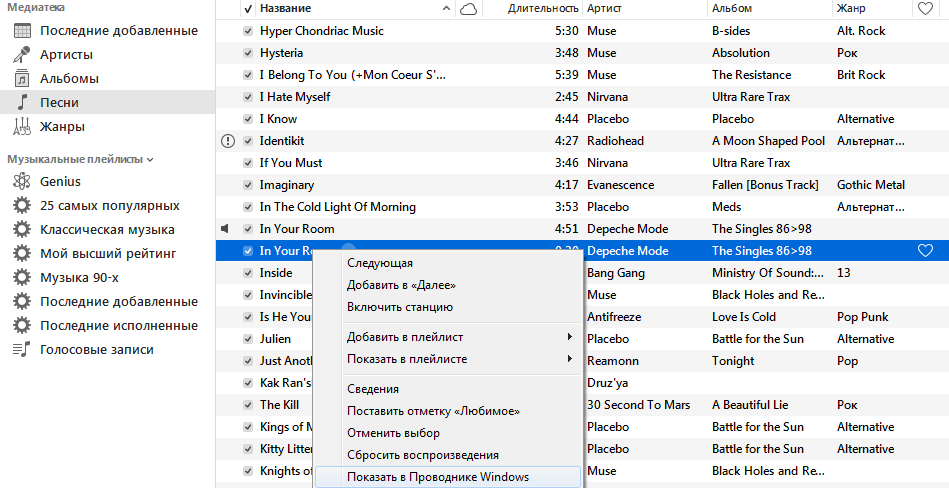
Step 7. Right click on the AAC file and select " Show in Windows Explorer»:
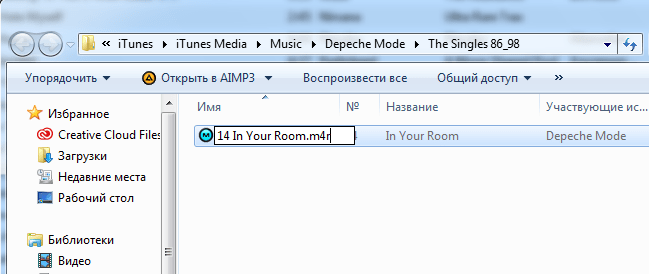
A special folder will open iTuneslocated on the C drive on the computer - it will contain the ringtone:

Step 8. Change the file format from m4a on m4r... This is where the complexity lies, because on many Windows 7 computers, file formats are hidden. To display the permissions, you will have to dig deeper into the computer settings - in the explorer, type “ Folders settings"And go to the found section. A window like this will appear:

Go to the " View"And uncheck the box next to the item" Hide extensions for registered file types"(Located almost at the very bottom). Click " Apply"And" OK". After that, next to the file name in the folder iTunes the format will be displayed - change a on r will not be difficult:
Step 9. The final chord remains: in the side menu of the media library iTunes Choose a section " Sounds»And enter the melody in m4r format in the appeared field:
Step 10. Connect iPhone to PC via USB cable and start sync. An important point: after connecting the gadget to the computer, click on the device icon in the top panel iTunes and in the left pane select the section " Sounds»:
Check the box next to " Synchronize sounds"And press the button" Apply" at the bottom. If this operation is not performed, synchronization will be ineffective, no matter how much you do it.

Further, it is a matter of technology to set the music on the call: on the iPhone we go along the path “ Settings» « Sounds» « Ringtone»And select a new ringtone (it will be the first in the queue). A new call can be set not only for a general call, but also for a specific subscriber - for this you need to find a suitable contact, press " Edit"And select the item" Ringtone».
How to put ringtone on iPhone via iTools?
iTools - an alternative software solution from Chinese manufacturers that allows Apple users to do without synchronization when downloading music and iTunes generally. Create and put a ringtone through iToolsincomparably easier than through iTunes,however, this method has its drawbacks.
When creating a ringtone for iPhone via iTools follow the instructions:
Step 1. Discover iTools and move to the section " Music»:

Step 2. Through the button " Add»Add the song to the list:

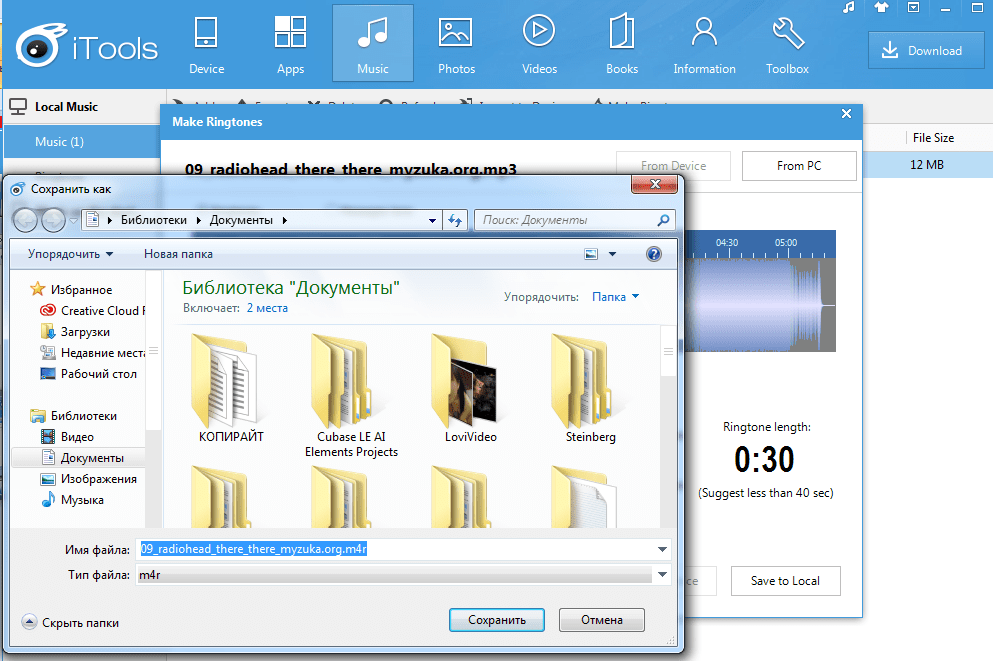
Step 3. Highlight a song in the list and click the " Make ringtones"Located in the top panel. A window like this will appear:
On the right you will see the length of the unprocessed track - the composition from the example is 5 minutes 23 seconds. Set the parameters " Start"And" End»So that the duration does not exceed 40 seconds.


Step 4. Click the " Save To Local", And the program will offer to save the ringtone to the computer memory immediately in the format m4r:
Step 5. Find the created ringtone on your computer and add it to the list with a simple drag and drop:
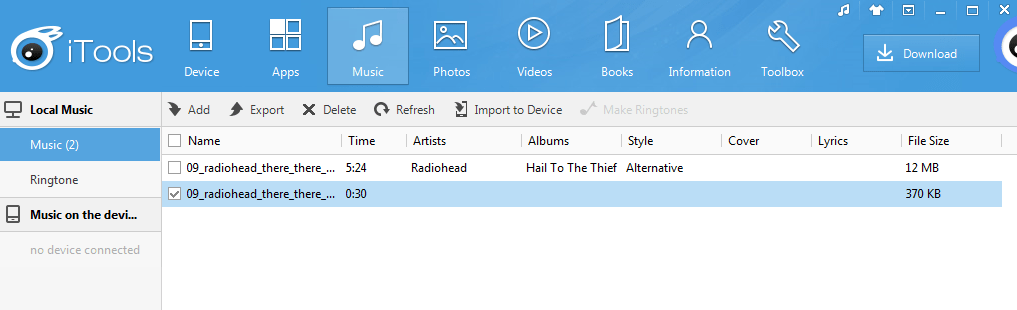
Step 6. Connect the gadget to your computer and click the " Import To Device»In the upper panel of the program. This will save the ringtone to the device memory.
In terms of making ringtones iTools has a number of advantages over iTunes: firstly, the user of Chinese software does not need to fool himself with extensions, and secondly, he does not need to synchronize. However, the program iTools There are also disadvantages: it is not Russified and does not give the user the ability to edit the metadata of the compositions.
You can place a call on an iPhone without using a PC at all - in the AppStore there are several special applications for creating ringtones at once, such as Ringtone and iTrax... You can read about the pros and cons of these and other programs for trimming music.
The main distinguishing feature of Apple is that all their products have been thought through to the smallest detail, from great design to convenient and functional software. The main pride of the company - Apple Iphone contains its own ringtones, which literally everyone knows by ear, even without this smartphone. But what if you want to put your favorite song on an incoming call, and not be limited to a standard set of ringtones? Another popular Apple product, iTunes, will help you easily deal with this problem. And today you will learn how to create ringtones in this program.
This method of creating ringtones is one of the easiest, so you will need your Iphone, a computer with iTunes installed, a USB cable and two to three minutes of free time.
Stage 1. Launch iTunes on your computer.
Stage 2. Open your iTunes music library and select a song to turn into a ringtone. Press the "Play" button and, paying attention to the time, remember from what moment you want to start playing the ringtone, and at what point to end. Please note that the ringtone must not be longer than 30 seconds.
Stage 3. Right-click on the desired ringtone, select "Details".
In the dialog box that opens, go to the "Parameters" tab and pay attention to the "Start" and "Stop time" items. In the "Start" item, you must indicate the time from which your ringtone will begin, in the "Stop Time" item, respectively, the moment the ringtone ends. After setting the parameters, for example, 0:15 and 0:45, click OK. 
Stage 4. Click on the resulting track with the right mouse button and select the option "Create version in AAC format".
In a second, a short AAC version will appear next to the original track.
Stage 5. There is little left to do. Right-click and select Show in Windows Explorer. A dialog box will open, which contains your ringtone. Copy this file by right-clicking and choosing "Copy", or by pressing Ctrl + C. 
Stage 6. Also, in Windows Explorer, go to the standard Music folder and create a Ringtones folder in it. Paste the copied ringtone into this folder. The next time you create new ringtones, save them to this folder. 
Stage 7. From the Start menu, open Control Panel. If your computer is running Windows 8, then move the mouse cursor to the very right side of the screen, select "Settings" and open "Control Panel". In the window that appears, select "Folder Options". Go to the View tab and find the option Hide extensions from registered file types. If there is a check mark in front of it, uncheck it. Click the "Apply" button and return to the created "Ringtones" folder. 
Stage 8. After making the changes, you may notice that the extension appears next to the file name. This way, in addition to the file name, we can change the extension. Right-click and select "Rename". Change the file extension from.m4a to.m4r. Confirm your intention to change the file extension. Now you have received exactly the ringtone for your Iphone.
Step 9. Finally, all you have to do is go back to iTunes, right-click the old 30-second file and select "Delete". Now you won't need it.
Step 10. Return to the Ringtones folder and double-click the file to select it. Your ringtone will start playing. And if you go to the "Sounds" tab in your iTunes library, you will see that the section is no longer empty, but contains your ringtone. 
Step 11. Connect your Iphone to iTunes (using USB cable or Wi-Fi sync). Go to the Iphone settings in the "Sounds" tab, select "Synchronize sounds" - "All sounds" and click the "Apply" button. After the sync is finished, the ringtone will be located in your Iphone. 
At first glance, it may seem that this method of creating a ringtone is too complicated. But in fact, it will take you no more than three minutes to create an individual ringing tone. Good luck!