Laptops Video Word lessons
for those who want to use the Word interface on a professional level and make the most of all the capabilities of this office program. Wandering around YouTube and knowing a lot of bad lessons..
Not those, so that the Word is so foldable that you can easily read it. However, there are times, for example, problems with Word, changing the register of the letter (from others to large ones) calls for difficulties. Other dribnitsi.
So I think learning about Word can be as simple as possible.
Of course, it’s a great idea to be smart and be literate. Word on the right helps, for example, checking spelling, even
corisna function This playlist has 39 lessons with MS Word.
The lessons range from simple to complex, there is a whole video course, I have never learned anything like this before. Hire in cost-free access definitely not. Marvel at Word video lessons
You might also just wonder
This program is a tricky thing to complete and it’s not always easy to get into it, but it’s less possible to use Excel first. Friends, subscribe to and receive interesting, informative, initial and unique, sometimes exclusive content to your inbox... Having written so much, I wanted to subscribe myself. The world has long released a new version of the famous office package
Microsoft company. The update was not missed and the text was pressing Word editor . In this article, along with instructions, we look at the main innovations and changes in this component.
The third point is “Create”.
This is a collection of templates, including various preparations: envelopes, questionnaires, resumes and much more. In addition to the supplied templates, the developer has the opportunity to find the necessary preparations on the official website of the company, specifically for which there is a search field on the site. One of the most notable is the “Druk” item, which will greatly simplify the work with printers.
All the main parameters for managing the seal are placed on this page, so you won’t have to rummage through the purchase dialogue windows, to know “the same” adjustments.
Everything is clearly laid out.
The number of copies, printer selection, other settings - everything is visible. The remaining item “Save and send” is an innovation that did not exist in Office 2007. new versions The Microsoft office wanted to create the most user-friendly environment for transferring documents and creating documents from behind-the-scenes access. Now a number of people can work on one document - of course, this discovery is not new, but it still deserves praise.
And transferring files to colleagues has become easier: automatic conversion from PDF, sending to the specified email address. Possibility of text formatting in Word 2010 The new version of Word 2010 has significantly expanded the possibilities for formatting text.
Another enhancement to text formatting is the ability to format OpenType fonts.
These fonts were developed by Microsoft and Adobe and have recently been restricted to professional programs.
This help includes the ability to work with ligatures (a series of symbols formed between each other), as well as changing existing fonts.
For this purpose, a special section has been created in the “Font” dialog box on the “Dodatkovo” page for customizing OpenType fonts.
Another concept has been introduced as stylistic sets.
There are new options for editing fonts that affect the characteristics of characters - for example, their conciseness.

By choosing one of the stylistic options, you change the font a little, thereby choosing the optimal and most suitable one.

To avoid damaging your skin too many times, it’s easiest to create a new style.

For which we see a fragment of text, to which we have already set the necessary formatting, go to “Styles” and, having opened the entire list, find the option “Create a visible fragment as a new express style”.

We click on the new one in the window that has appeared, enter the name of our style, if necessary, you can immediately edit it by clicking on the “Change” button.

Once the name has been entered, click the “OK” button, and our style will appear in the list of basic Microsoft Word styles.
From here on, you can quickly cut down to different parts of the text.
To concentrate the reader's attention on a simple phrase or important word, they can be seen in the text using bold, italic and underlined text.
These elements are displayed in the “Font” section, and the color of the text is immediately edited.

In addition to the bold image of the text, you can see the main commands that are first written down in the instructions so that users can easily recognize them from the text they have already read.
Once the element is visible, open the special tab “Working with Babies (Format)” to make all adjustments to the image.
In the “Wrapping with text” section, you can select different options for wrapping the image in the text.
In our drop-down you need to select “Top and Bottom”, and after the image you need to make an exit by pressing the Enter key.
Word 2010 has another useful function called “Image Cropping”, in which you can not go to graphic editors, but “on the fly” change the images, cropping those parts that are not to be displayed in the document i. Also, the new version of the popular text editor has a monitor storage function. It is distributed in the same section as “Malyunok” and is called “Znimok”.
Before starting the function, you must see the area of the screen where you want to see it.
After you “view” part of the screen, this item will be automatically inserted at the same place, removing the cursor.
This new function is especially useful for folded instructions or explanatory articles, where you need to insert screenshots into the text.
Let's say we have a quote that indicates that in the new version of Word it has become possible to change parts of an image - for example, remove the background. At first we can see the proposition in which we are talking about qiu new features , then go to the “Position” section of the menu and select the “Insert wine” item. After this, for example, a wine appears at the sight of the number “1”, here you can describe the thought and enter the dzherelo.

Let's write, scho function given Appeared no longer in the new version and has not been seen anywhere before. Now you can note in the text that, for example, the little number “1” is added to the letter, which indicates the number of the wine. If you press the Ctrl key and click on a proposition, it will automatically be transferred to the wine. Using a similar procedure, you can turn back from the wine to the text. Headers and footers are used for display

short information
up or at the bottom of the side.
Such information can be the title of the book, articles, author's name, etc. Our instructions show you how to create headers and footers for paired and unpaired pages.

To do this, you need to double-click on the top empty area of the page, so we will switch to the header and footer editing mode.
On the panel, select the item “Different headers and footers for paired and unpaired pages.” What follows to the text “. So, open “Insert → Title Page”. Here, as well as with the substitution, you can select a template.
Perevaga
ready-made templates
in that they help to save time and in which case you don’t have to deal with formatting the text and sorting it out on the arches, everything will work automatically. As indicated by the name of our instructions, the authorship is the same. At this point our work is completed - the instructions are ready for use.
Visnovki In this material we looked at the new features of Microsoft Word 2010, and also began to create a guide. Based on the evidence you have drawn, you can easily prepare a diploma, an essay or a book - all based on the analogy with the pointed butt.
It is also necessary to have the Word 2010 text editor available from 1Soft's partners.
The most popular text editor is Microsoft Word. Which materials will you learn to create? new document
, enter, edit and format text, create lists, create styles and much more.
This article opens up a whole series of initial materials, in addition to which you will learn to create clear text documents in your own
popular supplement
The page includes a set of buttons and commands that help you perform various actions on the document and together (for example, changing the size of text or something else).
The document window itself looks like a standard white paper flap and is used for entering any test information. There is also a menu above the evil page Swedish launch , in the middle - the name of the document, and to the right upper codend
The buttons will appear: close the buttons, change the size and close the program window.
With the document now open, move the cursor near the top left corner of the page so that there is a small, flickering vertical line.
This rice indicates the symbols you have entered that start from this place.
ENTERING AND EDITING TEXT Once you open the program, simply open your text, and enter the letters you entered, the words and propositions will begin to appear on the page of the document. To start working on the same page, or a row below, you must press the Enter key.
The number of times you press Enter indicates the number of missing rows. When you enter text, the cursor moves step by step with your right hand. When you reach the end of the row, simply continue to enter the letters.
The symbols at the insertion point will be automatically transferred to the next row.
.jpg)
What do you need to start
new paragraph
What can you do with such armchairs?
To do this, you need to move the mouse cursor over the word under the chair and press its right button.
As a result, a small window will appear with suggested correction options. Select the required word and press the left mouse button. The word will be replaced, and the symbol will be removed. If the word is not recognized, Word does not reproduce the same variants. With respect to those who do not correct such armchairs, they will be visible on the over-armed sides of the document. If the word is not recognized, Word does not reproduce the same variants..
Similar actions can be performed in addition to the green color.
Please note that Word recognizes spelling errors well, most of them can be easily corrected, but knowing grammatical errors and wording errors on your own is much more complex.
If you are aware that you are typing, and Word is presenting incorrect options, simply skip the correction by selecting the appropriate item from the menu that clicks on the right mouse button, and the edit will be removed. If you don’t care to put your attention on your skin, you can ignore them while typing, and after completing the entry, check the spelling and grammar of each document. For whom, open the tab
Review
to the animal on the page and select the item
If you need to see a number of fragments in different parts of the text, press the Ctrl key.
See the first section of the text in any way, then press Ctrl and, without releasing it, see the next section, after which you can release the key.
If you need to see another fragment, press Ctrl again and continue. Shaping the text What would you like to turn your respect up to?
important information
For example, you can make the text bold, italic or underlined. Go to virtuapc.ru Ale tse drіbnitsi.
You can change the size, style, color, background and set to a new animation element. Go to virtuapc.ru And this is not the full range of possibilities that Word gives to writers when working with text. Now it’s time to figure out the line (string interface) that was found on the very beginning of the article, and find out how you can use it. The top of the work window contains a number of tabs.
The skin should be filled with the necessary set of actions.
.png)
We need to select a friend tab - (If it is not selected, you need to click on it with the left mouse button). The skin tab contains a number of groups with commands that share a number of elements. On depositі find a group.
Font
.png)
(The name of the group is in the bottom row of the page).
This group has a number of commands and buttons that allow you to add changes to the text. Now it’s time to figure out the line (string interface) that was found on the very beginning of the article, and find out how you can use it. In our option, you can see a sufficient portion of the text or the word, then click on the corresponding buttons in the group to change your image.
As you can see from the baby, after pressing the button
The method described in the previous section for making changes is handy especially in cases where you need to change the format of more than a few characters, words or words. To maintain multiple types of formatting, the entire document is recognized.
styles Go to virtuapc.ru With respect to those who do not correct such armchairs, they will be visible on the over-armed sides of the document. Various types of styles are available on the tab Styles
.png)
. All you need to do is select any style to automatically change the font, text size, attributes and paragraph formatting. For example, you can instantly change the font image, make the text larger, and add bold formatting.
As you can see, after choosing a style under the name Go to virtuapc.ru With respect to those who do not correct such armchairs, they will be visible on the over-armed sides of the document. Various types of styles are available on the tab Heading 1 , our first paragraph turned into a heading (the size of the font increased, the color changed)..
To experiment, on the deposit
Move your cursor across different styles. Go to virtuapc.ru With respect to those who do not correct such armchairs, they will be visible on the over-armed sides of the document. In this way, you can make the changes that will be made to the document after you want to decide on any option. To completely set the style, simply click on the new left mouse button. Now it’s time to figure out the line (string interface) that was found on the very beginning of the article, and find out how you can use it.).
To view other styles, you can open the collection by clicking the button in the lower right corner of the block with the arrow
Others
.png)
CREATED LISTS If you need to create a list for a document, you can also earn money by investing Paragraph (as is known as a right-handed person in the group Let's practice.
.png)
.png)
First of all, separate the text that will be converted into a list in separate paragraphs using the Enter key.
In this case, there can be either words or sentences for the purpose.
In our application, we decided to format the remaining paragraph as a list. Now you can see the text that needs to be converted to a list. In the paragraph group press the button Markeri. The text will be converted to a marking list. Without seeing anything in the list, press the button
The first value of the list is the field Zvichaine, which is actively Narazi. To create any fields, you need to press the button Vuzke . If you need to make the left and right fields significantly wider, click the button

Widely . When you select a field type, the fields will be automatically saved to the entire document.
When you select fields, the background colors of their icons will change.When you press the button again
fields, However, such a change in color can determine the size of the installation fields. VIKNO

BACKSTAGE To avoid wasting your money on work, you need to save it and save it the sooner you earn it. To do this, open the first tab on the page
File However, such a change in color can determine the size of the installation fields.. There is a great window called Backstage, in which you can carry out various operations, for example, save, recover, etc. In the left area of the window, select the item There is a great window called Backstage, in which you can carry out various operations, for example, save, recover, etc. Save
. However, such a change in color can determine the size of the installation fields. A new one will appear in a smaller size. In which window you need to indicate where you need to save the document on your computer, or otherwise..
After saving the document, continue working by saving it periodically. You can also save your document at any time by pressing the Ctrl+S keys. If the document is already ready to be sent to your friend, open the tab again
. However, such a change in color can determine the size of the installation fields. In the left area of the menu, select a command Druk.
It’s great to show up when you need to press it into a row
.
Of course, first of all, the connection to the computer is due to the connection between the printer and the other - the MFP.
In the next part, we will learn how to revise and insert fragments of text, change the row spacing, perform verification, change formatting marks, and much more.
Read also:
Microsoft Word is a text editor that can partially Microsoft package Office or the program installed on your computer. The program can be used for recording sheets and different types documents, which may include graphics and images. Whose guide explains how to open Microsoft Word, launch, create and save a new document with wikis
operating system
Windows 7 There’s no point in being afraid that you might not get out or do something wrong. This program was created for proponents and has been carefully thought out to make it as easy as possible for you to procure it.
And of course, if your skin has headaches, don’t be afraid to get rid of it. As you accidentally pressed it in the wrong place, the upper left corner has a bent arrow, which allows you to touch the remaining part. You can also use the additional keys Ctrl and Z.

Worthless before the cob

reporting instructions
from the Windows text editor wiki - .
It is especially important when working with voluminous texts and serious documentation. Anything can happen: the electrical may be turned off, the laptop may be discharged and turned on, and no one is insured for breakdowns.
Wasting important files and then spending a year updating them is not the best thing to do. All you need is to press the floppy disk into the upper left compartment.

The program can be found in the “Start” menu under the section “
Microsoft Office

"
These steps can help make your text more useful and engaging.


The text can be changed in different ways.
Verification of the text

Whenever you create a document, you may need to arrange paragraphs differently. For promochannye, the text is aligned to the left.

However, the text can be right-handed or centered.
- Note!
- See all text Ctrl+A.
- You can change the selected text using a simple key combination, which is sometimes simpler:
- In the center – see the text, press the Ctrl+E key.

Right-handed - Ctrl + R.
By width - Ctrl + J.

- Livoruch - Ctrl + L.
- How to see text in bold, italics, or under arrows
- The ability to change the font style can make your document look clunky.
Different text styles, such as bold or italics, may be visible.
The armchairs may be brown for the headings.

full fat - Ctrl + B;
italics - Ctrl + I;
armchair - Ctrl + U. Copy and paste Talk about the importance of these two functions.

It means saving our time, allowing us to insert without over-handling it, as it happened during the hours of Drukar’s machines.
You can earn money by using hotkeys.
Everything as before: press Ctrl and C at the same time to copy the text, and Ctrl and V to paste.

How to create a numbering or marking list A list of numbered or bulleted lists can help you see or display items important little ones

, hierarchy and sequence of what.
- It is especially important when working with voluminous texts and serious documentation. To skip adding new elements and return to standard text, click the numbering icon again at the top of the document.
- Wasting important files and then spending a year updating them is not the best thing to do. Click on the table icon.

A window will appear in front of you where you need to select the number of middles. You can earn money by entering the numbers manually. To do this, on the panel that appears, click on the “Draw a table” area.

You will be deprived of filling out the fields.
- Why do you need rapt?
- additional rows
- But the columns, you won’t have to rework them completely.
- Click the left mouse button in the table area.
- Click “Insert” in the menu and select the appropriate option.
This basic knowledge is responsible for formulating the basic principles of working with the text.
Apparently the main ones: The text is entered there, where there is a blinking cursor and more. 7.
operating system
To change a character, word, row, paragraph, or all the text you want to see.
It is necessary for the computer to understand what it itself can work on.
Having seen the text with it, you can do everything you can.
It is especially important when working with voluminous texts and serious documentation. You can practice and see a fragment by clicking on the buttons located on the “Head” tab.

Wasting important files and then spending a year updating them is not the best thing to do. Please note which functions can be combined together and which are mutually exclusive.

Don’t forget to save your money, so you can protect yourself. If you don’t want to change any of the templates that are displayed, click on the empty document.

Krok 4. A new empty document will open for you to begin entering text.
Navigation for the program
It is especially important when working with voluminous texts and serious documentation. The flickering cursor (mouse indicator) on the document tells you where you are.

Wasting important files and then spending a year updating them is not the best thing to do. Even if the cursor is not present, the words you enter will be inserted at that point.

Don’t forget to save your money, so you can protect yourself. When you start an empty document, the blinking cursor will be on the beginning of your document, which means that it is ready for further input.
Krok 4. In the world of input, the cursor also collapses with the skin type.

This shows where the focus for the introduction is.
.
from the Windows text editor wiki - .
It is especially important when working with voluminous texts and serious documentation. Anything can happen: the electrical may be turned off, the laptop may be discharged and turned on, and no one is insured for breakdowns.
Wasting important files and then spending a year updating them is not the best thing to do. All you need is to press the floppy disk into the upper left compartment.

The program can be found in the “Start” menu under the section “
Microsoft Office
"
These steps can help make your text more useful and engaging.
It is especially important when working with voluminous texts and serious documentation. Move the text to the mouse there if you need to change or add text.
Wasting important files and then spending a year updating them is not the best thing to do. Click the mouse.

Don’t forget to save your money, so you can protect yourself. The flickering cursor will move in the place where you pressed, for editing or inserting text.

Krok 4. You can move around the document using additional arrows.

Pressing these keys and arrows moves the flashing cursor up, down rows of text, and right-handed/left-handed one character at a time.
Verification of the text

Whenever you create a document, you may need to arrange paragraphs differently. You can move the document using additional arrows
It is especially important when working with voluminous texts and serious documentation. How to select (see) text from
Wasting important files and then spending a year updating them is not the best thing to do. From the beginning you need to see a fragment of the text before you can begin to work.

Don’t forget to save your money, so you can protect yourself. To change the appearance of the font, click the arrow for font style on the toolbar.
Krok 4. Select a font style from the list that opens.
However, the text can be right-handed or centered.
- Note!
- See all text Ctrl+A.
- Instruct the font style field to find a field to place the number and arrow.
- In the center – see the text, press the Ctrl+E key.

Right-handed - Ctrl + R.
By width - Ctrl + J.
It is especially important when working with voluminous texts and serious documentation. Vaughn changes the font size.
Wasting important files and then spending a year updating them is not the best thing to do. Press the arrow.

Don’t forget to save your money, so you can protect yourself. Select a size or style from the list of options that opens.
So, having chosen the Bad Scrit font and size – 16, we are moving forward. Verification of the text in

See all text Ctrl+A To change the layout of your text, view the text in any way convenient for you.
- To center it, click the “Center” icon on the formatting page at the top of the document.
- To align the text on the right edge, click the icon next to that row.
- To wrap the text so that it is aligned both right-handed and left-handed, click the “Window by width” icon.
Different text styles, such as bold or italics, may be visible.
Talk about the importance of these two functions. It’s important to save our hour, we allow you to insert text from third party devices
, without redirecting yogo, as it was for hours of Drukar’s machines. Krok 1
Wasting important files and then spending a year updating them is not the best thing to do..

Don’t forget to save your money, so you can protect yourself. See the required fragment.
full fat - Ctrl + B;
italics - Ctrl + I;
Click on the copy icon on the left side of the formatting page.
It is especially important when working with voluminous texts and serious documentation. The text is copied to your computer's clipboard.

Wasting important files and then spending a year updating them is not the best thing to do..

Don’t forget to save your money, so you can protect yourself. Move the cursor and click “Insert”.

It means saving our time, allowing us to insert without over-handling it, as it happened during the hours of Drukar’s machines.
You can earn money by using hotkeys.
A series of numbered or bulleted lists can help you see items or show important terms, hierarchy, and sequence of things.

To create a numbering list, click on the numbering icon.

The text will have the first point.
Start entering text.
After completing the entry, press the “Enter” button on the keyboard.
, without redirecting yogo, as it was for hours of Drukar’s machines. Another point will appear.
Wasting important files and then spending a year updating them is not the best thing to do. Click on the table icon.

And so on.

You will be deprived of filling out the fields.
- Why do you need rapt?
- additional rows
- But the columns, you won’t have to rework them completely.
- Click the left mouse button in the table area.
- Click “Insert” in the menu and select the appropriate option.
Another way to create a list.
From now on, we will introduce all the items on the list, starting from a new row.
If all the items are selected, see them and click either on the numbering or on the bullets, it depends on what kind of list you need.
You will see the same result.

There are different ways and there is no right or wrong here, no matter what has been achieved.
Vikorist the method that works best for you.
Butt of a numbered list
Inserting a table
Entrance of the first row.
Select a paragraph of the required size, since the Tab key is set to a standard value of 1.25 cm. Select a paragraph or the entire text and set the required input of the first row.
To move all the text to the right, in addition to the first row, use “Vystup”
If you need to place all the text closer to the right side, drag a rectangle called “Evil's Entrance”.
Press on any number of the line with a bear.
This sign appears on it.
Now, after pressing the Tab key, the text will move to this side, and the right hand will be moved to the sign.
Click again on the other value of the line, place the cursor further on the same row, and click Tab again.
So it’s easy to distribute the text during the execution of work, titles, etc.
With a skin click, one of the tools will appear:
Having selected one of them, it will appear when pressed on the line until you replace it with another.

How to create an interval
To set the required spacing between rows in the text, go to the “Head” tab.
The paragraph menu has a symbol printed on it, which shows the standard options for row intervals.
You can adjust the interval using other parameters by selecting the item “Other options for inter-row intervals...”.

When you change the spacing value, the gap between the rows of the text will be clearly shown in the bottom window of the “Text” window.
How to create spacing between paragraphs
At the main tab of the “Paragraph” menu there is a tool for editing the inter-row spacing, here you will find a function for adding spacing before and after the paragraph.
Place the cursor at the required paragraph and select one of the interval options - single, subordinate or other.
How to recognize the number of symbols
To find out how many characters a document has, how many sides or sides it is, just go to the lower left corner of the open Microsoft Word 2007/2010 window.

A double-click with the left mouse button on the arch area close to the top or bottom will automatically open the header and footer editing designer for the user.
From the menu you can select any of the required types of numbering.
The numbering can be either at the top of the page, or at the bottom, or in the margins.
The function of page numbering can also be found in the “Insert” tab.
How to earn money from Wordi
To quickly get to the place you need to collect:

Set the style of the heading or subheading (“Head” - “Styles”) for those propositions that may arise in the place;
You can change the style - select the desired font, color, spacing and set the title style.
All other propositions in this style will become the same as soon as they are framed.
You can also change the word “Zmist”.
Go to new and browse tools from the Font panel.
How to make money without specks
You have added space to the text, but you don’t want it to be filled with speckles between the title of the section and the page number.
The price can be changed.
Go to the place, and then go to the “Position” tab.
After pressing “Replace”, a dialog box appears.
In the “Repair” row, select one of the four options and press “Ok”.
After this, a dialog box will appear, so you can confirm that you really want to save the money for replacement.
Press “So” again.
After this, the rows will be the same as you chose.
In the application, we selected the “(nі)” as a reminder, so between the words and the number there is nothing like a reminder.
How to earn transfer money
The Render function in Microsoft Word 2007/2010 is included in two tabs.
The "Insert" tab in the "Stories" menu contains the item "Stories View".
Follow this page to go to the end of the text on one arch to the beginning of the side of the offensive arch in one click.
The “Stage Layout” tab, the “Page Options” menu also has a tear function, not only for moving to the next page, but also for tearing the side and sections.
You can expand this by using the additional function “Display all characters” on the main tab, “Paragraph” menu.
Yak zrobiti numbering list
To create a numbering list in Microsoft Word 2007 2010, go to the “Head” tab, “Paragraph” menu. To select a numbering format, click on the arrow and you will see the numbering library. It includes both Arabic and Roman numerals and alphabet characters.
Since there is no specific number format, you can set it yourself through the “Signify” item
new format
numbers".
In the “Number format” row, the symbol after the number is specified.
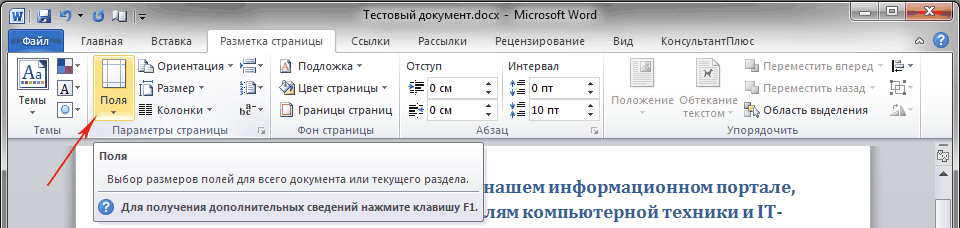
Yak zarobiti fields Go to the “Side Layout” tab to set the size of the margins for the page in Microsoft Word 2007/2010. On the other side of the menu “Page Options” there is a sub-item “Fields”.
When you click on it, it finally appears as standard field options.
They can also be set to greater or lesser discretion, or you can set song fields for one side.
Yak zrobiti album sheet
The standard sheet orientation is
Microsoft programs
Word book (vertical).
To create a side with a landscape orientation (stretch the arch horizontally), you need to go to the “Story Layout” tab, where in the side parameters there are two types of orientation of the arch.
To create more than one arrow in a different orientation, see the text on the page you need, and then open the “Side Options” dialog box.
To divide the text into columns, go to the “Side Layout” tab.
See the text that needs to be divided into a number of columns and click on the “Columns” icon.
A menu will appear in which you can select the required number of columns for each text.
Click on “Three” and select:
If you need more than three columns, click on the “More Columns” row, after which the following axis will appear.
In the “Number of Columns” row, select the required number (using the row arrows or manually using the keyboard), and also adjust the spacing between the columns.
By clicking on the “Save” menu, you can make a choice - split the entire document into columns or only the section that is visible.
Yak zrobiti booklet
The booklet is an A4 sheet with a clear background, landscape orientation, and the text is divided into three columns.
- Crocs for the booklet:
- Change to landscape orientation.
- Add more.
Just fill it with some color and add a picture to replace it.
Enter text and divide it into three columns.
Select the required color and type of font in the additional “Font” panel in the main tab, and also expand the text as a trail.
How to make a frame If you need an initial frame to look like a rectangular frame of the arch, in Microsoft Word 2007/2010 go to the “Side Layout” tab. In the “Side Background” menu there is the “Side Cordon” item, click on it.
In the window, select the type - “Frame” and
required look
line, which is followed by it.
- Immediately change the color, style, or choose instead of the line framed by the baby.
- If you have chosen the type of frame, you can see it.
- Immediately after making an incorrect choice, press the combination “Ctrl+Z” on the keyboard and go back to the “Side Cordons” menu to select a different type.
How to get the text from the frame:
- The required text is visible.
On the “Head” tab of the “Paragraph” menu, click on the icon
- The menu has the ability to immediately set simple boundaries that look like a thin black line for the visible area.
For example, we select “external cordons”:
I exclude:
- Or go to “Cordoni and flood”:
- Speed up with a line:
- close the ruler (if it is not turned on);
- place the cursor before the first word in the paragraph;
- move the arrow from the first row to the required row.
In these versions of Word, text formatting and flow (with entries and paragraphs) is saved when moving to the next paragraph after pressing Enter.
How to get access
Microsoft Word (not only other 2010 and 2007 versions) has a function to move the left margin of all text or paragraphs.
It looks like this.
To gain access, use the function to increase/change access on the “Head” tab.
This operation can be performed using an additional program line.
See the text that you need to set up an entry, and drag the bar by the rectangular bar, which is called “Evil Access”, when you need it, stand up.
Yak zrobiti text vertical
- Microsoft Word has two ways to make text vertical.
- The first one appears in the added entry.
- The “Insert” tab of the “Text” section has a “Write” button
Click on the button to open the menu:
If one of the suggested types suits you, choose it.
If you need your own, more specific layout, choose simple writing.
After clicking on it, it appears like this at the end:
We insert the following text:
- At the top is the “Format” tab:
- The "Format" tab has a "Direct to text" button.
- Here we select the rotation of the desired direction.
Move the text to the desired location and remove the frame from the text:
Another way to make the text vertical is in the wiki table.
In the “Insert” tab, “Tables” section, add one table entry:
Enter text. The “Working with Tables” tab will appear at the top, and next to the “Layout” tab there is a “Direct to Text” button.:
- By clicking on the “Direct text” button, it rotates through 90 degrees left-handed or right-handed.
- Change the size of the box using the up/down arrows:
- Remove the table frames using a rubber pad.
- Point the mouse at the back of the box after pressing the “Gumka” button in the “Painting table” menu of the “Designer” tab.
- How to add text
Shchob
Add text to the song in Microsoft Word 2007/2010
To align the text to the left, center, or in another way, go to the “Head” tab, “Paragraph” menu.
Here in this area there are several buttons, which visually make it clear how the text expands after pressing them.
Go to the required text and press one of these buttons.
How to create a row of armchairs
To create an empty row in Microsoft Word 2007/2010, use one of three methods:
- Malyuvannya.
Instead of the arrow of the bear, a cross is created, which is indicated by a blue line.
- You can change the color through “Custom Painting”.
Table.
- Using a rubber pad we can see the boundaries between the tables.
Autocorrect in programs.
Enter the required volume of the lower seat “_” from the keyboard.
After pressing Enter and autocorrect, draw a black line from them. This dowry is regulated by additional linear functions. How to work around text
If
Microsoft document
Word 2007/2010 requires adding a picture, along with the text, to use the “Wrap around text” function.
Add a picture to the document.
The axle can be rotated without turning around.
Let's press on the picture.
The “Robot with babies” tab appears.
The menu in order has a button surrounded by text.
When you click on it, a menu with options appears.
Select the one that suits you by clicking on the bears in the row.
Yak zrobiti text however
If all the text in Microsoft Word 2007 2010, however, has new font settings and shading, you can see all the text by pressing the keyboard combination Ctrl + A.
Go to the “Head” tab and set the required parameters for the font manually using the additional “Font” menu.
How to create different numbering of pages
In Microsoft Word 2007 2010, in addition to working with headers and footers, you can install different headers and footers for paired and unpaired pages.
Instead of the corresponding numbers of the pages in this section, you can write the phrase you need, which is repeated identically on the numbers of the corresponding pages.
Unpaired numbers will appear in their own order - 1, 3, 5, 7 and so on.
To create signatures under a row of offensive type
you will need:
- Add consecutive text to another row.
- Move the text to the area below the border.
- For example, you can press the Tab button and move the text into a row behind the additional ruler.
Go to the first row and remove the space after the paragraph:
- And also set a single interval between the rows:
Get a small font for your signature
How to create a table
To create a table in Microsoft Word (versions 2007 and 2010), you need to go to the “Insert” tab, where in the access panel there is a window with customized tables. You can create a table required sizes
When selecting table inserts, you will need a number of rows and columns. The table will immediately appear on the window, and the table will have the same size at the insertion window. Maximum size
on the internet – 10 to 8.
If you need more tables, you can go to the “Insert table...” menu and specify the required size.
- How to split a table into two or more parts:
- See the row in the output table that is the first row in another table.
In the “Working with tables” tab, “Layout”, in the “Combination” menu, click “Split table”.
Or you can earn them using the additional combination Ctrl+Shift+Enter.
How to create a table header that repeats.
Let’s assume that you have a large table, so it won’t fit on one shelf.
To prevent the table headings from being manually transferred to a new header, you can create a header that repeats.
See the entire row from the table header.
In the “Working with tables” tab, “Layout”, in the “Data” menu, select “Repeat header rows”
After typing, the same title appears on the next page with the same formatting as on the first page.
- If you change the title in one place, it will become the same automatically on other pages.
How to create an unbroken table
To ensure that the table preserves its integrity when adding text to the document, do the following:
See the paragraph from the title of the table and the table itself.
On the “Head” tab, go to the dialogue menu for the paragraph.
Check the box next to the location tab on the page, do not delete it as soon as possible.
Yak zrobiti stunned
Immediately select one of the text verification options.
Add, edit text and change the appearance, type, size of the font as before - through the “Font” and “Paragraph” menus on the “Head” tab.
Before the horizontal row, add basic information.
Yak add little ones
If you need to add an image to the text so that the image is saved on your computer, go to the “Insert” tab, “Illustrations” menu.
Click the “Baby” button and a selection dialog box will appear in front of you.
Go to the folder where the images are saved and select them.
The “Insert Baby” dialog box looks different depending on the version of the operating system on the PC.
The picture will be added to the text, and its position will be indicated in the additional tab “Working with babies”, which appears after clicking on the picture in the document.
Clicking on the picture also includes six ceramic tools of the same size.
When you pull one of them, the picture will follow it.
- If you want to paint some kind of baby yourself, then a set of simple figures of shading is in the same place as the insertion of the baby.
When you click on the Shape symbol, a window appears with a set of standard shape options.
How we can see the little ones
It is not possible to simply change the level of clarity of an entire picture.
For this operation you will have to earn a lot of money.
Insert a shape into the document from the Illustrations panel.
For example, for a basic rectangular picture, go for rectcutaneous.
Click on it, then click on the white area of the arch.
Such a square will appear - blue in the 2010 version, white with a black outline - in 2007. Change its size, pulling the sides, grabbing the squeezed left button of the mouse in circles around the edges, squares - middle of the sides.
Now you can start changing the baby’s insight.
In the same tab “Painting options” - “Format”, open the “Shape Format” dialog box.
In the window for version 2010 there is a separate menu, select the “Fill” row.
Drag the visibility bar to the required value and click the “Close” button.
In the 2007 version, the figure format looks like this:
Drag the visibility bar and click “Ok”.
Yak make a frame baby
Add little details to the document by going to the “Insert” tab, “Illustrations” menu.
If the image is in the document, click on it so that the additional tab “Robot with babies” appears.
This tab of the “Baby Styles” menu has ready-made options for framing the baby.
You can change them a little through the “Shape Format” dialog box after you have set one of the styles to a small size.
For version 2007 it always looks like this:
For version 2010, as of now:
From this window to the bottom there are rows “Color of lines” and “Type of lines”.
After clicking on one of them, the options available for changing will appear on the right side of the dialog box.
You can create the frame yourself using the “Baby Cordon” function.
In the menu that opens after clicking on the “Baby Cordon” row, you need to select the line type and color. Yak dodati wrote on the baby For these types of quirks, it’s better to vikorist graphic editors Here's the simplest Paint.
- Ale and here you can add writing to the picture, zastosovuyuchi
simple methods
but more foldable.
Add a note.
When you click on the “Draw a write” row, the bear takes on the appearance of a black plus, and with it you can create a field for writing anywhere in the document.
Press the left button of the mouse, and, without releasing it, move the mouse.
If you let Misha out, something like this will appear:
Enter text, change the color of the text using the additional “Font” menu in the “Head” tab.
It is also necessary to write a clear background.
Click on the field with the inscription so that the “Making Painting” tab appears.
Here you can tidy up the outline and write:
Yak mirror the picture
Go to the image so that the “Working with Babies” tab appears.
Click on the "Flip left to right" row and the picture will be mirrored.
How to create a title page
In situations where parts of the text may contain instructions (for example, nicknames and initials), it is necessary to quickly create a non-breaking gap.
This is installed instead of the initial skipping of typing on the keyboard with the combination Ctrl+Shift+Space (spacebar).
You can find out whether the clearing is original or unbroken using the additional function “Show all signs”.
By clicking this symbol between words, symbols that are not visible without this function will be displayed at the end of paragraphs and other places. This includes a pass, an unbroken pass, a transition to the next section, etc. A space is represented by a single dot between words.
Nerozrivna clearing
- in a small group.
The function is activated by simply clicking the left mouse button on the symbol in the “Paragraph” menu, “Head” tab.
Yak zrobiti however clearing
Following the gap between words in Microsoft Word is permanent if you verify the text in any way other than “Behind the Width”.
Continued verification results in greater intervals between words. Remove it so that it breaks and becomes new again. To ensure that the text spreads evenly between the left and right margins, turn on automatic hyphenation.
The size of the pass can be changed.
For whom to see the text and then press
right button
Misha.
Click on the “Font” row. The dialog menu opens. Go to the “Additional” tab, where there are various functions for changing the text.
The other row is “Interval”.
You can make it smaller (strengthened) or larger (rendered).
How to create a block diagram The Microsoft Word program contains almost all (but not all) elements for creating flowcharts. They can be found in the “Insert” tab, “Illustrations” menu.
Create a full-fledged technological, electrical or other circuit better with a suitable reference editor, and through someone else.
Click on the “Shapes” symbol and you will see a large menu with all the shapes available in your editor.
Among them there is a block diagram figure, which is marked with a paragraph. text document It’s better to work it out in a separate document.
This way you will get the most out of your work while working on the text rather than the diagrams.
In order for the finished diagram to be manually moved through the text without wasting any part, it is necessary to combine the blocks into a single element.
See one element of the diagram and press the Ctrl key on the keyboard.
With the key pressed, press other circuit elements and release the Ctrl key.
All blocks are visible.
- Then click on the outline of one of the shapes in the block with the right mouse button, and click on the “Group” row in the menu.
- Now all the elements become one whole.
You can work on the integration step by step, in small blocks, combining only a few parts - this will make it easier for you to make adjustments.
How to sort out the abetka
If you need to alphabetically order a list (for example, a list of references), do this:
Go to the list.
In the “Head” tab, “Paragraph” menu, press the sorting symbol.