-photoshop-statti-photoshop-statti-photoshop-statti-photoshop-
Today's lessons in robotics using Adobe Photoshop are dedicated to tools.
The toolbar plays an important role in working with Photoshop. Some commands can be removed from the toolbar, for example, text or painting tools.

Let's take a look at the tools. First group, vision tools.
1.Rectangles Marquee Tool– (Directly seen). The image is displayed by the way the cursor is moved while the mouse button is pressed. Once we see an area, we then try to see another area that the previous one has disappeared. In order to add a new view to the old one, you need to press and hold the key in front of the start of the view Shift . To get a new view from the old one, press and release the key Alt . If you press the key in bed Shift and Alt
This will lead to the fact that what we see will be an area where the old and new visions merge. Elliptical Marquee Tool (Eliptical view) – allows you to create a view of the elliptical area. Keys Alt and Shift
, vicoristics are similar to the rectangular vision. Single Column Marquee
- Visible number of pixels. Single Rou Marquee
- Visible row of pixels. 2.Lasso Tool (Lasso) - Allows you to conduct a video in a satisfactory form. The image works by dragging the cursor while pressing the left mouse button. Once the area has been specified, you can derive a song area from it. How to trim the button Alt pressed, you can see another area of vision between the first block. Key combination Shift+Alt
– to set the vision zone. Polygonal Lasso Tool (Mnogokutne laso). It is permissible that you need to see the trikutnik. Press the left button of the mouse and move the cursor to the base, then release the mouse button again, press again and see the base of the tricupus, release again and press the button, see the other side until you see go to the first side. Subordinate clacks
Use the left button to activate the video. l – (Magnetic laser). Allows you to create a view beyond the contrast. It is possible that we need to see light in the dark. Select the magnetic tool and move the cursor to the desired location of your image and press the left mouse button to start viewing. Photoshop Select the areas with maximum contrast and follow them with the outline of the vision. At the hour of viewing, the program automatically places reference points. The pressure of the buttons Backspace, you can select the remaining reference point and continue to see it. By simply pressing these keys, the reference points will be gradually removed.
17.Magic Wand– (Charming stick) – a tool for seeing significant areas filled with one color. Select the enchanting wand tool and move it to area required image
16 .Click the left mouse button, and you will see a plot of one color. The Alt and Shift key combinations work the same as with direct views. Move (relocation). Once the area is visible, it can be moved. Select a tool move . To get a new view from the old one, press and release the key Then move the cursor to the visible area. With the pressed left mouse button, drag your area where you need it. When you press the key , a copy of the area being moved will be created. If you need to move the visible area horizontally or vertically, release the key Shift . Also, if you need to accurately place the image at the desired point, you can press the arrow keys on the keyboard, when you press on the key, the image moves 1 pixel, or if you press the key, the image moves 1 pixel Shift
, The displacements will be displayed with a margin of 10 pixels. 3.Crop (Cropping), used for cropping the raster area of documents, with further cropping of those parts that did not reach the same rectangular area. Select a tool Crop and move it to the desired part of the image, and press the left mouse button to see the desired area. You will find that the color of the visible area is lighter than in the other image, and that area will be lost. Once you have specified your viewing needs, press the key
Enter that re-creation will be viconano.
18.Slice Tool(Penzel), the main thing with painting tools is to draw lines with soft edges. Let's draw a bear with the left image button pressed. Before painting is necessary, set the tool parameters. You can select the lens diameter, color, clarity, and pixel mixing mode.
Pencil Tool(Olivets), produces lines with sharp jagged edges. It can be adjusted in the same way as a pencil tool.
20.History Brush Tool(archive pencil) – allows you to rotate to any front position of the image, using one or more editing operations. Before turning around on the history panel, you need to insert an ensign before this item to turn around. The victorious pencil will lead to the erasure of all points of history that are considered lower than the ensign.
7.Blur Tool- (Rozmittya). To separate local image sections. Place the cursor at the desired location of the image and activate the stencil tool. Select the required size from a number of parameters and, pressing the left mouse button, use circular hands to knead the required section.
Sharpen(Sharpness), for local image correction.
Increases the sharpness of the cropped plots of the image. It works as a distribution tool. Smudge Tool
(Finger). The principle of operation is the same as that of the first two instruments. 22. Dodge Tool
(Osvitlyuvach) purposes for local image brightening. The work starts when you move the image tool while pressing the left mouse button. Sponge Tool (Sponge) - used for changing or increasing the density of colors in image areas, sprayed with tools. In a row of attributes, you can select parameters for this instrument - the diameter of the pencil, Flow - Strength pouring in, Mode-Saturate - Increased saturation, Desiderate
- Change in saturation. So, with the left mouse button pressed, you navigate through the required sections of the image. 5.Clone Stamp Tool . To get a new view from the old one, press and release the key(Clone stamp) allows you to copy one part of an image to another. It is necessary to specify the size of the image that will be copied. Why do you need to press a key?
In the morning, click on the target in the desired location, after which the key can be released, and begin painting as with the pencil at the required location, while painting is carried out on the images taken from the copied oh plots. Pattern Stamp (Viserunk stamp), the stamp works similarly to the cloning stamp. Only from the beginning you need to calculate the amount of money. Check the row of attributes, the column.
Pattern(gum), used for selecting a distant part of the image regardless of the color.
Magic Eraser– allows one mouse click to erase an area filled with one color. The color behind which the mouse’s clicking is fragmented will be erased. This tool is similar to a charming stick, except that the stick does not see, but erases the image.
Background Eraser(eraser for background), removes everything, but erases the background if the option is disabled Protect Foreground Color.
21.Paint Bucket–(Fill) fills the image area with the color you specify. The color of the foreground is changed. Select tool, select color. Then move the cursor to the place you want to fill, the cursor will be shaped like a bucket, and click the left mouse button. If you can’t see, the entire document will be lost. To fill it with texture, select the item (Viserunk stamp), the stamp works similarly to the cloning stamp. Only from the beginning you need to calculate the amount of money. Check the row of attributes, the column(Texture).
Gradient Tool(Gradient) – this additional tool is followed by a fill with a smooth transition of colors. Perhaps, as there are two basic colors, so and more. First select the gradient type in the attributes panel by clicking on the required type with the left mouse button. Then select the gradient fill method using five buttons and follow the list of gradient types. To fill, place the mouse cursor in the desired area and, holding down the left mouse button, move the cursor to the desired area; when you release the mouse button, the image section will be filled with the selected gradient.
4.Spot Healing Brush(The dot pen, which is new), works just like a cloning tool. When replacing the stamp, the Healing Brush tool creates a smooth structure, lightening and shading the affected area of the image. Select the Healing Brush tool, click Alt, placing the left mouse button in the desired image area. Run the tool over areas of the image that require updating. For example, with this tool it is good to remove the highlight from different parts of the image.
Patch(Patch) – allows you to recreate a visible area by cloning pixels taken from another area or image. To get a clear result, select small areas for correction.
9.Pan Tool(Feather) – allows you to draw lines to create anchor points that Photoshop automatically connects with segments.
Freeform Pan Tool– (Vilne pen).
Add Anchor Point Tool– (Add a reference point).
Delete Anchor Point Tool– (Visibility of reference point).
Convert Point Tool- (Kut).
24.Tools and figures:
Rectangle Tool- Straightforward.
Rounded Rectangle Tool- Straight cutter with rounded cuticles.
Ellipse- Elips.
Polygon Tool- Bagatokutnik.
Line Tool- Line.
Custom Shape Tool- Quite a figure. Allows you to create different shapes that are immediately filled with foreground color. For the creation of all figures, cream pretty figure, you need to select a shape, place the cursor on the desired section of the image, and then press the left mouse button to move the cursor to create a shape. Once the figure is created by pressing the space bar, you can move the figure to any point in the image. When pressing a pressed key . To get a new view from the old one, press and release the key When the figure is created, the figure will be created from the center. To create a satisfactory figure, you need to select it in the row of adjusting tools at the item Shape. To change the radius of the rounded shape of the orthocutaneous figure with rounded edges, in the same way, set the required values in Radius.
8.Path Selection Tool– (Vision of the outline).
Direct Selection Tool– (Directly visible).
23.
Horizontal Type Tool– (Horizontal text). To enter text, select a tool. Place the cursor at the desired location in the document. Click the left mouse button and a flickering cursor will appear. Enter text from the keyboard.
Vertical Type Tool –(Vertical text) the same, only the text will be entered vertically. In a number of parameters you can set the font typeface, text size and mode of paragraph formation, text color and format.
25 .Eyedropper ( Pipette ) transfer the color of the image section where you clicked the mouse to the color field of the toolbar, or display the digital values of the color on the panel Info.
Color Sampler(Adjustment of colors), allows you to set up to a few points from which the color values will be taken into account. These values are displayed on the information panel Info, For each new point in this panel, a new field opens in which the values for this point are entered. In order to clear all the points, you need to press the Clear button in the row of adjustments.
Measure Tool(Ruler) – purposes for adjusting the appearance of parts and cuts in the image. Click on the edit point and drag the cursor to the end edit point on the palette Info You will appear to stand between the cob and end points.
10.Notes Tool-(Notes).
Audio Annotation Tool- (Sound instructions).
11.Hand( Hand ) – if the image does not fit near the frame of the screen, we can drag it.
26. Zoom Tool(Scale), when you move the cursor over the image, the shape will appear, a cross will appear around the circle, and by clicking the left mouse button, the image will become larger. How to press the key Alt, then the images will change with the skin clicks.
13.Quick Mask- (Swedish mask mode).
12.Colorful squares-basic background colors
14 Modes for reviewing documents. The first standard mode is placed behind washing, the second is the second screen behind the menu, the third is the second screen. You can also switch between modes by pressing the key F.
15. Transferring the image to Image Ready and back.
In this article, we will look at a number of adjustment tools using the Adobe Photoshop program.
You can use Photoshop for any number of image editing options, such as photo editing, creating high-quality graphics, and much more. In this lesson we will introduce you to the Photoshop interface, including how to open a file, work from the Tools panel, adjust the workspace and change the image size.
Photoshopє a comprehensive program, and, perhaps, there are a few licks for vikoristannya first. It is recommended that we learn at once the upcoming lessons that have captivated our (click right button please ask for help to save it). The more hands-on you are with Photoshop, the easier it will be for you to master this program.
About this lesson
In this lesson, to show you what you can do in Photoshop, we will vikorize. What kind of vikorist are you? old version Photoshop, such as Photoshop CS5 or earlier, some functions may work slightly differently, but you can still get an idea of what's going on. However, it is important to note that if you are using Photoshop Elements, the features we will discuss may not be applicable.
File type
In most cases, you want to print to the robot using the original photo without creating a new empty file. Photoshop allows you to open and edit basic graphic files, such as.jpg or .png files, as well as .psd (Photoshop) files.
To open the file:

If you haven't opened Photoshop yet, you can find and right-click the file on your computer and select Open from I'll help you with Photoshop
to open this file. 
A look at the Photoshop interface
The fragments of Photoshop are intended for professional use, its interface can be a little foldable and clunky for beginners. Let me know that you have an excellent proof of working with others software security To edit the image, you will need to familiarize yourself with the various parts of the Photoshop interface.

1. Menu row. Tse te mіstse, de vi vykonuvatite riznі Photoshop commands. For example, from the “File” menu you can open and save files. The “Image” menu allows you to select various parameters, such as the size of the photo and so on. The Filter menu gives you access to more tools and effects.
2. Ceruvan panel. Here you can independently adjust the parameters for the selected instrument. For example, if you use the pencil tool, you can change the size of the pencil, the hardness, and much more.

One of the most important and basic tasks in Photoshop is the one you will choose necessary tools for editing and processing photographs. Once you have selected a tool, you can select it from the exact document.

4. Selection of tools. These tools allow you to select a specific area of the flow document. The “Direct Cutting Region” tool will be behind the promotional activities.
Other tools, such as the Lasso and Charming Wand, allow you to select specific objects without selecting a background.

5. Painting tools. These tools are similar to the tools of painting in real life. For example, the “Pencil” and “Olivet” tools allow you to draw on the image, and the “Eraser” allows you to erase parts of the image. For example, if you look at a part of a ball, then those that are under that part of the ball will be displayed.
At the butt pointed below, we erased part of the black and white ball, mostly the colored ball.
6. Instruments introduction. This tool allows you to add text to a flow document. For example, you can use it to create your own request.

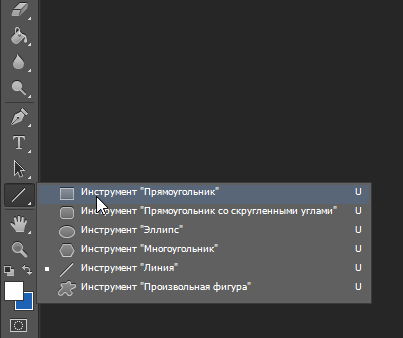
7. Tool Form. This tool allows you to insert shapes such as squares, lines, elipses and others.
8. Tool for choosing colors. Here you can select colors for various tools, such as Pencil, Gradient, Fill, etc.
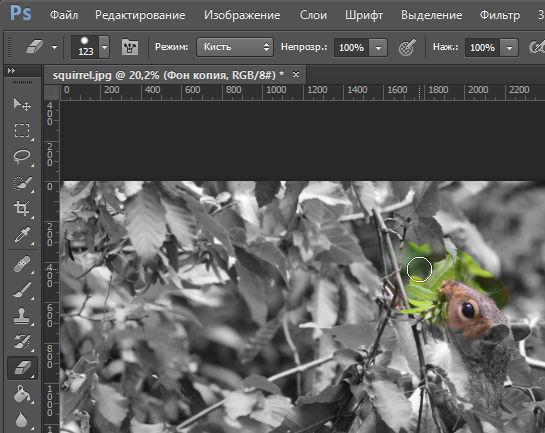
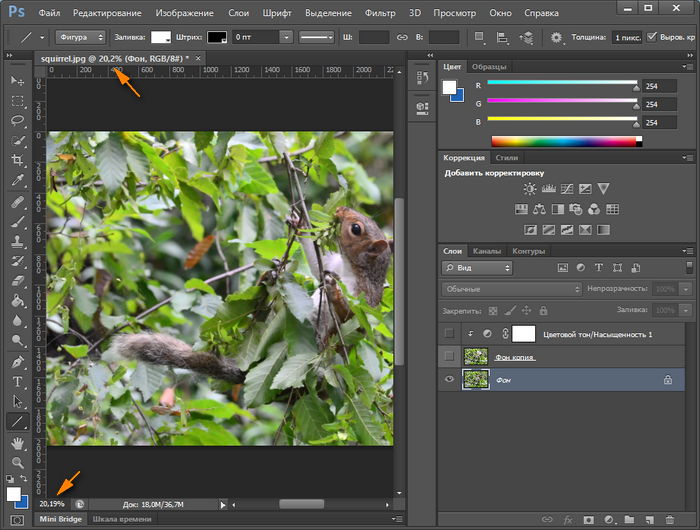
9. Document window. When you open the image file, it will appear in the document window. At the top of the document window, you will increase the file name at once using a precise scale. In our example, 20.2% of photographs are of full size.
10. Shari panel. Here you can edit the flow of the document. You can squeeze the ball or squeeze it by pressing the eye icon. 
Working with tools and other panels
The Toolbar is one of the most important features of Photoshop, where you can select a variety of tools to edit your image. Once you have selected a tool, you can select it from the flow document. The cursor changes its appearance depending on the selected tool.

To select another tool, click and hold on the new one, or right-click the mouse button. For example, you can press and press the rectangular tool to select other shapes, such as ellipse, line, or knurled tool shapes.
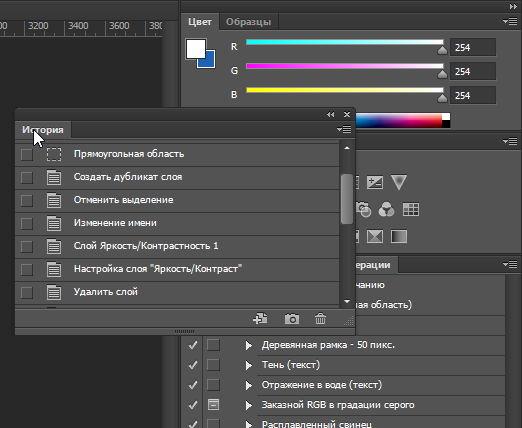
View of the panel: You can also view and change information about the current document in other panels in the workspace, for example, you can view document shares in the panel Shari. To show or grab a panel, select the menu Vikno, then select required panel- visible panels are marked with a checkmark. Click on the Window menu below to show the history panel on your workspace:

You can press the side arrows to light up or light up the panels. It can be brown if you want to quickly grab the panel without being visible from the working area.

You can also press the Tab key on your keyboard to show or grab all active panels.
If you need to change the layout of the panel, you can move it by dragging the panel to another part of the workspace.
However, if you plan to take our lessons, we recommend that you leave the panels in the places for the time being, so that they are removed for cleaning. To install the panels behind your windows, select Vіkno > Roboche seredovishche > Throw off Mostly robotic seredovishche. Please note that this activity may vary depending on the version of Photoshop you are using. For example, Photoshop Elements requires the command Window - Reset Panels. 
Adjusting the middle part of Photoshop
If you like to customize Photoshop, you can customize the parameters of the program for production. Most of these options are more technical, but we would like to show you two main adjustments that may be of interest to you.
To set up the units of simulation:
According to the rules, the dimensions of the document are measured in inches. If you do not edit the image of the head rank for each other, we recommend changing the adjustment to pixels.
- Select Edit > Settings > Display Units and Lines. If you're a Mac user, choose Photoshop > Preferences > Units&Rulers.
- Appear in the dialogue window. The guy is getting ready Only one in the world, click the Manual menu from Lines, select Pixels, and then click OK. You may need to restart Photoshop for the changes to take effect.

To change the text size:
If you want to increase or change the text in the Photoshop interface, you can adjust the font size of the program.
- Select Edit > Settings > Interface(or Photoshop-Preferences-Interface on Mac).
- The guy's got the hang of it Text, select the menu order from Menu Font Size, and then select required size. You may need to restart Photoshop for the changes to take effect.

Change in scale
When you edit an image in Photoshop, you will often view it at a scale less than 100% of its full size, because most daily digital cameras take great photographs, with high quality. In fact, desktop images are so large that most computer screens simply cannot display all the pixels in the image. It's good, because As you edit the image, you will find additional parts for the job.
If you want to enlarge or change the scale, just click Ctrl+ or else Ctrl-(Hold down the Ctrl key and press the + or - button). If you are a Mac victor, press Ctrl + or Command-.
When placed lower, you can enlarge the document by 20.2% of its full size. Note that you can adjust the exact zoom level at the top of the document window, as well as at the bottom left corner of the screen.
When viewed from the front, the image below shows the same images at 100% (new size). Please note that less than part of the image is visible at this scale. Behind the scenes, you can scroll horizontally and vertically to view other parts of the image.

To enlarge the image to fit the document window, click Ctrl+0(Hold down the Ctrl key and then press the zero key.) If you are using a Mac, press the Command + 0 button.
Zalezhnoe vіd graphic card On your computer, different scaling levels (eg 33.33% and 66.67%) may result in images being uneven. If so, you can increase the scale to 25% or 50%.
Use your keyboard shortcuts to adjust the scaling level of your application file.
Once you are familiar with the Photoshop interface, you are ready to edit the image. In the next lesson we'll talk about the basic settings you can make, such as cropping, resizing and wrapping.
Instructions
The panel of balls in the flattened area can be displayed in two ways. To light it up, just click the mouse on the end of the “Balloon” on the panel, which is located on the right edge of the window. And the panel will light up by clicking on the side arrow on the right edge of the title.
Open in Photoshop menu section “Windows” and place the icon opposite the item “Balls” if this panel is displayed. You can do this, not only by clicking the required writings with the help of Misha, but also by using an additional keyboard. To open a section of the menu, press the Alt key first (left or right - it doesn’t matter), and then the key with the letter “O” on the Russian keyboard layout. To move items in a section, use the navigation buttons. Since the required row is closest to the end of the list, you can then move to the next one using the arrows uphill. Well, clicking the left mouse button on the selected item replaces pressing the Enter key.
You can do without the editor menu, since the command to open/unhide the ball panel is assigned a “hot key”, which when pressed when the panel is turned off, will bring it up, and when turned on, it will return. This key is F7, use it to quickly display or attach this element to the interface.
Most of the storage parts of the working center of Photoshop can be easily moved by the user. It’s easy, but sometimes with a careless hand you can shove any of them in such a way that it becomes completely unintelligible how they are turned to the space available for emergency adjustment. This is also true from the balls panel: it is impossible to find them on the screen, although in the menu graphic editor A mark is placed opposite the corresponding item. In this case, speed up the “emergency” way - choose another version of the work environment. To do this, open the “Window” section in the menu, go to the “Working Middle” section and select one of the available options (for example, “Painting” or “Basically Working Middle”).
If you want to edit images using Adobe Photoshop, you will need to unlock the balls first. You should be afraid to just use the additional interface of Photoshop. There are two ways to allow the unlocking of balls.
You will need
- Computer, Adobe program Photoshop.
Instructions
Before you print the image correction, you will need to open it. Why launch Adobe Photoshop on your computer by clicking on this program's shortcut? Once you are ready for further work, you can open the required images. To do this, you need to move the bear cursor over the “File” section, located on the left side of the top menu of the program. Click on the section and select the “Unlock” function. A new window will become available to you, with the help of which you can search for the desired image and open it (find and press the “Unlock” button on the window of the window).
Once you open the image, you will not be able to enter anything else. drastic changes. For the file to become available for permanent editing, you must unlock the image ball. For this you need to quickly use the options on the top toolbar. Click on the “Shari” section with your bear. Here you need to hover the cursor over the “New” function. It’s not a shame that you need to sign up for “From the background.” In this way, you can unblock the ball and print away the image editing.
You can also unblock the ball using a different method. On the right side of the program you will see the “Shari” tab. Click on this tab (a window will open that displays all the existing balls). Right-click the bear on the blocked ball and select the “In the background” function. So you will be able to unblock the required ball.
Video on the topic
The power of robots with balls is one of the powers of the graphics editor Adobe Photoshop, which is handy for us. If necessary, one of the balls can be taken away in its place.

You will need
- Adobe Photoshop program on computer
- file in psd format with many balls
Instructions
Take a file for example to place three balls: an abstract background (Background), a ball with a black figure (Ball 1) and ball 2, whichever is located on it. It is possible that you need to remove the ball with the fish. To work with balls, you need the “Balls” palette (Layers). This is possible through the "Window" menu. Find the “Layers” item in the list and check it. Or just press “F7”.

In the panel that appears, you will see thumbnails with images of balls and their names. Find the ball to click with us, use the fish and click on the new one with the left mouse button once. The ball will be visible.

At the bottom right corner of the palette you will find an image of a smudge tank. Click on the new one with the left mouse button. Or go through the “Ball” menu by selecting the “Vidality” item there.

You will learn the dialogue box from the questions: “Can you see ball 2?” It is effective to press the ball that needs to be removed onto the button with the word “So”.

You will notice that the little one has a figurine of a red fish, and the palette of balls is Ball 2.

Save the changes to the file by selecting Save from the File menu. If you want to save the changes made to the baby in the saved file, select the “Save as” option and give the file a new name.
Regain respect
Rotating a remote ball will be impossible if you close the file and reopen it, or do a lot of work with the file.
If you need to rotate the ball further in place, go to the “History” palette, or go to the “Edit” menu and select the “Undo” item.
If you just want to quickly remove the ball from the visibility zone, you can do without the window - just left-click on the word panel on the icon behind the window. This method will help you determine which ball contains elements that you need to see, since there are a lot of balls - try turning on the visibility of the balls through, and be careful about changes in the edited image.
The goals that you follow from images in the Photoshop program can be varied: little by little, adjusting a few details, creating a photo montage, painting Garna picture... In any case, to put it simply, you can’t get by with the balls without a robot. When editing, you will often have to grab or, for example, turn on the balls.

Instructions
Open images if you need to edit them.
In the top panel “File-Edit-Image...” you will find “Ball” (Layer). All functions of robots with balls are here.
You can also interact with image balls by selecting the same function in the “Window” section. If you want, call, it’s a short time to spend some time getting dressed. The image of the balls is formed, and what they represent can be seen at the “Ball” window.
This is also called a quick transition - using the Shift+Ctrl+N keys. They are more often used by professional players and professionals, whose program and, apparently, the balls have been brought to automaticity.
You can attach the Photoshop ball frequently. Then you will get a very good effect. For example, as you work, it consists of several balls (or you made them like this - for your taste).
You see one ball at a time and step by step change the fill (the amount of fill required for the ball to be visible is in the open “Balls-Channel-Contours” window). The result is that the image becomes clearer.
Video on the topic
Corisna porada
If you click on the eye image in the “Balls” window while pressing the Alt key, all visible balls will be retrieved, except this one. Press again to renew the balls.
If you happen to catch and make visible a large number of balls in the process of work, let’s understand, and most importantly, clearly systematize the names. Otherwise you will get lost.
Attaching the ball may not only benefit you in order to “play” from the images. This function speeds up a lot of times (for the mind, of course, you can do without balls to get used to it).
The ability to work with balls is one of the best and most active options of the graphics editor. However, its value would sharply decline, as if it would not be possible to capture some versions and reproduce others. This function, obviously, has been transferred to the graphics editor Adobe Photoshop and can be used in a number of ways.

Instructions
Vikorist the balls panel for all manipulations with them. Follow the instructions in the interface of the graphic editor immediately after its launch. If you don’t want it to appear in the open Photoshop window, then open the “Window” section in the menu and click on the “Balls” item. If you want, you can just press I heat the key f7, which duplicates this menu command.
You can see on the balloon panel that there is a player that needs to be made invisible in order to click on it called a bear. You can turn off the display of the seen ball using the menu command - in the “Balls” section, select “Get balls”. If you see a bunch of balls (you move the mouse over all the needs while pressing the ctrl key), then select the commands to make them invisible.
Vikorist Misha to replace the commands in the menu - this will speed up the work. Left-click on the eye icon at the left edge of the row in the balls panel to make the ball invisible. If you do this while pressing the alt key, then all the balls will become invisible, except those you clicked. You can renew the output visibility scheme after pressing the alt key again.
Group the balls so that during the process the visibility of the entire set of lanes becomes visible. To do this, click on the icon with images of the folder and the “Create a new group” prompt at the bottom edge of the balls panel, and then drag all the required balls with the mouse over the created folder. After that, the visibility of the entire group will be instantly visible by clicking on the icon next to the window set by the father of the group.
Vikorist the power of the insight of the ball alternative method make yourself invisible. It’s less difficult, but such a possibility is also essential. At the top right edge of the panel there is a list with the inscription “Obscurity”, click on it to make visible the item that you need to move in the leftmost position. In this way, you will create a visionary ball and group that is completely transparent, rather than invisible.
Video on the topic
All manipulations with balls in the graphics editor Adobe Photoshop take place in a separate panel. It contains a large number of tools for adding new elements of this kind to the list, changing the order of their drawing, grouping, etc. Also, since most Photoshop operations allow you to implement decals in different ways, for example, you can insert a ball through the main menu, or using hot keys, or dragging with a mouse.

You will need
- Graphic editor Adobe Photoshop.
Instructions
The clicks should be seen on the panel of the balls of the one above which you need to insert new ball. If this panel is not on the screen, activate it by pressing the F7 key. Then, in the editor menu, open the “Balls” section, go to the “New” section and select “Balls”. This command is assigned to the hotkeys Shift+Ctrl+N, you can use it. At some point, a dialogue will be opened to create a new ball.
The little one below is presented Photoshop CS5 graphics editor tools with their modifiers. Tools divided into logical groups horizontal lines. Most of these tools and their modifiers are included in older versions of this program. Kožna New version Photoshop is being updated with new tools and/or modifiers, and the “old” tools can also be improved. All tools with their modifiers this cycle We won’t go into detail, let’s just talk about the main tools of Photoshop and their modifiers that are most often used for editing photographs.
The toolbar is the main panel of your graphic editor. Most skin trimming cannot be done without one of the other tools on this panel. The panel can be attached to the right/left border of the Photoshop desktop. And also they can be spit out of the cordon and spread in any place on the desktop of a graphics editor, div. screenshots below.

In order to move toolbar in another place, move the cursor over upper part panels, press left key bears, holding down the key, move the panel to the selected editor's desktop, div. screenshot above, or attach the panel to the bottom edge of the desktop, div. Screenshot below.


Shchob change the appearance of the toolbar, move the cursor to the top of the panel and click on the arrows, the panel will become a little shorter and wider, div. The screenshot is better. To move the panel, press the left mouse button, press the left mouse button, move the panel to the selected area of the desktop, div. video below.
How can such manipulations from the toolbar be useful? For example, if you have a small monitor, you may need to open the file on the entire desktop so that you can enlarge the file to the desired scaling level.
The toolbar can be closed by clicking on the cross mark at the panel header, or by checking the box opposite the “Tools” item in the “Window” menu.
To access the toolbar, you can use hotkeys by first specifying the combination in the “Keyboard Shortcut” settings. You can quickly access the keyboard settings menu through the additional “Edit” menu or by typing the key combination “Alt+Shift+Ctrl+K”. In the “Keyboard Shortcut” settings, select the “Window” item and then edit the “Tools” item.
We've taken a look at the toolbar, and now we'll have a detailed look at the various tools on this panel. Let's complete our familiarity with Photoshop tools, with tools and modifiers of the first logical group.
In order to activate a tool in Photoshop, an icon of which in Narazi visible on the screen, click on it. A small arrow is decorated with various pictograms.
When you click on it, the merge palette will open, where you can select a tool that belongs to that group.
If you have forgotten a key combination, move the cursor over the tool icon, hold for a few seconds, and the hint will remind you (Fig. 1.1). To alternately select the tools that are included in each group, with icons for each item, press the key . Also, if you need to accurately place the image at the desired point, you can press the arrow keys on the keyboard, when you press on the key, the image moves 1 pixel, or if you press the key, the image moves 1 pixel and the second “hot” key. You can also press the key Alt, Click on the icon of the visible tool.Small 1.1. Tooltip on the toolbar.
For the skin tool, various parameters are set (for example, blending mode, obscurity values) in the options panel located at the top of the screen (a report on the options panel is available in the “Options Panel” section of this section) - div. rice. 1.2. The set of parameters on the options panel changes depending on the selected tool.
Small 1.2. Tooltip on the options panel
In the Photoshop options panel, the right-hand icon for the active tool is displayed. When you click on the arrow with the icon, a menu will open where you can select another tool. This list can be edited, you can remove those that are rarely abused, and you can add tools that are frequently abused. The settings in the options panel are saved for the skin tool, as they cannot be changed or repeated after washing. You can customize, add and save various combinations of buttons, as well as update the characteristics of the tool you use using additional commands in the panel menu that appears (Fig. 1.3). In order to update the value of the options for all the tools that you use for cleaning, select the command there Reset All Tools(Renew all tools) or click on the button Reset All Tools at the window Edit > Preferences > General(Edit > Settings > Zagalni).
 At the window Edit > Preferences > Display&Cursors(Edit > Customize > View & Cursors) select how the cursor is displayed: the same as the tool icon on the toolbar, or the crosshairs in the view.
If you try to correct the tool incorrectly, the protection icon 0 will appear. Click on the icon to move the image you are working on to find out why the tool cannot be corrected in this case. situations.

Small 1.3. Photoshop Tool Selection Panel
In Fig. Figure 1.4 shows the Photoshop toolbar. Poruch h The name of the tool group indicates a “hot key” for clicking tools, xo nine wu qiu group.
Press the key . Also, if you need to accurately place the image at the desired point, you can press the arrow keys on the keyboard, when you press on the key, the image moves 1 pixel, or if you press the key, the image moves 1 pixel And a special “hot” key to click through the tools, arranged on one palette, which merges (div. Fig. 1.5-1.21) and connected with each other.
Small 1.4. Toolbar

Small 1.5. Tool palette for viewing an area of geometric shape

Small 1.6. The tool palette shows a fairly shaped area
![]()
Small 1.7. Palette of tools for eliminating image defects
![]()
Small 1.8. Clone Tool Palette

Small 1.9. Erasing Tool Palette

Small 1.10. A palette of tools to control the clarity between images
![]()
Small 1.11. Live View Tool Palette

Small 1.12. Tool palette for working with contours
![]()
Small 1.13. Palette of tools for making notes
![]()
Small 1.14. Palette of tools for working with skips
![]()
Small 1.15. Palette of painting tools
![]()
Fig.1.16. Palette of tools for working with the history of image creation
![]()
Small 1.17. Filling tool palette

Small 1.18. Toolbar for brightening and darkening the image

Small 1.19. Toolbar for working with text

Small 1.20. Panel vector tools painting

Small 1.21. Toolbar for work with colors, cutouts and extensions

Small 1.22. Note created by the tool Notes
Notes
Photoshop allows for additional tools Notes(Notes), the panel of which is shown in Fig. 1.13, create text notes in a format similar to the Acrobat format. These notes will not be displayed on other people. They can be used to transfer any information to the client, other people, etc. By clicking on the notes icon, you can get more information in the window (small 1.22). Audio notes can be created using an additional tool Audio Annotation(Sound note) – div. rice. 1.13.