In this article, I will show you how to set or change the password on Tenda routers. We will change the password for the Wi-Fi network, and at the end of the article I will show you how to set a new password that is used to protect the settings of the router. If you have a Tenda router (N3, Tenda N30, W311R +, W308R, N301, W3002R, W568R, etc.), then according to this instruction you can change the password for connecting to your Wi-Fi networks... When I wrote, I briefly described the process of changing the password, I try to write about this in every article on setting up a specific model. By the way, I will also write this article using the example of a router. (follow the link for a small review and reviews).
In the process of setting up the router, be sure to put a password on Wi-Fi. On Tenda routers, the wireless network is unsecured by default. If you do not install protection, then over time a whole bunch of neighbors will connect to your network, and if you have a not very powerful router, such as, for example, the same Tenda N3, then it simply will not work, it will hang all the time. And so that no one gets access to your home network (if configured), be sure to properly protect your wireless network. It will be enough to set a complex, long password.
And if you gave someone access to your Wi-Fi, and you want to close this access, or third-party devices have somehow connected to your network, then you just need to set a new password. What we are going to do now.
Changing (setting) a password on a Tenda router
All these settings, of course, are changed in the router's control panel, which we need to go to. It is done like this: we connect to the router (via cable, or via Wi-Fi), in the browser go to the address 192.168.0.1 , and specify the password to access the settings (if prompted, leave the field blank by default)... For more information on how to enter the settings of the Tenda router, I wrote in the article:.
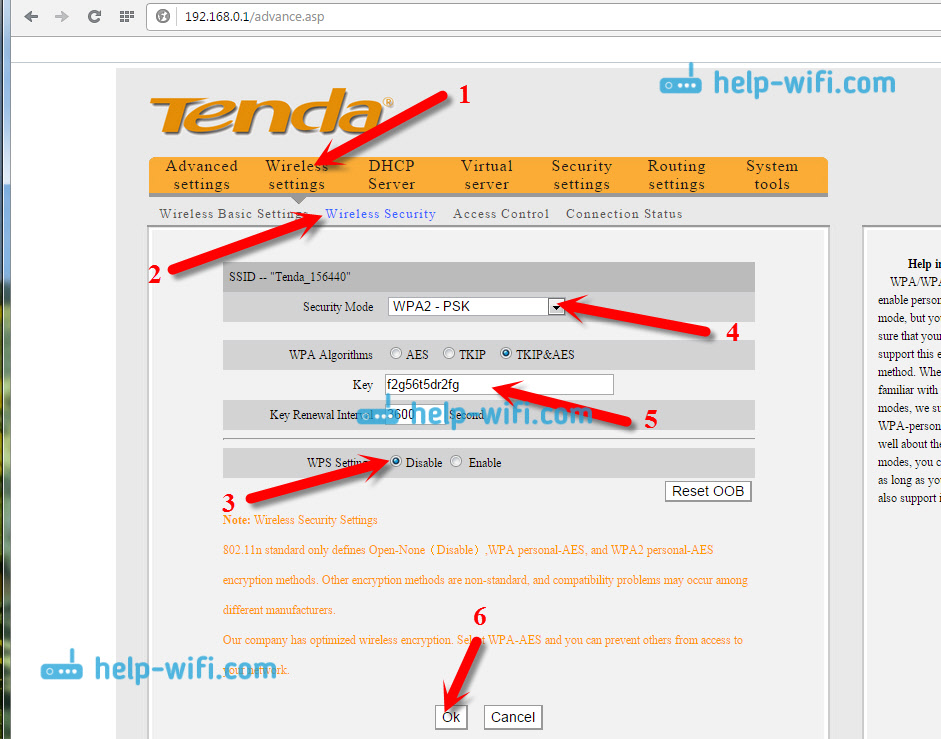
Next, go to the tab Wireless settings - Wireless Security... Near the point WPS Settings put Disabl e. In the dropdown list Security Mode choose WPA2-PSK... Now the most important thing is in the Key field, enter the password that you want to use to connect to Wi-Fi... Minimum 8 characters. Try to install complex password, similar to mine in the screenshot below. If you want to change your password, just erase the old one and write a new one.
I advise you to immediately write down the password so as not to forget it.
After specifying the password, click on the button Ok to save the settings.
The router will reboot and the new password will already be used to connect to Wi-Fi.
If the devices do not connect after changing the password
Sometimes it happens. This is due to the fact that the device is saved old key, and after installing a new one, they do not match. On a computer, for example, it will most likely be an error: "The network settings saved on this computer do not match the requirements of this network." It looks like this:

You just need to delete your network on the device (forget the network), and reconnect to it, already with a new password. This is not difficult to do, I wrote about this in detail in the article. Likewise, we delete the network on other devices if there are problems connecting to your Tenda router.
Protecting Tenda settings: setting a password for access to the control panel
At the beginning of this article, I promised to show you how to protect the settings of the Tenda router. This is also a very important point, because if you do not have a password for access to the control panel, then anyone who is connected to your router will be able to enter the settings and change them.
In the settings go to the section System tools - Change password... In field Old password need to indicate Old Password which was previously used to access the settings. If no password has been set, then leave this field blank. And in the fields New password and Confirm new password create and enter a new password. I also advise you to write it down somewhere, otherwise you will have to reset the settings if you forget it. Click on Ok to save the settings.
 That's it, your wireless network and settings are now securely protected.
Tenda routers are quite reliable, inexpensive and easy to connect. Let's figure out how to connect and configure a new router. After you have unpacked and made sure that all the components of the purchase are present, you can begin the connection process.
Your actions in order:
- We connect the cables to the devices: the computer is connected to the router using a patch cord (it is supplied with the router). Next, we connect the cable of your provider, and turn on the router to the network. It looks like this:
- We configure the network card on the computer in automatic mode (for IP and DNS). That is, sequentially: from the window "Connection status" - "Properties" - "Internet Protocol TCP / IP" and a mark in the properties about automatic receipt. Here is a picture:

- Next, we register the IP address in the new router, in the new model it is marked on the package and usually it is 192.168.0.1. Such a combination is entered into the address bar of the browser. Then in the field "user" and "password" we write the word "admin" (sometimes a password is not required). Here is the following picture:

- Setting up connections. Most ISPs use PPPoE when offering services. When filling out the protocol, you need to specify the username and password, which you will find in the agreement with your provider.
- The Tenda window opens several fields, you choose "Advanced Settings". Then find "Wan Settings" and mark in order in the lines from top to bottom:
The window looks like this:
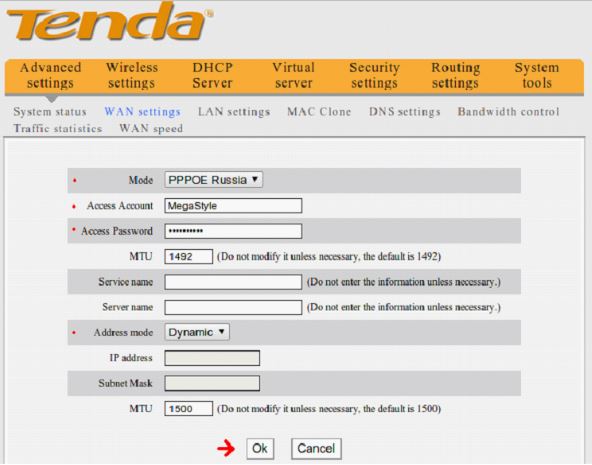
After clicking the "OK" button, a connection should appear immediately.
Advice: for your ADSL modem to work as a router, then Tenda w316r on PPPoE does not need to be configured - otherwise there will be no connection.
- If, after completing all the operations, the connection did not occur, then the reason is that the provider had a combination with the MAC address. Do not close the Tenda window to continue. On the same web interface, go to the "MAC Clone" tab

Here the following buttons open, from which you need to select and click "Apply". After that, from the computer, from his network card, where the web interface is open, the MAC address will be copied and written to the router port.
Everyone sorted it out. The modem router is now configured.
DHCP provider: what are the features of setting up a router?
The main steps remain the same as for ADSL, the only difference is at the last stage:
After opening the web interface, select "Advanced Settings" and stop at the "Wan Settings" tab. It turns out like this:

Longer in the line of the mode - "Mode" - mark DHCP. That's all - press the "OK" button and the connection is complete.
If something went wrong, check, as in the ADSL version, the "binding" to the MAC address. Carry out the same operations as in step 7 and the router will be connected.
Advice: You can restore the previous MAC address that was in the router initially using "Restore Default MAC". But this is necessary in rather rare cases when the provider cannot be informed about the replacement of the hardware address.
Wi-Fi transmission setup
On the Tenda page in the "Wireless Settings" tab, open the "Wireless Basic" window

We put the mark "Enable function" and turn on wireless transmission... You come up with a name for your network yourself and write it in the SSID field. In order to hide this name, you can select the “Disable” function in the “Broadcast” line.
That's it - you are done with the basic settings. Now you need to secure your network.
Safety and security.
To protect against unwanted intrusion (from neighbors), we set encryption and a password:
In the same Tenda window, move to the "Wireless Security" tab and act according to the picture:

Come up with a strong and memorable password for you and type it on the keyboard. To avoid confusion in the future, do not use capital letters and type all characters on the English keyboard.
Click "OK" - your entire network is configured and under reliable protection!
The manual tells how to configure the Tenda W303R, W308R, W309R routers via the WEB interface, since there is no need to install software or drivers on the user's computer. Setting up Tenda W316R and setting up Tenda N3 is carried out in a similar way. All settings are available through the router's WEB interface. All you need to configure is a browser (Chrome, Firefox, Opera or Internet Explorer).
To start setup, connect the router to your computer via network cable... In the properties of the network connection, set the automatic acquisition of the IP address and DNS servers (usually these are the default settings).
Configuring a Tenda router
Open a browser window and enter the address in the address bar 192.168.0.1 ... After that, a window will appear with an invitation to enter your username and password. Default login and password admin... We enter them as shown in the figure and enter the Tenda control panel.
![]()
When the page is loaded as shown in the picture, click on the link Additional installation.
Setting up connection to Beeline

On the page for configuring settings for connecting to the Internet Installing WAN, select the mode L2TP, enter L2TP address l2tp.internet.beeline.kz or 80.241.35.45 ... Enter in the field Account the login given to you by the provider and the password in the field Password... Leave the rest of the settings unchanged.
Setting up Megaline, ID-Net

Unlike Beeline, select in the field Mode PPPOE... In field Check enter your username (given to you by your provider), and in the field Password enter password. Save the settings.
Configuring security

In order for no one except you to be able to access the settings of your router via the Internet, close access to the router from the outside. To do this, uncheck the box Inclusion On the page Installing security → Remote control WEB.

To ensure that no one except you has access to the settings of the router and cannot guess the password for changing the network settings, change standard password admin. To do this, go to the page System Tools -> Password Correction and fill in the fields: one with your old password, and two others with your new password. Save the settings.
WiFi setup

Tenda N3 has a built-in access point (AP) and supports WPS mode for simplified WiFi settings... Thus, there are two ways to configure WiFi: via WPS or via the WEB interface.
Let's use the second method and configure the wireless network via the WEB interface. To do this, go to the page Installation wireless network→ Basic wireless settings... Check the Enable wireless function checkbox. If you want your wireless network to have a different name from the standard name, enter in the field Primary SSID your network name.
If you want to increase the security of a WiFi network so that only someone who knows its SSID can connect to it, turn off Broadcast SSID... This can complicate the connection process for inexperienced users who do not know the exact name of your network, so usually this is not required and it is enough to set a password to access the network.
Option AP Isolation allows you to make sure that users working through Tenda N3 cannot contact each other, but can only access the Internet. In this case, you will not be able to exchange files via local network and use other intranet services. Enable this option only if you need to isolate WiFi network users from each other for some reason.

The last step in setting up a WiFi connection in Tenda N3 is setting a password to protect the network. If your network is open, anyone can connect to it and use your Internet for free. Therefore, if you do not want such a development of events, go to the page Wireless network setup → Security and select Security Mode WPA2-PSK for the maximum level of protection. In field Password, enter the password (at least 8 characters long), which will be known to those who are allowed to connect to your WiFi network. Save the settings.
Congratulations! You have just successfully configured your wireless network and secured it from unauthorized access. Now only you and those to whom you give the password will be able to use your WiFi network through the Tenda N3 router.
Additional instructions for setting up Tenda N3
Setting up Tenda N3 can also be done according to this instruction. Click on the picture.
TENDA W316R is an inexpensive but highly functional Chinese-made router. It is now widely popular, since in this case there is no overpayment for the brand. Next, this device and the principles of working with it will be described in detail.
Connection
Let's consider how to connect a tenda w316r router to a computer. In fact, this is a simple operation that anyone can handle.
So, we do the following:
Tip: in order to find out the model of the card, go to the device manager, find the necessary equipment and copy the identification code to any search engine.

Note that the router is best placed in the center of the apartment. This is to ensure that all rooms have an equally clear wireless signal.
Many experts advise against placing the wireless router near household appliances such as microwave ovens, washing machine, electric stove, etc. It is believed that they are capable of degrading the signal. Moreover, this theory has been proven in practice.
Authorization
Now you need to authorize. It is needed for further work and setting the settings.
You will need to do the following:

Please note that you can immediately set any password in order to exclude the possibility of unauthorized people connecting to your device. Don't forget to save it in a separate document.
If you set a password and then forget it, everything can be easily corrected. To do this, you need to press the Reset button on the device case. To do this, you need a pen rod or something similar.
Changing the factory password
Each router has a factory password by default. Most users prefer to change it, since it is better to set it yourself, so as not to forget in the future.
This is done quite simply:

Video: Overview and how to reset settings
How to set up a tenda w316r wifi router to the Internet
Such a multifunctional device as a router works in several protocols at once. The exact choice depends on the provider you are using. Next, we will consider all possible options.
PPPoE
This setting is needed to work with the provider Rostelecom and many others. This protocol is highly reliable and available. That is why it is very popular.
You will need to do the following:

If the connection is not activated, then most likely the provider binds to the MAC address.
To create a connection, do the following:

L2TP
You will need this protocol if you use the services of the Beeline provider (or MTS). It is no less popular today. Setting parameters is not difficult.
We do the following:

Wi-Fi
Of course, the main purpose of this device is to provide a wireless Wi-Fi network. Setting it up is also easy, the main thing is just to have the correct information.
So, you need to do the following:

Other possibilities
This brainchild of Chinese developers has a fairly high functionality.
Briefly, we will voice what it allows you to do:
- place the device in the DMZ. Such a measure will allow you to configure the network as a direct connection;
- in addition, it is possible to activate uPNP. This will do much faster work applications such as torrent, Skype, ICQ and others. To do this, you need to put a tick in the settings opposite the uPNP item;
- as in many other routers, it is possible to connect to IPTV.
In addition, the ability to set up port forwarding is available. This allows you to create home networks from several computers and work under common system management.
Let's see how to activate this mode:

Thus, it can be stated that, despite its low price(this device belongs to the budget category) TENDA W316R is a very functional router that allows you to use all the capabilities of wireless networks.
That's all. As you can see, there is nothing difficult in setting of this type equipment. With the right information and the right level of patience, you can achieve the desired result. In the end, it is worth noting that, if necessary, you can reset all settings by clicking on the Reset button.
The router manufacturer Tenda has many interesting, inexpensive models that quickly found their consumers and became polarized. Recently, I wrote about one such router, this. In this article, I want to write in detail about how to enter the settings of the Tenda router. This will be an instruction manual for all models of this manufacturer, since everything is almost the same there. For a bit of information on logging into the control panel, see the article on. But, I decided to write about everything in detail in a separate article.
To set some new parameters, configure the router after purchase, change the password, block the device, etc., you will need to go to the settings of your Tenda router. What are these settings? This is a regular page that opens in a browser at the IP address of the router. To be honest, the Tenda N3 control panel itself looks very boring, clearly outdated and there is no Russian language. I don't know, maybe something has changed (or will change) in new firmware versions, but for Tenda N3 new firmware I never found it. This is already a topic for another article. Yes, the control panel doesn't look very good, especially when compared to the competition. But, as it turned out, everything is very simple and well thought out there, and this is the main thing for a router.
You need a device from which you will enter the settings. Of course, a computer or laptop is best suited to connect to the router via a network cable. But, if there are no such devices, then you can access the Tenda settings from a tablet or phone via a Wi-Fi network.
How do I log into the control panel on Tenda?
The first thing to do is connect the device from which we will enter the settings to our router. If you already have everything connected, then you can skip this. Computer / laptop can be connected via cable. A small network cable is included with the router. Just connect your computer to your router.
If this is not possible, then you can connect via Wi-Fi. If you have a new router that has not yet been configured, then connect to the Wi-Fi network, which will appear after turning on the router, and will have the standard name "Tenda_6 digits". The network will be without a password, so there should be no difficulties with connection. Just in case, .

If everything is connected, then you can continue.
We go to the control panel of the Tenda router at 192.168.0.1
Everything is simple here. The address for entering the settings is indicated at the bottom of the device itself. Like this:

The address is usually used 192.168.0.1 ... We open any browser and write (or copy) the ip-address in the address bar 192.168.0.1 ... We pass on it.

If the router is new, you have not yet configured it, and have not changed the standard password for entering the settings, then most likely the control panel will open immediately. You can continue with the configuration of your router.
But, you may be prompted for a password to access the settings. Default, just leave the "Password" field blank and press Ok... The login does not seem to need to be specified, but by default it is - admin.
![]()
If your password is (or empty field) does not fit, the "Password" field is simply cleared and that's it, it doesn't go into the Tenda settings, it is most likely that the password has been changed. If you do not know him, then you need to reset the router settings. There is a recessed button Reset, press on it with something sharp and hold for 10 seconds.
Standard data for access to the control panel:
- IP address - 192.168.0.1
- Password - leave blank
- Login - admin
That's all. If something does not work for you, the settings do not open, there is no access to the page at 192.168.0.1, etc., then in which I collected everything possible reasons and their decisions on this matter.