This article will help you quickly answer your questions. You can also study the entire material to get a complete understanding of network setup in Windows 7.
Introduction.
By purchasing an operating system Windows 7, the user should be prepared for the fact that sooner or later he will be faced with the task of configuring the network in the operating system. For some, this task is not difficult. Typically, installing and configuring the network in Windows 7 is the next step right after installing Windows 7 ( if you have not yet installed Windows 7 and are not quite sure of the steps to take, then you should read this section: Installing Windows 7).
The network configuration step is required for the following steps after installation:
- downloading the latest distributions of anti-virus programs from the Internet;
- downloading the latest versions of the video player, web browser;
- if necessary, downloading drivers from the network for some devices on your computer (if they were not downloaded and installed automatically, or if the installation discs are missing);
- using the XBOX prefix;
- exchange of documents and quick access to shared resources of several computers or laptops. In this case, to use the Internet, you need to set up a wired or wireless network. As a rule, one computer or laptop serves as a kind of Internet distributor for all other units of computer equipment..
The same is the case with MAC addresses and subnet masks. All of these settings have remained the same and have long been familiar to users. Some changes only affected the interface of the Control Panel and its items, which are used to access network parameters. Everything else is unchanged. This is another undoubted plus of Windows 7. Users who previously used Windows XP will be able to quite easily understand the new operating system. Typically, configuring a local network in popular operating systems such as Windows Vista, Windows 7, Windows Server 2008/2008 R2 starts with a component for configuring network properties such as "".
This property configurator allows the user to select a network location, set up printer and file sharing, and view a network map. You can also monitor the status of all your network connections. It is very convenient and practical.
How and where to open the Network and Sharing Center component.
Before you can use the full functionality for creating network parameters, you need to find and open it. One of the following actions of your choice will help you open the active window correctly " Network and Sharing Center»:
As you can see, if you are careful and read everything, then with the search for the component "Network and Sharing Center", no problems should arise. It should be noted that in order to expand the ranges of IP addresses in Windows 7, in addition to the previously existing IPv4 protocol, a new one was added - IPv6. However, providers have not yet used it, and when this will happen is currently unknown. Most likely, the creators of Windows 7 were ahead of the curve.  Figure 1. The illustration shows the Network and Sharing Center window.
What does the network location of the computer mean?
Understand what is " Network location", You need to even before you start working with this important component. For all computers, this parameter is set automatically the first time they connect to the selected network. This also applies to the firewall and security settings of the network selected for the connection. All of them are also configured automatically during the first connection of a computer or laptop to the network.
Windows 7 operating system supports multiple active profiles simultaneously. This allows for the most secure use of multiple network adapters that can be connected to different networks.
By the way, Windows Vista uses the strictest firewall profile for all network connections. This may be why Vista is not as popular as Windows 7.
There are four main types of network locations:
| The first type is the home network. From the name itself, it is clear that this network location is intended for a computer that is used at home. It is also used in networks where all users know each other well. Such computers can not only create, but also join home groups. Typically, for the convenience of users when using home networks, network discovery is automatically turned on. Home networks provide all computers with quality network access. | |
| The second type is an enterprise or organization network. This type of network location also allows you to find the network automatically. The difference from a home network is that on an enterprise network, you cannot join or create a computer to a homegroup. The network is intended solely for professional activities in a company, organization or office. This type is called an abbreviated form (SOHO), which is used in a small office network. | |
| The third type is the social network. Cafes, airports, train stations and other public places - this is where computers use the third type of network location. By default, the ability to join homegroups is disabled in this location. Network discovery is also disabled. It is no exaggeration to say that this is the most strict arrangement. | |
| The fourth type is the domain network. The domain type of network location is almost no different from the working network. Except, in the domain type, the configuration of network discovery and Windows Firewall is determined by Group Policy. This also applies to the network card. For an existing network to automatically receive the "Domain" network location type, the computer only needs to be joined to an Active Directory domain. Only in this case the network can become domain. |
 Figure 2. Selecting a network location for the computer.
Network map.
In order to see the location of all devices included in a particular local network, a network map is used. This is a graphical representation of the devices on the network and the diagram by which they are connected to each other.
The network map can be seen all in the same window "Network and Sharing Center". True, only the local part of the network card is displayed here. Its layout directly depends on the available network connections. In the upper left corner, you can see the display of the computer on which the map is being generated. On the left you can see the display of other computers included in the subnet.
 Figure 3. An example of a network map.
You can view the network map at any time. True, only for locations such as "Home Network" and "Enterprise Network". If the user is curious to view the maps for the "Domain Network" or "Public Network" locations, he will see a message that the network message has been disabled by the administrator by default. The network administrator can enable mapping using Group Policy.
In Windows 7, not one, but two components are responsible for the network map. it Link Layer (Link Layer Topology Discover Mapper - LLTD Mapper). It is this important component that requests the devices on the network to include them in the map.
Network connections.
In the window " Network connections»You can see the entire set of data that a user needs to connect a computer to the Internet, local network or any other computer from the home network.
This data is available for viewing only after installing all the necessary drivers for each network adapter on Windows 7 and after automatically configuring all network connections on a specific local computer or laptop.
There are several simple and affordable ways with which you can quickly and easily open the " Network connections»:
- Open the window " Network and Sharing Center"And follow the link" Change adapter settings"(See Figure 4);
 Network and Sharing Center"." Href \u003d "/ upload / nastroika-windows-7 / windows-7-nastroika-seti-img-7.png"\u003e
Figure 4. Open the " Network connections" through " Network and Sharing Center».
Network and Sharing Center"." Href \u003d "/ upload / nastroika-windows-7 / windows-7-nastroika-seti-img-7.png"\u003e
Figure 4. Open the " Network connections" through " Network and Sharing Center».
- Press the "Start" button and, when the menu opens, enter "View network connections" in the search field. In the results found, select the "View network connections" application ( very convenient way);
- You can also use the classic keyboard shortcut Win + R... This will open the "Run" dialog. In the "Open" field, which is located in the "Run" dialog box, you must enter the following command: ncpa.cpl or control netconnection... Having done this, you need to click the "OK" button.
 Figure 5. "Network Connections" window
Window " Network and Sharing Center»Is similar to the Windows XP window. All detailed information about the network connection can be obtained by selecting the "Properties" option for a specific network adapter (see Figure 6). In Windows 7, to configure the network connection in the "Properties" window, select "Internet Protocol Version 4". In the same window, you can also make the necessary settings for gateways, subnet masks, DNS server, IP addresses, etc. All this information can be obtained from the provider that provides the Internet access service.
 Figure 6. Details of the network connection.
Renaming the network adapter.
The developers of Windows 7 made sure that the operating system, by default, assigns all network connections the names "Local Area Connection" or another option - "Connecting to a wireless network". If the user's computer has more than one network connection, the system also assigns a number to the connection. There are three ways to rename the name of any of the connections you create.
- First way. Select a network connection and click on the "Rename connection" button located on the toolbar. After entering a new name, press the key Enter;
- Second way. With the key F2: press, enter a new name and save with the same key Enter;
- Third way. To rename a network connection selected from the list, right-click on it, select the Rename command from the appeared context menu, rename and save the changes using the already familiar key Enter;
Network status.
In addition to the ability to rename the connection, you can also check the network status in this window. Using this window, which is called "Network Status", at any time you can not only view any data about the connection network, but also find out such details as the MAC address, IP address and many other useful and interesting information.
There are providers that open Internet access to users using the MAC address of the network card. If, for some reason, the network card has been changed or the entire computer has been replaced, the MAC address will also change, and Internet access will stop. For a new connection to the Internet, you must set the required physical address (MAC-address).
How to see the MAC address of a network card in windows 7?
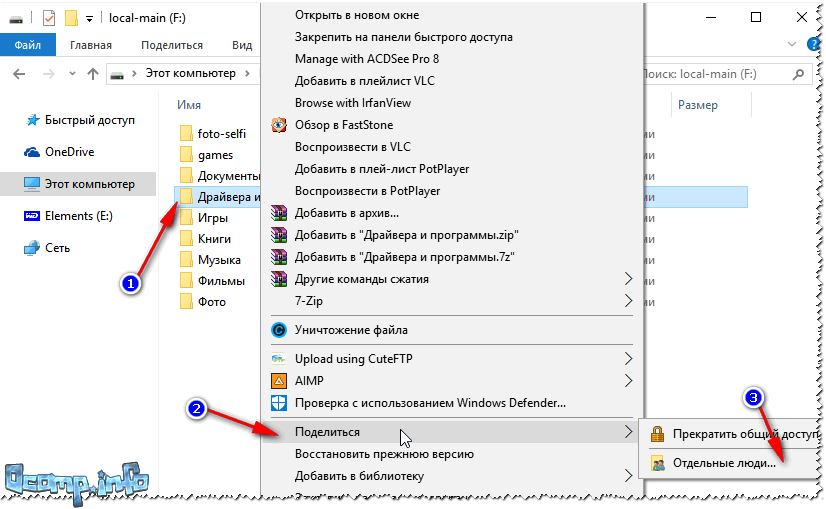
To see the current MAC address, as well as full information about the connection, you need to right-click on the connection to the local network, and then select the "Status" item in the context menu that opens (see Figure 7). Figure 8. How to change the MAC address of the network card (network adapter).
Network diagnostics.
If a situation has arisen when your network connection has unexpected errors or failures, you can eliminate them using the connection diagnostics. The diagnostic tool can be found in the Network Connections window.
We select the window " Troubleshooting», Which, analyzing the connection status, offers a choice of possible malfunctions and troubleshooting methods. To start diagnostics, you need to right-click on the network connection and select the Diagnostics command from the context menu.
 Figure 9. Opening the Local Area Connection Troubleshooter.
The second way to start checking the parameters of a network connection is to select the required network and click on the "Diagnostics of connections" button. The button can be seen on the toolbar.
In the dialog box that opens, to diagnose the connection, just follow the steps of the wizard to troubleshoot errors and problems. Nothing complicated.
Disable network device (network adapter).
Sometimes there are situations when network connection problems are not solved with the help of the troubleshooting wizard, but simply by disconnecting the network adapter from the computer. This can be easily done by doing one of the following:
- Select a network connection and click on the "Disconnect a network device" button located on the toolbar;
- Right-click on the network connection and select the Disconnect command in the context menu that appears;
Conclusion.
The article details how to configure, connect and diagnose network connections.
If you have any doubts about your own options for configuring and connecting the network, then it is better to seek help from specialists, or carefully read the article again.
Now almost every home has a computer or laptop, most often there are several devices at once. You can connect them to each other using a local network. In this article, we will take a closer look at the process of connecting and configuring it.
Combining devices into one local network allows you to use shared services, a network printer, directly exchange files and create a play area. There are several different ways to connect computers to the same network:
Method 1: Network cable
Connecting two devices using a network cable is the simplest, but it has one significant drawback - only two computers or laptops can be connected. The user only needs to have one network cable, insert it into the appropriate connectors on both future network participants and pre-configure the connection.

Method 2: Wi-Fi
This method requires two or more devices with Wi-Fi connectivity. Networking in this way increases the mobility of the workplace, frees up wires and allows more than two devices to be connected. Previously, during configuration, the user will need to manually register IP addresses on all network participants.

Method 3: Switch
The switch option requires several network cables, the number of which should correspond to the number of devices connected to the network and one switch. A laptop, computer or printer is connected to each port of the switch. The number of combined devices depends only on the number of ports on the switch. The disadvantage of this method is the need to purchase additional equipment and manually enter the IP address of each network participant.

Method 4: Router
With the help of a router, a local network is also created. The advantage of this method is that in addition to wired devices, Wi-Fi is also connected, if, of course, the router supports it. This option is one of the most convenient, as it allows you to combine smartphones, computers and printers, set up the Internet on your home network and does not require individual network settings on each device. There is also one drawback - the user is required to buy and configure a router.

How to set up a local network on Windows 7
Now that you have decided on the connection and completed it, some manipulation is required for everything to work correctly. All methods, except the fourth, require editing the IP addresses on each device. If you connected using a router, you can skip the first step and proceed to the next.
Step 1: register the network settings
These steps must be performed on all computers or laptops connected to the same local network. The user does not need any additional knowledge or skills, just follow the instructions:
- Go to "Start" and select "Control Panel".
- Go to "Network and Sharing Center".
- Select item "Change adapter settings".
- In this window, select a wireless or LAN connection, depending on the method you have chosen, right-click on its icon and go to "Properties".
- In the network tab, you must activate the line Internet Protocol Version 4 (TCP / IPv4) and go to "Properties".
- In the window that opens, pay attention to three lines with the IP address, subnet mask and default gateway. In the first line, you need to write 192.168.1.1. On the second computer, the last digit will change to "2", on the third - "3", and so on. On the second line, the value should be 255.255.255.0. And the value "Main gate" should not be the same as the value on the first line, if necessary, just change the last number to any other.
- During the first connection, a new window with network location options will appear. Here you need to select the appropriate type of network, this will ensure adequate security, and some of the Windows Firewall settings will be automatically applied.


Step 2: Check the names of the network and computers
The connected devices must be in the same workgroup, but have different names for everything to work correctly. Verification is very simple, you only need to perform a few steps:

If the names are the same, then change them by clicking on "Change parameters"... This check must be done on each connected device.
Step 3: Check Windows Firewall
Windows Firewall must be enabled, so check this beforehand. You will need:
Step 4: Verify Network Operation
The last step is to test the network for health. To do this, use the command line. The analysis can be performed as follows:

This completes the process of connecting and configuring the local network. Once again, I would like to draw your attention to the fact that all methods, except for connecting through a router, require manual setting of the IP addresses of each computer. In the case of using a router, this step is simply skipped. We hope this article was helpful and you were able to easily set up your home or public local area network.
The principle of creating a local network in any version of Windows (XP, 7, 8, 10) is practically nothing is not different... The exceptions are complex multi-layered corporate networks that use multiple subnets, proxy servers and VPNs.
But in this article we will look at how to create home network, without resorting to buying expensive equipment, but using a regular switch or router with Wi-Fi support.
What is needed to create a network
First of all, to create a local network from a certain number of computers, we need equipment:
note: in the event that a direct connection will be used (i.e. we insert a twisted pair into both devices without using a router), then you will need not a standard cable, but cross— over, unless modern network cards with MDI-X support are installed. In this case, you can use the standard crimp method.
How to create a local network
Now we proceed directly to the creation. First, we need to prepare:
- Install all the equipment in its place - computers, routers, etc.
- Crimp cable, if necessary.
- We do wiring, i.e. stretching the twisted pair cable to the equipment.
- We connect twisted pair equipment.
Worth notethat when the connection is made and all devices are started, the connection connectors on the computers should shine... The same applies to routers with routers, only their bulbs are located on front panel... If any light is off, then the connection is made wrong.
When the connection is made, you need to configure the network in the operating system.
To start check working group, for which we go to the properties " Of my computer". You can not open properties, but use the combination Win+
R and enter in the window sysdm.
cpl.
On all devices working group must be is the sameotherwise the computers won't see each other.
To change the group, just click on the button change and enter the group name. Name must be entered in Latin, and match on all devices. 
Then we look for network icon in the notification area and with its help we get to Network and Sharing Center.
Here we are interested in the link changing additional parameters, it's third from the left and will allow you to edit the sharing options. In each profile we choose: Enable network discovery, autotuning and general access to files and printers. 
Scrolling page and below turn off shared access with password protection. All other settings can be left. Push Save change and exit.
This completes the setup. The network should work, but only if your router distributes dynamic addresses.
If a router was used, or the devices were connected directly with a cable, then a few more settings must be made.
Network settings
When direct connection or using a router, we need change ip-addresses of computers. For this necessary:

We will not describe what each setting is responsible for, since this is a rather voluminous topic. It is enough to enter the addresses described above on all computers.
After making all the above settings, the network should work. However, keep in mind that a firewall or antivirus can completely block the network. Therefore, if nothing worked, check their settings or temporarily disable them altogether.
Local network via WiFi router
Setting up a network through a router is absolutely nothing is not different from what we described above.
If the device is configured to dispense dynamic addresses, the addresses do not need to be changed. Well, if the IPs static, you will have to use the previous section.
Also, there will be no difference between the device being connected by cable or via Wi-Fi, in most routers the setting for the distribution of addresses is configured simultaneously and on wireless and on wired connection.
How to make shared folders
After everything is configured, you need to create shared folders for information exchange.

However, this is still not enough. Now on the folder properties window you need to find the bookmark safety... And then press consistently Edit – Add to.
Good day!
Eh, if in the 90s of the last century a computer was a luxury, now many people have not one, but several computers / laptops at home ...
If you connect computers to a local network (which will even have only 2 devices), you can get undeniable benefits:
- the ability to open files located on another PC, work with them, etc. Now you do not need to run back and forth with a flash drive or disk;
- the ability to make a network printer (scanner, CD / DVD drive, etc.), and use it from all PCs in the local network;
- the ability to play network games (this is a separate and most interesting opportunity that can be talked about for a long time).
In this article, I wanted to consider the issue of building a home local network (and setting it up), which will be useful to all novice users.
I'll go along the path of step-by-step analysis, I'll start with the question of connecting one PC to another, then I'll consider setting up Windows, and how, in fact, to share (make it accessible to the local network) folders, printers, etc.
When creating a home local network, two options are most often used:
- connect two computers (PC with laptop, PC with PC, etc.) using a cable (it is often called a twisted pair);
- acquire specials. a "box" called (😎). A PC is connected to the router using a network cable, and laptops, phones, tablets and other devices get access to the Internet via Wi-Fi (the most popular option today).
Option number 1: connection of 2 PCs using a twisted pair
pros: simplicity and low cost (you need 2 things: a network card, and a network cable); providing a high enough speed that not every router is capable of delivering less indoors.
Minuses: extra wires create confusion, get in the way; after reinstalling Windows OS - network configuration is required again; for Internet access to be on the second PC (2), the first PC (1) must be turned on.
What is necessary: so that each PC has a network card, network cable. If you plan to connect more than 2 PCs to a local network (or so that one PC is connected to the Internet, and at the same time is on the local network) - one of the PCs must have 2-3 or more network cards.
In general, if both PCs have network cards and you have a network cable (also called Ethernet cable) - then connecting them using it is not difficult. I don't think there is much to consider here.
Note: Please note that usually the green (yellow) LED on the network cards starts to light up when you connect the cable to it.

Another important point!
Network cables on sale are different: not only in color and length 👌. The fact is that there are cables for connecting a computer to a computer, and there are those that are used to connect a PC to a router.
For our task need a crossover network cable (or cable, cross-pressed - here who calls what).
In a crossover cable, the yellow and green pairs are swapped at the end connectors; in standard (for connecting a PC to a router) - the colors of the contacts are the same.

Twisted pair / network cable
In general, if two PCs are turned on, they are working, you connected them with a cable (the LEDs on the network cards blinked), the network icon next to the clock stopped displaying a red cross - it means the PC found the network and is waiting for its configuration. This is what we will do in the second section of this article.
Option number 2: connecting 2-3 or more PCs using a router
pros: most devices: phones, tablets, laptops, etc. will get access to the Wi-Fi network; less wires underfoot, after reinstalling Windows - the Internet will work.
Minuses: purchasing a router (after all, some models are far from cheap); "complex" device configuration; radio waves of the router, more and freezing (if the router cannot handle the load).
What is necessary: router (it usually comes with a network cable to connect one PC to it).
With connection router, as a rule, there are no big problems either: the cable coming from the Internet provider is connected to the special. router connector (it is often called "Internet"), and local PCs are connected to other connectors ("LAN ports").
👉 To help!
How to connect and configure a new Wi-Fi router yourself -
Those. the router becomes an intermediary (An approximate diagram is shown in the screenshot below. By the way, in this diagram, there may not be a modem on the right, it all depends on your Internet connection).

By the way, pay attention to the LEDs on the case of the router: when you connect the Internet cable from the provider, from the local PC, they should light up and blink.
In general, setting up a Wi-Fi router is a separate big topic, besides, for each router, the instructions will be slightly different. Therefore, it is hardly possible to give universal recommendations in one single article ...
☝ By the way, when connected via a router - the local network is usually configured automatically (i.e. all computers connected via a network cable should already be in the local network, a couple of small touches will remain (about them below)).
The main task after that is to set up a Wi-Fi connection and access to the Internet. But since this article is about a local network, I do not focus on this ...
Setting up a local network (Windows 7, 8, 10)
In this subsection of the article, I will give universal instructions, regardless of how your local network is organized: connected via a network cable, or using a router. Where the settings will relate to a specific option, there will be notes.
Note: all settings are relevant for Windows 7, 8, 8.1, 10.
Computer and workgroup name
Allegory: each person has his own name, surname, patronymic, date of birth, city, etc. - no two people are exactly alike. The same is in the network - there should not be computers with the same name ...
The first thing to do when setting up a local network is to check and configure working group name and computer name... Moreover, you need to do it on every computer on the local network!
Control Panel \\ System and Security \\ System
- pC name and slave. the group must be in Latin;
- each PC / laptop in the local network must have its own unique name (for example: PC1, PC2, PC3);
- every PC / laptop must have the same working group (ex: WORKGROUP).
To change the name and workgroup - press the button "Change parameters" .


Change workgroup and PC name
In general, when you bring all the names in accordance with the requirements above, you can proceed to the next stage of configuration.
Enable Sharing of Printers and Folders
Relevant for connecting via a router, and directly ...
This innovation appeared in Windows 7, supposedly provides greater OS security (purely in my opinion, it only creates the need for additional configuration of the local network).
The bottom line is that by default Windows blocks and does not give access to open and share folders, a printer, etc., until the security policy is "relaxed".
To remove this block and enable sharing, you need to:

Configuring IP addresses, DNS, masks, gateways
1) For a network organized using a router
In general, for PCs connected to a local network using a router, usually nothing needs to be configured (everything works by default). If something is wrong, just in case, I recommend that you go and check the connection properties.
To do this, you first need to open "network connections" ... This is done simply:
- first open the window "Run" - combination of buttons Win + R;
- then enter the command ncpa.cpl and press Enter (works in all versions of Windows 7, 8, 10).

Next open local area connection properties . (To do this, just click on the connection with the right mouse button - in the pop-up menu, select the required one, see the screen below).

Local Area Connection Properties

2) To connect PC to PC via network cable
PC 1
By PC 1, I mean a computer that has two network cards: one of them is connected to the Internet cable of the provider, and to the second is a local network cable that goes to PC 2.
Note: although, the Internet cable from the provider does not have to be. If not, choose PC 1 and PC 2 - arbitrarily ...
And so, we open local area network connection properties (how to do it - see a little higher in the article).
- IP address: 192.168.0.1;
- subnet mask: 255.255.255.0 (see screenshot below);
- save the settings.

IN iP version 4 properties (TCP / IPv4) second PC, you need to set the following parameters:
- IP address: 192.168.0.2,
- subnet mask: 255.255.255.0;
- main gateway: 192.168.0.1;
- preferred DNS server: 192.168.0.1 (see screenshot below);
- save the settings.

👉 Actually, directly configuring the local network is completed. Now you can start the fun part - sharing and using the shared resources of the local network. Actually, what we were going to ...
Sharing Internet access on a second PC
Relevant for PCs directly connected with a LAN cable ...
It is necessary to configure PC 1 (i.e. the one to which we have an Internet cable provider connected).
First we open network connections : press the combination Win + R , we introduce ncpa.cpl , Further Enter .

Next open the tab "Access" , and check the box next to "Allow other network users to use this computer's internet connection" ... Save your settings.

Allow other users to access the internet
If everything is done correctly, the Internet will be on both computers.
Note: of course, for the Internet to be on PC 2 - PC 1 must be turned on! This, by the way, is one of the inconveniences of such a local network, when connected via a router - the Internet will be available regardless of which PC is turned on / off.
Sharing folders / files for sharing

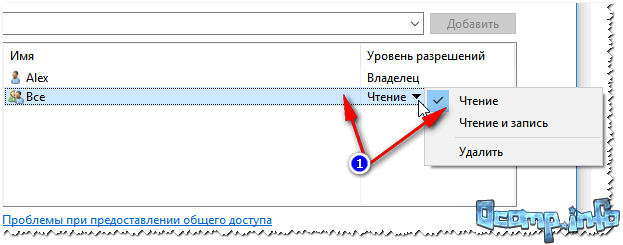
3) Set the resolution: read or read and write.
☝ Note:
- read allowed: users can only copy your files to themselves (they cannot delete or change them!);

5) After a few seconds, Windows will inform you that the folder has been shared. So everything went well.

6) To access the folder:
- open the explorer;
- then open the "Network" tab (left, bottom of the window);
- we open computer namewhere the folder was shared. As you can see, in the screenshot below - it is shared, you can go into it and start copying (reading) any files.

Check / folder is shared / now everyone can copy files from it
Printer sharing (shared network printer)
1) The first thing to do is open:
control panel / hardware and sound / devices and printers.
3) Then open the tab "Access" and check the box "Sharing this Printer" ... Save the settings (see screen below).
Actually, now the printer is shared and it can be used by other PCs / laptops / tablets and other devices in the local network.

How to share a printer
4) To connect a network printer, open conductor , select computer name on which the printer is shared. Then you should see it: click on it right mouse button and select the option in the menu connections .

How to connect a network printer
5) Then you can open any document, press Ctrl + P (File / Print), and try to print a friend page.
Note: By default, Windows usually specifies a different printer (not the one you connected over the network). Do not forget to change it when printing.
👉 To help!
Regarding setting up a local network printer - I recommend reading
On this I finish the article.
In Microsoft Word, you can add and modify pictures, illustrations, shapes, and other graphics. All of them can be edited using a large set of built-in tools, and for more accurate work, the program provides the ability to add a special grid.
This mesh is an auxiliary tool, it is not printed and helps to make a number of manipulations on the added elements in more detail. It is about how to add and configure this grid in Word that will be discussed below.
1. Open the document where you want to add a grid.

2. Go to the tab "View" and in the group "Show" check the box next to "Grid".

3. The grid of standard sizes is added to the page.

Note: The added grid does not go beyond the margins, as does the text on the page. To resize the grid, more precisely, the area it occupies on the page, you need to resize the margins.
Change the default mesh sizes
You can change the standard dimensions of the grid, more precisely, the cells in it, only if the page already has some element, for example, a picture or a shape.
1. Click on the added object twice to open the tab "Format".

2. In a group "Arrange" press the button "Align".

3. In the drop-down menu of the button, select the last item "Grid options".

4. Make the necessary changes in the dialog box that opens, specifying the vertical and horizontal dimensions of the grid in the section "Grid step".