W [n] \u003d w [n] || ; w [n] .push (function () (Ya.Context.AdvManager.render ((blockId: "RA-256600-11", renderTo: "yandex_rtb_R-A-256600-11", async: true));)) ; t \u003d d.getElementsByTagName ("script"); s \u003d d.createElement ("script"); s.type \u003d "text / javascript"; s.src \u003d "//an.yandex.ru/system/context.js"; s.async \u003d true; t.parentNode.insertBefore (s, t); )) (this, this.document, "yandexContextAsyncCallbacks");
Radio amateurs are those people who do not want to save money, but to bring all the parameters of the device to the maximum. This also applies to those who assemble underwater metal detectors with their own hands. If you have knowledge, you need to use it! And do not take a ready-made device for underwater search for $ 100-200, when the filling in it is $ 30-50. So, if you are one of such radio amateurs and want to assemble an underwater metal detector with your own hands, then we suggest doing it right now.
What is the difference between an underwater metal detector
An underwater metal detector is a device for detecting objects made of metals and alloys directly in water on the surface of the ground or shallowly in it. It can be used to search in conditions of poor visibility and strong noise.
- The main difference from the standard detector is the prolonged stay under water. Some search engines go into the water with metal detectors up to their throats, so it is important to consider the immersion depth of the device.
- The second difference is the recognition of small objects: earrings, chains and rings. Since this is the main prey of underwater search engines.
- Hence, one more difference follows - setting mainly for the search for non-ferrous metals.
When assembling an underwater metal detector, it is these three important differences from ground devices that should be considered.
What scheme is going
There are many schemes for assembling metal detectors. We'll take a sample board below.


What parts and tools are needed
Resistors:
- R1, R10, R22, R35 \u003d 100 kOhm
- R2 \u003d 3.3 kΩ
- R3, R7, R8, R13, R14, R21, R33 \u003d 1 kΩ
- R4, R5 \u003d 100 Ohm
- R6 \u003d 390 Ohm 1 W (damping)
- R9 \u003d 1 MΩ
- R11, R20, R23 \u003d 22 kΩ
- R12 \u003d 10 kΩ
- R15, R16, R17 \u003d 220 kΩ
- R18 \u003d 47 kΩ
- R26, R29 \u003d 51 kΩ
- R28 \u003d 240 kΩ
- R32 \u003d 75 kΩ
- R34 \u003d 30 Ohm
- R25 \u003d 50 kΩ (variable resistor)
- R10 \u003d 100 kΩ (variable resistor)
- R33 \u003d 1 kΩ (variable resistor, volume potentiometer)
- P-5 \u003d 10 kΩ (potentiometer for threshold adjustment)
Capacitors:
- C1 \u003d 0.022 μF
- C2 \u003d 1000uF 25V
- C3, C4, C8, C16 \u003d 0.1uF
- C5, C6, C7 \u003d 0.47 μF
- C9, C10, C11, C12 \u003d 0.001uF
- C13, C14, C15 \u003d 220uF 10V
Transistors:
- Q1 \u003d 2n3906
- Q2 \u003d IRF-9640
- Q6 \u003d MPSA-13
Diodes:
- D1, D2, D3 \u003d 1N4148
- D6 \u003d 1N4001
- D7 \u003d 1N5819
- D5 \u003d 1N755 (Zener diode)
Integrated circuits:
- U1 \u003d TLC555
- U2 \u003d NE5534
- U7 \u003d CD4066
- U3 \u003d LM358
- U4 \u003d MC14093
- U5 \u003d 78L05
- U6 \u003d ICL7660
For a 23 cm search coil:
Copper wire 0.5mm required. You should get 24-25 turns. You can experiment with wire and coil shape. The length will depend on this. Take at least 4 meters for the standard version.
For boom and control unit:
Plastic tubes or light stainless steel are best suited. The frame should not be very light, so as not to rise up, but not heavy, so as not to go to the bottom. In this matter, it is better to trust your feelings and tastes. The main thing is that the frame material behaves well in salt water, does not collapse in an aggressive environment.
To build:
Soldering iron, wires, electrical tape, silicone sealant, scissors, hacksaw and other tools.

Assembly stages
Let's start with the hardest part - creating a printed circuit board.
- Then we install all the necessary electronic elements on the board. We solder exactly as in the diagram.
- We connect the power supply. Better if it is a powerful rechargeable battery, and not Krona batteries.
- We install the finished board with a power supply in a sealed container. We put LED bulbs on the surface of the container, if necessary, fill all joints with silicone sealant. We attach the container to a pre-assembled bar.
- We wind the search coil. You can use a 3 liter jar for this. We choose a plastic case for it, then fill the wound wire with silicone sealant. Use this winding pattern:
- We solder the leads from the coil to the stranded wire.
As such, the underwater homemade metal detector does not have a control unit.
We provide tightness
For tightness, you can apply the following tricks:
- Fill all cracks with silicone sealant.
- For the coil and control unit, we use ordinary polypropylene pipes of a convenient diameter.
- The rod can be constructed from an old fishing rod and plastic pipe adapters.
- You can also use a sealant tube for the control unit box.
- We put waterproof ports for connectors (for example, under the wire from the coil or under the headphones).
What is the result
According to this scheme, a completely sealed dynamic underwater metal detector is obtained, which you can take with you on vacation abroad, or use it as a hobby if you live by the sea. You can swim with it! We recognize small objects made of non-ferrous metals well, but also stumbles upon corks. The trifle recognizes at a distance of 20-25 cm, large targets - up to 1 meter.
Click "Like" and get only the best posts on Facebook ↓
With the onset of spring, more and more often people with metal detectors can be found on river banks. Most of them are engaged in "gold mining" purely out of curiosity and excitement. But a certain percentage does make a lot of money looking for rare things. The secret to the success of such research is not only in the work experience, information and intuition, but also in the quality of the equipment with which they are equipped. A professional tool is expensive, and if you know the basics of radio mechanics, you have probably thought more than once about how to make a metal detector with your own hands. The editors of the site will come to your aid and tell you today how to independently assemble the device using diagrams.
Read in the article:
Metal detector and its device

Such a model costs more than 32,000 rubles, and, of course, such a device will not be affordable for non-professionals. Therefore, we propose to study the device of a metal detector in order to assemble a variation of such a device yourself. So, the simplest metal detector consists of the following elements.

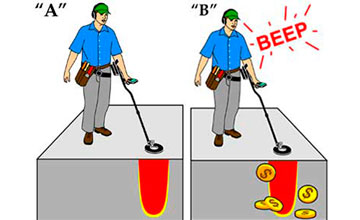
The principle of operation of such metal detectors is based on the transmission and reception of electromagnetic waves. The main elements of a device of this type are two coils: one is transmitting and the other is receiving.

The metal detector works like this: the red magnetic field lines of the primary field (A) pass through the metal object (B) and create a secondary field in it (green lines). This secondary field is picked up by the receiver and the detector sends an audio signal to the operator. According to the principle of operation of emitters, electronic devices of this type can be divided into:
- Simple, working on the principle of "reception-transmission".
- Induction.
- Pulse.
- Generator.
The cheapest devices are of the first type.

An induction metal detector has one coil that sends and receives a signal at the same time. But devices with pulse induction differ in that they generate a transmitter current, which turns on for a while and then turns off abruptly. The coil field generates pulsed eddy currents in the object, which are detected by analyzing the attenuation of the pulse induced in the receiver coil. This cycle repeats continuously, maybe hundreds of thousands of times per second.
How a metal detector works, depending on the purpose and technical device
The principle of operation of a metal detector differs depending on the type of device. Let's consider the main ones:
- Dynamic type devices... The simplest type of device that scans the field continuously. The main feature of working with such a device is that it is necessary to be in motion all the time, otherwise the signal will disappear. Such devices are easy to use, however, they are weakly sensitive.
- Pulse type devices.They have great sensitivity. Often there are several additional coils for such a device for tuning for different types of soil and metals. Requires certain skills to set up. Among the devices of this class, one can distinguish electronic devices operating at a low frequency - not higher than 3 kHz.

- Electronic deviceson the one hand, they do not give a reaction (or give a weak one) to unwanted signals: wet sand, small pieces of metal, shot, for example, and, on the other hand, provide good sensitivity when searching for hidden water pipes and central heating routes, as well as coins and other metal objects.
- Depth detectors sharpened for the search for objects located at an impressive depth. They can detect metal objects at a depth of 6 meters, while other models "pierce" only up to 3. For example, the Jeohunter 3D depth detector is capable of searching and detecting voids and metals, while showing objects detected in the ground in 3- dimensional form.

Depth detectors work on two coils, one is parallel to the ground surface, the other is perpendicular.
- Stationary detectors - this is a framework installed at especially important protected objects. They calculate any metal objects in bags and pockets of people passing through the circuit.

Which metal detectors are suitable for making with your own hands at home
The simplest devices that you can assemble yourself are devices that work on the principle of receiving-transmitting. There are schemes that even a novice radio amateur can handle, for this you just need to pick up a certain set of parts.

There are many video instructions on the Internet with a detailed explanation of how to make the simplest metal detector with your own hands. Here are the most popular ones:
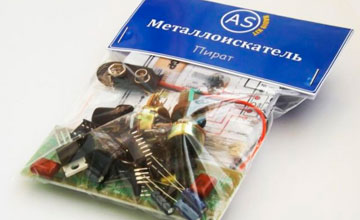
- Metal detector "Pirate".
- Metal detector - butterfly.
- Emitter without microcircuits (IC).
- A series of metal detectors "Terminator".
However, in spite of the fact that some entertainers try to offer systems for assembling a metal detector from a phone, such designs will not pass the "battle" test. It is easier to buy a metal detector toy for children, there will be more sense.

And now, in more detail about how to make a simple metal detector with your own hands, using the example of the Pirate design.
Homemade metal detector "Pirate": diagram and detailed assembly description
Homemade products based on the Pirate series metal detector are among the most popular among radio amateurs. Due to the good working qualities of the device, it can "detect" an object at a depth of 200 mm (for small items) and 1500 mm (large items).
Parts for assembling a metal detector
Metal detector "Pirate" is a pulse-type device. To manufacture the device, you will need to purchase:
- Materials for making the body, the rod (you can use a plastic pipe), the holder, and so on.
- Wire and electrical tape.
- Headphones (suitable from the player).
- Transistors - 3 pieces: ВС557, IRF740, ВС547.
- Microcircuits: K157UD2 and NE
- Ceramic capacitor - 1 nF.
- 2 film capacitors - 100 nF.
- Electrolyte capacitors: 10 μF (16 V) - 2 pieces, 2200 μF (16 V) - 1 piece, 1 μF (16 V) - 2 pieces, 220 μF (16 V) - 1 piece.
- Resistors - 7 per 1; 1.6; 47; 62; 100; 120; 470 kOhm and 6 pieces for 10, 100, 150, 220, 470, 390 Ohm, 2 pieces for 2 Ohm.
- 2 diodes 1N148.
DIY metal detector circuits
The classical scheme of the Pirate series metal detector is based on the NE555 microcircuit. The operation of the device depends on a comparator, one output of which is connected to the IC pulse generator, the second to the coil, and the output to the speaker. In the case of detecting metal objects, the signal from the coil goes to the comparator, and then to the speaker, which notifies the operator about the presence of the desired objects.

The board can be housed in a simple junction box, which can be purchased from an electrical store If such a tool is not enough for you, you can try to make a device of a more perfect plan, to help you with a diagram for making a metal detector with a reference to gold.

How to assemble a metal detector without using microcircuits
In this device, Soviet-style transistors KT-361 and KT-315 are used to generate signals (you can use similar radio components).
How to assemble a printed circuit board of a metal detector with your own hands
The pulse generator is assembled on the NE555 microcircuit. Through the selection of C1 and 2 and R2 and 3, the frequency is adjusted. The pulses obtained as a result of scanning are transmitted to the transistor T1, and it transmits the signal to the transistor T2. Amplification of the audio frequency occurs on the BC547 transistor to the collector, and headphones are connected.

To accommodate radio components, a printed circuit is used, which can be easily made by yourself. For this, we use a piece of sheet getinax covered with copper electrical foil. We transfer the connecting parts to it, mark the attachment points, drill holes. We cover the tracks with a protective varnish, and after drying, we lower the future board in ferric chloride for etching. This is necessary to remove unprotected areas of copper foil.
How to make a coil for a metal detector with your own hands
For the base, you need a ring with a diameter of about 200 mm (ordinary wooden hoops can be used as a base), on which a wire of 0.5 mm is wound. To increase the depth of metal detection, the coil frame should be within 260-270 mm, and the number of turns should be 21-22 vol. If you don't have anything suitable on hand, you can wind the spool on a wooden base.
Copper wire coil on wooden base
| Illustration | Action Description |
 | Prepare a board with guides for winding. The distance between them is equal to the diameter of the base on which you will mount the coil. |
 | Wrap the wire around the perimeter of the fasteners 20-30 turns. Tape the winding in several places with electrical tape. |
 | Remove the winding from the base and give it a rounded shape, if necessary, fasten the winding additionally in several more places. |
 | Connect the circuit to the device and test its operation. |
Twisted pair coil in 5 minutes
We will need: 1 twisted pair 5 cat 24 AVG (2.5 mm), knife, soldering iron, solder and multitester.
| Illustration | Action Description |
 | Roll the wire into two coils with a pigtail. Leave 10 cm on each side. |
 | Strip the winding and free the wires for connection. |
 | We connect the veins according to the diagram. |
 | For better attachment, solder them with a soldering iron. |
 | Test the coil in the same manner as for the copper wire device. The winding leads must be soldered to a stranded wire with a diameter in the range of 0.5-0.7 mm. |
Brief instructions for setting up a DIY metal detector "Pirate"
After the main elements of the metal detectors are ready, we proceed to the assembly. We attach all the assemblies to the metal detector rod: the body with the coil, the receiving-transmitting unit and the handle. If you did everything correctly, then additional manipulations with the device will not be required, since it initially has maximum sensitivity. More fine tuning is done by means of a variable resistor R13. Normal operation of the detector should be ensured with the middle position of the regulator. If you have an oscilloscope, then with its help, at the gate of the transistor T2, you need to measure the frequency, which should be 120-150 Hz, and the pulse duration - 130-150 μs.
Is it possible to make an underwater metal detector with your own hands?
The principle of assembling an underwater metal detector is no different from the usual one, with the only difference that you have to work hard on creating an impenetrable shell using a sealant, as well as on placing special light indicators that can report a find from under the water. An example of how this will work in the video:
Do-it-yourself metal detector "Terminator 3": a detailed diagram and video instructions for assembly
The Terminator 3 metal detector has occupied an honorable place in the ranks of home-made metal detectors for many years. The two-tone device works on the principle of induction balance.

Its main features are: low power consumption, metal discrimination, non-ferrous metal mode, gold only mode and very good search depth characteristics compared to semi-professional branded metal detectors. We offer you the most detailed description of the assembly of such a device from the craftsman Viktor Goncharov.
How to make a metal detector with your own hands with metal discrimination
Discrimination against metals is the ability of an instrument to distinguish between detected material and to classify it. Discrimination is based on the different electrical conductivity of metals. The simplest methods of determining the types of metals were implemented in old devices and devices of the entry level and had two modes - "all metals" and "non-ferrous". The discrimination function allows the operator to respond to a specific amount of phase shift compared to a set (reference) level. At the same time, the device cannot distinguish between non-ferrous metals.

How to make a homemade professional metal detector from available tools in this video:
Features of deep metal detectors
Metal detectors of this type can detect objects at great depths. A good, hand-made metal detector looks at a depth of 6 meters. However, in this case, the size of the find must be solid. These detectors work best for detecting old projectiles or large enough debris.

There are two types of downhole metal detectors: frame and boom-mounted transceiver. The first type of device is capable of covering a large area of \u200b\u200bland for scanning, however, in this case, the effectiveness and focus of the search is reduced. The second version of the detector is a point detector, it works directed inward at a small diameter. You must work with it slowly and carefully. If your goal is to build such a metal detector, the following video may show you how to do it.
If you have experience in assembling such a device and using it, tell others about it!
Many people are engaged in the production of equipment with their own hands - so it costs less than if it was bought in a store. Is it possible to assemble an underwater metal detector with your own hands? Every beginner and professional search engine has such an opportunity. It should be noted immediately that the assembly process will require experience in assembling electronic circuits and knowledge in the field of electronics. Without all this, attempts to assemble a full-fledged underwater metal detector with your own hands will be unsuccessful.
What do you need to assemble a metal detector? First you need to find a suitable scheme. It should provide the ability to search underwater in salt and fresh water, and to the maximum possible depth. Many schemes allow you to find a five-kopeck Soviet coin in the ground at a depth of 20-25 cm. The immersion depth depends on your ability to create sealed cases. In total, we need to do the following things:
- Find a suitable scheme;
- Purchase parts;
- Draw up a layout diagram of the elements on the printed circuit board;
- Create a printed circuit board and place all circuit elements on it.
Pay attention to the quality of the soldering - it must be high so that the metal detector can work without failures. Epoxy can be poured onto the board to provide water resistance, but this can make it difficult to replace parts if the detector breaks down.
When creating an underwater metal detector with your own hands, you will need to create a search coil. On the Internet, you will find many options for coils, and you can ensure their tightness with any plastic material, for example, by putting the coil in the same epoxy resin and waiting for it to dry completely. The result is a sealed search coil that can be used to search at a wide variety of depths.
The last step is to come up with a body. It must be airtight and water resistant even at great depths. If any control elements are provided in your chosen scheme, you need to provide that they are sealed and can work in water. We also ensure the tightness of the battery compartment and connectors for connecting the search coil and headphones.
When assembling an underwater metal detector with your own hands, you may encounter various difficulties:
- The circuit works successfully in air, but starts to get weird under water;
- Setting up the circuit requires the use of an expensive oscilloscope;
- The resulting metal detector is not sensitive;
- Nowhere to take waterproof elements or underwater headphones.
All these problems can be avoided by purchasing a ready-made underwater metal detector. Factory-assembled devices are stable in the most difficult conditions and high sensitivity, and they are supplied with underwater headphones. Ready-made metal detectors from leading brands allow you to find even the smallest metal particles in the ground, and some models can withstand immersion to a depth of 60 meters. They can easily tolerate prolonged exposure to water, differing in their tightness. Better search coils will provide a decent search depth. If you have experience in assembling electronic circuits, and you are well versed in electronics, try to assemble an underwater metal detector with your own hands - homemade devices, well-tuned and adjusted, often give excellent results. Well, their most important advantage is their affordable cost, which compares favorably with the cost of factory-assembled metal detectors.
The dream of finding a treasure is increasingly being replaced in our time by a more realistic program for searching for precious metals in natural or artificial environments.
In modern conditions, it is very important to find and extract valuable materialsfound among the waste, or in another uncontrolled environment.
Hardware is an important component of this search technology.
Search and recovery of gold and valuable metals from waste, garbage, in the natural environment is part of the recycling strategy, technology for the effective processing of used materials, including.
Searching for them in the ground or in the mass of industrial and other wastes not only requires the use of equipment, but also stimulates its improvement. Created devices of different levels and specializations... Amateurs and enthusiasts of searching for valuable metals are interested in such equipment.
 The metal detector is the most important tool for manual metal search in a chaotic natural or artificial environment.
With the help of such a device, you can search not only, but also, silver and other precious metals.
The principle of the device any metal detector based on electromagnetic effects.
This is how a typical metal search technology works:
- Device creates an electromagnetic field.
- Metal an object, hidden in a foreign environment, affects such a field when falls within his sphere of influence.
- Device catches the effect of the object on the electromagnetic field and signals it.
Most of the metal detector models work on this principle.
The technical differences of such equipment make it possible to obtain more complete information about the detection of a metal object, for example:
- estimate the mass of the find;
- get data about the shape, size and configuration of the object;
- specify the location, including depth.
There is a lot of information on the Internet about metal detectors of varying complexity and design. There you can also brush up on the theory of the electromagnetic field taught in school.
The most simple, primitive metal detectors (usually self-made constructions for searching for gold, silver and other metals of amateur enthusiasts) assembled from finished devices and products working with the use of electromagnetic effects.
Many are familiar with a primitive, but quite workable metal detector circuit, in which an electromagnetic field is created by a pulse element of a conventional calculator.
 The reaction created field on detected metal objects picks up the simplest household radio... The signal about such a find is sound, quite distinct and understandable.
More complex amateur and professional metal finders keep the logical basis of the technology in the form of three components:
- an electromagnetic field generator;
- sensor of changes in this field;
- equipment for evaluating the detected anomalies, signaling this.
Devices of different levels of complexity and functional potential can be conditionally divided into groups. Classification based on professionalism and user specialization is one of the generally recognized:
- amateur equipment, assembled with his own hands and used as a hobby tool or beginners in the search for metals;
- semi-professional equipment necessary for enthusiastic amateurs and fanatics;
- professional metal detectors for those constantly working in this field;
- special devices for metal prospectors in difficult conditions - at depth, under water, with the release of precious metals.
The proliferation of search equipment is such that many devices of this type can be purchased at gardening and dacha supply stores.
The apparatus for searching and detecting metal is needed not only in the recycling business, in the search for artifacts and treasures. Multiple security systems, everyone known framework - one of the versions of the technology search for metal. The settings of these frames are focused on finding weapons and similar dangerous items.
Coil
Very important node metal search equipment - coil or frame... This is most often a winding of a special configuration, the task of which is to form an electromagnetic field and catch its reaction to the detection of a metal body foreign to the search environment.
In most designs the coil is placed on a long shaft - a handle for moving it near the search area.
For the amateur making of coils, frames of the most popular types are sold. The easiest way to make such a purchase is in an online store.
 Many amateurs make coil frames independently... This is done for reasons of cost savings or in the hope of getting a better quality custom design tool.
For this, improvised means are used. - plastic products, plywood, and even filling the assembled winding with construction foam.
The search operator or treasure hunter seeks to find the most effective technique for working with a metal detector, choosing the necessary operating modes for the electronics and the correct techniques for manipulating the coil.
Electronic circuit
The logical element of the metal detector is an electronic circuit. It performs many functions:
- The first task of this component is in creating an electromagnetic signal of the required format, which is converted into a field using a coil.
- The second task of the electronic circuit is analysis of field changes captured by the frame, their processing.
- The third task is giving an informing signal to the operator - sound, light, indications of indicators and devices.
It is best if the person who wants to assemble an electronic circuit independently owns knowledge in radio amateurish business or in electronic technology. Such a master can not only assemble the desired circuit, but also change and improve the design.
Many electronic devices are simple enough even a beginner can build them... The resulting device will be functional without configuration if the assembler has followed the recommendations of the developer of such a scheme.
How to make "Pirate" yourself?
 One of the most popular models of metal detectors designed for hand-made amateurs is the Pirate.
The title, which contains abbreviated details of his device and developer site, wittily reflects the romance of finding precious metals.
Here the main advantages of this model:
- simplicity of device and assembly;
- low cost of parts and materials;
- sufficient operating parameters;
- recognized convenience for beginners.
The electronic circuitry of this model does not require programming. In the "Pirate" used parts available to everyone, a properly assembled circuit is fully functional.
Design and working principle
The design and layout of the Pirate metal detector is traditional for equipment of this kind. It is a barbell, at the lower end of which is installed coil, and at the top - electronic unit with battery.
The location of the electronic unit should leave room for a comfortable hand hold of the rod.
Some craftsmen prefer that the sound signal of the device is not given by the speaker, but by the headphones. In this case, the headphone cable comes off the electronic unit.
The technology of the device is impulse... This makes it possible to provide very good sensitivity indicators for this class of equipment. Below is a diagram of the electronic unit on microcircuits. 
A similar circuit can be assembled by using transistors instead of microcircuits. This version may require additional settings that are only available to experienced radio technicians. This is why the transistor circuit is less commonly used.
Materials, parts and blanks
In addition to the details and details indicated in the circuit diagram of the electronic unit, to build metal detector for gold and other metals you need to prepare some materials and blanks:
- a ready-made board for assembling an electronic circuit or foil material for its self-production;
- power supply in the form of any combination of accumulators or batteries with a total voltage of 12V;
- enamel wire with a cross section of 0.5 - 0.6 mm for the manufacture of a coil;
- stranded copper wire for connections with a cross section of at least 0.75 sq. mm;
- housing for the electronic unit - a plastic container of a suitable size;
- strong enough plastic tube for the rod;
- frame for winding the coil;
- consumables - solder, heat shrinkable cambric, electrical tape, screws and self-tapping screws, adhesives and sealants.
A printed circuit board for assembling an electronic circuit is best made according to the model of the developments presented on the Internet.
Below is the one such sample, suitable for assembling electronics on microcircuits.
Lovers of homemade electronics are engaged in the manufacture of the board, and even then not all. Most of those who want to create a metal detector on their own prefer to buy such a part.
For coil assembly requires a frame or framethat does not contain metallic elements. An amateur craftsman can make such a frame from plywood, plastic, or pick up a similar one in parameters from finished plastic products, for example, dishes. The frame can be purchased ready-made or made by yourself
Recommended coil parameters - 25 turns of enamel wire with a diameter of 0.5 mm on a mandrel with a diameter of 190-200 mm. Increasing the diameter by 30% will lead to an increase in the sensitivity of the apparatus, provided that the number of turns is reduced to 20-21.
A plastic coil frame is one of the most common metal detector parts on the market.
The coil manipulation technology is such that this very fragile unit can suffer from impacts on uneven ground, stones, sharp objects. To avoid this the coil on the frame is covered from below with a plastic plate... Such a cymbal not only protects the reel, but also provides a sliding mode on tall grass. The search becomes more intense.
Assembly order and design
 For successful assembly of a metal detector it is best to follow this procedure:
- pCB manufacturing and electronic circuit assembly;
- selection of a plastic container of a suitable size for it and completion of the assembly of the electronic unit;
- coil manufacturing;
- making a rod of a convenient shape and attaching an electronic unit and a coil to it, making connections to an electronic circuit.
Although the assembly order has no fundamental character. For those who make an apparatus for continuous long-term work in the field of searching for non-ferrous metals and subsequent recycling (recycling for reuse), usability is an important factor.
In this case, the study of the shape of the boom and the layout of the main elements of the apparatus becomes a key factor. Thus, a serious design phase appears in the creation of the device.
It is best to do this step of the job with life size simulation... This simulation can be done using wooden parts of a suitable shape, for example:
- shovel handle;
- plywood pieces of the desired shape;
- scraps from;
- temporary fasteners made of pieces of wire, nails and ropes.
After making sure that the assembled model of the device will be functional and convenient enough, you can proceed to the decisive assembly. Finished device, usually, does not require configuration, it is completely ready to go. You can start searching for metal by choosing the desired level of sensitivity and the correct tactics for manipulating the coil.
 Assemblers who need to assemble their apparatus as quickly as possible, can use ready-made sets of parts.
The purchase of such a kit allows you to significantly simplify the manufacture of the "Pirate". One of the proposals is.
Users of the Pirate metal detector, who have skills in radio amateurish business, modify the design of this device. That's just several directions such improvements:
- Manufacturing coils with unusual parameters - by size, made of special materials, for example - "twisted pair" cable.
- Arrangement of additional functional systems, for example - indication of the degree of discharge of the battery.
- Manufacturing models for underwater work.
- Supplements electronic circuit, distinguishing between metals (creating a discrimination function).
Simple, inexpensive and reliable metal detector "Pirate" works well in a variety of conditions.
Homemade metal detector - pros and cons
Cheapness, basic advantage independent production of any products, relevant for a metal detector. Here are some more dignity from a homemade device:
- the most appropriate search technology for beginners;
- the possibility of creating a device with a completely individual shape, design and configuration;
- the pleasure of making an efficient, workable appliance yourself.
Like any hobbyist device, a metal detector not devoid of some shortcomings.
 Here are the features of the "Pirate" model noted by users:
- energetic charge consumption power batteries;
- no discrimination, that is, accurate sensitivity to ferrous, non-ferrous and precious metals;
- limited in comparison with expensive models sensitivity.
Despite the shortcomings, the Pirate model is very popular. This is due to the simplicity of homemade manufacture and the high performance of an inexpensive device.
Recycling professionals believe that the discrimination potential of a metal detector does not matter much. All the metals found are so valuable that recycling is always justified. Focusing on gold prospecting requires not only equipment, but also considerable experienceaccompanying knowledge and of course good luck.
Related Videos
The video provides a detailed guide for making and assembling a Pirate metal detector with your own hands:
Conclusion
When the metal detector is ready, you can start working. We must be aware that no one of the most advanced apparatus will allow finding only golden hidden objects.
A metal detector will help you find valuable metal, and it is very likely that it will be gold. It is best if the future metal and gold finder has a real understanding of the search technique.
Many features of the operation of finished equipment are very important for those who develop and assemble their own models. You need to have an idea of \u200b\u200bthe technology of work in advance with such equipment - this is the basis of its high-quality design.
The effectiveness of gold prospecting increases with experience. Here the most important elementssuch experience:
- the correct choice of the design of the metal detector and its high-quality DIY manufacturing;
- ability to choose the right search site;
- the ability to use the full potential of the metal detector;
- choosing the right search technology in different conditions;
- modernization of the metal detector.
Correctly assembled and debugged equipment will always help in the search for gold, and this valuable metal will certainly be found.
In contact with
Devices called metal detectors or metal detectors can help detect metal objects (ferromagnetic or non-magnetic) in a weakly conductive or neutral environment. The difference in these definitions lies in the functional purpose of the devices. Both the metal detector and the metal detector indicate the location of the metal object, but only the first device has another function that allows you to recognize the type of metal. Such products are used for work purposes by archaeologists, geologists, builders, military, treasure hunters. They use expensive devices that Russian and foreign companies produce specifically for such purposes using various technologies. Industrial designs differ in construction schemes, technical characteristics and the presence of additional options. This can be the depth, type of metal, shape of the object, etc. Is it possible to make a metal detector with your own hands at home? This question will be answered by lovers of search work in this article.
Note! An electronic type metal detector can detect coins at a depth of 0.5 m and large-sized objects at a depth of 3.0 m.
Principle of operation and components
The principle of operation of a metal detector depends on the construction type:
- induction;
- running on beats;
- in transmission-reception mode;
- designed according to the scheme of an electronic frequency meter;
- impulse.
There is a sensor in induction appliances. It contains a special design coil. It is excited by an alternating signal. If there is a metal object under the sensor, an email appears. a signal that is fixed in a certain way.
A metal detector working on beats registers the difference in the frequencies of the operation of 2 generators. One operates at a frequency that is known, the second has structural elements operating in a frequency setting circuit. In the ground, walls, wood, etc., where there are no metal objects, the frequencies of the generators are the same, if any, they differ. These changes are recorded by appropriate means - by wiretapping or digital.
The principle of operation of devices operating in the transmission and reception mode consists in recording a signal that is reflected from an object of non-ferrous or ferrous metal. The device has at least 2 coils, one of which operates in the transmitting mode, the other in the receiving mode. The signal comes from the transmitter coil, because it is affected by an alternating magnetic field. The best results are obtained from sensors with coplanar coils.
Metal detectors according to the frequency counter scheme are devices with built-in microprocessor technology. They are characterized by compact dimensions, and their sensitivity is much higher. Frequency increments can be estimated, allowing such devices to be used to recognize the variety of metal.
Pulse metal detectors use such a phenomenon as self-induction in a conductive object. In the design, it is customary to distinguish between the following components:
- generator of current pulses;
- receiving and emitting coils;
- block for processing the received signal;
- switching device.
The switching device is necessary to separate the signals emitted and reflected by such an indicator as time, i.e. for some time, a damped-type current pulse is maintained, which is recorded.
You can assemble a metal detector at home using any of the above schemes. The main thing is to select all the necessary parts and components, without deviating from the parameters indicated in the diagram. It is very important to comply with the technologists of the work performed.
main parameters
The principle of operation of the simplest metal detectors is based on the properties of electromagnetic induction. The main technical characteristics of the product are:
- search depth;
- selectivity;
- sensitivity;
- coverage area;
- noise immunity.
In addition, the amount of consumed electricity and the time for which the supply of electricity is calculated is taken into account. A simple metal detector is made by hand, taking into account all these factors.
Metal detector on transistors
Such a homemade metal detector with a 12 V power supply is made according to the scheme shown in Fig. below.

Do-it-yourself assembly of a metal detector is preceded by preparatory work: a list of necessary components is drawn up. Then they are purchased in the retail network or are among the parts available to the radio amateur. Further, the correct sequence of work performed will help to make a metal detector with your own hands. They are executed according to the following algorithm:
- the board is made;
- installation of parts and elements on the board is carried out;
- a coil is made;
- the functionality of the board is checked;
- the metal detector frame is in progress;
- the operation of the metal detector is checked.
Stages of manufacturing the board:
- the dimensions of the textolite are determined (in this case, you will need a piece 84 cm long and 31 cm wide);
- preparation of PCB for transferring the circuit (sanded and cleaned of contamination);
- board printing, carried out using a laser printer on low density photographic paper;
- transferring the scheme to textolite (using a heated iron);
- exposure in a solution of ferric chloride or copper sulfate;
- removing toner with acetone;
- drilling holes for the installation of elements;
- manufacturing of board tracks (using LTI-120 solution and solder).
The elements on the board are installed in the following order: microcircuit, amplifier, 2 SMD capacitors, MLT C2-23 resistor, transistors and capacitors.
The coil is made on a mandrel Ø 200 m with a PEV wire Ø 0.5 mm. The number of turns is 25. The speaker is taken from any portable radio receiver.
The device is configured from 10 and 100 kΩ potentiometers.
A rod for a metal detector can be made using a crutch with an armrest or plastic or light metal pipes, giving them the necessary configuration. This is already the taste of the manufacturer. The device that was collected according to this scheme will see objects at a depth of 1.0 m, if they are large, and coins up to 0.4 m.

The circuit of the metal detector may be different, it all depends on what the amateur has at hand and what kind of result he wants to get.
The nuances of making a deep metal detector are presented in the video https://youtu.be/0WnD4UZCmcU.
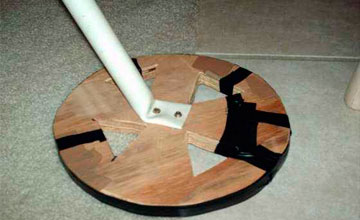
Homemade underwater metal detector
How to make a metal detector to work underwater? The main difference from devices for work on land is the creation of a coil, which must be sealed, and when creating a circuit, it is necessary to take into account the specifics of the device's operation under water. As a rule, such an underwater metal detector with their own hands is used to find small items made of non-ferrous metals (rings, earrings, pendants, chains, etc.) in water at different depths. Therefore, the product must be tuned to gold or search for other non-ferrous metals. And yet - the device is in water for a long time during operation, therefore, increased requirements are imposed on metal detectors for the material from which the rod is made, and protection of electronic components from water is also required. On the Internet, you can find diagrams of all 5 types of metal detectors and descriptions for them. It is not difficult to choose according to your liking or technical characteristics, as well as make a metal detector at home. The main desire.
The video at https://youtu.be/XGVeqdTYVzk shows in detail the manufacture of an underwater metal detector, as well as the nuances of its setup.
How the board with components looks like is clearly seen in Fig. below.

The manufacturing steps are the same as for the device for working on land, but only the control unit board is inserted into the housing, which is additionally treated with silicone sealant. For these purposes, you can use a tube from the sealant itself or another, hermetically sealed device.
A homemade metal detector with transistors or using other elements is not difficult to perform. To do this, you just need basic knowledge in the field of electrical engineering and electronics, the ability to work with your hands and use the tools necessary for performing specific work, including control and measuring instruments. You can even create not only the simplest device, but also a powerful metal detector. The detailed instructions that the Internet is replete with will help you do everything yourself - from the board to the design. It all depends on the desire and the money that the fan of creating wants to spend on his brainchild.
Video