For full operation of the printer, you need to install additional software - drivers. Usually, they come with the device, on a special boot disk. Without them, the computer will not detect the connected device. Of course, we are not talking about devices that are automatically recognized by the system. I would like to note right away that you need to read the entire article, since there are complex and simpler ways to install drivers and therefore you need to read the article to the end. Almost at the very end of the article there is information on how to install a driver for a printer automatically, keep that in mind. When the question arises of how to install a printer without a disk, inexperienced users think that it is very difficult. But in fact, this procedure can be mastered in 15-30 minutes. Let's check if this is so.
There are two main ways to install a printer without a boot disk, namely, download the necessary drivers from the Internet
- Using basic Windows Update tools;
- By yourself, knowing the identification code of the device or using the printer model.
The first method is perfect for simple printer models (only printing and scanning documents, without additional tweaking), because Windows Update installs a basic driver package.
The second method allows you to download the latest software version, so after installing them, the user will have access to absolutely all printer functions, including more "advanced" ones.
In addition, the reason for installing drivers may be not only their complete absence, but also a malfunction of the device itself. Sometimes, using one or another driver, the printer refuses to print documents, and all because the driver you installed was not suitable for your device. This, of course, is one of the reasons why the printer may not work correctly, but as you understand, we are not talking about this in vain right now. After all, below we will tell you how to download your driver to your computer, but if you are in a hurry, then you may have difficulties. Therefore, proceed in stages.
If you have previously studied this issue somewhere and none of the methods have been successful, then you can try to reload the driver. This article is universal - here we will tell you how to do it in different versions of Windows.
Therefore, before installing the printer without a disk, you must:
1. Disconnect the device connected to the computer;
2. Go to "Start" - "Control Panel" - "Devices and Printers" or "View devices and printers";
3. Here you will need to find the line "Add a printer" or "Add a printer" in the top panel;
 4. The Add Printer Wizard will open, select "Add a local printer" from the offered options and click "Next" (for Windows 7). If you have Windows 8 or 10, then at the bottom click "The required printer is not in the list" - and then select "Add a local or network printer with manual parameters" and click "Next".

 5. The Add Printer and Other Hardware Wizard will prompt you to select a port, leave the default settings (LPT1) and go to the next step;
 6. Click on the "Windows Update" button and wait until the available drivers are updated;
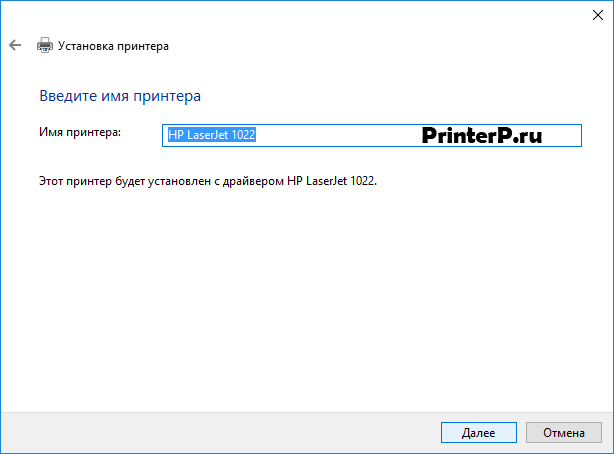
 7. The list of printer companies and major models will be loaded. It may take 5 to 30 minutes. Find the manufacturer on the left and the printer model on the right. Then click "Next". In this case, we chose the HP brand and the LaserJet 1022 model.
 8. The installation wizard will ask you to come up with a name for the device (leave the default name or come up with your own), click "Next";
9. Wait for the installation to complete;
 10. The "Using General Settings" window will open, here you must select the "No sharing to this printer" option and click "Next" (the window will appear if Windows 7 is installed). If you have Windows 10, then you will see a window where you need to click "Finish" (the same window will appear later in Windows 7).

The next thing to do is to remove the newly installed device. To do this, right-click on the icon that appears for the printer and select “Remove device” from the context menu (this will keep the installed drivers).

After the steps taken, you can connect the printer to the computer. When you connect the printer, you need to wait a bit for the computer to automatically recognize the printer and install it. Then you can print any document to make sure the driver is installed.
How to do it in Windows 7:
Official sites
If you do not have a disc with drivers for the printer, you can download them from the manufacturer's official website. To do this, it is enough to know the brand and model of the printer. You can find them in the documentation, on the case or on the back of the device. If you do not understand the instructions below, you can download the required driver on our website without any fear (all drivers without viruses).
Open any browser and in the search bar enter: "HP LaserJet p1102 printer driver download". In this article I will be looking for drivers for the above device, but you need to specify your model.

As a rule, the link to the official website of the developer will be on the first search page, at the very top. But it does not always happen and therefore you need to be careful. In order not to download malware instead of drivers, make sure that you actually went to the developer's official website. To do this, pay attention to the site link in the search engine. There should be nothing "superfluous" (the address will be something like this: "hp.com" or "samsung.com", etc.)
If you doubt the authenticity of the site you have found, you can enter only the name of the printer company without the model and other information. And from the main page, go to the "drivers and other software" section.

Benefits of downloading drivers from the official website:
- Security (digital signature of drivers, absence of embedded malicious code);
- The developer places on the site only the latest, "fresh" versions of drivers.
As soon as you get to the required page (“Drivers and other files”, “Software”, “Software”, “Download”, as well as “drivers” on the English version of the site), you will need to enter your printer model and search.

In addition, some sites allow you to automatically determine the device model and the required drivers, for example, there may be a button "Define a product". So, if we are on the HP website, we click "Search for a product" and in our case, variations of this model appear. We need to select the desired model by clicking the left mouse button.

After the necessary drivers are found, you will need to specify information about the version of your operating system, the bitness of the system. If this window does not appear, then just click on the link or button to download the drivers.

A situation may arise that the site will offer to download the driver version of your choice:
- Basic - to access the basic features of the device;
- Extended - for access to additional functions.
You do not need to worry about which version you are downloading, the main thing is to indicate the correct bit depth of your system (discussed above).

Upon completion of the download, you need to run the downloaded file and follow the instructions of the installation wizard.
Windows Update
The Windows operating system contains by default all the basic drivers for the most popular peripherals. Including for printers and scanners. To do this, connect your device to your computer and wait a few minutes. If the attempt to automatically install the printer is not successful, you must do the following:
1. Open the "Control Panel";
2. Find "Hardware and Sound";
 3. Click the left mouse button on "Devices and Printers";
 4. A new window will appear with icons of the connected devices. Find an image of a computer or laptop (in my case it is a laptop) and right-click on it. In the context menu that opens, click on the line "Windows Update".

5. After that, a window will open where in the menu on the right you need to click "Check for updates". It should start automatically searching for available updates for all your devices. I must tell you that it is desirable to have a fast Internet connection, as this procedure can take 10-30 minutes.
 6. Now you need to wait for Windows to download the found updates in automatic mode;
 7. After the search is completed and all the updates found are downloaded and installed on your computer or laptop, you need to restart the device.
After restarting the computer, the printer should work. If, after restarting, the computer still does not see the device, the root of the problem may not be in the drivers. Try connecting the printer to a different USB input.
Finding the Printer ID
Each device that connects to the computer has a unique identification code. If you know the hardware ID, then you can easily download the driver you need. If the above instructions did not help you, and you did not understand, how to install a printer without disk, you need to find out its identification code. I recommend using this option in the most extreme cases, and if you downloaded the drivers from the official site, then you can skip this option.
So, to find out the ID:
1. Right-click on the computer and select "Properties", then on the left click "Device Manager";

 2. In the window that opens, find your printer. Right-click on the desired line and in the menu that appears, click on "Properties";
 3. A dialog box will open where you need to go to the "Details" tab. Next, in the "Property" line, select "Equipment ID".
 4. A value will appear in the window below, which will be the identification code of the printer (if there are several values, then you must select the first one);
5. Copy the identifier. Go to the official website of your printer manufacturer and search for the copied identification number. You can also use search engines to find the driver you want using the hardware ID. But do not forget that our site has all the drivers for existing printers. It remains only to load the found driver.
Remember that you need to download drivers only from official resources. It's completely free and as secure as possible.
Installing drivers in automatic mode
So that this problem never bothers you and the drivers for any external devices are installed automatically, it is enough to change the basic Windows settings. For this:
1. Go to the "Devices and Printers" menu again (we told you how to enter here above) through the control panel. Right-click on the "Computer" icon and select "Device installation settings" in the context menu that appears;
 2. A dialog box will open where you must select "Yes (recommended)" (recommended default settings) and click "Save";

Now, after connecting a new device, Windows will automatically search and install the necessary drivers from its own database or using an Internet connection.
This material describes how to connect and configure the HP LaserJet P1102w printer to a Wi-Fi network of a home or office router using the WPS button and through software installation from the HP official website. This article will help you configure most HP Wi-Fi printers that do not have an information screen in the panel
In the names of HP printers, the letter "w" means the presence of a Wi-Fi module - consider this when purchasing a printer
Unpack the printer and connect it to 220 volts. It is not yet required to connect it with an interface cable to the computer - you will do this in the middle of the installation process
Press the button with the antenna on the printer (top button in the picture above). Press the WPS button on the Wi-Fi router (in some models, you need to hold the button for a few seconds)

After one to two minutes, the printer will be connected to the wireless network
Details on using and configuring the WPS button (in some models it is disabled by default) is described in our materials on configuring routers:
To print from a smartphone or tablet, use the app HP ePrint (for Windows Phone - HP Smart) - install it through the application store (Play Market, App Store). To print to a printer, a smartphone (tablet) must be connected to a Wi-Fi network

After starting the application, you need to select a photo or document for printing, then the application will independently find the printer in the local network, and you just have to click the "Print" button

Connection printer HP LaserJet P1102w to a wireless network and installing a driver from the official HP website on a computer or laptop with Windows operating system
Use a computer or laptop connected to the wireless network to set up the printer
After the reset, you need to install the software. You can use the included disc, but it's best to download the latest version from the manufacturer's website
Go to the manufacturer's website link, enter the model name into the search bar and click the "Search" button

Operating system version is detected automatically... In our case, software is required for 32-bit Windows 7
Below we select the required software package - in the section "Driver-Installation software for the device" press the button " Download"next to" Full Solution Software and Driver for HP LaserJet Pro P1100, P1560, P1600 Series "

At the end of the download run the installer file

Wait for the program to unpack the package and extract the files

In the window for selecting the device to be used, find the required series of printers (in our case, P1100) and click " Wireless installation"


In the window for selecting the type of installation, put the radio button " Advanced installation"and click the" Next "button

Be sure to agree with the terms of the license agreement (check the box and click "Next")

In the "Privacy Policy ..." window, click the "Next" button

In the next window, uncheck the "Install HP Customer ..." checkbox so as not to take part in surveys, and click "Next"

In the next window, select the printer model - in our case it is " P1100w Series", and click" Next "

In the "Printer connection method" window, select the item " Wireless Printing Setup"

Wait until the software components are updated taking into account the selected settings

After the update, the Wireless Printing Setup window appears. Right now and you need to connect the printer to a computer or laptop USB interface cable

Once you connect the printer, the "Print Settings ..." window will disappear, and the software installation will continue automatically - no need to click

In the "Wireless detection method" window, you need to set a radio button " Automatically". You can select the item manually and enter the parameters of your wireless network (its name and password from Wi-Fi) yourself

After checking the entered parameters, the program should display the name of the wireless network to which your computer is connected. Click "Next"

The installer will try to connect the printer to your Wi-Fi router

If successful, the Product Options window will appear. Install the radio button " Disable direct printing"so that only devices on your network can connect to a wireless printer (the printer broadcasts its private open network so that you can print on it even without a router)

After the "Successful network configuration" window appears, you need to disconnect the USB cable from the printer and a computer. Then click "Next"

In the last window, a polite program will congratulate you on a successful installation and offer to print a test page - be sure to do this: check the "Print a test page" and click the Next button. Now you should finally hear the sound of the printer mechanisms and see the result of the installation work

Wireless Printing Setup Utility
The printer software package includes a utility that will help you connect to the wireless network after settings without completely reinstalling the programs
Connect the printer with a USB cable to your computer, click the "Start" button, then in the "All Programs" section, find the "HP" - "HP LaserJet Professional P1100 Series" folder and run the utility " Setting up wireless printing"


Wait for the end of the initialization phase

In the "Wireless detection method" window, select the method for detecting your Wi-Fi router - press the radio button " Automatically", then click the" Next "button

Check the name of the wireless network and click "Next"

After the Successful Wireless Setup window appears, disconnect the USB cable from the printer and computer
Then check the box " Print a test page"and press the button" Done"

After the steps taken, the printer should print a test page
The HP laser jet 1018 printer is a popular device that can meet the needs of the average user or the modest office. The HP Laser Jet 1018 prints at 12 sheets per minute and prints the first page 10 seconds after the job is sent. Self-installation of the hp laserjet 1018 printer is the main task of the happy owner of a common model.
Printer settings
Let's assume that you didn't have any problems when you figured out how to connect the hp laserjet 1018 printer. Correctly installing the wires in the sockets and the software from the disk is very simple. The uncomplicated design of the hp laserjet 1018 printer makes this task fast.
Now let's figure out the main issues that cause the hp laserjet 1018 not to install

We check the serviceability and make sure that the wires are connected correctly by the luminous indicators.
We use restarting the computer, which almost always helps. If nothing has changed, in the control panel you need to go to the "Printers and Faxes" section and find the hp laserjet 1018 printer there. Make sure that there are no print jobs in the queue or delete the existing items.
Sometimes the power of the power supply is not enough to maintain the desired voltage parameter on the USB ports. We leave only the keyboard and mouse connected to the USB ports.

Further configuration of the hp laserjet 1018 printer continues by looking for broken USB ports. Connect the device to another port, then it can work.
We clarify the configuration of the driver, which must match the model. "By default" can be set not laser jet 1018, but another model. Select the "default" printer hp laserjet 1018.
One of these points will surely help you figure out how to install the hp laserjet 1018 printer.
Installing the software

To understand how to properly set up your hp laserjet 1018 laser printer, you need to start by installing the correct driver. Then you can quickly and easily install the laser jet 1018 printer.
In fact, standard drivers for connected devices already exist in the bases of the Windows operating system. However, there is no better software than the manufacturer's “native” software. Therefore, you need to insert the disc into your computer and follow the installation instructions. If there is no disk, the driver you need can be easily found and downloaded from the manufacturer's official website. There you will also find tips on how to use the hp laserjet 1018.
Briefly about the printer
- printer for home, small office
- b / w laser printing
- up to 18 ppm
- max. A4 print size (210 x 297 mm)
- max. print size: 216 x 297 mm
Download and update the most current / latest driver for the HP LaserJet Pro P1102 Printer. By updating this driver, you will get rid of multiple errors associated with outdated software.
Especially for those printer users who have lost the CD or it does not work for them, we have uploaded all its contents to the server and now you can download the original drivers from the official website.
This post is a reminder for yourself where and how to quickly download a driver for a popular printer. So that I can download it once, or, for example, explain by phone where to download this driver.
Windows Driver Details
Driver name: HP LaserJet Pro P1102 Windows Driver
Dota file: 05 January 2016
File name:hp_LJP1100_P1560_P1600_Full_Solution-v20120831-50157036_SMO.exe
Version: v1601;
Compatible with the following Operating Systems:
Microsoft Windows 10 (64-bit)
Microsoft Windows 10 (32-bit)
Microsoft Windows 8.1 (64-bit)
Microsoft Windows 8.1 (32-bit)
Microsoft Windows 8 (64-bit)
Microsoft Windows 8 (32-bit)
Microsoft Windows 7 (64-bit)
Microsoft Windows 7 (32-bit)
Microsoft Windows Vista (64-bit)
Microsoft Windows Vista
Microsoft Windows XP
Download Driver for Printer HP LaserJet Pro P1102
Version: 20150114
Operating Systems: Windows (32-64 bit)
Description
This update utility installs the latest firmware on the printer. The firmware version can be found on the Self Test / Configuration page.
Bug fixes and improvements: Added support for P1109w
Installation instructions
You must use a 2 meter Hi-Speed \u200b\u200bUSB (2.0) cable.
1. Download the firmware updater file to your desktop. Double click file.
2. Select the printer (s) to upgrade from the list. 3. In the dialog box, click "Refresh All" or "Refresh one".
4. Follow the instructions on the screen to continue the update process. The printer lights will blink while the firmware is being updated.
5. DO NOT turn off the printer and computer while performing the update, otherwise the printer may become unstable and / or the printer may become unusable without HP service. The firmware update process may take several minutes. Wait.
6. You can print a configuration page to verify that the update is correct. On the configuration page, the device details section will indicate the current firmware version.
Notes. If the firmware has already been updated, no changes will be made. Otherwise, after the firmware download is complete, a successful download message will appear.
——————————————————————————————————————————-
Description
HP Print and Scan Doctor is designed by HP to provide users with troubleshooting and problem-solving capabilities that are often required when working with HP print and scan devices connected to Windows computers. Just launch the program and follow the instructions on the screen. does not require installation.
For use HP Print and Scan Doctor just download the file and run it.
- Click the Download button and save the file to your computer.
- Navigate to the location on your computer where you saved the file and double click on the file name HPPSdr.exeto open and run the program.
- Follow the instructions on the screen to use HP Print and Scan Doctor.
Note... When you run the HPPSdr.exe file for the first time, the shortcut HP Print and Scan Doctor will appear on the desktop. This shortcut can be used to quickly access HP Print and Scan Doctorto troubleshoot future problems.
hp laserjet p1102 driver download
hp laserjet p1102 driver free download
download drivers for printer laserjet p1102
download printer driver hp laserjet p1102 free
download driver for printer hp laserjet p1102
hp laserjet p1102 driver download windows
hp laserjet p1102 driver download windows 7
hp laserjet p1102 driver download free install
hp laserjet p1102 driver download windows 10
Installing the Printer Driver
To control the printer, as for any other "hardware" device, you need to install a program on your PC or laptop, or rather a driver. Each printer model needs a different driver. True, Samsung and HP have created a universal print driver for their line of printers and MFPs.
So, in order to install a printer driver on a computer or laptop, you first need to download it from the manufacturer's website or download it from the disk supplied with the printer.
The driver must be compatible with your printer or mfp model and operating system. So, for example, a printer driver created under Windows XP x32 will not work under Windows XP x64. True, there are also universal drivers that will be compatible both there and there.
There are several ways to install the driver. Let's consider them.
Automatic for Windows XP.
After downloading the driver to your PC, run the executable file (setup.exe, autorun.exe) from the driver directory. DO NOT CONNECT THE PRINTER to the PC. Then follow the instructions of the installation wizard. At a certain stage, he will ask you to connect the printer to the PC. Windows Installer will automatically search for devices. In some cases, it needs to be canceled in order for the driver program to complete the installation itself.
Manual mode for Windows XP
Press START-CONTROL PANEL - PRINTERS AND FAXES and press Printer Installation
Follow the instructions of the installation wizard

At this stage, you need to abandon the automatic installation and put the choice in the item "install from a specified location" 
Now you need to click on the "browse" button and specify the location where you unpacked the archive and the driver. Usually this folder should contain a file with the extension "INF" 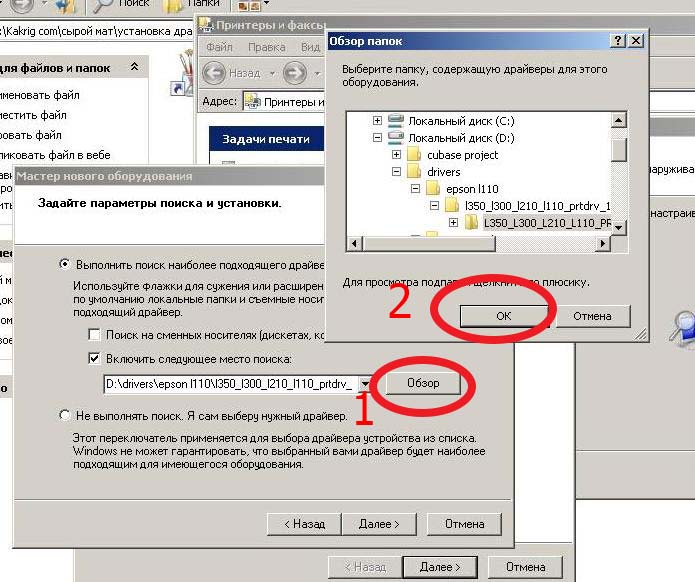
When the path to the driver file is specified, click "OK" and then "Next"  Next, the driver will be installed. It will take some time. Wait.