Most desktop laptops face situations where it is necessary to reinstall the operating system, often in which it is necessary to preserve the Windows license. This publication covers a number of methods on how to reinstall Windows 7 on a laptop, and also talks about the nuances of the process of installing the OS on laptops from various manufacturers.
System update with additional backup copy of Windows 7
Most manufacturers of mobile computers create backup storage for distribution kits or any other OS. Reinstalling Windows 7 on a laptop from these memory areas requires the use of additional utilities.
To print the reinstallation, restart your laptop and press:
- for Windows on an HP laptop using F11;
- on an ASUS laptop with F9, you'll get a kick out of the excitement;
- for Windows 7 on Lenovo laptop on F11;
- On an Acer laptop, use the key combination Alt+F10;
- for Windows 7 on a SAMSUNG F4 laptop.
After pressing the required key, instead of the standard Windows 7 installation, the OS update interface will open:
Once you are interested in programs, please sign in before updating Windows.
Please remember that all settings will be discarded, and data from the previous copy of the system may be deleted.
Reinstallation from disk
When reinstalling from disk, remember that in order to renew the license you need to install the distribution with the same OS that was installed previously. You can find out the version of the installed system on the sticker that is located on the back of the laptop. Before speaking, there is a license key for your copy of Windows.

Remember that during the reinstallation time, a new operating system will start up from the disk, and to avoid problems with the new one, you must delete the data from the previous Windows.
This is done through additional formatting of the system partition; then ask later about transferring all the required data from the selected hard disk volume for installing Windows. It is not necessary to transfer installed programs, since this will waste registry connections, and many of them may not start. Don't be lazy, install them again after replacing the OS.
The distribution package of the installation disk does not include drivers for all laptops, so please download the drivers for your device from the official website of the manufacturer. If nothing can be done, then after the establishment of a high probability of the following problems:
- the hemstone card does not work;
- does not use Wi-Fi;
- The programs do not start.
If you have reinstalled the OS without anything, then in order to eliminate the problems of the least possible installation, you will have to download the driver distribution kit for another computer and transfer them, vikorystnye and other devices, then before reinstalling, do not forget to secure and download the drivers for the temperature card and Wi-Fi module.
To begin the installation process, insert the disk into the drive and restart the laptop. After starting the computer, open the animation menu, then select the video from the DVD.

This dialogue appears on most laptops using the additional F12 key, and on HP devices the combination F9+Esc is selected.
Often on older computers this function is disabled, so you need to open the BIOS and independently adjust the priority of the settings. To go to the BIOS on laptops, you will need the following buttons:
- Acer, Asus, Samsung, Lenovo - F2;
- hp-F10 + Esc.
If the brand of your device is not in this list, find out the appropriate key on the window that will appear when the PC is turned on.

The BIOS interface is not similar for different phone systems, but the sequence of steps to change the priority is practically identical. Navigation through the windows of the current BIOS of all versions is done using the arrow keys on the keyboard and the Enter, Esc, +, - keys.
Sequence of actions for BIOS AMI:

Sequence of action for BIOS Phoenix-Award:

Windows installation
After making a change to the BIOS and rebooting, a dialog with notifications will appear: “Press any key to boot from CD or DVD.”

Further installation of Windows 7 is not difficult, just follow this:
- Press any key on the keyboard.
- When the file unzipping process is complete, a screen will appear with the entry “Windows is loading files...”.

- In dialogue " Windows installation» Enter your language and press the Next button.

- In the window, click on the large Install button.

- Select the system version that includes the license code. This entry will be required after installing Windows 7.

- Wait a minute for licensing.

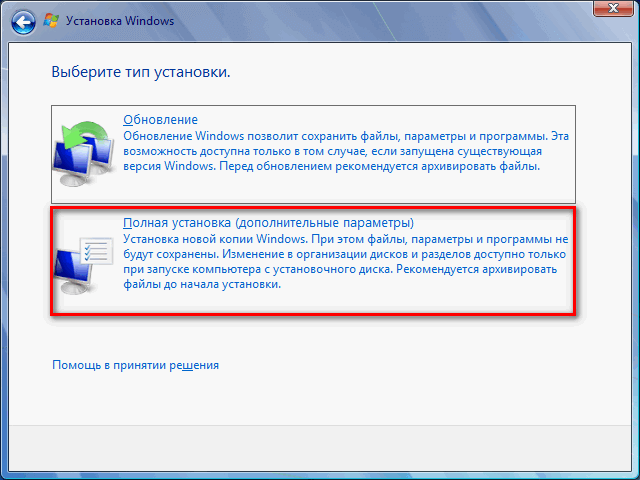
- Select installation method - “ Povna installation».

- Select the storage volume on which you are going to install the OS, and prepare it by clicking on the item “ Adjusting the disk».
 Situations arise when the list of reservations has an accumulator section, you must select a different volume.
  Due to the availability of disks with a capacity of more than 250 GB, they will be split into pieces. Please ensure that the system is installed with a large partition of up to 100 GB in size.
- Format the selected storage section. If you contact us ahead of time, all information will be available on site. Confirm that you have saved all the necessary data before. Wait for the installation to complete and click Next.

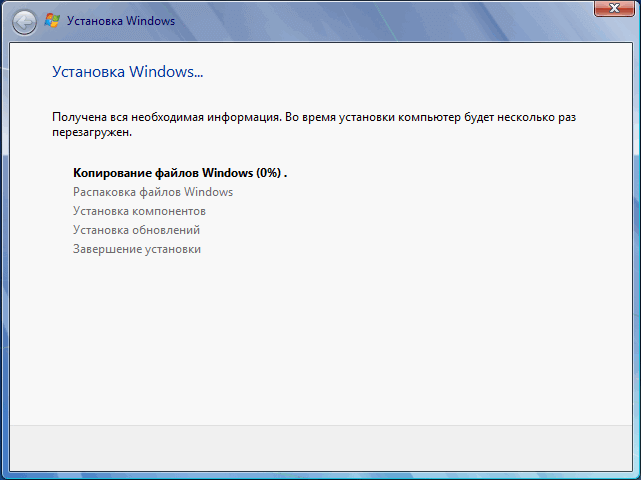
- Wait until the installation process is complete; on average, it will take between fifteen and twenty-five minutes, which may depend on the configuration of the laptop.

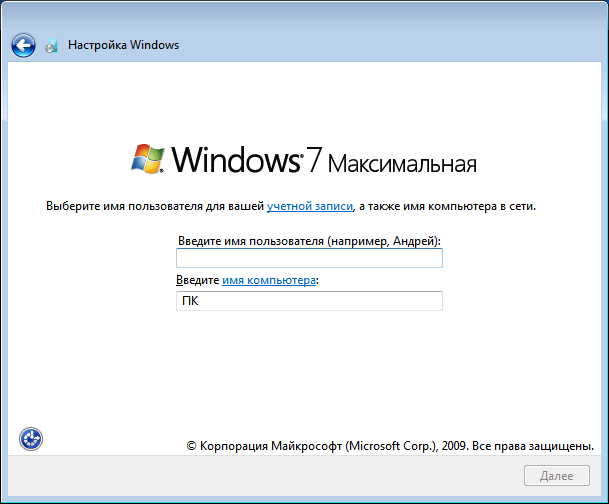
- Fill in the registered fields with the names of your account and PC.

- Protect your cloud account with a password and you can skip this whole thing.

- Enter the key, written off from the sticker on the laptop.

- Select security settings.

- Adjust the date and hour.

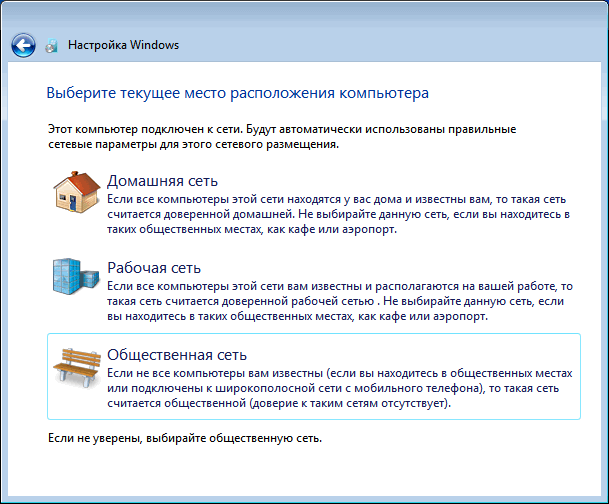
- If a connection is available, please indicate the connection type.

Windows has been reinstalled and is ready to go. If you change the storage priorities in the BIOS, put the hard drive first in the list, otherwise the computer will gradually start from the DVD.
Reinstalling from a flash drive
Many compact PCs, for example, have a DVD drive on netbooks. The answer is how to properly install Windows 7 on them. The answer is simple - avoid the worst wear.
To reinstall from a flash drive, you need to download the Windows 7 distribution image in ISO format and write it on this media using a special utility. Remember, in order to correctly reinstall Windows that holds a license, you need to install a container with the same OS version. The flash drive itself has a volume of at least a few gigabytes.
Record Windows on your nose using the most popular analogue utility Ultra ISO follows the next algorithm:

The installation flash drive is ready, but to start the installation, you need to select BIOS as the priority device to start the laptop USB-HDD" How to set up the BIOS is said above, all steps are similar, just select another entry from the explicit list. Further installations will not be affected by installing Windows 7 from DVD.
Often, after installation, Windows does not work. To solve the problem, select another OS distribution and repeat the installation process. In addition, many computer users ignore the need to format the partition and install the disk onto a disk that already has a copy of the system installed. Please be aware that this may also be the cause of problems.
Visnovok
This article covers reinstalling Windows 7 in a number of ways. If there is a daily backup copy, then this procedure should be carried out from the disk on which the same version of the OS is recorded. Some laptops do not have a CD-ROM, so reinstallation can only be done using external media, for example, from a flash drive.
Video on the topic
I can't help but wonder how to reinstall Windows 7 without a disk, flash drive or BIOS. When working on a computer, computer users are faced with the need to reinstall Windows 7 for any reason.
In some situations, the user has no choice: the operating system has malfunctions, it is necessary to reinstall it, and there is no possibility of working with standard methods. Let's look at possible situations in the report.
To install the operating system on your computer, use a disk drive or USB connector to insert an optical disk or USB flash drive containing Windows. To take advantage of these devices, you need to go into the BIOS settings.
Installing Windows 7 without a disk, flash drive or BIOS
Install Windows 7 from a DVD or a good flash drive. To select a new device, you need to go to the BIOS or the boot menu. If bad luck happens, it may become impossible for you to become victorious.
For example, the optical drive on the computer is broken or the disk drive is stuck on the device, which means we won’t be able to quickly download a DVD. How to install Windows 7 without a disk?
Nothing - a backup option: create a private flash drive. What if you don’t have a flash drive, but the system needs to be completely reinstalled? How to reinstall Windows 7 without a flash drive?
Some business owners know that it is difficult to enter the BIOS, so they do not understand that there is a lot of work to do in order to correctly select the required disk for running Windows.
This would seem to be a hopeless situation again. We will try to reinstall Windows 7 without a disk or flash drive from the desktop, without entering the BIOS.
In order for everything to work out for us, it is necessary to come up with the following thoughts:
- Windows 7 may be installed on your computer, so you need to reinstall it;
- We need an image of the Windows 7 operating system in order to reinstall the OS.
There are two ways to start the Windows installation:
- Unpack the system image in the “.ISO” format using an additional archiver, and then run the “Setup” file as an administrator.
- Converts Windows installation from a virtual drive.
In the first step, the Windows 7 disk image file will be unpacked into a folder on the desktop, and the user will start installing the system from this folder.
For another method, you need to install a special program on your computer - a virtual disk emulator, for example, the free Daemon Tool Lite program. The program creates a virtual drive on the PC, which the system treats as a primary physical CD/DVD/Blu-ray drive. Using the virtual disk drive, the operating system is installed.
Reinstalling Windows 7 without a disk or flash drive
In this article we will look at instructions for installing Windows directly from the operating system. We will be using the Daemon Tools Lite program as it needs to be installed on your computer first.
Before you begin installing Windows, save important data to a flash drive or external hard drive, so that when you reinstall the operating system, all files will be deleted into the Windows.old folder. Confirmed users can retrieve files from the old system without the folder being deleted from the computer.
To start the installation of Windows 7, right-click on the Windows 7 image, select “Seek Help”, and then “DAEMON Tools Lite Agent”.
The Windows 7 installation program window will open on your desktop. Click on the “Install” button.
In the window “Getting Important Updates,” you are encouraged to choose one of the options:
- Reconnect to the Internet to uninstall the remaining installation program updates (recommended).
- Do not ignore the remaining updates of the installation program.
We need to reinstall the operating system, and the update can be installed later. Therefore, you should choose another option, taking into account the need for the remaining updates, so as not to delay the installation process of Windows 7.

In the “I accept the consent of the license” checkbox, put a check mark next to the item “I accept the consent of the license”.

The “Select installation type” window has two options:
- Update - update the system on top of the previous installation with saved files, settings and programs.
- Fresh installation (additional parameters) – installation of a new system with deleted data from a recent copy of Windows.
We need to reinstall the operating system, so we select the new installation type.
In the “Select partition for installing Windows” window, the partition before which the system will be installed is selected. The system will be installed in the partition in which Windows was previously installed.

A window will open where you can select a section to contain files from a previous installation of Windows. This data will be transferred to the Windows.old folder, and you can deny access to files in this folder until it is deleted from your PC.
Wait, press the “OK” button.

The installation process of Windows 7 begins, during which time the computer will be restarted several times.
At the final stage of installation, you need to select the region, hour, penny units and keyboard layout.

Select the account owner's name for cloud registration.
Enter the password for the cloud account. If you are not validating your password, please leave all fields blank.

You can skip entering a Windows product key by activating the operating system at a later date.

Select parameters and update:
- Vikoristovat recommended parameters - installation of important and recommended updates.
- Install only the most important updates - install only security updates and other important updates.
- Solution documents - the docks are not updated.
Click the shortest option to update.

In the “Change the date and time settings” window, select various parameters that correspond to your settings.

In the window “Select more precise computer refurbishment” you need to select the parameters for moderate refurbishment:
- Home furniture - a computer is in the house.
- Working border - the computer is in work.
- Gromadska Merezha - the computer is located at the city center.
After completing the configuration of the parameters, a “clean” Windows 7 will be launched on the computer, with the previous system installed instead.

Visible Windows.old folder in Windows 7
The files from the previous version of Windows are lost on the computer under the folder Windows.old. They take up a lot of space on the system disk, so they need to be deleted.

We delete unnecessary files using the installed system option “Disk Cleanup”.
Follow these steps:
- Press on the Win + R keys.
- In the "Viconati" window, enter the command: "cleanmgr" (without paws), press the "Enter" key.
- The program evaluates where it can be located on the C: drive.

- In the “Disk Cleanup (C:)” window, click the “Clean up system files” button.

- The utility will re-estimate the size of disk space available for storage.
- In the window, put the box next to the “Windows advanced settings” item, and then click the “OK” button.

- Please wait in advance to ensure that these deleted files are not deleted.
- Make sure you are finished deleting data from your computer.
Open the C: drive in Explorer to reconnect so that the Windows.old folder is removed and the place occupied by the latest version of Windows 7 is restored.
Visnovki statistics
Since it is impossible to use the standard methods for installing the operating system on a PC, you may be unable to reinstall Windows 7 from the OS. In this case, the reinstallation will be done without installing a DVD or a backup flash drive with Windows, without entering the BIOS or the Boot Menu, from the desktop of your computer. After installing a new system, you must delete the files that were lost in the previous copy of Windows.
Reinstalling Windows 7 without a disk, flash drive or BIOS (video)
Do you need a clean installation or a clean reinstallation of Windows 7 with a new format of the hard drive, but you don’t know how to do it? Easily! We can tell everything in this article by the words and pictures.
Krok 1
In most cases, a clean installation of Windows 7 allows you to remove the original operating system and replace it with a fresh, completely new Windows 7 operating system.
In other words, this is a process of “erasing everything and starting from scratch,” getting rid of the confusion, viruses, bugs and problems that have accumulated over many years.

This article is about how to install Windows 7:
Do you want to delete everything you have and install a new, clean Windows 7
You want to reinstall Windows 7
Do you want to install Windows 7 on a new hard drive?
This 34-click guide describes in detail all the intricacies of a clean installation of Windows 7. Let's take a closer look...
Backup copy and search for product key
The most important thing you need to do before installing a clean installation of Windows 7 is to save all your important documents, music, movies, photos, etc.
You are also responsible for knowing the Windows 7 product key, a 25-digit alphanumeric code.
Start the Windows 7 installation process
Once you are absolutely sure that all the required data from the computer has been successfully saved and recorded on other media, proceed to the next deadline. Please be aware that once you have deleted all the information from this disk (as it will be saved in the future), it will be impossible to rotate the data!
Croc 2

To proceed with the clean installation process of Windows 7, you will need to restart your computer and download the DVD or USB device, depending on which device you are storing the Windows installation files on.
1. Insert the DVD or USB from Windows 7 into your computer and restart it.
2. You will immediately appear (in a small way) with notifications, press any button to start downloading CDs or DVDs.
3. Press the key to start your computer and download it from a Windows 7 DVD or USB drive. If you don't press the key, the computer will try to remove the connection from the next device as a connection. If you have installed an old operating system, then you will become more interested in it.
Note. It's obvious that you won't be able to press the key, but your current operating system will simply interfere - the reason is that your BIOS has not adjusted the settings from external storage devices. When you reboot your computer, press the F2 or Del key to reboot, go to the BIOS and in the “Advanced BIOS Features” section, go to the “Boot Sequence” item and put the CD/DVD disk in the “1st Boot Device”. (USB - flash)
Croc 03
Check out the Windows 7 installation file until you download it

Here we simply check the Windows 7 docks to complete the import of files during preparation before adjustment.
Note. No changes have been made to your computer at this time. Windows 7 easily downloads files that are necessary for the installation process. You will delete everything on your computer at the next stage.
Croc 04
Please wait until the Windows 7 installation program finishes installing

Once the Windows 7 installation files are loaded into memory, you will see the Windows 7 splash screen, which indicates that the installation process is about to begin.
At this stage you don't need to do anything.
Kroc 05
Select your language and other settings

Select the language to install, the hour format, as well as the keyboard layout for the settings you need to use in the new Windows 7.
Krok 06
Click the “Install now” button

Click the “Install now” button in the center of the screen under the Windows 7 logo.
Kroc 07
Check it out until it's time to install Windows 7

Krok 08
Get your Windows 7 license

The next screen appears with a text field to enter your Windows 7 software license.
Read the word, select Ensign I accept the consent of the licensed authority, and then click “Next” to confirm that you agree with the mind.
Kroc 09
Select installation type Windows 7

Click the “Settings” button (expanded).
Krok 10
Disk partitions for the new Windows 7

On this screen you will see a section that recognizes Windows 7. The clean installation transfers a list of all sections associated with the current operating system, as it is, let's see them.
Important: if you install Windows 7 on a new hard drive that does not contain the operating system, you can skip ahead to chapter 15!
In the next few steps, you will remove partitions to replace the operating system.
Krok 11
Visible section with explicit Windows

Important. First of all, remember that the selected partition permanently deletes all data from this disk - all programs, all music, all videos, all documents, etc. what was stored on this particular drive that you selected.
Go to the section you want to delete and click on the “View” checkbox.
Note. The list of sections may differ significantly from what is shown in the image. On my computer, I do a clean installation of Windows 7 on a 30 GB hard drive that previously had the old Windows 7 installed on it.
If these drives have multiple hard drives and/or multiple partitions, be careful to confirm that you are selecting the correct partition. For example, many people have two hard drives or separate them as backup drives.
Krok 12
Confirm the selected section

After selecting the section, Windows 7 installation prompts you to confirm the action.
Click the OK button.
Krok 13
View other sections related to the operating system

Windows 7 Clean Install – Croc 13.
If there are other sections that you need to delete, you can delete them.
For example, the Windows 7 installation previously installed on my computer created a special partition of 100 MB in size (even small) to save system data. Now this section is no longer needed, so I also see it.
Note. How can you bachit, divided, which we saw on the remaining croci, know. You may think that it is still waking up, but if you respectfully marvel, you will see that this space of 29.9 GB is now labeled “Non-divided space”, and not a section.
Krok 14
Confirm the types of additional sections

As of 12, the installation of Windows 7 prompts you to confirm the selected partition.
Click the “OK” button to confirm.
Important: as before, remember that all data saved on the disk will be lost.
Krok 15
Select physical installation for Windows 7 installation

Windows 7 Clean Install – Croc 15.
As you now see, the entire space on the installed hard disk is undistributed. There are no partitions on this computer.
Note. The number of partitions that are displayed, and those that are separated by unpartitioned parts of the hard drive, before the partitioned spaces or before the formatted and empty partitions that will lie before your specific system and sections that you have selected for the remaining amount of money.
If you install Windows 7 on a computer with one hard drive, on which you have deleted all partitions, your screen may look like the one shown above, except for the hard drive.
Select the appropriate non-partitioned space for installing Windows 7 and click the “Next” button.
Note. You don't need to manually create a new partition, and you don't need to manually format a new partition. Windows 7 will earn money automatically.
Krok 16
Check in while Windows 7 is installed

Now Windows 7 install a clean copy of Windows 7 in the selected location first. Now there is no need to do anything other than check.
On your computer, this process can take from 5 to 30 minutes.
Krok 17
Restore your computer

Now, if the Windows 7 clean installation process is complete, you need to restart your computer.
If you don't earn anything, the computer will automatically re-engage itself. You can also click the “Restart now” button.
Krok 18
Please check until Windows 7 continues installation

Installation of Windows 7 will continue after restarting.
You don't need to work for anything here. And a few more automatic installation steps for Windows 7.
Krok 19
Please check while the Windows 7 installation program updates the registry.

The Windows 7 installation program now updates the registry settings in preparation for the final stages of a clean installation of the operating system.
Krok 20
Check that Windows 7 docks start essential services

Make sure that Windows 7 docks to start a variety of necessary services.
This service will be launched whenever you use Windows 7, otherwise you won’t get any help. Services start in the background at the time Windows starts up.
Krok 21
Wait until Windows 7 installation is complete

Windows 7 Clean Install – Croc 21.
On this remaining Windows 7 “Installation Complete” screen, you may need some help. Everything you need to earn, just check it out - everything is automatic here.
Since the Windows 7 installation process is complete, why are we still on the 21st installment?
Other steps in this clean installation process include a number of simple but important configurations that need to be configured before you can install Windows 7.
Krok 22
Check until your computer is automatically re-enabled

Keep an eye out for Windows 7 to automatically restart your computer.
Important. Do not reset your computer manually. The Windows 7 installation program will reinstall your computer for you. If you interrupt the installation process by manually reinstalling it, the clean installation process may fail. Then you may need to start the Windows 7 installation again from scratch.
Krok 23
Check it out while Windows 7 gets excited

Windows 7 Clean Install - Krok 23.
Check it out while Windows 7 gets excited.
There is no need for a gift from a koristuvach here.
Krok 24
Stay tuned while Windows 7 prepares your computer for the first time. The Windows 7 program is now preparing the computer for the “first vikoristan”.
Windows 7 now checks drivers to make sure everything is configured correctly, and also deletes time files, etc.
You don't need to work for anything here.
Note. Remember that this clean installation of Windows 7 completely removed your old operating system. Windows 7 is installed and configured the same way as on a new computer.
Krok 25
Check out Windows 7 docks to check video performance on your PC

Windows 7 Clean Install – Croc 25.
Check the Windows 7 docks to check the video performance on your computer.
Windows 7 needs to know how well your video card performs and what it has to do with it, so that it can properly adjust the performance settings for your computer.
For example, since the video system works properly, Windows 7 can enable functions such as Aero Peek, similar to windows and other graphical functions of the operating system.
Krok 26
Select your account name and computer name

Windows 7 needs to know how you want to become a lawyer, and how your computer will be identified to the local network.
In the field "Enter the name of the customer" enter your name. You can enter one name, your name and nickname, or any other text that suits you.
Note. You can use the same names as you had on your old operating system.
In the “Enter computer name” field, enter the name that appears in the local network.
Note. It’s better to write names that are vikoristic and less English letters.
Note. If you need a number of users on your computer, don’t worry, you can adjust this parameter later.
Krok 27
Select a password to access Windows 7

Krok 28
Enter the Windows 7 product key

Windows 7 Clean Install – Croc 28.
If your old Windows 7 was a licensed copy, then take and enter the old key, if you do not have a key, uncheck the “Automatic” box, fill in the key field with an empty one and click “Next”.
You can activate activation / crack for Windows 7, you can use it to describe the entire sequence of actions.
Krok 29
Select Windows update option

Windows 7 Clean Install – Croc 29.
I recommend that you vibratily install important updates. This setting is secure because it does not allow Windows 7 to do anything with your data or on your computer, except for outages when important security and stability updates are available.
Note. These settings can be easily changed in Windows 7 later.
Krok 30
Select the correct time zone, date and hour
Windows 7 Clean Install – Croc 30.
On the “Check Time and Date” screen, select the correct time zone, “Date” and “Hour”.
The hour and date shown for everything are already correct, but be sure to invert the time zone and change it as needed.
Krok 31
Select the type of fence

Windows 7 Clean Install – Croc 31.
In the “Select the exact settings for your computer” window, as you download, Windows 7 will ask where your computer is located so that you can set up the correct security measures - more reliable protection for large areas and easier for private ones , such as budinki ta roboti.
Select “Home Measurement”, as it is your home computer.
Select “Gromadska Merezha” if you have a laptop and often access illegally accessible Wi-Fi networks.
Krok 32
Check until Windows 7 connects to the limit

Windows 7 Clean Install – Croc 32.
Windows 7 connects the computer to the limit.
You don't need to work for anything here. Everything is more automatic.
Krok 33
Check it out, Windows 7 docks are preparing your desktop

Windows 7 will now add all the finishing touches to a clean installation.
You don't need to work for anything here. All changes are saved automatically in the background.
Krok 34
Your clean Windows 7 is ready for robots!

This completes the final step of a clean installation of Windows 7. Let's go!
Read also our articles about choice:
—
—
—
—
If you need it, then you can attract it. And the activator for it is Art.
The installation is identical to the installation of Windows 7.
I love everyone again with my god!
Preparatory activities
Before you install a new OS from a flash drive or other device, you first need to talk about two important aspects.
First of all, here are the files you need. Reinstalling the “operation” will remove all files on your C drive. Therefore, you need to transfer everything either to another logical partition of the hard drive, or to a disc or a USB container. There are such directories as the desktop, my documents (plus all directory entries) and the folder “ Zavantazhennya" Don't hesitate to use whatever OS you like on Windows XP , what's on the newest versions.
Otherwise, you need to create a backup copy of the drivers. Otherwise, then you’ll have to prank them all over again, and you don’t need to waste time, right? You can benefit from a program like Double Driver. You can bewitch you by let's get it done.
Before the speech, there you will find Russian instructions that clearly describe how you need to work.
Place the saved drivers on another logical drive, for example, under Letter D or on a separate drive, so as not to download them via the Internet later.
This is practically everything that needs to be done before installing the operating system. I especially recommend that you rewrite your saved passwords for social networks and Wi-Fi, otherwise you will end up having to renew your passwords, which will be a waste of time.
Distribution entry


This stage is divided into two options. Either you install Windows 8, or a different version, from a flash drive, or from a blank. At any time, you will need a large nose with a size of at least 4 gigabytes. Then you need to install the distribution itself. It's best to use beta versions. It's legal and safe. I give it to you posilannya windows 10. Also, at the same time, you can find other distributions using the search engine.
Now let's take a look at the method of creating a flash drive. Download the UltraISO program zvidsi. Install it on whatever version of Windows you have, so you won’t have any problems during the installation process.
Open the software, click on the button Trial period" You will see the main interface of the program. Click on the tab " file", the list is embossed " open» and select the operating system distribution. Then insert the nose into the USB port. In the program, click the "" tab, then " burning a hard disk image" So, if you are going to install the OS from a flash drive, you choose it yourself. Press the button " formatbath" Once the process is complete, click on the word “ write down" That's it, you are no longer ready to complete the check. The flash drive is ready!
If you decided to install a disk from the disk, the process is exactly the same, but when choosing a drive, you select an empty disc that you can then place in the PC drive. If it is empty, there is no need to format anything, just go straight to recording.
Setting up the BIOS
This is an important aspect of the entire OS installation process. Your responsibilities are even more important because the BIOS is one of the most important software parts of your laptop. We will recognize the infection as through the bios to adjust the attraction of a changeable nose. For starters, you will re-engineer your car. As soon as the screen is closed, you need to press and press one key or a combination of them. There is a stench of carnage on your laptop, so I’ll give you a sign that you can use to orient yourself.


If everything is organized correctly, it is so easy to appear before you.


Select the tab " Boot", then go to the row under number 1, emboss " enter» And in the list, select the row that begins with the letters USB-HDD. This is because you are installing Windows from a flash drive. For discs, select the CD-DVD row. Next, press the F10 button. The laptop will be re-engineered and will start again during its replacement period.


Installed OS
If you have done everything correctly, a black screen will appear in front of you, with this message.


If you want to do otherwise, repeat the adjustment of the Bios, after all, you have not saved the results of your adjustments.
As everything goes like this, you have to press down on whatever key. You must show up like this in the end.


Where do you put the message instead of the message? . In other versions, the interface will be slightly different, but the principle of all operations is absolutely the same, so you won’t get confused. Check the box next to "Evil" I'll accept the favor» and click away. Select the new installation type, or not upgrade. This is much smarter. Having read a lot of articles from this drive, the contractors are encouraged to start installing from scratch.


A window will open to select a local disk. You click the mouse on the section where you previously had the operating system. Then you need to clean the surface. For which you select the button “ Format" This process can take up to 10 minutes to a year. Everything depends on how much space is on the local disk on which you install the OS and how many files are on the new one. After formatting, it will be completely clean. Press " Dali».
Now you can no longer check for the completion of all processes. It takes about an hour. Everything depends on the strength of your laptop and the speed of reading data. You can drink tea in this hour, but you won’t get anything special to work for now. The whole process is automated.


As soon as your computer is about to reboot, you will need to adjust the settings from the hard drive via bios. As soon as I have described everything, now in the row under the number 1 you enter the values with the HDD letters. Don't forget to save the button F10. The laptop is liable to become over-obsessed with the hard drive.
Completed installation and setup


This is the final stage. After rebooting, the system prompts you to enter the name of the accountant. Write to your heart’s content. Then you can set a password. Find out for yourself here. I use the computer alone and I don’t need any wine. Then you select security settings recommendations, set the date and time, set the time limit and enter Wi-Fi passwords.
To begin with, reinstall Double Driver and install the drivers from a previously purchased copy. Then you will restart your computer. It is your responsibility to check the system for updates. This is an important aspect, it is possible that new service packs have been released. I also recommend that you install anti-virus programs. Please come forward Avast, Panda Cloud Antivirus or else AVG AntiVirus FREE
Visnovok
That's it, you've learned to install the operating system yourself. Everything you need can be acquired via the Internet. There are many difficult processes that need to be followed to do everything according to instructions. At the very least, you can quickly watch numerical videos in which this process of readings is carried out. Axle is one of them
Golovne, don’t interrupt the installation process! Otherwise, you will have to start again. The worst option is that you can damage the software part of the computer!
After installation, you will notice the difference between the OS, which was previously filled with unnecessary files, and the latest version, which is not galvanizing. I'll give you one more listening pleasure. Save all necessary files on a different logical drive than the one where the system is located. It is best to let you get over the situation if, after formatting, the information can no longer be returned.
And on the OS section there will be drivers, browsers, archivers and antiviruses. They still have to be reinstalled after removing Windows. Don't let the stench get away immediately when formatting. Otherwise, you will have to uninstall them manually, which will take a long time.
This is where I say goodbye to you, my beloved readers. Share the post on the article with your friends on social media, as the information is useful and may be useful to everyone. Subscribe to the latest blog and always be the first to know about new releases and instructions! Until new zustrich!
If you still understand that installing an operating system is not a job for computer masters, you seriously regret it.
Having quickly downloaded this guide, you can install Windows 7, starting with a PC. Father, I’ll get ready first.
- Open up "My computer" And wonder in which section you have the system installed.
Remember its size and name, so that you can later know the required volume at the time of installation. - Next, download to a flash drive or another drive all the necessary drivers for your computer or laptop. Since there is no disk with drivers, they can be downloaded from the official website of the manufacturer. If you don’t create anything, you risk being left without the Internet after installing a new system.
- How to select the capacity of Windows 7 -? Press « Control panel -> System and security -> System»
If you have more than three gigabytes of RAM installed on your computer or laptop, you should definitely install the 64-bit version. In the meantime, x86 is recommended to be placed only on a weak or even old one in the yard of the 21st century, after all:). Please note, the drivers for the same device in them differ, in essence there are two different systems! - Download the installation ISO image of Windows 7:
What kind of image is this?
These are original MSDN images, imported from the official Microsoft website. One change – the ability to select the system edition is unlocked at the time of installation. No files are damaged, the system is not activated.
Other versions of Windows 7 images can be downloaded. - Prepare a flash drive with Windows 7. We will install the system from the flash drive itself, which is much easier. You can find similar instructions on how to make it.
- Since when installing a formatted disk from the installed system, all important files that are otherwise saved must first be copied to a separate storage device or to another partition of the hard disk. Remember that files on your desktop are also saved on the system disk. If you need stinks, it is obligatory to transfer them to another place. When formatting, all previously installed programs will be deleted and installed, but this does not mean that they also need to be copied onto flash drives and disks. It’s easier to install the programs again, just tell me about – photographs, documents, music, etc.
Create a USB flash drive. Next, insert them into the USB port and change the storage priority in the motherboard BIOS so that this flash drive is booted first. If difficulties arise at this stage - the axis of the report is instructions. If you have done everything correctly, changing the priority of preferences, after exiting the BIOS and rebooting the computer, the “Press any key” message will appear on the screen. Find out what you can - press any key to print the message from the installation.
You only need to press the key once and only at this stage of installation.
After pressing any key, you will be notified that Windows is encroaching on files.
System installation
Now, let's get started with the installation of Windows 7. Wait until the installation is completed, after which the installer start window will appear on the screen. Well, the most important thing is behind us!
- Choose a language, hour format and layout. Press "Dali".
- Click on the great button "Install", to run the installation wizard.
- Find out about the license and accept it.
- Select new installation (update will not work).
- After starting a fresh installation, the section selection screen appears. The installer window will have a number of sections: First Make reservations by the system (update files are saved). You need 100 MB and no need to download it. Otherє system - so that Windows files are saved. Next, make sure to install the new system. Third section - file. This is where customer data is saved so that any incomplete information is lost after reinstalling Windows.
There may be other options: for example, there is no system-reserved partition or there is no volume with backend files. In case of any emergency, you will need that section on which the previous system already stood - it is not for nothing that during preparation before installation, you will marvel at and remember its size.
If for any reason you still have one partition, the volume of which exceeds 250 GB, it is better to immediately divide the disk into two volumes: one for Windows and programs (approximately 50-100 GB), the other for special files. To do this, use the additional “Disk Setup” tool to delete the existing partition and create the first volume first (“Create” - indicate the obligation - “Freeze”), and then the other.The creations will be named Section 1, Section 2. It is not our fault to be deprived of undivided space - the system simply cannot accommodate it.
Well, you have at least two sections, one of which is for the operating system files. Since there are not only a few creations, but even earlier ones, then it needs to be formatted, having seen all the data. "Adjusting the disk", go to section and click "Formatuvati". When formatted, all files from the system partition will be deleted (then the values in the “Resize” and “Vilna” sections will become the same). The same thing was done to us. To run a clean installation, press "Dali", checking once again that you see the same section as you saw under the system.
- Chekaemo. After selecting a partition and starting the installation, the final screen will appear where you can begin the process of unpacking Windows 7 files and writing them to your hard drive. As long as you can guess, for 15-25 weeks you won’t get anything done. During this hour of installing a computer, you can re-engage yourself several times. After installation is complete, you will need to enter the following parameters for the robotic system.
- Enter Computer name Computer name The computer name is what your computer is called in the local network. I am a koristuvach. It is important to use Latin symbols instead of Russians, which will help eliminate problems with certain programs in the future.
- Behind the scenes, you can set the administrator password, but this is not necessary. If you want to set a password, you will need to enter it every time you start your computer or laptop. We will leave the field empty for now; you can “password” the cloud record later.
- Enter the activation key if you have entered it. If there is no key, remove the icon "Automatically activate" and skip the croque by pressing "Dali".
- Indicate how Windows is configured - simply select the recommended settings; if you recognize a new system, configure it in your own way. - here you need to remember the priority of storage by placing the hard drive first.
- Turn on automatic system updates and check for the process to complete. Most drivers will be installed with security updates. If you don’t have Internet access, you can quickly use the program to install drivers .
Respect!
Note: select the version of Windows in which you receive the activation key (which you enter at the final stage of installation). If there is no key, please read the instructions after installation.
The instructions were very helpful, but now you know the main nuances when installing Windows 7 and can easily do it yourself. Carefully follow these recommendations and the installation will be successful.