Routery
The entire process of cob production is carried out by the installation master.
If you become a raptor, you just need to re-adjust it, so it’s even easier to do it.
Nowadays, you can adjust the required parameters absolutely cost-free, without having to call a repair team.
You can set the modem parameters for Rostelecom in two ways:
1. The simplest.
The installation disc will come with the router. There is a file on it that is automatically launched whenever the disk becomes full. By finishing the inscriptions, where the writings there are very clear, the adjustments are getting smoother.
One minus is that other programs are installed on the computer at once via the modem, which are simply used to detect space, and no one uses them. 2. Another method is independent, manually, through. Let's take a look at the report.
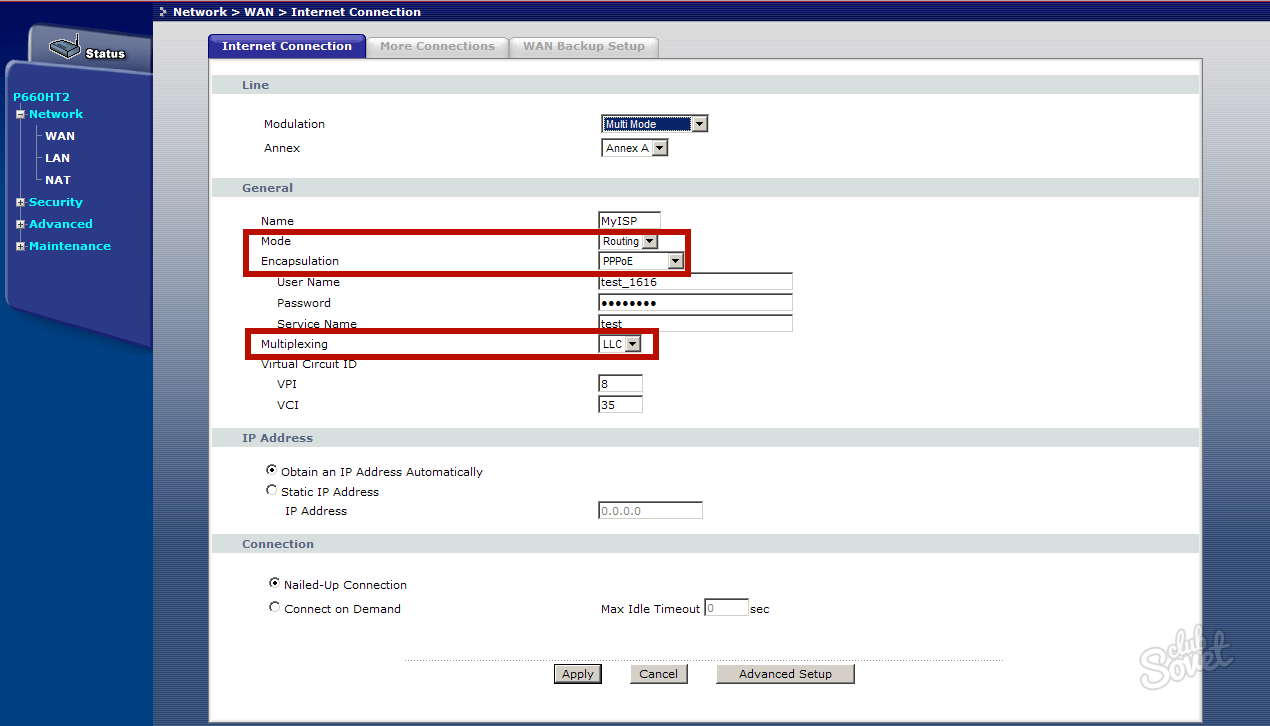
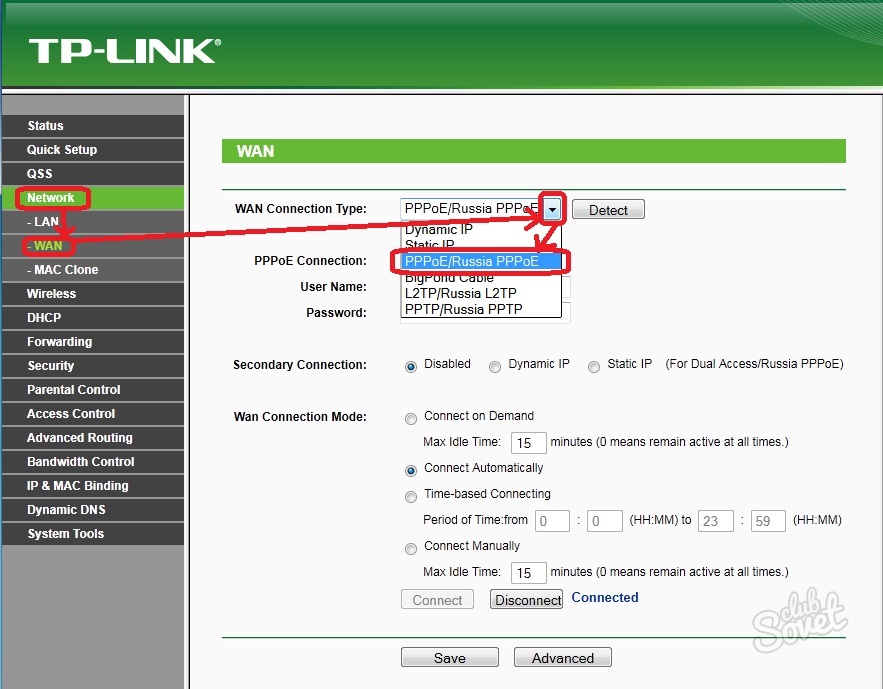
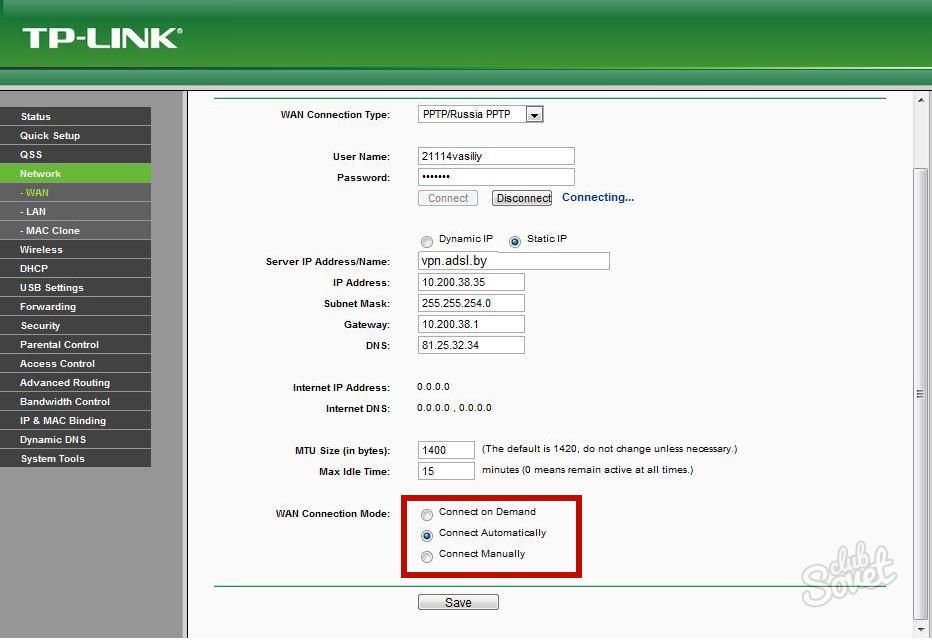
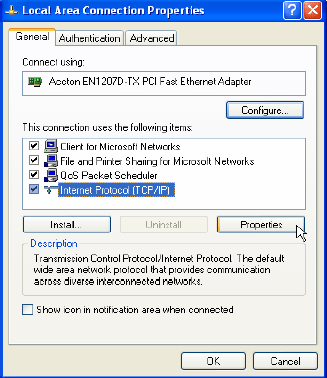
In order to set up the router, you need to pick up the agreement and specify the login and password information. Then go to your browser and open the page located at the address 192.168.1.1. Password and login are saved – admin. In the main menu we know Merezha – connection.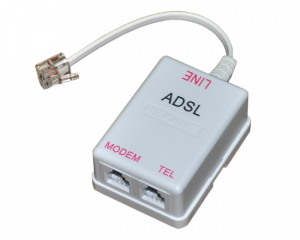
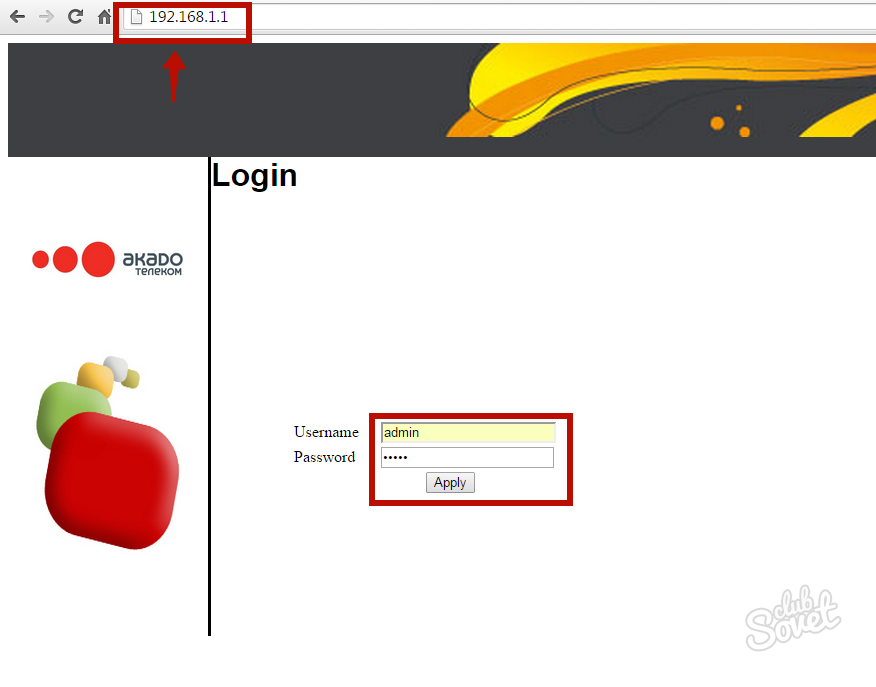
Enter your login and password and press Enter. You went into setting up the modem. Note: If for some reason you don’t have the sticker with your login password, don’t get embarrassed.Changes are requested from the web interface of the modem. By turning the modem over, you can change its IP address, as well as login and password for logging in. Enter the IP in the address bar of the browser and press Enter. By turning the modem over, you can change its IP address, as well as login and password for logging in. For most models, the IP address is 192.168.1.1. 1234 For most models, the IP address is 192.168.1.1. For other modems, the address is 192.168.0.1..

- In some cases, you may have to remove the old interface and create a new one.
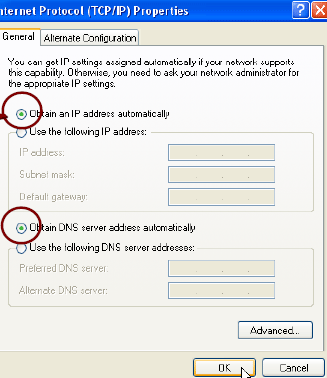
- Enter your login, agreement details, and password to access the event, disable automatic Internet connection and save changes by clicking on “Save” or “Apply”.
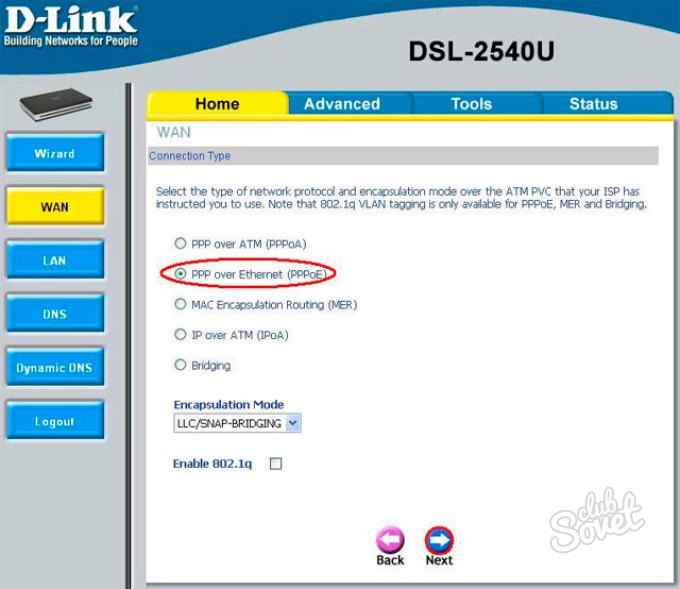
- D-Link modem
The connections to the interface can be removed in the settings of the modem using the “Remove” button.
You can also add and set up a new connection with your provider to access IPTV, VoIP and other options.
When setting up any routers, it is necessary to additionally specify a standard connection gateway - the PPPoE interface. first version, updated Uvaga, tse stara statya 2007 roku. From that hour they changed Windows versions , assortment of ADSL modems, steel modern computers (for example, merzheva map
once again I was forced into
motherboard
), do not run websites with firmware. But the basic aspects, of course, have not changed. Notes:
* Might as well, you’ll have some korisna or something.
a) The article is written for those who want to independently connect to ADSL, saving money on customized and installed software, without being in
dosvidchenym koristuvach chi fakhіvtsem. If you listen to Cisco on dark autumn evenings, then there is nothing to worry about here.
b) None of the terms and concepts pretend to be scientific, accurate, or correct in their formulation, but they have been carefully created so as not to fascinate the reader’s mind with rich historical periods and other nonsense.
I wrote this article for friends and acquaintances who ask to “set up ADSL” - so as not to explain it again, but simply to date the message.
c) To unprepared practitioners: you read but don’t understand anything?
Skip straight to the practical part.
e) Author
does not bear any responsibility for possible harm, subject to this article
.
If it’s not right, don’t read it.
If you have any doubts, call a technically competent operator or install and configure the software from the operator.
I have done my best to ensure that everything goes smoothly and simply for you.
Theoretical part:
1) What is ADSL?
2) AnnexA and AnnexB
3) USB chi LAN?
4) Router chi bridge?
5) Vimogi to the line
6) What driver is required for the ADSL modem?
7) How to connect two or more computers to ADSL?
Practical part: 5) Purchase of equipment 6) Connectivity 7) Setting up the modem in bridge mode (on the Acorp LAN 120 application) 8) Setting up a connection with the provider
9) Traffic flow
If the apartment has an alarm system, connecting to ADSL via AnnexA may be difficult. Ale for the availability of PBX AnnexB ports to connect you without problems. You can be connected to AnnexB if you don’t have a home alarm system or not.
For example, AnnexA is already occupied, and AnnexB is free. There is a potential for the future to switch from AnnexB to AnnexA and, as a result, technical feasibility
on the PBX).
The modem can operate in two modes: bridge or router. The first time you click, for example, on the shortcut on your desktop, you will connect to the network in the same way as you did before when connecting via a local modem (not ADSL). This connection method is described in this article.
This is for beginners and even basic home users who only have one computer at a time.
In another way, the modem connects to the network itself, in which the connection command is issued from the modem web control panel and is connected there. It is easy to organize the connection of up to several computers (you should buy a modem with additional LAN connectors, for example Acorp Sprinter@ADSL Lan 420, which has several such sockets, and this model does not have USB interface
).
Also, the router mode is dark in many other situations, which are described beyond the boundaries of this article.
Vimogi to the line
The simplest way is to buy a modem with additional LAN connectors, for example, the Acorp LAN 420 with a multiple-port switch, in which the modem can install multiple cables and provide Internet access to a number of machines.
Another option is to add a switch to the modem, configure the modem in router mode, in which it will act as a gateway/router via NAT; details of such a connection can be found on the Internet.
Practical part
Purchase of ownership
We need three devices: an ADSL modem, a junction card, and a splitter (possibly more than one). First of all, you need to select the model of the modem that is connected to the ADSL operator. Call Bazhano
technical support
and clarify everything.
Some operators, upon completion of the contract, provide a booklet about the most suitable modems.
The splitter is included with all modems.
Let’s assume that you have more or less standard wiring and you only need one splitter.
When purchasing a modem, please check what is included in the package.
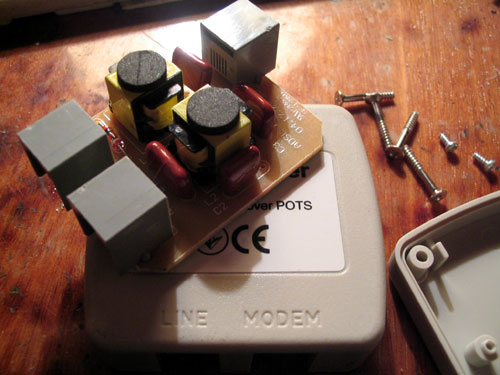
The splitter can be connected to D-Link and Zyxel modems. And the axis at the end of the Acorp splitter can be out of sight..
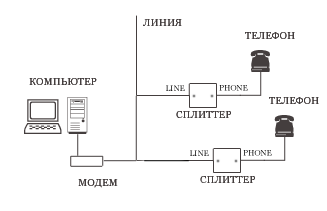
(The diagram shows three different, but essentially the same - modem connections to the line without the middle. If you install it in the “Modem” socket of the splitter, you will achieve exactly the same effect - this socket is in the middle The ter is shorted directly to the “Line” socket "). Why bother if the telephones are separated by the apartment? Buy another splitter or microfilter (splitter without a “Modem” socket). Then connect your phone through your individual splitter. Do not confuse the “Modem” and “Phone” sockets, as it is primitive, but it is very common. Next, we'll move on to installing the hemline card. You will need a twister. Shut down the computer. Turn it on again by unplugging the plug from the socket.

Open the system unit (the design of the cases is different, sometimes it is necessary to remove the casing by unscrewing screws from the rear side of the system unit, and sometimes you need to unscrew two screws and break one of the walls back). Find a free one PCI slot
(usually white color(It’s similar to a telephone line, but the roses are a little wider), one end is connected to the edge card socket behind the system unit, and the other to the modem.

In Acorp LAN 120 this socket is called LAN.
Now connect the modem to the telephone socket or the “Modem” socket of the splitter using an additional standard telephone cable (which is called an “ADSL cable” in the instructions for the modem) - included in the package for the modem.
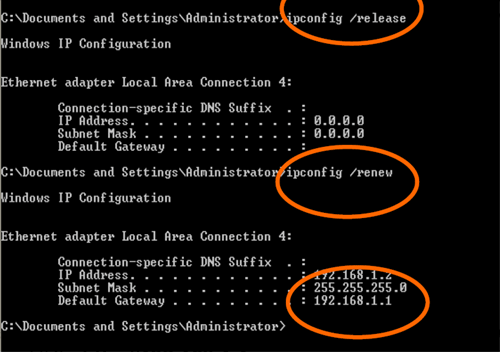
There is no need for landline phones, faxes, analog dial-up modems, and other devices to be connected to the telephone socket directly to the line via a splitter! Remember the rule: you can connect an ADSL modem directly to the line, everything else cannot be done except through a splitter. Next, we remove the modem’s life block, one end is at the Power socket on the modem, the other is in the power supply. Two lights will light up: PWR and LAN. Everything is fine. Before speaking, now the monitors will show us (by moving the mouse cursor) that a 100 megabit speed connection has been installed. Ownership connection is completed. Now we need to get everything straightened out.
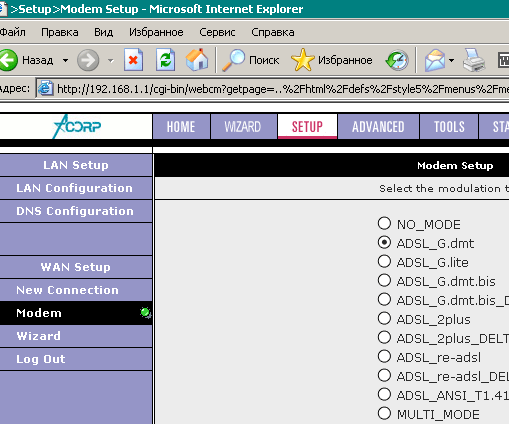
Setting up the modem in bridge mode (on the Acorp LAN 120 (420) application The modem is set to bridge mode. Note: on the website beta.acorp.ru ( V present moment
the site is not working
) vykladenі vіzardi (mistry pіdklyuchen), which will help you set up the modem and connection with the network in automatic mode. The program supplies a few necessary supplies and sets everything up on its own. It’s better not to rely on a program for dummies, but to master everything yourself. Tim more, this article was written for the uninformed koristuvach..
And the bosses can also let you down.
We will first complete the instructions included in the manual. "Start" - ", Firefox, Opera), type 192.168.1.1 in the address bar.
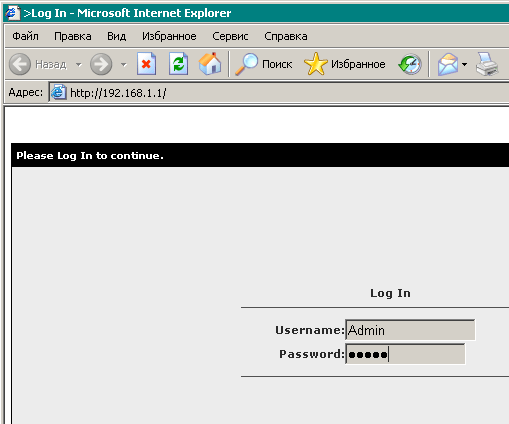
For Username and Password, enter the word Admin (the first letter for Akorpa may be large, but for other modems it will be small).
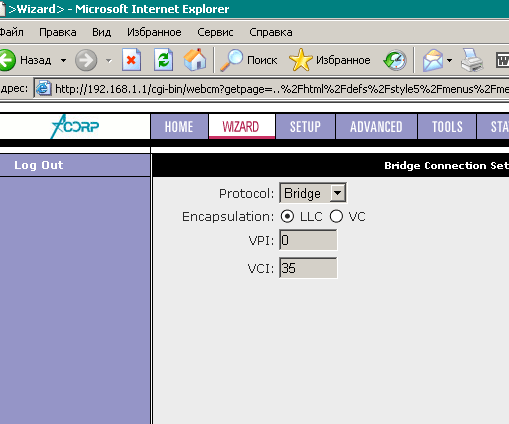
Click the Log In button at the bottom right corner. After that we will go to the web interface for managing the modem. At the top menu, find the WIZARD item and go there.
In the top row of Protocol, select Bridge.
Appear like this:
Your ADSL operator is responsible for providing you with the Encapsulation, VPI and VCI values under the contract.
If something has gone wrong, call technical support. For skin operators, the values vary. If you set it incorrectly, the Internet will not work or work unstable.
At the bottom right corner, click the “Next” button, and then Save/Restart.
Now we are ready to connect, for help you connect to the Internet. Let me guess, you already have a computer (margin card) connected to a modem. Now you need to connect the modem to the Internet.
If you have Windows XP, you do not need to install additional software. If you have Windows 2000, you need to be careful additional package
WinPoET and enter your username and password for this program. Let’s take a look at the setup method for Windows XP."Start" -> "Settings" -> "Control Panel" -> "Merge connections".
Right-click on the "Create a new connection" menu -> "Next" button -> "Connect to the Internet" checkbox -> "Next" button -> "Set up connections manually" checkbox -> "Next" button -> "Via" checkbox high-speed connection, ask for the user's name and password" -> Enter a sufficient name for the connection - > "Next" button -> Enter the user's name and password (password for two places), withdrawn from the ADSL operator before the time of the agreement - > "Next" button " -> checkbox "Add connection shortcut to desktop" -> "Done" button.
That's all, using this shortcut you connect to the Internet.
With the third one highlighting the connection icon, select the connection (“Start” -> “Settings” -> “Control Panel” -> “Metered Connections” -> name of your connection ->
rights button
Click on the icon - "Power" -> check the box "When connected, display the icon in the notification area" -> "OK" button).
This way you can use a modem card to connect.
If you try to connect to the Internet, you will see a message, check that the connection card is connected to the modem.?
Anyway, activate “Start” -> “Settings” - “Merezhevi connections” - name of connection.
And don't get confused.
How to set up Internet adsl for Rostelecom? This food is for everyone who intends to independently figure out how to set up the Rostelecom adsl modem. For whom it is necessary to follow
step-by-step instructions
, which will be presented below.
What is adsl? First of all, let’s start by looking at it. Before setting up the Rostelecom adsl modem, it is important to understand what this Internet technology is. Otje,
adsl technology
є asynchronous data transfer, which is characterized by the speed of reception, which outweighs the speed of output.
- It is possible to install calls from video, mail and IP telephony. To prevent the phone line from being blocked when you are using the Internet, install a splitter equipped with one input and two outputs. These sockets are valid for different cables; as a result, the frequency crossover is turned off.
- How to configure the Rostelecom adsl modem? Rostelecom-adsl, which is designed for simplicity and ease of use, provides two options for independent Internet connection: Via the Web interface To get connected with adsl-Rostelecom for help this method, you must provide your mother with the computer and also provide information about your login and password.
For additional disk assistance Requested by Rostelecom
adjusting adsl
- , you can also install it behind the help of a special
- installation disk
- , which is included with any modems.
Rostelecom: setting up an adsl modem using an additional Web interface
Currently, Rostelecom offers three universal modems that support adsl connections:
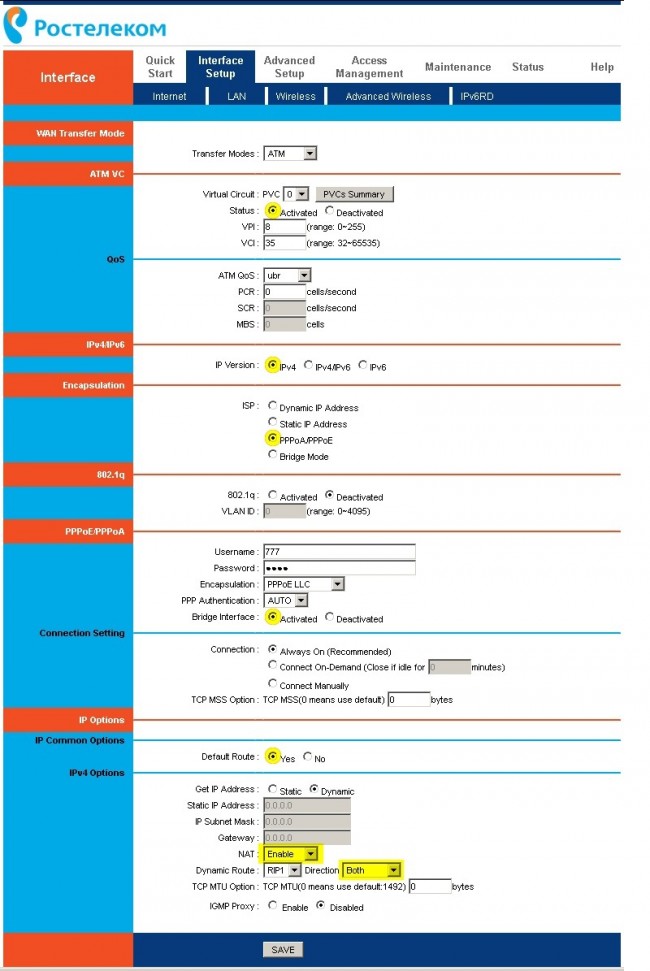
D-link DSL-2640U;
Sagecom F@st 2804 v7;
Qtech RT-A1W4L1USBN. Rostelecom looks at adsl setup on the most popular RT-A1W4L1USBN modem: 1. Internet setup:
2. Setting up Wi-Fi: