Golovna
It’s clear that you can easily work without installing additional programs, for which you just need to know the algorithm. Let's figure out how to implement wifi distribution from a laptop, just one command line
.
Obviously, this method is not the only one, as the author himself says.
Windows 7 and newer OS (8, 10) plan to demonstrate great flexibility.
Clients connected to the point created in this way will automatically cancel the DHCP configuration and the device will be ready for work.
The maximum possible number of device connections is 100, and the bandwidth of the communication channel (WiFi) created on my laptop is 74MB.
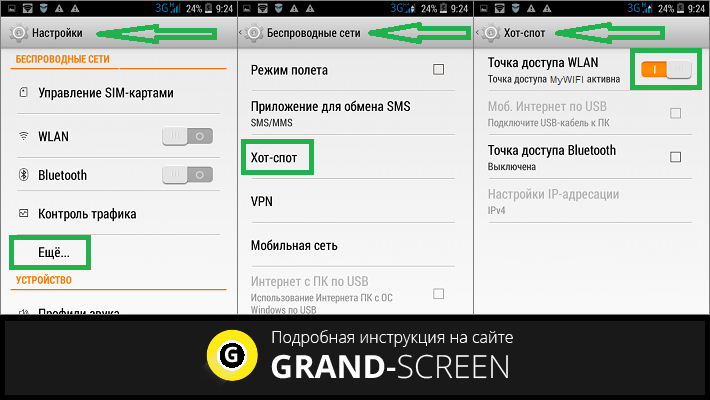
1. Open the border management center:
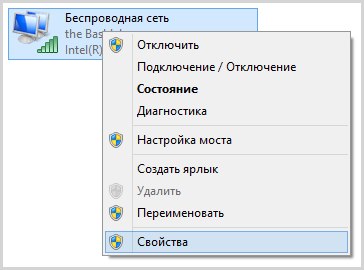
On the keyboard Win + R (press on these two buttons)
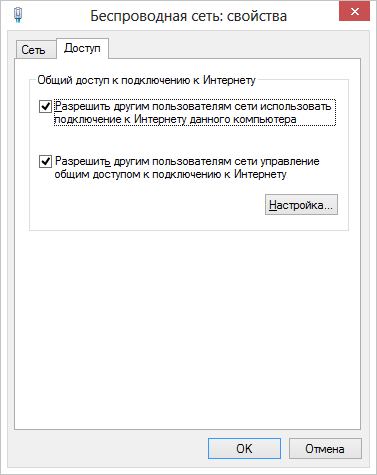
2. It is permissible for others to use your Internet channel:
Then we select other connections
Let's tick a couple of boxes
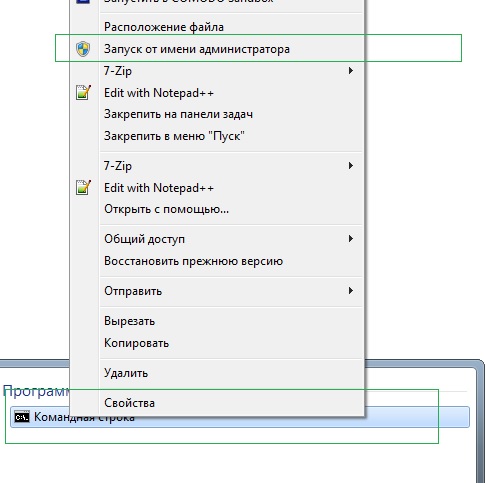
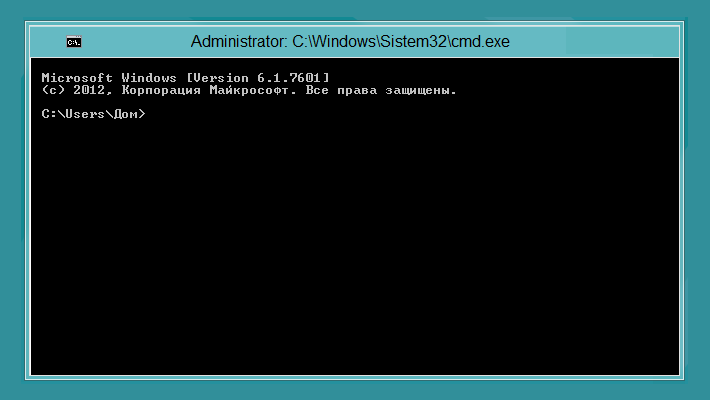
3. Open the command row (it is important to open it as the system administrator):
Open “Start” and write in the search box: “command row”
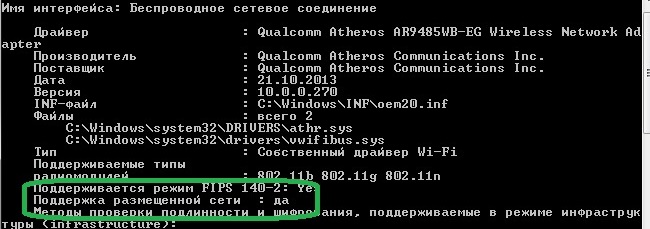
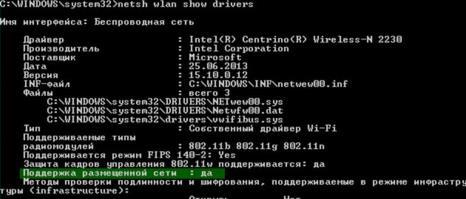
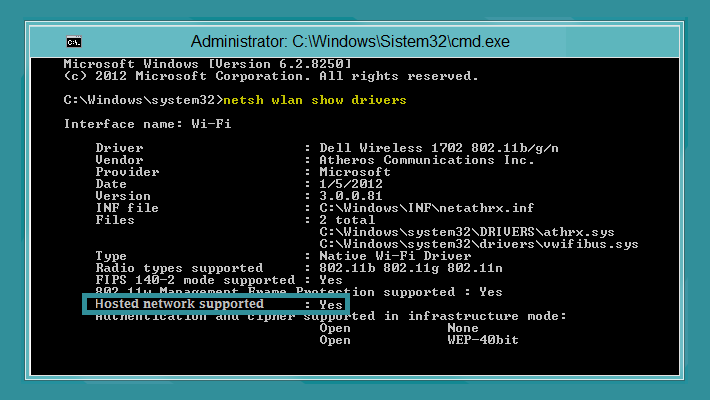
4. Let’s check whether the adapter is installed on the laptop and the operating mode we need:
If you are reading about those that you cannot support, try updating your drivers.
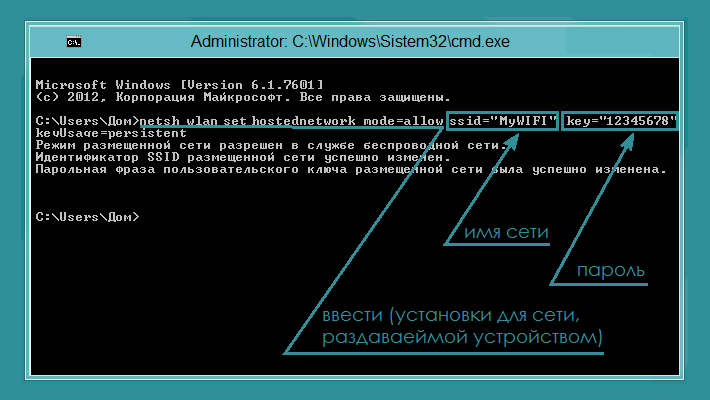
5. Specify the name of the network and enter the password before it (the SSID and Key values can be changed):
netsh wlan set hostednetwork mode=allow ssid=netlab-kursk key=qwerty12
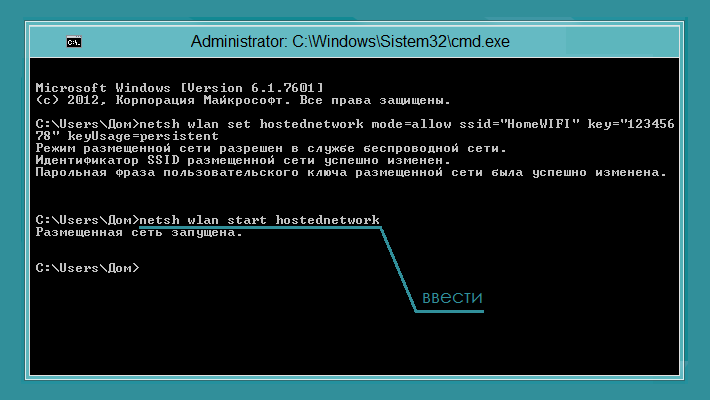
6. Let's start distributing wifi from a laptop
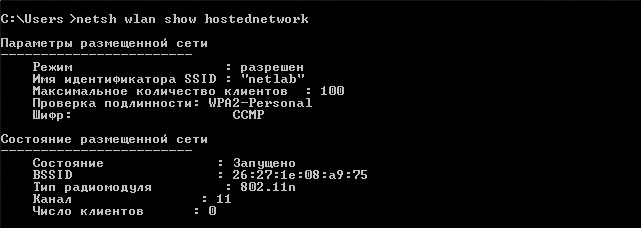
netsh wlan start hostednetwork 7. To view information about your access point, enter the command: netsh wlan show hostednetwork
As can be seen in the screenshot, the client can view the name of the access point, the number of clients, the status of the robot, as well as the channel
dartless link
on whom does he work?
8. In order to complete the distribution, you need to enter the command:
netsh wlan stop hostednetwork The only downside is that all changes made after rebooting the system will be displayed. However, distributing WiFi from a laptop is less necessary only in special situations, as this method is less power-intensive. However, I can’t help but be aware of the fact that no one will want to enter all these commands every time..
More specifically, we will talk about the distribution of Wi-Fi from a laptop equipped with a built-in drone-free monitoring module. About those how to earn money for graphic help Windows interface written chimalo. Tim, who is in the team row, melodiously suits our descriptions of the methods.
Before you start entering instructions into the command line, you will need to do the following: The preparatory stage of our work can be completed, now other computers mobile devices potentially ready to accept WiFi signal
from a laptop.
Ale tse is far from all.
Having “shared” access, it is necessary to configure it correctly in order to distribute the laptop’s network resource to other devices.
- For whose sake we are in the command row.
- Let's get started with the console
To start the console you need to speed up one of the two methods below: Press the key combination "Win" + "X". In this case, you may end up setting up rights, where you will need to indicate your login as the system administrator.
The console shortcut is easily visible in the Start menu. Launching as an administrator can be done from the context menu of the shortcut with the same name. You will be required to show us your requests before entering commands.
 How can I distribute WiFi for this additional help?
Obviously, you need to enter instructions into the command line to activate other functions of the drone-free range.
The system told us what barriers it had created.
How to distribute Wi-Fi to other devices? For this purpose the start command is assigned, which must be entered without parameters: “netsh wlan start hostednetwork”. If everything is assembled correctly, the system will notify you about it with the phrase “The placement of the fence has been started”:
In principle, this is completely sufficient for our purposes.
You can now immediately connect to the Wi-Fi of the laptop that is distributing it and look at the web pages.
Ale can’t help but guess about another one
- cortical functions : the ability to view current subscriber connections and statistics of such connections. Try this command "netsh wlan show hostednetwork". The result will be similar to those of the images on the baby. Most often, homeowners have a need to secure a number of gadgets around the world.
- However, for the addition of special equipment, a song is needed. There are also other methods. This material is familiar to readers of our blog on how to distribute WiFi from a laptop to Android tablets or smartphones.
- You can share the Internet from a laptop on an Android device in a number of ways, which we’ll talk about right now.
In order to ensure the distribution of wifi from a laptop running Windows OS to Android (or any other device), you have to do a lot of brainwashing, and it’s not dependent on which method will give you the advantage.
The laptop has a lot of equipment
Wi-Fi adapter
ohm

desktop computer
, then you definitely need to detect the external signal from the connections to the USB/PCI connector).
The Wi-Fi adapter requires a driver to be installed that supports Virtual WiFi.
Yakshcho
Now enter the name of the network (enough), create a password and put a tick in the “Save settings for this network” row so as not to enter a password during the hour of personal connection:
That's all, you can now share the Internet from your laptop (or computer) by connecting an Android device.
For additional help from the team row
You first need to check whether it is possible, in principle, to distribute from your PC. To do this, press the button on the laptop in the lower left corner of the display. Start "that is entered into a row by search"»:
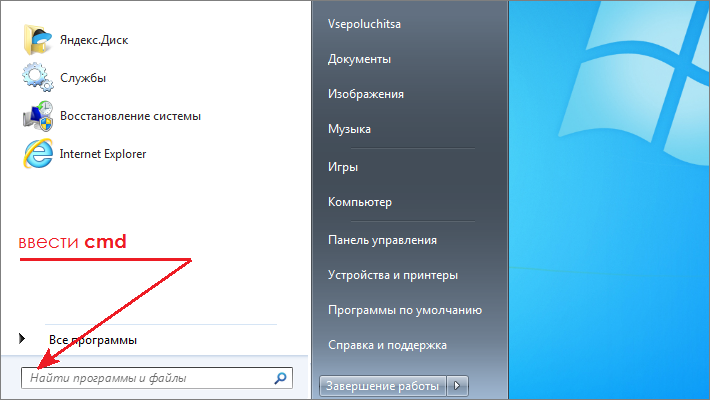
cmd
After the system recognizes the program, the following command line is displayed: Now we need to send the command " netsh wlan show drivers "(without paws). After which information will appear in which order you will find Hosted Network opposite it there is written “ Yes»: « "(To tune in the Russian language: "»):
Support for placed hemlines So=Now, since our laptop supports distribution, we return to the command line and enter settings for the range that is distributed by the device:=» netsh wlan set hostednetwork mode allow ssid 12345678 MyWIFI "key="“. netsh wlan set hostednetwork mode De ssid- There is a limit, it is set quite (in the screenshot 12345678 «):
), A

key
- password, also quite clearly indicated (in the screenshot “
Now it’s no longer possible to fix our carefully constructed boundary.
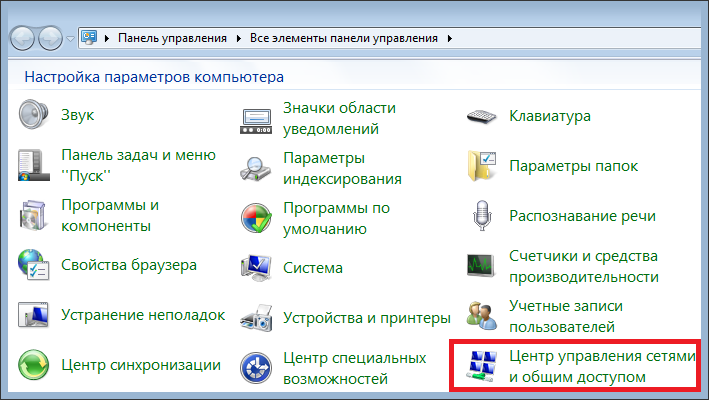
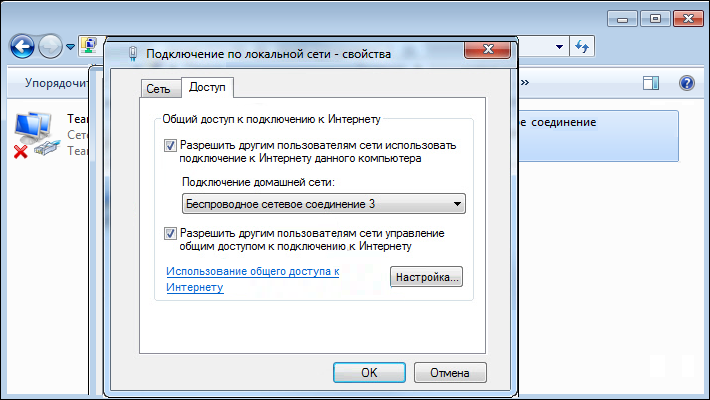
- For this, we follow the path described above: “Start” - “Control Panel” - “Network Control Center”, on the left side we finally find “Change adapter settings”, open it, find your network, click on it with the right mouse button and, at the window, sho vipav.
activated by “Vlastivosti”: In the new window, on the top panel, click on the “Access” tab and, by checking the box, allows other users to connect to the Internet from their PC. In the field shaded lower, select your border and press “OK”:
- Now we can connect our Android device via Wi-Fi to the Internet connected to the laptop.
Possible problems:
The smartphone does not connect until the network is created
For this you do not need to enter a password or a password, you just need to enter the command. 5. Specify the name of the network and enter the password before it (the SSID and Key values can be changed):
How to open the access point on a smartphone
However, since one of the described methods gave a positive result, we lost access to Wi-Fi on Android.
Trying to do it is simple: *On your device, items may have different names, for example: “» — « Setting up» — « More» — « Modem mode».
Wi-Fi hotspot
Distribution of wifi from a laptop for additional third-party software
If you do not fit the described options, you can easily and simply remove the baskets by installing one of the add-ons.
Let me tell you about the Connectify program, which allows you to distribute the Internet without much effort. You can download Connectify from the official website of the distributor, where you can learn more about the functionality and capabilities of the program. Well, briefly introducing the program, I’ll say what’s special about it
programmatically will ensure distribution to the Internet without the help of a router (router), which means, as a distribution device, a Wi-Fi adapter inserted into the motherboard. The program is expanding on a paid and free basis. The cost-free version provides a customized function WiFi distribution .).
After the attraction of Connectify, we will need to use licensed property.
- « Then, having checked the installation is complete, we restart the system (button Reboot now After restarting, a similar icon will appear on the desktop, open the program, go to the section “ Settings
- « "(Parameter). Here we need to make three points where we need to enter the following data:
- « Hotspot Name» - I have boundaries, in
catless version The ones you see in the screenshot are available. Password » - Password, which must be at least eight characters. Internet to Share
"- here, by pressing the button, we select from the list of active connections that we will vikorize
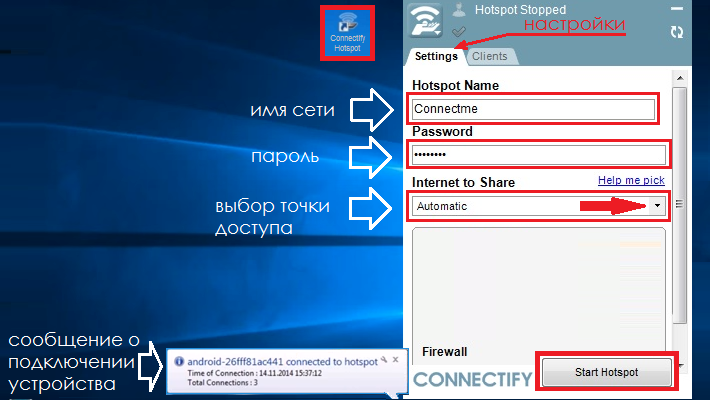
The axis and all settings lost pressing the button "
Start Hotspot » and start the distribution process. through USB cable, but it’s not the simplest procedure.
More precisely, the Internet has become accessible not to all programs. If the fragments were obviously a laptop with Windows 7/8, to distribute the Internet via Wi-Fi (Wi-Fi), you had to run a simple command. If you want to distribute Wi-Fi from a laptop, you can quickly use cost-free programs. Since you don’t have a router, it’s very easy to distribute the Internet via Wi-Fi. Windows 7, 8, 8.1 support this function, wanting manual care on your own
operating system
- There are no Windows.
- They can come to help
- Virtual program Router, Virtual Router 2, Connectify, Marify. Having tried all the knowledge programs, if you need to share ADSL Internet with Rostelecom (Disel).
by installing Microsoft Virtual Router For happiness, good decision Wi-Fi distribution
From a laptop with Windows 7, 8, 8.1 you know. No additional information software security Windows 7, 8, 8.1 were not needed for this. How to distribute the Internet via Wi-Fi (Wi-Fi) from a laptop running Windows (Windows) 7, 8, 8.1 in standard ways the operating system itself The solution, of course, is not ideal. If you restart your computer or send it to sleep, your wireless Wi-Fi connection will be turned on.
It’s easy to turn on your computer by running the same
batch file with administrator rights. Tse no-cost decision you can do it if you have the day at hand
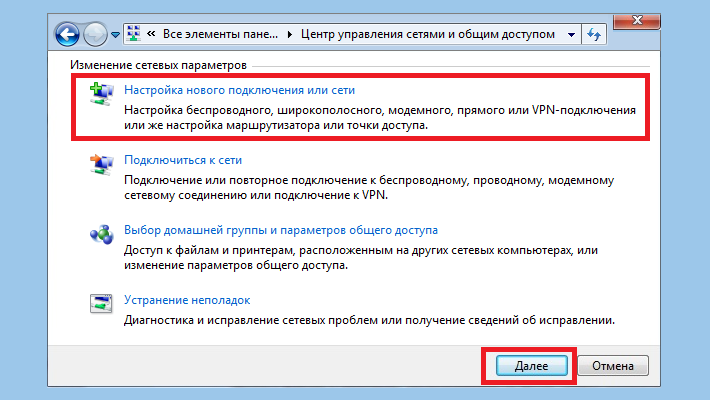
- Wi-Fi router , and also a laptop with Windows (Windows) 7, 8, 8.1. Aje installed zayvikh program It deprives the system of its operation, as stench is constantly present in the background. How to distribute the Internet via Wi-Fi (Wi-Fi) from a laptop with Windows (Windows) 7 using the operating system with the help of Master for setting up a new connection or network With Windows 7 everything was much easier.
- Click on the message “Set up a new connection” in the “Change” section edge parameters". Launch the "Connection and Network Installation Wizard".
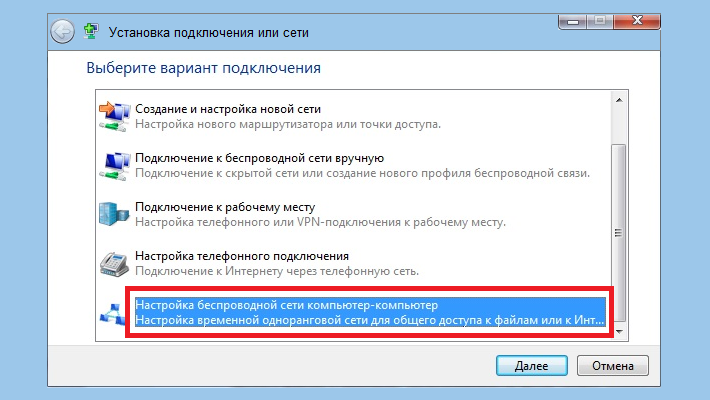
- Select “Setting up a drone-free computer-to-computer interface” and click the “Next” button.
- The dialog box “Adjusting the drone-less computer-to-computer network” will appear.
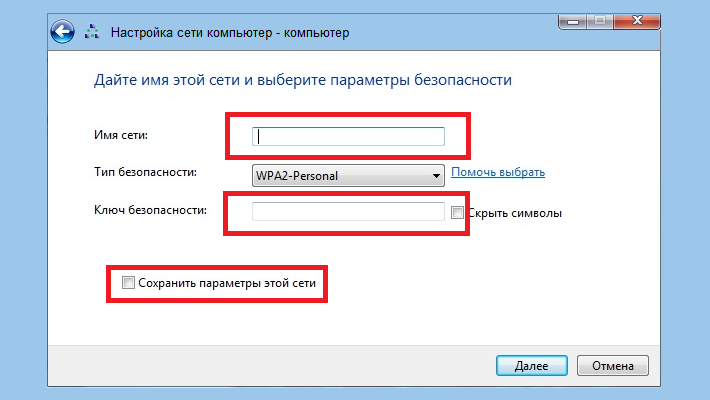
- In security settings, enter the Wi-Fi network name (SSID) and Wi-Fi password (security key). The security type is better than choosing WPA2-Personal, as it suits your dartless attachments
- . Check the box "Save the settings of this map" and click the "Next" button. Please contact us to inform you that Wi-Fi network ready to go, appear on the list
- dartless measure
- And lose the active one, and you won’t be able to absorb all the benefits. To share the Internet from your computer, you need to click on the “Increase shared access to the Internet” item in this dialog box. After setting up, the message “All access to the Internet has been disabled” will appear. Now you can close the dialog box by clicking the “Close” button. If you want, you can get more from the measure
- border folders printers, otherwise you need to go to the "Internet and Access Control Center", select "Change Additional parameters