Before you start configuring the distribution of the Internet from a laptop / computer, you need to make sure that the Wi-Fi adapter is turned on. On most laptops, the WLAN adapter activity indicator is present on the case, otherwise you should enable the adapter in the Network and Sharing Center.
Set up the distribution of the Internet using a wireless Wi-Fi network on a computer / laptop.
One of the ways to organize the distribution of the Internet over Wi-Fi is to create a Wi-Fi network computer-computer windows tools (Don't rush to do it !!!). I will immediately explain this method has a small drawback, the fact is that you will not connect an Android tablet to such a network or iPhone smartphone, just another computer / laptop with the Windows operating system installed. This is due to the fact that you create a point in Ad-hoc mode (also called: point-to-point, computer-to-computer, peer-to-peer network) and devices with a different operating system (Android, iOS) will not see your network or will not be able to connect to it. You need Soft AP mode (also called: access point mode, soft Access Point, virtual WiFi, virtual router), how to do this is written in the second part of the article.
The first step is to get to the Network and Sharing Center. To do this, you can click right click mouse on network icon in the lower right corner of the screen and select "Network and Sharing Center."
Another way is to go to "Start" - "Control Panel" - "Network and Sharing Center".

It doesn't matter which method you used, in the end you will see the Network and Sharing Center window. Click "Set up a new connection or network".

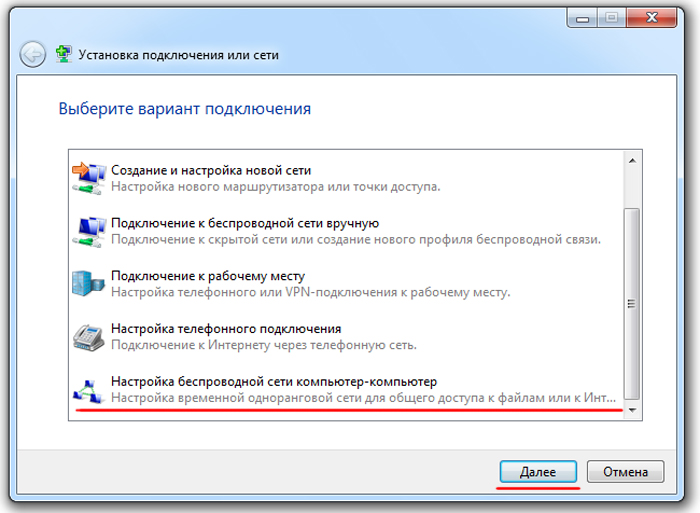
In the Set up a connection or network window, select "Configure a computer-to-computer wireless network" and click "Next".

You read the information window and click "Next".

In the next window, you must enter the data for the created network:
Network name- the name of the Wi-Fi network (SSID) that other computers / laptops will see. Enter any name.
Security key- password for connecting to a Wi-Fi network, I recommend using a complex password of at least 8 characters, consisting of letters, numbers and special characters ( [email protected]#$).

In the next window, click the "Enable Internet Connection Sharing" button and click the "Close" button.

This completes the setup of the Wi-Fi network computer-computer. Now if you go to the Network and Sharing Center, you will see your Wi-Fi network.

On other computers, you can see and connect to the created network.

To remove the computer-to-computer connection, go to the Network and Sharing Center, select "Manage wireless networks" and delete the created network.

Configure the distribution of the Internet on a laptop for a computer / laptop / tablet / smartphone.
If you want to distribute the Internet not only to computers and laptops, but also tablets and smartphones, the method described below will suit you.
Launch command line with administrator rights, for this click "Start" - "All Programs" - "Accessories", right-click on "Command Prompt" and select "Run as administrator".

Another way is press keyboard shortcut
On the command line, run the command:
netsh WLAN set hostednetwork mode \u003d allow ssid \u003d "point name" key \u003d "password"
For instance:
netsh WLAN set hostednetwork mode \u003d allow ssid \u003d site key \u003d Pa $$ w0rd

After that, you need to turn on the network, for this run the command:
netsh WLAN start hostednetwork

The next step is to provide Internet access to all connected devices, to do this, go to the Network and Sharing Center and select "Change adapter settings". In the connections window that opens, select the connection that has access to the Internet (it does not matter what is the Internet Source - 3G / 4G modem, provider cable or Wi-Fi network with access to the global network), for this you can change the view to "Table" and see opposite the connection "Access to the Internet". In my case, this is "Connecting by local network 2. ". The orange line marks the network that we created, the line Microsoft Virtual WiFiMiniport Adapter will tell you about it (remember the name of the network, it will come in handy later).

Click on the connection with the right mouse button and select "Properties".

In the properties window, select the "Access" tab, check the box next to "Allow other network users to use this computer's Internet connection", below select the connection that you created, in my case it is Wireless Network Connection 2 (the connection marked with the orange line in the picture above).

This completes the Wi-Fi network setup. It should be noted that after restarting the computer distributing the Internet, you will have to run the command again because it will not work automatically . If you want it to start automatically every time your computer boots, you need to create a batch file and add it to startup. To do this, create a text document, enter the command into it netsh WLAN start hostednetwork,save the document. Further change the extension from txt to bat and add the file to autoload (Start - all programs - autoload).
In order to remove Wi-Fi connection, run Command Prompt as administrator and use the command:
netsh WLAN set hostednetwork mode \u003d disallow ssid \u003d "point name" key \u003d "password"
For instance:
netsh WLAN set hostednetwork mode \u003d disallow ssid \u003d site key \u003d Pa $$ w0rd

That's all. If you have any questions or wishes, write in the comments.
With the advent of a large number of mobile smart devices on the market, users have become more likely to wonder how to share Wi-Fi from a laptop. In fact, it is very convenient to connect your smartphone or tablet to a wireless network and enjoy all the benefits of a working Internet connection. The issue of efficient distribution of Wi-Fi is solved very simply if you have a router, to which you can easily connect almost any compatible device without any problems. But what can be done if there is no free router at hand, and the desire to connect a tablet or smartphone to the network takes over? In this case, the ideal solution would be to use a laptop as a Wi-Fi hotspot.
In order to distribute Wi-Fi from a laptop, pay attention to the natively built-in operating system tools. Also for this demanded purpose, you can use software products from third-party developers. Thus, there are several ways to distribute Wi-Fi. We'll take a closer look at each of them.
How to distributeWi— Fi meansWindows
To use this method, you do not need to download and install any additional software products on your computer. All the necessary functions are natively built into the OS. To distribute Wi-Fi in this way, make sure that a working wireless adapter is installed on your machine.
First, let's go to the "Network and Sharing Center". This can be done by right-clicking on the network connection status icon in the lower right corner of the screen.

After that, go to the "Connection or Network Setup Wizard" section.

Choose the connection option as in the photo below and click "Next".
An information window will appear on the screen, in which you need to click the "Next" button.

In the next window, you need to enter a standard set of wireless network parameters: network name, type and security key. Enter an arbitrary network name, it is better to set the security type “WPA2-Personal”, come up with a complex password (at least 8 characters, with letters and numbers). We enter all the parameters, put a tick in front of the item “Save the parameters of this network” and click the “Next” button.

The wireless network has been created. Before using it, you need to enable sharing. To do this, press the appropriate button.

After enabling sharing, a special window will appear, which we close with the "Close" button.


Install the selectors as in the photo below and click the "Save Changes" button.

Now we have completely finished configuring the wireless network. You know how to share Wi-Fi from a laptop using Windows. You can easily connect tablets, smart set-top boxes, smartphones, modern TVs, media players and other compatible devices to the created network.
How to distributeWi— Fi using command line

You can configure a virtual access point in order to distribute Wi-Fi from a laptop in the future using the command line. This is easy enough.
Go to the "Start" menu and enter "Command Prompt" in the search box. Run the command line as administrator.

Next, to create a wireless network, enter the following command: “netsh wlan set hostednetwork mode \u003d allow ssid \u003d komputer-info key \u003d 12345678”. In this command “komputer-info” is the name of the network, set it as you like. “12345678” is the network password to use when connecting. Try to come up with a good strong password. After you have entered the command, press “Enter”.

The screen will display information about changing the network name and password. To start the created Wi-Fi network, enter the command “netsh wlan start hostednetwork”. A message about the launch of the created network will appear.

After starting the network, you need to make some settings so that the created network has access to the Internet. To do this, go to the "Network and Sharing Center", click on the connection through which the computer is connected to the Internet and go to the "Properties" section.

Go to the "Access" section and allow other users to use the Internet connection.

After these procedures, you can connect to the created network various devices... To connect, you need to use the network password that we set in the command earlier. The created network has access to the Internet, like any devices connected to it.
List of commands for network management:
- netsh wlan start hostednetwork - start network
- netsh wlan stop hostednetwork - stop network
- netsh wlan show hostednetwork - View network status
After restarting the computer, you must enter a command in the command line to start the network. If the error “Failed to start the hosted network” is thrown out, then you must enter several commands in the command line.

If this error appears, first enter the command “netsh wlan set hostednetwork mode \u003d disallow”, then the command “netsh wlan set hostednetwork mode \u003d allow”.

Now you know how to distribute Wi-Fi from a laptop using the command line and then how to manage the created network. Next, let's move on to considering special programs.
How to distributeWi— Fi with laptop program

If the previous methods did not help you, you can use to distribute Wi-Fi special program Connectify. First you need to download the program and install it on your computer. Connectify can be used in two versions: free (Free) and paid (PRO). Free option differs from the paid one in somewhat limited features, but they are more than enough for our purposes.
We launch the program. Set the network name and password. In the “Internet to Share” field, select the connection through which the laptop gains access to the Internet. In the “Share Over” field, select a wireless adapter with which we will distribute Wi-Fi. In the "Sharing Mode" field, select the operating mode wireless adapter (“Wi-Fi Ad-Hoc, Encrypted” recommended). To start distribution, press the “Start Hotspot” button.
![]()
After that, you can connect all kinds of devices to the created network. Please note that if you use any additional utilities to configure the Wi-Fi adapter on a laptop, the Connectify program may not work or be unstable. It is better to disable such utilities.
How to distributeWi— Fi MyPublicWiFi program

This simple program is a free analogue of Connectify and is often used by users to distribute Wi-Fi from a laptop. Before using MyPublicWiFi, download and install the software on your computer. After that, launch MyPublicWiFi as administrator.
Set the selector opposite the “Automatic HotSpot configuration” item. In the “Network Name” field, enter the name of the new wireless network. In the “Network Key” field, enter the password that will be used when connecting devices to the network. Next, check the box next to “Enable Internet Sharing” and below select the connection that is used by the laptop to access the Internet. Wi-Fi distribution will start after clicking the “Set up and Start Hotspot” button.

In the "Management" tab, you can set automatic start programs when loading the computer's operating system. To do this, put a tick in the “Auto start” section.

How to distributeWi— Fi program

mHotSpot is another simple program that will help the user answer the question of how to share Wi-Fi from a laptop. The interface of this utility is simple and straightforward. Download and install mHotSpot on your computer. Run the program as administrator.
Next, in the “Hotspot Name” field, enter the desired network name. In the “Password” field, set strong password, and in the “Internet Source” field, select that connection. With which the laptop gains access to the Internet. In the “Max Client” field, you can set the maximum number of devices simultaneously connected to the network (no more than 10). To start distributing Wi-Fi, press the “Start Hotspote” button.

Now you can connect various compatible devices to the created network.
conclusions
We figured out in detail the question of how to distribute Wi-Fi from a laptop. To do this, you can use both built-in OS tools and programs from third-party developers. You can choose the easiest and most reliable way for yourself, apply it in practice and quickly create wireless network for their own purposes.
Hello dear PC users! Today with the help Wi-Fi router it will not be difficult to distribute the Internet from a computer, today almost every computer user is familiar with this procedure. But what if you do not have this device, and the Internet is urgently needed?
The solution is quite simple - we distribute the Internet from the computer to other devices, be it other laptops and PCs or various gadgets. In this article, I will tell you in detail how the process of distributing the Internet from a computer generally goes. So, I decided to choose the two easiest ways:
1. You have a laptop or desktop computer with a Wi-Fi module - distribution is carried out wirelessly.
2. You only have a PC without a Wi-Fi module. Therefore, we will share the Internet with other computers using a cable.
You can immediately decide on the method for yourself and go to the necessary instructions. I must say right away that the method of distributing the Internet via Wi-Fi is much easier than the option with connecting a cable. And for mobile devices the second method will not work. Follow the instructions carefully, and in a few minutes you will be able to use the global network on all devices in your apartment or even in your office. At the end of the article, you can also watch a video instruction.
How to distribute the Internet via WiFi?
We will distribute the Internet using a standard Windows tool and third party program... The disadvantage of distributing through the Windows service is that only computers with the Windows operating system can connect to the Internet. If you don't need more, then choose this method. Using an alternative program allows you to distribute the Internet from your computer to all devices, including Android gadgets.
IMPORTANT! All schemes described in this article are suitable for the operating room windows systems... Distribution of the Internet in MAC is carried out in the same way, only the location of the settings differs, so it will not be difficult for you to distribute the Internet on Apple devices.
We use a standard Windows tool
I have already described how to distribute the Internet from a laptop to other devices in this article:
I will perform this action in Windows 7, for more modern versions of the operating system, the scheme is approximately the same. All you need to complete the procedure is a computer or laptop with a built-in or plug-in Wi-Fi module (present in all modern laptops), as well as an Internet connection. Now let's get down to business.
Open the "Network and Sharing Center" - at the bottom of the screen near the clock we find the connection image and right-click on it:

In the window that opens, select the item with the name "Network and Sharing Center", and then proceed to the section "Setting up a new connection". Here we need to click on the item "Connection or Network Setup Wizard", as shown in the screenshot below:

Here we will be offered several options, select "Setting up a wireless network computer-computer", and then click on the button "Next". The purpose of the function is simply described here, we proceed to setting. Here we will need to enter the parameters of the new wireless network. In the "Network name" column, you must specify a name for your network, the security type should be left WPA2-Personal, the security key is a password. Come up with a secure passcode to prevent unauthorized users from connecting to you.
In one of my episodes, I talked about how to put a password on Wi-Fi and thereby protect your computer.

After entering the parameters, you need to save the changes by clicking the corresponding button. All that remains is to set up sharing so that you can connect other devices to the Internet. Click on the "Enable Connection Sharing" button. To configure, you need to open the "Network and Sharing Center", as we did in the beginning. In the menu that appears, select the item "Change additional parameters".

In this menu you can change access to folders, for example, so that other users have access to certain directories. Here you will figure it out on your own, since each point is described in detail. By organizing your home local network in this way, you can access your resources from any device (laptop, phone). Again, this is a separate topic and I have already talked about it in this issue:
With standard windows tool we are finished, now we will consider a more convenient option using a third-party application.
How to distribute the Internet from a computer using the program?
The simplest and convenient program for distributing the Internet via Wi-Fi, the Connectify application is, but it is paid, so I chose its free counterpart.
MyPublicWiFi– free program for internet distribution
I used both programs and didn't notice much difference. The program is pretty simple and you can download the MyPublicWiFi application from the Internet.
Installation takes place according to the standard scheme, so you should not have any difficulties. After the installation is complete, the application must be run as administrator, then right-click on the shortcut and select the appropriate item, as shown in the screenshot below:

A simple menu will appear in front of you, where three main parameters of the future access point will be available. The network name, security type and password are what you need to fill in to distribute Wi-FI. We leave a tick in front of the "AutomaticHotspotconfiguration" item and enter a suitable name and password, after which you can click the "SetupandStartHotspot" button.

Now the Internet is distributed from your computer, if necessary, you can make changes in the "Management" section. For example, you can take the useful "EnableFirewall" button, which prohibits the use of file sharing, thereby protecting your data from unauthorized users. So, the first part of today's question - How to distribute the Internet from a computer, we have considered.
You can try the free version of Connectify with limited functionality. It is quite enough for standard needs, although you will not be able to change the SSID. The setup process is exactly the same as in the MyPublicWiFi app that I described.
How to distribute the Internet from a computer without a Wi-Fi module?
So, you have two computers. First, you need to open the network connection setting. Our task is to find the "Allow the connection" button. After that, you can connect the computers with a cable to each other. It is important that the settings on the two computers are the same. For example, on PC # 1, the properties of the local network must have IP 192.168.0.1, and on the second "machine" IP must be 192.168.0.2. If you are worried about these concepts, then first I recommend that you familiarize yourself with this lesson:
In general, in theory, this scheme should work. But in practice, many users encounter various errors. Differences between operating systems, various network cards, hardware incompatibility - all this can cause the lack of an Internet connection on the second computer. It is much easier to distribute the Internet via a modem, now almost every provider provides such a device.
) is the ability to "share" the Internet from one connection to all computers at once.
And this article describes in detail how to distribute the Internet over a local network for two or more personal computersand also what network settings for this you need.
So, before you share internet windows 7 through a local network, this very network needs to be created. Detailed instructions for connecting a standard "lokalki" are presented in articles and.
Here we will focus only on how to connect two (or more) computers to the Internet through one provider cable. In other words, if you only have the Internet connected to this computer, then you can distribute it to all other devices.
How to distribute the Internet over a local network?
So, there are several fundamentally different approaches to "sharing" home internet to other devices:
- 1. The most simple and convenient way - use a regular router. To distribute the Internet to a second computer, you only need the router itself and the LAN cable. Just LAN cable and install desired settings network card.
Modern models of routers are equipped with 4 - 5 LAN ports: For home internet this is more than enough.
- 2. You can also distribute the Internet over the network. From a great variety of proxy programs, you should opt for the "AnalogX Proxy Server".
Setting up a connection takes just a couple of minutes.

- In addition, a kind of router can be made from one computer.
In this case, this computer will play a role in this local network and it will be possible to distribute the Internet from it "directly" - without connecting additional network devices.
Very important: If you connect to the internet directly through network cable provider, then two network cards must be installed on the "distributing" computer. One "network card" can be dispensed with only if the connection to the world network occurs with via USB modem (beeline, mts or adsl usb modem)
How to distribute the Internet from computer to computer?
- - On the main computer, go to "Start" - "Run" - the command "ncpa.cpl": this will open the "Network Connection";

- - By default, there are two shortcuts here: "Internet Connection" and "Local Area Connection". In an active Internet connection, open "Property" - "Advanced";
- - Set "Allow other network users to use this computer's Internet connection";
- - If you want other users to be able to manage the connection - check the box next to "Allow other network users to manage the shared access to the Internet";

- - Click "OK" - a notification will appear that the ip address is assigned 192.168.0.1 (if you have specified another address, do not be alarmed, this is possible).
Now let's move on to the second computer: here you need to register the connection parameters:
- - go to "Network Connections" - "Local Area Connection" - "Properties";
- - hereinafter "Internet Protocol (TCP / IP)" - "Property".
Please note that since 1 computer is assigned an ip address 192.168.0.1, then 2 must be set to 1 more address, for example 192.168.0.2;
- - The "Subnet mask" will be determined automatically, and the "Default gateway" and "Preferred DNS server" parameters are the ip address of the first PC 192.168.0.1.

Restart the main computer and all client computers on the network - Internet access via the local network is configured.
At the request of visitors, I'm posting this article ...
Sharing the Internet via Wi Fi (Wi-Fi) is actually very simple. Almost exactly the same as. It can be distributed in several ways. Now we will consider them in more detail.
1 way to distribute Wi-Fi.
The easiest and most effective way is to buy a Wi-Fi access point. When buying, pay attention to this and the possibilities (in particular, the speed). In the instructions for use, everything is detailed. I will not write about the setting, because There are a great many brands and models now, and entire sites are usually made for customization. It is better to turn to the help of your Internet provider (if you cannot understand the instructions). They have such a service.
In short, I will just write that you buy a router, then connect an Internet cable to it, then connect it with a cable to the computer, and then you set everything up on the computer or directly in the router (again, it depends on the model).
2 way how to distribute Wi-Fi
If buying a router or router is problematic for you, then you need to buy either a separate "bar" in system unit (namely in), which looks something like this:
or, if there is no space in the motherboard or does not fit or "the toad is choking", you can take an adapter of something like this:

On the screenshots, I showed options with antennas. They will transmit the signal better and you need to take them, preferably. There are also such devices without antennas (for example, adapters like flash drives). They are cheaper, but the signal quality will be worse. If we have already touched on the topic of quality, then the adapters that are plugged into the USB connector will also be worse than those that are connected directly to motherboard... This factor should also be taken into account.
Suppose that you already have Wi-Fi access on your computer, now you need to "share" (distribute) it. This can be done either by following the instructions, going through the steps, or by going a little differently.
This has already been described in the article, as well as in the article to which the link was given above. There, one commentator described the same steps.
But this I digress a little.
In general, we launch, preferably with administrator rights. Next, we enter into it:
netsh wlan show drivers
and pay attention to the highlighted line:

this line will show us whether the computer is working properly for us, namely to act as an access point ("dispenser" in the common people). You need to stand there Yes, if it will be #, then you need to either update the firmware of the device, or replace it altogether. it does not support this feature.
If windows version you have Russified properly, then the line will be called Hosted Network Support: Yes
Now we enter the command in the command line:
netsh wlan set hostednetwork mode \u003d allow ssid \u003d NETWORK NAME key \u003d PASSWORD
This will create our access point. We draw your attention here to:
NETWORK NAME - write yourself as it will be called, in Latin letters it is desirable
PASSWORD - it must be at least 8 characters.
Now we enter the command:
netsh wlan start hostednetwork

This will activate our network. The answer should appear, as in the screenshot above ( The hosted network started, but in Russian it will be Hosted network started). If the answer is hosted network couldn’t started, then reconnect your bracket / adapter or start a search for new equipment. This error means that your module was not found.
Next, go to Network connections at Control panels which is located. There we are looking for our Wireless connection or LAN connection (depends on how you connected) from which you are on the Internet, press the RMB on it and select Properties.

Go to the tab Access and put a tick "Allow to use by other users". A drop-down menu will open in which you need to select the created connection:

Click "OK" and check if the wifi works and is distributed ...
It happens that Internet providers prohibit multi-user access. Then you will need to register the IP manually (in the properties of the Internet protocol, select "Use the following IP addresses").
3 way to configure the distribution of Wi Fi
You can use the standard Windows capabilities to create a new network connection. For this in Network connections start the "Connection and Network Setup Wizard" on the left (in XP it is "New Connection Wizard"), then select "Computer-to-computer network setup", then enter a name for the network, then in the "Security Type" section, select WPA2-Personal and in the "Security Key" field, enter the password.
The next step is to click on the "Enable Internet Connection Sharing" button and close the wizard.
If you did everything right, then you will again find yourself in Network connections... Select the link "Change sharing settings" on the left and enable detection and sharing there (optional).
All. Now we check.
4 way how to distribute Wi-Fi from a personal computer.
In an article about distributing file from a laptop, I gave a link to the program Connectify... It also facilitates all the setup and allows you to distribute the Internet (if you already have an adapter or Wi-Fi module). But now the developers have decided to make some money on it due to the popularity and now in free version you can only distribute 90 minutes and cannot work with 3G and 4G modems. In general, I do not think that this method will suit you, but if you want you can download it from. Note that it works with Windows 7 and 8.
You can read about how to work with it, as well as find out a good alternative in the article about.
That's all for me. I hope that I did not disappoint you much and that you can set up Wi-Fi on your computer and distribute it yourself.