Sometimes one gets the impression that it is in winter that the magic button "Create a masterpiece" appears on the camera. Especially if it snowed the night before, and the trees in the park are wrapped in beautiful snow caps. Nice, isn't it?
Winter photos are mesmerizing. But taking pictures during a snowfall is not very convenient. And I want the snowball in the captured picture not only to lie around with a soft blanket, but also to spin in the air. This is where Photoshop comes to the rescue, where you can create realistic falling snow.
Using the example of this image of a girl on a winter background, we will add floating snow to the composition.
How to make snow in Photoshop - flying snowflakes in the photo
So let's get started:
- Let's create a new empty layer in any convenient way. By clicking on the icon for creating a new layer, or by pressing Ctrl + Alt + Shift + N.

- Take a round, soft white brush and randomly place dots on the image. To get the snow effect in Photoshop, you need to change the brush size. The future snowflakes will not be the same then.

- To prevent the snow in the photo in Photoshop from looking so unnaturally round, we will blur it and give the snowflakes the effect of movement. Go to the menu: "Filter" - "Blur" - "Motion Blur". We choose the strength of the blur and the angle of motion, guided by our own taste. Play around with the settings and find the options that best suit your image.

For larger snowflakes that fly close to the camera, create another layer and draw a few larger snowflakes in the same way. We repeat the steps as for the first layer, only with different parameters of the strength and direction of the blur.

The next step is to create the snow texture
For this step, solving the problem of how to make snow in Photoshop, you need to download a picture with snow on a black background online. Let's transfer it to our working document as a smart object.

- We choose: "file / place". The image with snow will appear in our document, now it needs to be stretched so that it covers the entire image.
- Do not forget to hold down the Alt key while transforming when you stretch the image so that the proportions of the snowflakes remain natural and do not deform.
- Change the blending mode from normal to " Screen».
- Let's hide some snowflakes by creating a mask on this layer and using a black brush to remove snowflakes from the lips and chin of the model.
Wondering how to make snow in Photoshop? Yes, very simple! We created realistic snow in just a few steps.

Method two, how to create snow in Photoshop
In the second method of how to add snow in Photoshop, we will use the same image of the girl and make it more dynamic and attractive with the help of falling snow. Unfortunately, the author of this photo is unknown. You can use your own photo or download any suitable for creating a similar effect from free photo banks.
Using the Noise tools to create snow
So let's get started:
- Open the original image, press Ctrl + O to open it to the entire workspace.
- Create a new layer: press latin key D to reset the default colors.
- Fill this layer with black by pressing Alt + Backspace.
- Apply the "Noise" / "Add Noise" filter to this layer. Set approximately 100-120% Gaussian distribution and check the “Monochrome” item. Click "Ok".

- Then apply the "Simulate" / "Dry Brush" filter to this layer. For Photoshop CS6, go to "Filter" / "Filter Gallery" / "Imitation" / "Dry Brush". By changing the size of the brush, we get more or less snowflakes, depending on the settings of the brush parameters. Let's stop at 2 for the brush size, leave the detail at 0 and texture at 1.
Now, if you enlarge the image, you get falling snow - realistic snowflakes, just like in nature. You will not find the same here, they all differ in size and shape.

Now by pressing the keyboard shortcut Ctrl + J duplicate this layer. On the first we will create the foreground snowflakes, on the second - the background. Hide the visibility of the second layer and work with the top one for now.

To get rid of the black background, change the blending mode to Screen or Screen. And the black background becomes transparent - invisible.
The snowflakes are not supposed to be so harsh, so we'll blur them out a bit "Gaussian". Let's set the radius to about 1-1.5 pixels, depending on the image.
Dynamics of movement - snowflakes flying in different directions
Now our snowflakes need to create some kind of movement dynamics, since in Photoshop we need to make the snow realistic and dynamic. If you use the "Motion Blur" filter, it will blur all the snowflakes at the angle we define. We will go the other way and create the effect of snowflakes flying chaotically in different directions, as in nature:
- First, let's convert this layer to a smart object so that we can edit it. Go to the menu - "Filter" / "Distortion" / "Wave".
- Set "Number of generators" to 1, type - "Triangle". We set "Repeat boundary pixels" by default, but with the "Wavelength", "Amplitude" and "Scale" settings, you can play and choose the appropriate ones for your image.
Now all the snowflakes are flying in different directions. If you don't like the result, then when you double-click on the "Wave" line under the "smart object" layer, you will again open the filter's dialog box, which can be edited.

Getting rid of unwanted artifacts in the image
If you pay attention, after applying this filter, unnatural stripes will appear at the edges of the image, you can get rid of them by simply stretching the layer with snowflakes beyond the edges of the main image. To do this, press the shortcut keys Ctrl + T to call the free transform tool, and hold down the Alt key and stretch the image so that the stripes along the edges go beyond its borders. When a warning window appears that smart filters will be temporarily disabled, we confirm the action.

Make an adjustment layer "Levels" - create a sending mask for it and, moving the sliders middle and left, adjust the number and brightness of the snowflakes.

Go to the second, still hidden, layer, make it visible, repeat all the steps as for the first, with the only difference that the background snowflakes should be smaller and blurry.
Then you need to create a layer mask on this layer and hide the snowflakes from the model with a soft round black brush to make it look as natural as possible. And also reduce the layer's opacity to 60-70%.

Now you know how to make snow in Photoshop. Here's what we got. I wish you creative success - try, train!
How to create a festive collage for the New Year with a resting Santa Claus in Adobe Photoshop - see three video tutorials by Elena Minakova. In this lesson you will: get acquainted with the techniques of photomontage; you will learn how to create a realistic black and white drawing from a lantern; work with brushes to draw individual details at work. In this video tutorial Elena Minakova will show you how to create [...]
How to create a collage "In the kingdom of ice and snow" in Adobe Photoshop - see three lessons by Elena Minakova. After watching the video tutorial, you will learn: How to assemble a winter landscape using various images. How to draw a starry sky and add the northern lights. How to add light penetrating through the ice. How to add footprints in the snow using the Clone Stamp tool. How […]
How to create a Treasure Keeper collage in Adobe Photoshop - see three lessons by Elena Minakova. After studying the material of the video tutorials, you will learn: how to add dynamism to the image, using an unusual angle in the collage; how to add mystery to the atmosphere using lighting, smoke and fog; how to create the illusion of movement. “A new video tutorial in which Elena Minakova will show you how to create a fantastic [...]
12.04.2016 27.01.2018
In this tutorial, we will tell you how easy it is to make a collage from photos in Photoshop. The end result will be a beautiful collage of several photos glued together in Photoshop.
The collage that you learn to make will look like this:
What is needed to create a collage in:
- 5 different photos
- Photo or image for background
What is a photo collage and why is it needed
Collage is a single image glued together from several others. It can be either a collection of photographs or an image in which you may not notice that it is glued together from several other images. In this tutorial, we will make a regular photo collage, like a photo album.
How to make a collage
To make a collage you need:
- Prepare the background for the collage, over which there will be photos
- Prepare the photos themselves. In this tutorial, we'll take five photographs.
Short lesson map
The points that you will need to complete in this lesson:
- Open each photo separately in Photoshop.
- Open the background for the collage, in this document we will create a collage.
- In Photoshop, open the tab with the 1st photo, select it and copy
- Go to the tab with the background for the collage, insert the photo on a separate layer.
- Repeat the operation with all photos. So copy and paste all the photos.
- Place photos on collage and zoom for each photo. Add styles.
Note: In this tutorial, you will learn how to make your own collages and use your photos. These instructions will allow you to create a collage on any topic - a family picnic, lovers in nature, a wedding collage, cityscapes and so on. You are limited only by your imagination.
Create a collage in Photoshop
Open in Photoshop 6.jpg - this will be the background for our collage.
.jpg)
.jpg)
If you did not have time to make the desired scale for the photo or you need to adjust:
- Select the desired photo in the list of layers
- Click CTRL + T
- Re-scale.
Since photos are smart objects, they can be scaled back without losing quality. For now, position the photos on the collage. For convenience, I placed all layers in a separate folder.
.jpg)
Turn off the visibility of layers with photos for now. To do this, click on the icon with the eye opposite the layer with the photo.
.jpg)
With a tool Ellipse (Ellipse Tool), can be of any color, draw a circle where the proposed photo will be.
.jpg)
The photo will be displayed in a circle. In the lists with layers, you will see how an arrow appeared on the layer with the photo, it indicates that the clipping mask acts on the layer below - on the layer with a gray circle.
.jpg)
You can move the photo to the desired position and adjust its scale.
.jpg)
.jpg)
Repeat this scheme with the rest of the photos:
- Enable photo visibility
- Make a clipping mask out of it
- Move to the desired position and change the scale
After that, the collage in Photoshop will be ready for you!)
.jpg)
Remember that you can play with backgrounds, layout and number of photos. Make all kinds of compositions in Photoshop!
For example, someone likes a more calm background and square frames)
.jpg)
If you have a desire to see how it works in Photoshop or you want insert your photos —
In today's lesson, we will visually consider the creation of an emotional, sensual pattern in a dark forest. The main character of the picture will be a deer. To acquire a whole episode, different pictures are combined into a common image, for this they use adjustment layers, layer masks, and as a result, light, shadows, etc.
This lesson is performed using Adobe Photoshop CC 2014, but other versions of CC 2014 and newer are possible.
Applicable materials:
- deer
- crow
- texture of the nebula "Nebula"
- the texture of burning lights ("Starry 4").
Chronology of creation
Step 1
Create a new document. Commands File - New (File - New). Set the dimensions, they must be at least:
W .: (Width): 894 px
V .: (Height): 708 px
Resolution: 300 (px / inch) 
Step 2
Open the initial drawing "Forest", using the command "Move" (Move Tool), transfer it to the previously created new document, if necessary, then transform it. Press the keyboard shortcut (Ctrl + T) and hold down Shift to maintain the proportions. Place the picture as shown in the photo. 
Step 3
Change the initial "Forest" drawing into a smart object, for this right-click on the forest layer and select "Convert to a smart object" (Create Smart Object).
To add depth to the future drawing, apply the "Gaussian Blur" filter. Go to Filter - Blur - Gaussian Blur and set the blur radius to 8.2px. 
Step 4
Select the Brush tool. Soft brush, black color. In the tool setting, set the Opacity and Flow to 30%. While on the "Gaussian Blur" filter layer mask, remove the blur. The photo below shows the zone: 
As a result, depth was formed in the future drawing: 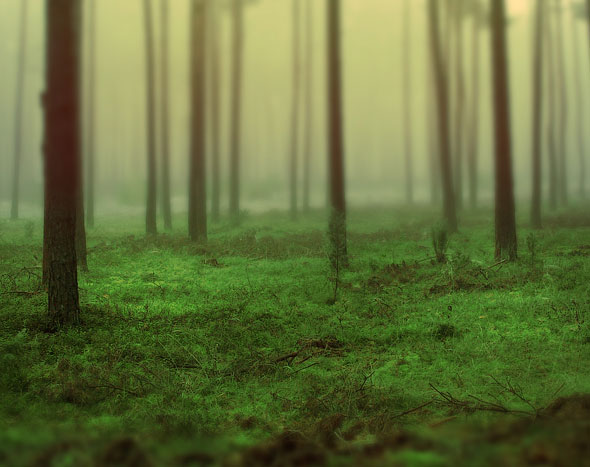
Step 5
Add a "Brightness / Contrast" adjustment layer, apply a shape that hides another image so that only the clipping mask contours remain visible, in other words, you need to attach a "Brightness / Contrast" adjustment layer to the forest layer. You need to hold down the (Alt) key and move the mouse between the adjustment layer "Brightness / Contrast" and the layer of forest. Then they click the left button. As a result, the adjustment layer is linked to the forest layer.
Set the brightness to 62 and contrast to 46 
Step 6
Add a "Color Balance" correction layer and use a "Create Clipping Mask" with it.
After completing the previous step, where adjustment layers were added, the following indicators are used for the shadows (Shadow): set - 19 for the red shade, green - 7, blue +7. For midtones: red - 24, green - 21, blue +5. For Highlights: Red - 15, Green - 10, Blue - 2. 
The result is: 
Step 7
In this action, you need to reduce the amount of yellow in the picture. In this case, an adjustment is used. To do this, select the "Selective Color" command and apply the "Create Clipping Mask".
The settings panel looks like this: yellow - 19, cyan - 100%, magenta - 4%, black is not used and is set to 0. 
The result was: 
Step 8
The next step adds a special nebula. To do this, open the starting image "Nebula" and with the help of the tool "Move" (Move Tool) move it to the main document, use the key combination (Ctrl + T) to transform it.
To maintain the proportions, hold down the Shift button, apply a picture: 
Before you see how special the nebula used looks, rename the layer to Nebula, lower the Opacity to 33% and transform the blending order to Screen: 
Step 9
Add a "Hua / Saturation" adjustment layer to "Nebula" and apply a "Create Clipping Mask". Indicators of hue - 92, saturation - 13. Set a mark on the command "Toning" (Colorize). 
Step 10
Open the PSD file with a raven, select any object you like, then place it on the main document. For a more realistic picture of the raven inscribing, apply the Gaussian Blur filter (Filter - Blur - Gaussian Blur). 
Step 11
Let's move on to creating a light source. Create another layer "Light source" using the combination of buttons (CTRL + SHIFT + ALT + N). Select the "Brush" (Brush Tool). Make it soft with the Opacity and Flow settings up to 50%. Change the foreground color palette to (# 1b3a5d) and create a ray of light. This can be seen in the figure below:
Change the order of the "Light Source" layer to "Linear Dodge", and lower the "Opacity" (Opacity) to 88%. 
Step 12
At this stage, you need to add the "starry4" texture to the picture, which is contained in the set and add it using the "Move" tool to the main document and position it so that only half is visible. The figure below shows how it looks: 
To eliminate the black background and harmoniously fit the texture in the picture, you need to change the order of the texture mapping on the "Screen": 
Let's move on to changing the color of the texture. Add an adjustment layer "Hue / Saturation" (Hue / Saturation), then apply a Clipping Mask to this layer.
In this case, the saturation index is 100: 
For the finished painting add a couple of burning objects, create a new layer "Glow 2". Select the "Brush" (Brush Tool). They make it soft, the color is white, as in the picture: 
Step 14
Add an outer glow "Glow 2". This can be done by clicking on the layer with the left mouse button 2 times and using the following Outer Glow dimensions - lightening the base (Color Dodge), Opacity - 54%, Color (# 166082), Size (Size) : 32 px.
Duplicate the "Glow 2" layer with the keyboard shortcut (Ctrl + J) and place the glowing point in different places of our document, where you see fit. The preliminary result that should turn out: 
Step 15
It's time to add a deer to the dark forest. To do this, you need to open the main picture and use the tools to select and extract the image and place it on the main document. Change, this requires a key combination (Ctrl + T). To maintain the proportions, hold down the Shift key. Position the picture as shown below: 
Mask the lower limbs of the animal using a layer mask. This is necessary to create a realistic effect of a deer standing in the grass: 
Step 16
Next, you need to create an external feeling of a shadow falling on the grass. The natural ray of light is directed at the back of the animal, hence the shadow will fall from its lower limbs. Form a new layer "Shadow", it is located above the layer with the animal. Select the "Brush" (Brush Tool). They make it soft, the color is black, set the "Opacity" and "Pressure" levels to 30%, then apply a shadow as in the picture: 
Step 17
Decrease the brightness of the animal drawing, add a Hua / Saturation correction layer, change the Saturation value to - 34. Use a Create Clipping Mask on the deer layer. 
Step 18
At this stage, the brightness values \u200b\u200bof the deer and the main picture differ. To do this, add a correction layer "Curves" (Curves), while applying the "Clipping Mask" (Create Clipping Mask) to the layer with the deer. 
The result was: 
Step 19
To fit harmoniously into the image, change the image and add "Color Balance" of the deer in order to fit it even better. The following indicators of tones are used: red - 20, green - 17, blue - 15; for semitones: red - 29, green - 3, blue +12. For light: red + 11, green +7, blue +6. Thus apply "Clipping mask" (Create Clipping Mask) to the layer with the deer. 
As a result: 
Step 20
Form one more layer on top of the entire "Lighting", in the palette change the color in the foreground to (# 2b5463). Choose "Brush". They make it soft, set the "Opacity" and "Pressure" levels to 30%, push in a natural light source falling on the back of the animal, as in the picture: 
Transform the order of the "Lighting" layers to "Linear Dodge" and reduce the "Opacity" to 55% 
As you can see in the picture, the deer fits perfectly into the main image.
Step 21
We repeat action # 11. Brush color (# 1d506d) with Forest Lighting layer 
Step 22
Change the blending order of the "Forest Lighting" layers to "Lighten" and reduce the "Opacity" to 66% 
Step 23
Start the final adjustments to the painting by adding a Gradient Map adjustment layer. 1 click on the gradient color bar and adjust the indicated colors: from left (# 000000) to right (# 143d4e) (from black to dark blue). 
Change the blending order of the "Gradient Map" to "Color Dodge" in order to lighten the gradient. 
Step 24
Add a correction layer "Selective Color" and adjust the following parameters: the settings panel looks like this (color - green): yellow - 100%, cyan - 100%, magenta - 100%, black is not used and set to 0.
The settings panel looks like this (color - yellow): yellow - 5%, cyan - 13%, magenta - 26%, black is not used and is set to 0.
This is to eliminate the extra green. 
As a result: 
Step 25
Add a layer for adjusting "Brightness / Contrast" with indicators: brightness - 67, contrast - 32, opacity up to 64%.
Immediately add a Color Lookup layer. It is important to note that the preset was used here: "Kodak 5218 Kodak 2383". For those not using Photoshop CC, we recommend that you achieve similar results by lowering the Opacity level for the Find Color Adjustment layer to 55%. 
After using the adjustment layers, it turned out: 
Step 26
And finally, using correction layers, add the final "Brightness / Contrast" with indicators: brightness - 49, contrast - 1. 
As a result: 
Step 27
Being on the last adjustment layer "Brightness / Contrast" you need to get rid of unnecessary shades, for this go to the layer mask of the adjustment layer and select "Brush". They make it soft, set the "Opacity" and "Pressure" level to 30%, the color is black, this will save the bright lights in the center of the image: 
As a result: 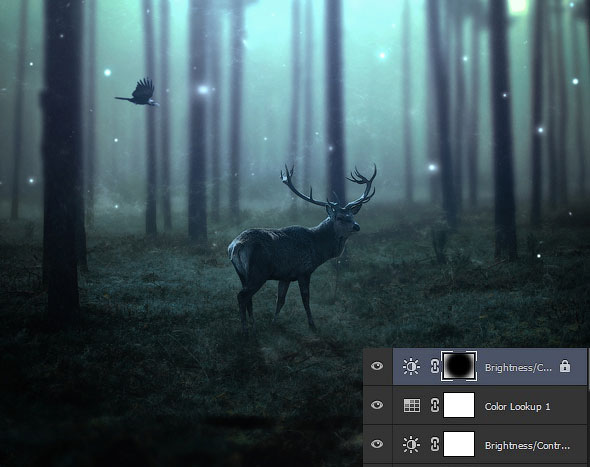
Step 28
If you want to make fewer glowing lights, you do not need to take the "Brush" again, but just place the cursor on the "Brightness / Contrast" layer mask and double-click the left mouse button. A window appears: 
Decrease the "Density" (Density) from 100% to 65%, drag the slider to the left. Decreasing the density results in a color change from black to gray. 
Let's take a look at the final result of our work:

As you can see, the brightness in the center of the picture has been reduced using the density of the layer mask. If
How to make a photo collage in Photoshop? This question is asked not only by the moderators of groups in social networks, but also by ordinary page owners. Often after a vacation you want to create a new photo album about your trip. And it's great when the cover photo is a collage. This way the album will get more attention. To make a simple collage in Photoshop, basic knowledge of the program is enough. Perhaps you are wondering how to create a collage in Photoshop from several photos? Then you need to connect your imagination and be patient, and you need a little more knowledge of the program.
Collage in Photoshop quickly and easily
Let's look at how to make collages in Photoshop using examples, from simple to complex. The simplest photo collage can consist of one photo.
Take any snapshot from a vacation like from an amusement park. From such familiar pictures, you can make an interesting photo collage quickly and easily.
Open the image in Photoshop. On the right side of the workspace is the Layers palette, which shows how the image is split into layers.
For further work, you need to unpin the layer of your image. It's very easy - just click once on the castle image on the layer.

Keyboard shortcut Ctrl + J make two duplicate layers. Apply an adjustment layer to the duplicate in the middle. "Hue / Saturation" / (Hue / Saturation) in toning mode. Hide the top layer for now by clicking the icon "Eye" on the contrary. You can call the adjustment layer on the layers palette below. The icon for the adjustment layer list is a half-filled circle.

To make the adjustment layer work in shading mode, in the settings window that opens after calling the layer, click the checkbox "Toning" / Colorize... Now moving checkers Hue / Hue, Saturation and Brightness left or right, achieve shades similar to the old photo. Then apply a Gaussian Blur to the same duplicate layer. We go to the layer and in the paragraph "Filter" / Filter select the main menu Blur, Gaussian Blur.

In the window that appears, moving the slider to the right, select a blur that is comfortable for the eye. Click on Ok... This layer will serve as our background.

Now go to the topmost duplicate layer. Click the empty icon to make the icon appear "Eye" and the layer became visible.

Remain on this layer and select the selection tool Rectangular Marquee Tool... Let's create a portrait for the first collage element. Select an arbitrary frame by holding the left mouse button: just stretch as much as we need in the image. The selection is indicated by a dotted line.

Then immediately, without removing the selection, press the icon "Create a mask"... A mask will appear next to the layer, and the selected image will remain visible.

Click on the paperclip between the layer and the mask. It disappears, and the mask becomes free to move around the layer and transform. Go from layer to mask (on the layers palette).

Now by choosing the tool "Move" / Move (called by key V), you can grab the mask and move it anywhere in the image. And if you press the keyboard shortcut Ctrl + T, you can stretch or reduce the size of the mask. Grab the corner point of the transformation frame and hold down the left mouse button while stretching or shrinking the dimension. To prevent distortion of the rectangle during transformation, click on the paperclip on the control panel.

You can also rotate the mask by an angle. To do this, move the cursor to the corner point of the transformation frame and wait for a rounded arrow to appear. Now hold down the left mouse button and rotate to the desired tilt. When finished, click Enter.

On the same layer, go from mask to layer (on the layers palette).

Remaining on the layer, press the right mouse button. In the appeared console list, select the item.

In the preferences window select "Stroke" / Stroke... Move the top slider to adjust the size of the frame. The color can be changed by calling the palette by double-clicking on the color swatch box. After completing all selections, click Ok.

Now duplicate the mask layer by clicking Ctrl + J... On a new layer, call the tool "Move" / Move (key V) and, grabbing, drag the mask to a new location. It is desirable to highlight one more portrait. If necessary, resize the mask or rotate it differently, as it was done on the previous layer. This will give you the second collage element. Repeating the steps from creating a duplicate to finding a new mask position, create as many collage elements as you need. Do not forget: to move the mask over the image, on the layers palette, go from layer to mask. If you need to undo any action, press the keyboard shortcut Ctrl + Alt + Z.

To make the picture even more interesting, you can selectively apply an adjustment layer to the layers of the collage. Hue / Saturationas we applied it to the background layer. You can apply an adjustment layer too "Black and white".
To apply the adjustment layer effect to only one layer, not all, between the adjustment layer and the layer to which you are applying the effect, make one click, while holding down Alt... An arrow will appear in front of the adjustment layer, indicating an anchor to the layer below. And the effect will only be applied to the specified layer.
Apply adjustment layers to your liking. When finished, save the file ( Shift + Ctrl + S) in psd format, in case you want to change anything. Save the finished collage in any format convenient for you, JPG or other ( Shift + Ctrl + S and specify a different format).

It's so easy to create an interesting collage from one ordinary photo. Optionally in the window Blending Option you can, in addition to the stroke, set a shadow and glow around each element of the collage.
How to make a collage of several photos in Photoshop
Let's consider how to make a collage from several photos in Photoshop.
Simple collages include a selection of beautiful photos in one color scheme. Such collages can be found under the name "Color Inspiration". Or they are simple collages of travel and other events. Simply put, these are several rectangular photos, beautifully arranged in one frame.
Prepare the required images in advance. It is advisable to select photos of large sizes and good quality. Start Photoshop. In the explorer, select all the prepared images and drag them with the mouse into the Photoshop window.

We reply to messages when opening a file Ok.

You can switch image windows if there are too many of them in the list on the control panel. Click on the double arrow and select the one you want.

Remove the icon on all images. "Castle" on the layer. Think in advance in what order you place the pictures on the collage. Select the image to be the anchor center frame. Place the cursor on the image layer, click Ctrl + Tif everything suits you and you do not need to cut the fragment. When the transformation frame appears, on the control panel, click the icon "Clip"... In this case, the transformation will not violate the proportions of the image. Move the cursor to the corner of the frame and reduce the image to the desired size. Push Enterto complete the transformation.

If we only need a fragment of the image, then the selection tool (key M Ctrl + C and Ctrl + V. We will have a new layer with the desired blank. Delete the old layer. Tool "Move" / Move (called by key V) move the image to the desired position. To do this, move the cursor to the image and, while holding the left mouse button, move the image to the selected position.

Preparing the next fragment of the collage. Go to the tab with the desired image. Selection tool Rectangular Marquee Tool (key M) cut out the desired area, click Ctrl + C... We return to the bookmark with the first fragment of the collage and click Ctrl + V... A new layer appears with the image. We put the cursor on it, click Ctrl + T and transform to the desired size. Push Enterto complete the transformation. Tool "Move" / Move (called by key V) move the image to the desired position.

You can close the bookmark with the used image so as not to get confused among their many. If you wish, you can add a stroke to each element of the collage. Remaining on the layer, right-click. In the appeared console list, select the item Blending Option... In the settings window, select "Stroke" / Stroke... Moving the top slider, adjust the frame size. The color can be changed by calling the palette by double-clicking on the color swatch box. After completing all selections, click Ok.

Repeat all the cutting, copying, adding to collage and transforming steps with all the selected pictures. Complete your collage. Save in any of the desired formats ( Shift + Ctrl + S), JPG, etc. Your collage is ready. If you suddenly want to change something in it, then save the psd file of your collage ( Shift + Ctrl + S) and select the psd format). Then, by opening this file in photoshop, you can easily make changes.

You have learned that making collages in Photoshop is simple and fun. Now you can show your friends how to make a collage of several photos in Photoshop using the example of your work. Perhaps creating collages in Photoshop will become your favorite pastime. Good creative work to you! Give it a try, share your work on social networks. You will definitely succeed!
