Internet connection Bezlіch koristuvachs on the basis of information have switched over to the korstі gadgets operating systems
Windows Vista and Windows 7. In this article we will look at gadgets that take temperature readings from processor and video card sensors on the desktop. We also know how to use these gadgets in the operating systems Windows 8, 8.1 and Windows 10.
We install processor and video card temperature gadgets
To adjust the temperature of the processor and video card on the desktop, we need gadgets. Offering gadgets are available everywhere through the website http://addgadgets.com, where you can purchase them without any costs. To install these programs in Windows 7, you just need to run the downloaded files. Our vidad has the files “All_CPU_Meter_V4.7.3” and “GPU_Meter_V2.4”. The processor temperature gadget looks like this.

And the widget for the video card looks like this. The images show that these supplements have daily temperature displays. In order for them to have temperature characteristics, a utility is required PC Meter

. The archive from this utility can be downloaded from the same site as the gadget. After unpacking the archive, the utility can be launched immediately, as long as it does not require installation. To launch the utility, the file PCMeterV0.4.exe is created.

After launching the utility, it will appear in the notification area. The program is launched by clicking on its shortcut in the menu area. Program settings can be found in the menu “ Options The images show that these supplements have daily temperature displays. In order for them to have temperature characteristics, a utility is required" In these options, you can configure the window to be minimized

, attention at system startup and support for viewed widgets. The program is launched by clicking on its shortcut in the menu area. Program settings can be found in the menu “».

To display the temperature, you need to go to your options tab " On this contribution in the row " Show CPU temperatures "it is necessary to set the parameter " ON (PC Meter) " To save the settings, press the OK button. After this adjustment, you can increase the temperature of the widget for the processor AMD processor

A6-5400K, which adds up to 17 degrees for the skin core. Also, on your PC, in the options of this program you can select select a temperature unit and the possibility of adjustment sound alert when high temperature processor The program is launched by clicking on its shortcut in the menu area. Program settings can be found in the menu “».

. For widgets, let’s also go to the tab “ In a row" Select Method » selectable parameter «" To save the settings, press the OK button, as for the previous widget. Having set it up, we will check the temperature of the video card in the gadget AMD Radeon HD 7540D, which is 14 degrees.

Just like in the previous gadget, in whose contribution “ The program is launched by clicking on its shortcut in the menu area. Program settings can be found in the menu “» you can customize the sound indicator, which is a type of alert for high temperatures graphics processor. On the deposit " Color", as in both programs, you can customize the colors of the rows of windows.
From the butt you can see that vikoryst's gadgets, koristuvach always know the thermal characteristics of the processor and video card, and you can also find out if they are overheating.
Launching All CPU Meter and GPU Meter for Windows 8 and 10
To launch these gadgets, we need a utility 8GadgetPack. This utility contains a collection of various widgets. A welcome addition for the customer will be that he does not need to acquire the most looked at widgets, as the remaining pieces are already at the 8GadgetPack warehouse.
You can download the utility from the official website http://8gadgetpack.net. After installation, for example, in Windows 10, context menu You can add the item “ Gadgets».

The design of the window with a set of widgets closely resembles the Windows 7 window.

Setting up and installing new widgets is the same as in the family, so any PC owner can figure it out.
If your computer is running Windows XP, you will not be able to use the program. 8GadgetPack Because it is not supported in this version of the OS. To quickly use widgets for XP on your desktop cost-free utility Xwidget. For example, in Xwidget You can find such a popular desktop monitoring program as Afterburner from MSI.
This program supports a variety of widgets that can monitor the temperature in XP. Also Xwidget You can without any problems vikorystuvat both in the family and in the tens.
We pad the pouch
Which materials did we read about widgets for monitoring temperature readings? central processor and video cards on the desktop. From looking at the applications, you can see that any PC user can launch and configure widgets. Please read the additional material to learn how to install other options by following instructions.
We hope that this material will be useful for you and will allow you to easily monitor your system for the various widgets you are looking at.
Video on the topic
Pevne kolo koristuvachiv bezhat for technical characteristics computer. One of these indicators is the processor temperature. Monitoring is especially important on older PCs or devices whose settings are not balanced. First and foremost, such computers often get hot, so it is important to turn them off immediately. You can monitor the temperature of the processor in Windows 7 using additional gadgets that are specially installed.
Unfortunately, Windows 7 gadgets for monitoring the CPU system only have a CPU usage indicator, and there is no similar tool for monitoring the processor temperature. You can install it first by downloading it from the official Microsoft website. Ale later, fragments given company I praised the gadgets for the dangers of the system, from which it was likely to become increasingly difficult. Nowadays, tools that provide the temperature control function for Windows 7 can only be purchased on third-party sites. Next we will talk in more detail about the various programs in this category.
All CPU Meter
Let's finish with a description of gadgets for monitoring the temperature of the processor from one of the popular add-ons Whose directly - All CPU Meter.
- Once you go to the official website, enjoy not only the All CPU Meter itself, but also the PC Meter utility. If you don’t install it, the gadget will no longer rely on the processor, but will not be able to display its temperature.
- After whom go to "To the Explorer" to the directory where the desired object is located, and unzip the zip archives instead of both.
- Then run the unpacking file from gadget extensions.
- Opens at the end when you need to confirm your actions by pressing "Install".
- The gadget will be installed, and its interface will be immediately opened. Also, you will get more information about the attachment on the CPU and on the edge of the core, as well as a number of attachments RAM and the file is downloaded. Temperature data is not displayed.
- To correct this, move the cursor to the All CPU Meter shell. The close button will appear. Click on it.
- Navigate to the directory where you unpacked the PCMeter.zip archive. Go to the middle of the downloaded folder and click on the file with the EXE extension, which has the word “PCMeter” in its name.
- The utility will be installed in background mode and appear in the tray.
- Now click right button bears across the area "Desk". Choose among the options that presented themselves "Gadgets".
- Open at the end of gadgets. Click on name "All CPU Meter".
- The interface of the selected gadget opens. It is still not important to change the temperature of the processor. Place the cursor on the All CPU Meter shell. Right-handed icons appear in front of her. Click on the icon "Parameter" Viconations in the shape of the key.
- The adjustment finally appears. Go to tab "Options".
- A set of parameters will appear. In the field "Show CPU temperatures" Select a value from the list "ON (PC Meter)". In the field "Temperature Show In" If it is placed a little lower, from the part that opens, you can select a temperature unit: degrees Celsius (for washing) or Fahrenheit. Once all necessary settings have been completed, click "OK".
- Now, opposite the number of the skin core in the gadget interface, its current temperature is displayed.


CoreTemp
A new gadget for measuring processor temperature, as we can see, is called CoreTemp.


Please note that information in the gadget is only displayed until the CoreTemp program is running. When you exit this program, all data from the window will disappear. To update their display, you will need to run the program again.

HWiNFOMonitor
The latest gadget for monitoring CPU temperature is called HWiNFOMonitor. Like previous analogues, for correct functioning the wine will require the installation of the motherboard program.
- Thank you for everything, please install the HWiNFO program on your computer.
- Then launch the gadget file from behind and emboss the window that has opened "Install".
- After this, HWiNFOMonitor will start, and then a message will appear. To set up a correct robot, you need to perform a number of manipulations through the HWiNFO program interface.
- Launch the shell program HWiNFO. Click on the horizontal menu "Program" and select from the list "Settings".
- The adjustment window will now open. Obviously, place the icons opposite the advancing points:
- Minimize Sensors on Startup;
- Show Sensors on Startup;
- Minimize Main Windows on Startup.
Stitch in the same way, in the opposite direction to the parameter. "Shared Memory Support" there was a tick. For getting dressed, for work adjustments to the front, it’s already installed, but you still can’t get it under control. After you have installed icons in all relevant places, click "OK".
- Turning to the program window, click on the toolbar behind the button "Sensors".
- After which the window will open "Sensor Status".
- And what’s more important to us is that the gadget itself has a great set of technical data for computer monitoring. Opposite point "CPU (Tctl)" The processor temperature will be displayed.
- Like other analogues, when working with HWiNFOMonitor, to ensure the display of data, it is necessary for the mother program to work. Here's your guide - HWiNFO. Ale mi previously set up the adjustment of programs in such a manner that when pressed on standard icon throat at the window "Sensor Status", that's not how you burn "Panel zavdan", and trey.
- In such a way, the program may not work for you. About its operation, see the icon in the notification area.
- When you hover the cursor over the HWiNFOMonitor shell, a series of buttons will appear, which will help you close the gadget, drag it or swipe additional adjustment. Zokrema, the remaining function will be available after clicking on the icon that looks like a mechanical key.
- You will see a window for adjusting the gadget, where users can change the appearance of its shell and other display parameters.


Don't care about those Microsoft company inspired by the support of gadgets, other PP distributors will continue to release Danish type add-ons, including for adjusting the temperature of the central processor. If you need a minimal set of information that is displayed, then pay attention to the All CPU Meter and CoreTemp. If you want, in addition to the temperature data, to collect information about the computer’s system using a variety of other parameters, which is where you will choose HWiNFOMonitor. The peculiarity of all gadgets is that the mother program is necessarily launched when they display the temperature.
The problem of overheating threatens any computer or laptop. And apparently, serious overheating can result in significant consequences and losses. The two components of a computer that are most vulnerable to overheating are the processor and the video card. To prevent this from happening, you should install gadgets that display the temperature of the processor and video card directly on your desktop. With their help, you will now be able to control the temperature of your computers and promptly clean and replace thermal paste. The usefulness of gadgets has been verified on Windows 7, Windows 8.1 and Windows 10.

We present to you the most beautiful gadget on your desktop, which represents the mass basic information in real time about your processor, including its temperature! Also, All Cpu Meter shows the name of the processor, its logo, the frequency, what type of processor it is running on, the name of the computer, the amount of RAM, the load of the processor core and its temperature. The effectiveness of this gadget's processor temperature has been verified on Windows 7, Windows 8.1 and Windows 10. For correct operation of the gadget, a PCMeter is required.
1.Download and install the All Cpu Meter gadget;
2.Download and launch the PC Meter program as administrator;


4. We check to ensure that all the checkboxes are ticked;

With such configurations, the program itself will launch immediately from Windows and you will not have to launch it manually to display the temperature of the processor and video card.
5. Let’s go into setting up the gadget;

6.On the “Options” tab, in the “Show CPU temperatures” row, select “ON (PC Meter)”;

7. Set up the adjustment by pressing the Ok button;
GPU Meter - Video card temperature gadget for Windows 7, Windows 10 and Windows 8.1

GPU Meter is Robotnik's coolest gadget Windows desktop to display the temperature of the video card in real time! You can always control the temperature of your video card at any time. Which gadget displays the video card's name? clock frequency, low and low volume of video memory, fan speed. If you need a video card temperature gadget, then GPU Meter is better than a solution Whose food?
Enter
Indicators of attraction, which are available, and not less so from the outside looking in ale y carry suto practical bark.
This article consists of two independent parts: the processor and hard drive indicator.
Winchester attraction indicator
Before starting to build the indicator, search for the most optimal scheme. Having devoured a number of sites, I discovered a remarkably small variety of schemes. One of the most important criteria is to produce a clear fashion for very little money. Most circuits use LM3914 microcircuits, which are not that cheap. So I started looking for a microcircuit for the level indicator from the output of 5-8 LEDs. The choice fell on the AN6884 due to its low price and wide availability. This microcircuit outputs five light-emitting diodes and passes 7mA through the skin.
To read the signal, two darts are used in order to go from motherboard, to which the hard drive indicator LED is connected, located on the front panel. Instead of the LED, the input of the optocoupler (div. circuit) is connected to them. However, if you reverse the polarity, nothing will burn. The optocoupler on the circuit is necessary for the electrical decoupling of the circuit breakers of the motherboard and the indicator (it is not necessary to protect the motherboard first).
At zero voltage - the phototransistor in the middle of the optocoupler is closed - at which point C6 is discharged through R11. When the hard drive is activated, the phototransistor opens, and C6 begins to charge through it. The voltage on C6 changes proportionally to the voltage level. The fluidity of the pressure level changes continuously in the C6 capacity.
The voltage from C6 is taken through the connector R12, R14. Adjustment resistor R14 is used to change the sensitivity of the indicator.
LEDs can be installed at any discretion. For myself, I set the three smaller equals to greens, and the two larger ones to reds.
Hard drive indicator circuit
The indicator is adjusted until sensitivity is set using R14.
Processor status indicator
Since the hard drive indicator is already broken, I started to think about the indicator, what else. Select the CPU usage indicator.
In the search process, two options were found - through LPT and through COM.
I chose the COM port only so that there is no need for it to be administrated as LPT. In the process of searching, we found the Clear66 article, and found out about connecting a car tachometer to the COM port. This idea is less suitable because it does not require special circuits for converting digital values into an analog signal. To manage the vicor, the PCTach program is used (for example, statistics).
Although there were no fragments at hand at that moment, although any tachometer had a chance to work, a self-made version of the factory one. After folding and adjusting, the indicator of the processor's intensity began to show more or less accurately.
But I did not like the increased fluidity of the display of the level of attraction, which was expressed by the noticeable shrinking of the indicator needle when the processor was unevenly engaged. This was corrected by adding an additional capacitor in parallel to the microammeter.
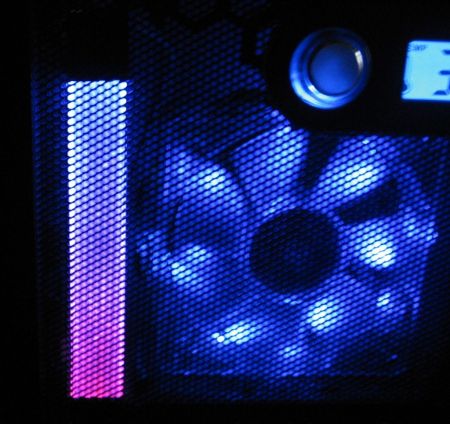
The appearance of the pointer indicator was less influenced, and we decided to look for an alternative. The indicator has become a single LED, and not a scale of two LEDs, but two directions opposite one to the other LED of a different color of illumination. The display of the value of the level is important for the smooth change of brightness of the LEDs.
To prepare the indicator, I used 4-5mm orgsclo and two light-emitting diodes: red and blue. From the orgskla there is a frame measuring 150mm by 15mm. After this, along the edges of the blur there are places under the LED. The end and one side of the grease need to be sanded with a zero-grit sandpaper to an even matte finish. This is necessary for uniform distribution of light. A piece of foil is glued to the back side (which is not sanded with emery paper) and to the sides of the paper to add light-emitting diodes. When the mixture is ready, the LEDs are glued.
Growth of light-emitting diodes in a male orgskla
If the LED is already glued, electrical tape or glue is glued to the ends of the strip so that it is self-adhesive. This is necessary so that the light-emitting diodes shine as much as possible on the desired part of the skin.
The blue fire symbolizes the cold, then. low processor speed. The red one at the bottom symbolizes heating, then. great attraction. The importance of the processor is proportional to the transition of colors among themselves. The wire that goes to the board and a 68-100 Ohm resistor are fixed at one edge of the joint behind additional hot-melt adhesive.
To smoothly change the brightness of the LEDs, a PWM signal shaping circuit is formed. With this method of curing, the brightness of the LEDs changes as the hour progresses and when the LEDs are not lit. This way better control voltage because the brightness of the LEDs changes proportionally to the voltage.
The scheme consists of the following blocks:
voltage form on DA1.1
sawtooth signal generator on DA2
voltage equalization block on DA1.2 DA1.3
The resistor circuit R4, R3 sets a voltage equal to 1.2 volts, which is approximately equal to the minimum voltage of saw-like pulses DA2. The pulses are taken from the third output to the COM port of the computer. When the input level is high, capacitor C1 is charged through resistor R1 and diode D1. When the level is low, capacitor C1 is discharged through R2. On C1, the voltage is proportional to the level of input of the processor. So, the amplitude of the voltage is less than the amplitude of saw-like pulses DA2 in the present booster circuit on DA1.1. The maximum level of the indicator can be adjusted by changing the gain coefficient using R6. Lancer R7, C3 residually smoothes out the voltage pulsation from the booster output. The PWM is formed using additional equalization of the vibrating voltage and saw-like pulses.
DA1.2 forms a direct, and DA1.3 inverts, a PWM signal. These two signals were sent to LEDs, first amplified by switches on transistors T3, T4.
Processor indicator circuit

Vikonannya
So, as I’m offended by the rotating indicators on the front panel, I’ll pay for them. At one edge of the dress there are two separate tracks with a dark appearance. Before this, two M3 nuts are soldered. In front of the frame of the body, two 3mm holes are drilled so that they stand between the centers of the nuts on the board. Then two M3 screws are screwed into these nuts on the plate, which pass through the openings in the frame.


Processor intensity indicator with different levels of attraction: