Hello. In today's article, I will talk about one problem that occurs among a large number of PC users. Namely, the problem when recording a desktop or game stream. That is, when a recording is in progress, an extraneous hissing noise is heard, even if the room is quiet. Driver update, microphone replacement, installation special programs the sound settings do not solve this problem.
The more often the comment sounds, the easier it will be. According to Problen, he helps against slogans. Perhaps you've already prepared text or keywords, or you want to accompany your photos with free audio commentary. It's nice to hear audio commentary at least once. If micro is already included with the sample, you can also listen to the test recording. The sample gives you more security, you know where the stumbling blocks are and pay attention better.
If you touch the microphone or cables while recording, it may also cause noise. Make sure your microphone is snug enough on your lips without touching it while recording. A microphone holder or even a stack of books can help. There's a pop car in front of the mic.
Runet has a lot of information on solving this problem. But unfortunately, all these supposedly valid tips did not help me. And in most cases, only 3 solutions are offered, about which a whole bunch of similar video lessons and articles have been written.
Personally, I found a simpler and more effective method, about which nothing like this is said on the Internet. The method is very simple, we do not have to install any programs or drivers. All you need is to use the program for recording video and configure it.
In flat sounds, air is pressed faster through our lips. The microphone acts like a violent storm, and very loud noise is generated. For example, a foam cover that protects the microphone from strong air currents. For some microphones this case is included.
You can also create or buy a separate pop protection. Avoid noise while recording. When it is fairly quiet, we record the sound in a room where there are no disturbing sounds - with the window closed and without putting in technical devices. Good location - closet. In the car, you can also easily record sound. Admittedly, you may prefer to sit at your computer. But what if he's racing through a loud fan? As mentioned above, it is important to find the right level. However, there are many other factors that can lead to noise or hum.
Open Broadcaster Software setup.
To get rid of unnecessary noise in the microphone opens the OBS program.
A program window will appear in front of us, in which we go to the microphone settings.
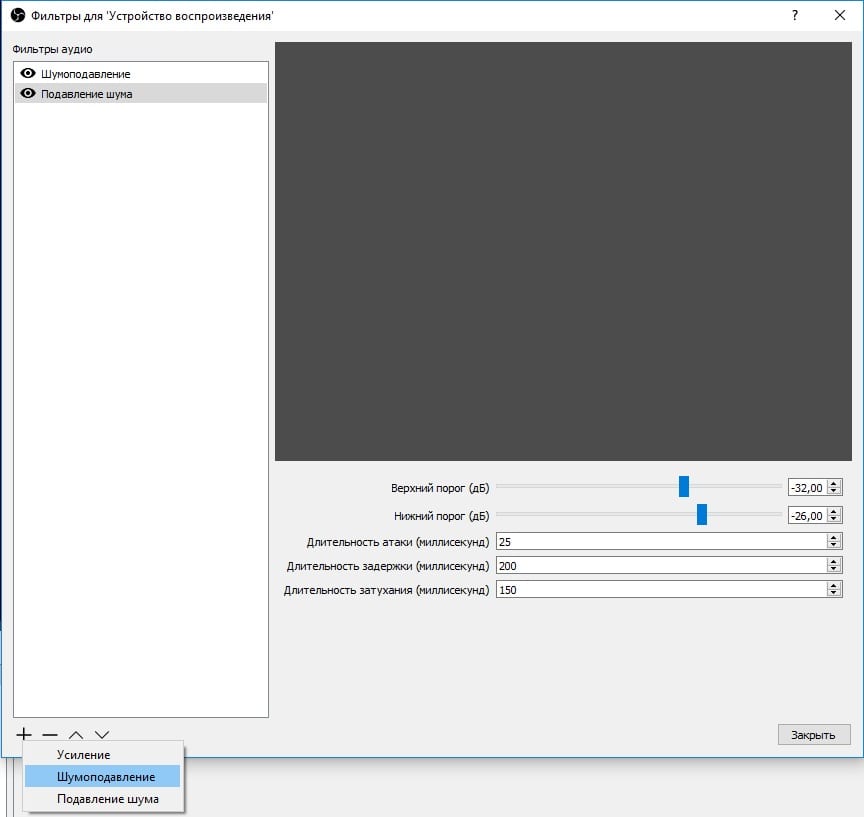
In the settings, select the filters section. And there we add a filter to gainand noise suppression.
Based on the recorder itself, cables, connectors, and audio input may be causing problems. sound card... Here one should act systematically and consider one factor after another. Purchased expensive microphone, interface to the installed software, and he already underway - the recording can be so simple, but the joy is often quickly blurred by unpleasant noise in the recording of the origin, it is often a mystery. We will give you some tips on how to get rid of noise.
Tip 1: eliminate the causes
To get a proper audio recording, you must first consider what equipment and budget are appropriate. Expensive microphones are often bought, the signal of which is sent to the audio interface with moderate quality. The result is usually disappointing and disappointing. There is no clear response to eliminate noise as various factors are involved.
For more details on how this is done, see the video.
That's basically all, the method is very simple and effective. Use it to your health! 😉
The author of the article, Alexander Rus!
Related materials:

How to create a bootable USB flash drive with Windows
Quite often, many have to reinstall operating system on your computer. And constantly there are problems with finding a good version of windows. On your ...
However, this is the wrong way to deal with noise along the way. Invest your energy in researching the causes to figure out where the noise in the signal path comes from. This also applies to devices that are often not viewed as the cause of external hard drives. To mute the speaker volume, you will hear sound from the headphone output.
Do not underestimate the role of the cables used, even here you cannot save on the wrong end! Make sure cables are shielded and only when necessary. All devices must be connected to the same outlet. The best results are achieved with a high quality condenser microphone and a sensible audio interface that are of a quality standard. The best mic sounds as good as the connected interface.

How to reduce image size
Hello. From time to time I monitor my site on the google service - PageSpeed \u200b\u200bInsights, to check the site loading speed. So it is there ...

We recommend a condenser microphone due to its very low noise level of only 5 dB and its very good quality a sound that is unmatched in this price class. The microphone comes complete with pop shielding and a spider mic, which we highly recommend for high quality recording.
Tip 3: sum makes music
Recording is only as low-noise as the fastest element in the signal path. Don't focus on the component, the amount makes up the music. If the hardware setup has been verified, the volume must be set correctly. Since the time of analog recording, this principle is still known as loudly as possible to record, which in short is synonymous with similar media. This is no longer suitable in the digital age.
Hooray! You have become the owner of a good and possibly expensive studio microphone. Can't wait to try it out and delight the audience with the new sound of your voice? Eh, if only everything were so easy ... Microphones of this level usually have high sensitivity and pick up almost all sounds in the room and, most likely, outside it.
Tip 4: as quietly and louder as possible when needed
A very good value for vocal recordings is to record it at a maximum level of -10 dB. High levels input signal unnecessarily amplify the microphone's own noise. Take advantage of 24-bit quality and use your hardware that gives you plenty of space.
Tip 5: create a compact recording location
Do not emphasize the difference in sound between an environment that is optimized for recording and any that is not suitable. Of course, the chosen room should be as quiet as possible, with very few surfaces that reflect sound well. For example useful or hanging windows. Create a compact recording space without sources of interference such as power supplies, pipe monitors, and ambient noise.
In this tutorial, we'll show you how to remove low frequency noise and make your voice more interesting to viewers.
Software
To implement our idea, you need to install 2 programs: Adobe Audition and Virtual Audio Cable (both programs are paid, but ... μ). The first is used to process audio tracks, the second to output the processed result to the capture program. In our case, it will be OBS. The entire chain of interactions looks like this:
It offers you an uncomplicated solution that can be installed and removed quickly. Just sit with a microphone under your vocal recording mat and compare this recording to one in your regular recording environment to make a difference. If you use these instruments, you should be aware that the audible parts of the sound mix disappear or deteriorate, and the natural character can be tampered with.
Use noise reduction software very carefully and with the help of know-how, adjustments without specific knowledge often make more disturbances than you help. If you are struggling with noise, you can start the problem step by step, starting with the components, connecting to the recording environment, controlling the level before controlling the noise with plugins. Developed root control is definitely worth the more noise with plugins and filters to combat and achieve better quality results.
Let's start with the microphone and create the default values \u200b\u200b- set the averaged parameters, with which you can subsequently perform various manipulations and customize the capture for yourself. Our values:
- Audio capture: 50%
- Capture Method: Cardioid *
(Cardioid mode can be the default, without any switches. This is the case with most mid-pro and professional microphones. -approx. sleepsomewhile)
Choose your equipment wisely — the sound quality of your recording sounds as good as the worst component in the signal path. The maximum level is -10 dB at 24-bit quality. Put in the effort and optimize your recording environment if possible. Learn how you can use plugins like squelch.
All of these factors are added together in the recording, according to which no one wanted to be neglected if professional recording was required for them. Virtually every mixing and mastering engineer had to work on audio material in their career that was garnished with unsightly crackers or other nasty noises. The main task is to carefully study the supplied audio material for errors and, if necessary, correct them.
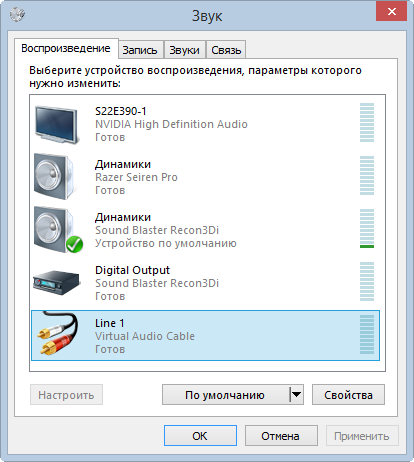
Download and install Virtual Audio Cable, then go to the audio settings (speaker icon) and select Recorders there.
Unity is strength
First, we need to configure the microphone for the audio format used in OBS. The default is 44100Hz, for better sound you can use 48000Hz.
Most interference has the unpleasant property of constantly pulling through individual tracks or entire songs and thereby constantly changing the ear to negative. This applies, for example, to low-frequency mains rumbling, high-frequency hiss of lamps, or relatively loud noise in unsuccessful recordings.
Their amplitude is often so high that they superimpose the wanted signal for several milliseconds. Both phenomena can be clearly seen in the waveform representation of the affected track. Since each processing of audio material can lead to further errors, it is important to weigh the troubleshooting carefully. Generally, short-term impulses are less noticeable than permanent noise mats. Many sounds can be clearly heard in solo mode, but they are completely lost in interaction with other tracks in the project.
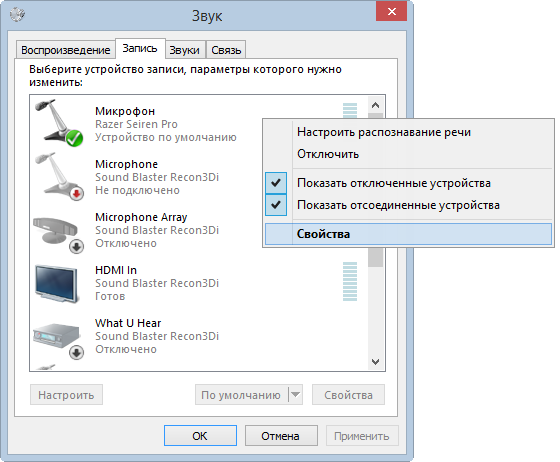
- In the Recording tab, click right click on the microphone and select Properties.
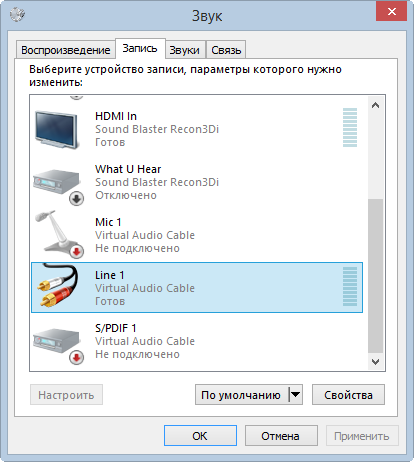
- Go back and in the Record tab, select Line 1, right-click and select Properties.
- In the window that opens, select Levels and set the volume to 50%.
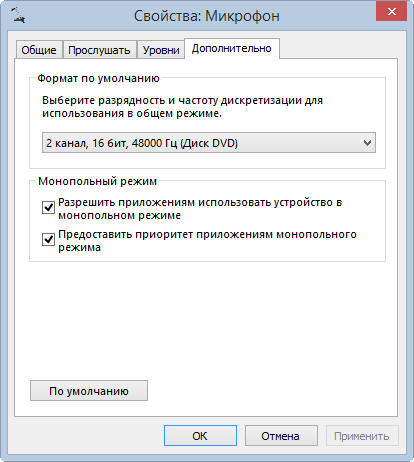
- In the Additional tab, set the default format (2 channel, 16 bit, 44100 or 2 channel, 16 bit, 48000).
In such a case, processing can lead to unnecessary and time consuming use. In other words, if they are of no use to the song or instrument. In this case, the compressor or limiter used will react much more strongly during the pulses than before or after.
The possible triggers for temporary interference pulses are manifold. Natural disturbances include, for example, the scythe and tongues of a singer, or scraps recorded too loudly in wind instruments. It is often recommended to reduce this noise level. Even during firing and synchronization processes or during mixing, sources of errors can be recorded in the audio material that was still played through the computer's hanger. Progressive technologies are becoming more stable - mistakes of this kind are rare.
- Go back and in the Playback tab select Line 1, right-click and select Properties.
- In the window that opens, select Levels and set the volume to 50%.
- In the Additional tab, set the default format (2 channel, 16 bit, 44100 or 2 channel, 16 bit, 48000).
However, you should always listen critically at different stages of your production and check if everything sounds the way it should. Even in the analogue environment, sources of error penetrate: for example, through oxidized device connections, defective cable connections or damaged or dirty analogue data carriers.
Chronic human noises. Inattentive editing work can also lead to unsightly noise. These errors are manual and cannot be read from the original form of the edited track if it is not recalculated. To minimize the risk of errors in the digital and analog domain, please note the following.
All of these adjustments have been made in order for Virtual Audio Cable to work properly.
Adobe Audition settings
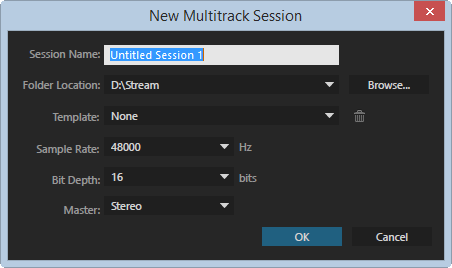
Despite the fact that Adobe Audition has a very wide functionality, we will use only some of it. By running the program for the first time, you can enjoy a pristine clean screen. Choose File -\u003e New -\u003e Multitrack Session. In the window that opens, leave the following settings:
They all have advantages and disadvantages - their suitability mainly depends on whether you are dealing with a language, an instrument, or a whole mix. It is also important where exactly the noise occurs. You can then access the EQ and automate it so that it can temporarily remove a narrow range of problematic frequencies. Also, the use of a compressor or limiter can help regulate the appearance of a peak in perception.
After noise reduction, plugins should be disabled again by automation. Each manufacturer uses its own method, which is usually based on physical principles. Often the steep return signals from the plug-ins are routed to the virtual one, and the original signal is phase-inverted again so that the antiphase noise pulses cancel each other out.
Click OK, then go to Edit and at the very bottom of the Preferences, and there Audio Hardware ...
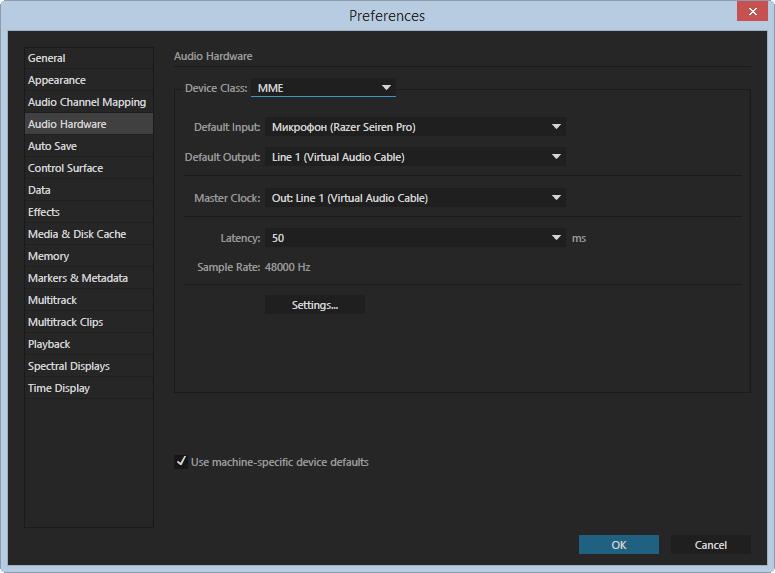
In the window that opens, select:
- Device Class - MME;
- Default Input - your microphone;
- Default Output - Line 1;
- Master Clock - Line 1;
- Lattency - 50 ms *.
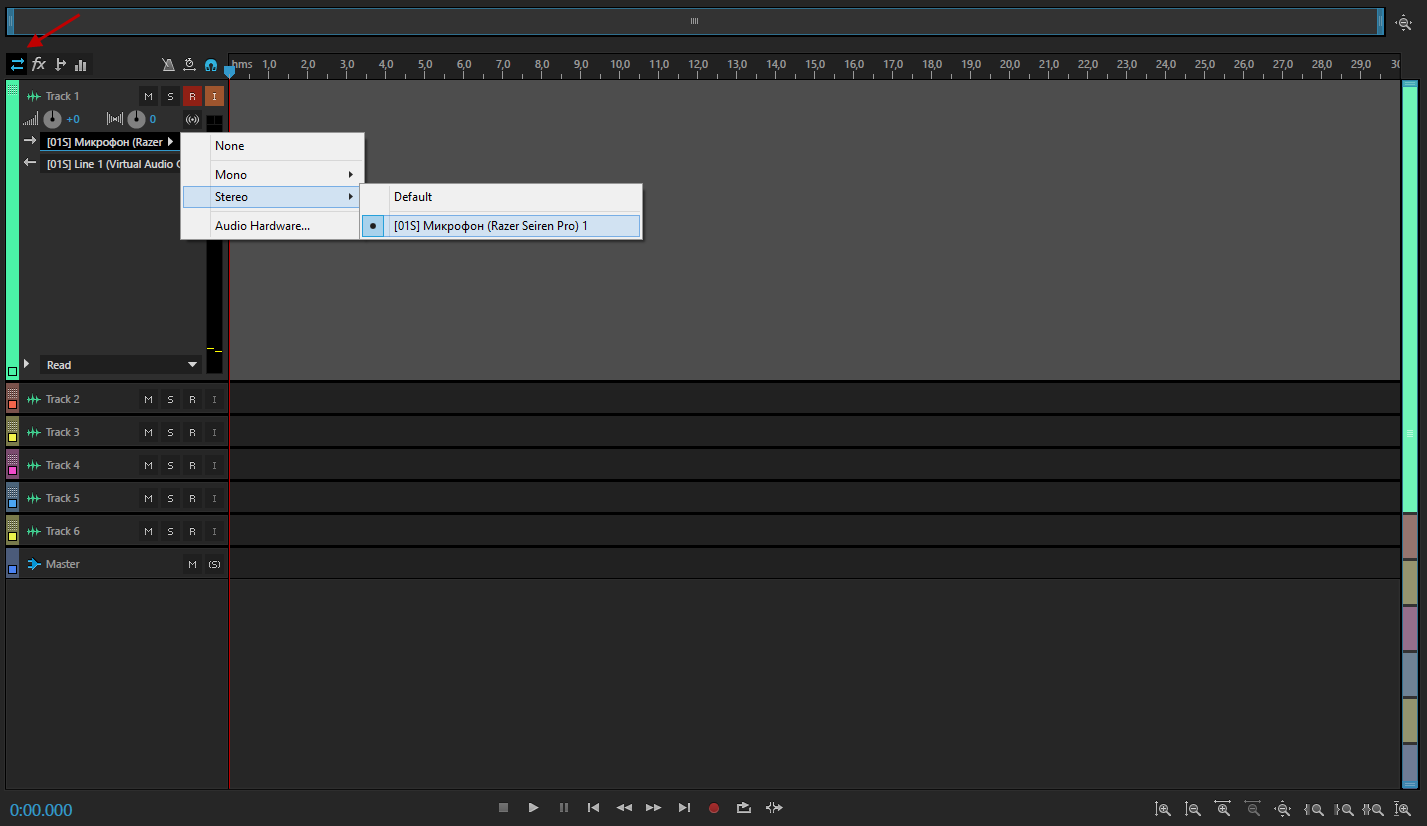
In the main editor window on Track 1, select the Input / Output icon and in the Input field, select Stereo -\u003e our microphone, in the Output field, select Stereo -\u003e Line 1
The dangers of using plugins like this are also to draw in a useful signal of compassion. These types of plugins give good results when glitches significantly overload the signal. Typically, plugins cannot replace manual intervention.
Rather, they are an urgent solution for quick results. The scissor tool is especially suitable for solving problematic interference. When working with scissors, it is important that it is cut with the zero strokes of the waveform. If desired, after that, you can set the attenuation on the useful signal so that no new cracks appear.
* If the webcam and sound are not synchronized during the broadcast, set the microphone offset in the OBS audio settings, for example -50 ms.
Removing unnecessary noise
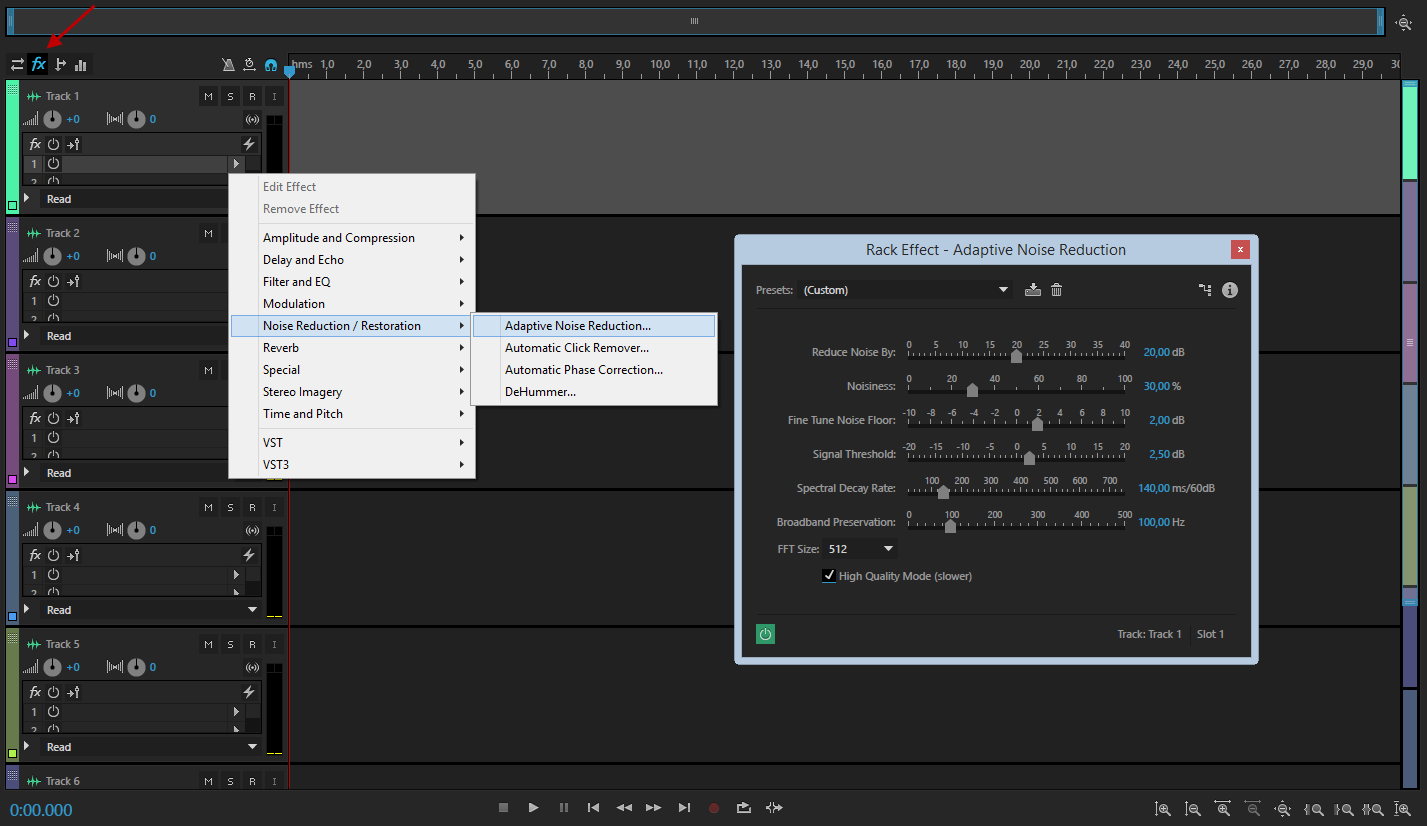
It's time to add effects that will help get rid of unnecessary noise and make our voice more pleasant. To do this, select the Effects icon, and add our first effect, Adaptive Noise Reduction. In most cases, you can leave the default values \u200b\u200bby adding only the High Quality Mode checkbox. Noticed the letters M, S, R, I opposite Track 1? For all settings to work, you need to activate R (Record) and, if desired, I (Monitor Imput) to activate the visual display of the input signal in Adobe Audition. These settings are enough for streaming, but if you still want to get the best sound, then we should continue.
N.B. Adaptive Noise Reduction removes noise, but reduces the amount of "pronounced" sound. This is due to the clipping of the base noise frequencies. Consequently, fewer overtones remain in the voice, it becomes less pronounced, rich, and so on. BUT, this thing cuts out noise. And for some, that will be enough.
- Adaptive Noise Reduction - noise suppression;
- Hard limiter - limits the volume of the sound, suitable for those who like to scream during the broadcast, but do not want the audience's ears to faint;
- Parametric Equalizer - adds a little bass to your voice;
- Multiband Compressor - the main voice processor, I would recommend not to change anything here, but it's also worth playing around with the settings;
- Dynamics Processing - allows you to more accurately adjust the noise reduction, for example.
You can download ready-made settings and play around with Adobe Audition yourself.
If you have any questions, we will be happy to answer them in the comments.