Description Reviews (0) Screenshots
- Full, as well as incremental backups of the system files necessary for the computer to work on local media, as well as in the Acronis Cloud.
- Unusual double protection for the entire system, available in the event that the local copy is damaged, was lost or stolen.
- Affordable backup of data, folders and files - both in the cloud and in local storage.
- The ability to recover from the cloud - fast and high-quality recovery of the entire system, without the need for storage on a local media.
- Try & Decide - the ability to create secure, controlled and temporary spaces to work on your PC without any need to install special software for virtualization. With it, you can safely install new programs, safely visit suspicious sites and open files downloaded from suspicious sources.
- 5 gigabytes of secure storage Acronis Cloud is available for free for 1 year (it can be expanded for a fee in the application interface). Here users can download their most essential data and use it from anywhere in the world.
- Support for Windows 10. Windows 7 Acronis Recovery Utility also works on the new Windows 10 operating system.
Acronis True Image 2016 is a utility that allows computer users to take advantage of advanced features to protect data and important information from theft or inoperability of your computer by creating and storing a complete image of your system in a secure remote storage. In other words, this is a program for recovering Windows 7.
Using the best local backup capabilities on plug-in portable USB data carriers, users of their computer can be one hundred percent sure that a complete system image, including all data, applications, files, bookmarks and settings, will be protected reliably.
Simple and easy-to-use interface of Acronis True Image 2016 allows users to back up and disaster recovery of Windows 7 much easier using previously saved data. User data and his backups will be available and restored anytime, anywhere, for absolutely any computer.


The main tasks performed by the Windows 7 recovery utility
By downloading the above application once, you will forever get rid of the fear that your operating system will crash. If you liked this program, we advise you to pay attention to.
Backing up is the most important procedure that should be followed by every PC user. Unfortunately, most of us remember about backups only when important data has already been irretrievably lost.
If you store not only entertainment content, but also important documents, work projects or databases on your computer's hard drives, then you need to think about their safety. Do not forget about system files and parameters, as their damage can deprive you of access to your account, and therefore to data.
Acronis True Image is one of the most widely used and powerful software for backup, recovery and data storage. Akronis can create copies of individual files, folders and entire disks. In addition, it includes an arsenal of tools to improve system security, restore boot, create rescue media and clone disks.

The user is given space in the cloud on the software developers' server, which, as well as managing the program, can be accessed not only from a desktop machine, but also from a mobile device.
Aomei Backupper Standard
Aomei Backupper Standard is slightly inferior in functionality to Akronis, but it is also a very efficient tool. It includes utilities for cloning and creating bootable disks on Linux and Windows PE, has a built-in task scheduler and a function to notify the user by e-mail about the results of the next backup.

Macrium Reflect
This is another harvester for creating backups. Macrium Reflect allows you to mount copies of disks and files into the system to view the contents and restore individual elements. The main distinguishing features of the program are the functions of protecting disk images from editing, checking the file system to identify various failures, as well as integrating into the operating system boot menu.

Windows Handy Backup
This program, in addition to backing up files and folders, allows you to synchronize the contents of backups and directories on local and network drives. Windows Handy Backup can also launch selected applications at startup or completion of the backup procedure, send notifications by e-mail, and work through the Windows console.

Windows Repair
Windows Repair is a comprehensive software for restoring the operating system. The program "cures" the system in the event of a firewall failure, errors in update packages, restrictions on access to system files by viruses, and also restores the functionality of some ports. For increased security, there is a flexible disc cleaning function.

All software from the above list is designed to restore the system from the created backups. Only Windows Repair is out of the picture, since its principle of operation is based on identifying and eliminating errors in the file system and registry.
Most of the programs presented are paid, but the price of important information stored on disks can be higher than the cost of a license, and this is not only about money. Make backups of key files and system partitions in time to protect yourself from unpleasant surprises in the form of disk breakdowns or hooliganism of malicious applications.
Windows recovery software Windows 10 and previous versions should restore files and, if necessary, perform a full Windows system restore from a backup. Handy Backup solution contains a complete set of plugins to accomplish these tasks.
Features of Handy Backup as Windows recovery software
Free access to all Windows files
When Handy Backup is used as a Windows file recovery program, the "Computer" plugin allows you to freely access files and folders, even those occupied by other applications. Handy Backup can also work with libraries and registry.
Universal program for Windows system recovery
Plugins "Disk Image" and "System Recovery", as well as the utility Disaster Recovery, allow you to restore Windows 10 and previous versions to "bare metal" (new or blank disk), over the network or over an old copy of the OS, preserving all data.
Cross-platform solution
Disaster Recovery (HBDR) and Handy Backup can not only restore Windows 10 or earlier versions, but can also be used to restore Windows in server solutions, Linux disk images, FreeBSD and other operating systems.
Recommended solution for restoring Windows from a backup
Video Tutorial: Windows Backup and Restore
This video tutorial shows how to create and restore a Windows system from a backup using the Disk Image plug-in and the Disaster Recovery utility. Handy Backup interface is shown in English, but steps are similar for Russian. Handy Backup Disaster Recovery interface is available in English only.
Note: In this video tutorial, Handy Backup software is already installed on your computer and Disaster Recovery utility is installed on a USB disk.
How do I perform a Windows System Restore using HBDR?
Here is a quick guide to using the Disaster Recovery utility. If you need detailed help about this utility, please refer to the User Guide.
Before restoring Windows, you will need:
- USB disk with HBDR utility installed,
- backup disk image created using the Disaster Recovery utility, Disk Image plug-in or System Recovery,
- as well as the computer to which you will perform Windows recovery.
- Before starting, make a backup copy of the drive to which you will be performing Windows system recovery. You can lose important data by restoring Windows to a disk that already contains information; in this case, preliminary copying of the hard disk will help you.
- Boot your computer from a USB drive containing a copy of Handy Backup Disaster Recovery. The system image that you are restoring can be located either on a USB disk or on any disk connected to the computer.
- On the desktop, open the Disaster Recovery utility, and in it the folder Tasks... Click New Task on the window toolbar. A dialogue will open New Task... Enter a name for the new Windows recovery task in the box Name and select the task type Restore... Click OK.
- A new task window will open. Open a folder on your desktop My computer... Find the file with the disk image from which you are going to perform the Windows 10 system restore (or any other). Drag this file to the task folder What to restore.

- Go to the window again My computer and double-click the drive name that Windows recovery software will use as the destination. For the whole disk, you need to use the object full drive image in folder Where to restore.
- To run the task, click Restore on the task control panel. The Windows repair program will start to automatically perform your task. Wait until it completes, remove the USB disk from the computer and restart the computer.
Handy Backup solution is an efficient and convenient recovery software for Windows 10 and any other OS. Download the 30-day free trial now with a full suite of plugins and features!
Due to the presence of viruses, mismatch of drivers or software, the OS may malfunction. If your Windows crashed, don't panic. The situation can be corrected by returning the state of files and programs to the time when the PC was working properly.
Certain errors and problems may occur while running OS Windows 7, 10 or 8. As a result of such failures, a new start of the operating system in operating mode becomes impossible. In this case, it is not at all necessary to do a laborious reinstallation of the OS. It is enough to perform a system restore.
OS recovery using recovery environment
When working, we use the following scheme of actions:
- Reboot the computer, press the F8 key during boot;
- Troubleshooting;
- System restore, select OS restore point;
- Click "Further" and again "Further";
- Push the button "Done", we reboot the system (in the Menu, select the boot with the last good configuration).
There are several ways that you can resort to resuming the OS. Some of them are based on rolling back to saved parameters. Others simply clear the data.
You can "reanimate" the OS in one of the following ways:
- by choosing restore points;
- using the command line;
- through safe mode;
- using the recovery environment;
- using an image / boot disk.
Recovering the operating system using the "reanimation" checkpoints of the system is one of the most affordable, effective and popular options. To apply it, you need to spend a series of clicks:
- Panel "Start";
- "System Restore";
- "Further";
- "Select a restore point";
- "Done".
Such an operation will fix the problem with the computer, discard the changes and return the system to the operating state that allowed the PC to boot normally. No data, files or documents are lost during such recovery. All data is saved. The operation is reversible. You can roll back the system to a previous computer state and use a different restore point.
Many people ask themselves how to independently (manually) make a recovery point in order to select it in the future? To do this, in the same menu "Start" - "System Restore" you can create such a point yourself at any convenient and suitable moment for you. It will be saved with the current date, which you can only remember.
From the point of recovery
In computer engineering, there is such a thing as a restore point. These are saved PC parameters. As a rule, saving occurs automatically with each successful OS boot. The easiest way to resume Windows 7 is to use this data.
Press F8 while booting your computer. This command will bring up a menu of options for starting the system. Next, you need to select the Last Known Good Configuration option.
Another method can be used. Go to the properties of the My Computer folder. Find the line System protection, by clicking on which you will open the dialog box of the same name. Click Recovery - Next. We set a key date, specify the disks to be repaired, and confirm the actions. After restarting, the PC should work fine.
No restore points
You can fix problems with the OS even without restore points. To do this, you need to resort to the LiveCD program. It needs to be downloaded and written to a USB flash drive with the .iso extension.
Further, all actions will take place in the BIOS. It is necessary to configure booting from a USB flash drive. To do this, in the Boot section, select USB-HDD in the First boot device line.
Before proceeding directly to the recovery, copy all the necessary files to a removable disk. The LiveCD program provides a special menu for this purpose.
We will fix the system error using an archive copy. Connect the USB flash drive, open the Windows \\ System32 \\ config \\ folder. Files with the names default, sam, security, software, system must be transferred to any other folder. In their place we transfer similar files from the RegBack folder and restart the computer.

The described method will only help if the problem is related to the registry.
Command line
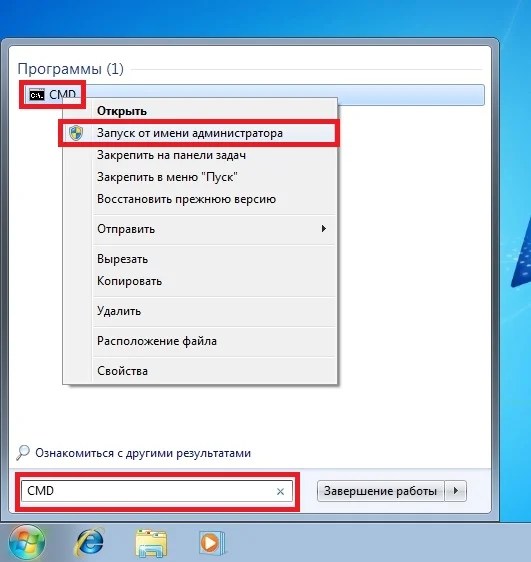
You can resort to "reanimating" Windows 7 from the command line if the PC begins to freeze or work slowly, however, the system boots. Enter the menu "Start" and use the right mouse button to run Command Prompt as administrator. Issue the rstrui.exe command, which will open the System Restore program. Click "Further"... In the next window, select the desired rollback point and click again "Further"... Upon completion of the process, the PC should work normally.
You can enter the utility differently. Go to "Start"... To call the command line, press "Run" and register the CMD command. Click on the found CMD.exe file and wait for the launch. Next, enter rstrui.exe in the command line and confirm the action with the Enter key on the keyboard.
It is not always possible to play it safe and create OS restore points in advance. There may be problems that block the option of such a "resuscitation" of the PC. Then you can use another, no less effective and easy option - Windows system recovery using the system itself.
We rely on the diagram:
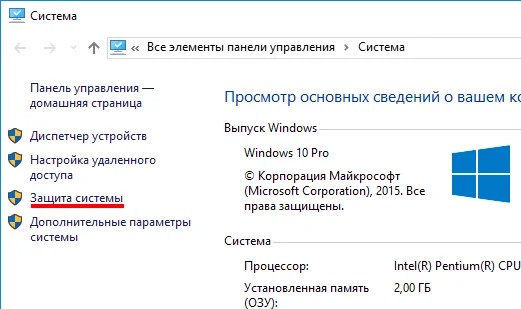
- Icon "My computer" - right mouse button "Properties";
- "System protection";
- In the new window, click "System protection", restore button;
- "Further";
- We select a restore point in accordance with the date;
- We indicate the system disks to be restored;
- We confirm the operations and reboot the system.
Restoring Windows 7 with Safe Mode
This method is preferred if the usual system boot is impossible. Then after pressing the PC power button on the system unit, hold down the F8 key to call Launch menu... One of the "Menu" options is "Safe mode"... Select it and press Enter on your keyboard. As soon as Windows boots up, we perform the same algorithm of actions that we described earlier.
System Restore Windows 8 / 8.1
If you were able to start the OS, you can resume Windows 8 via "Options"... Move your cursor over the upper right corner and enter them. Click on "Changing computer settings" – ... Section "Recovery" will offer several options:
- "Normal recovery with information preservation".
- "Removing data and reinstalling the OS".
- "Special Option".
Decide what exactly needs to be done. Then follow the prompts on the menu.
If you choose the latter method, in the window that opens, click on the diagnostic item. You will be offered the following options:
- "Restore";
- "Reset to original state";
- "Extra options"... This item includes the ability to roll back to the desired resume point.

To resume Windows 8.1 press Win + R and call sysdm.cpl. In the system properties window in the tab "Protection" specify the required system drive. Click "Restore"... By clicking "Further", you will be able to see a list of rollback points. Select the one you want and click Search for affected programs... Changes that have been made on the PC since the selected moment will be deleted. End the process by clicking "Done".
In the case of working with Windows 8, problems may occur, incorrect operation of the Internet, etc. To fix this, you can use the classic recovery method via restore points.
Another option is to roll back the system. To do this, open the menu "Start" - "Control Panel" - Windows Update... Choose an item "Removing updates"... You can do the same using the command line.
So, in the list of updates that opens, we delete those of them, from the moment of installation of which (look by date) problems and problems began. Delete unnecessary files and reboot.
In Windows 8.1, you can perform a factory reset. Important files will not be affected by this operation. The method is effective, but for its implementation you need the OS to boot without problems. We use the algorithm:
- Right side of the monitor - "Options";
- "Change settings";
- "Update and recovery" - "Recovery";
- "Recover without deleting files".
If you cannot log into the system in the usual way, you must use the system disk. Load the installation disk, select "System Restore"... Push the button "Diagnostics"and "Restore".
If you have problems with Windows 10, press Windows + Pause. Go to "System protection" and press "Restore" – "Further"... Select the required indicator and press again "Further"... When done, press "Done"... The computer will automatically restart and the changes will take effect.
One of the advantages of "ten" is the ability to return the settings to the factory settings. This avoids having to install the system first. To reset data go to "Computer settings" – Update and Security – "Recovery" – "Reset the computer to its original state"... Click "To begin".
You can take care of the possibility of rollback in case of failure in advance. You can create resume points yourself, or you can set up their automatic creation at the desired frequency. To do this, in the settings, in the Update and security item, select Backup service. Specify where to save copies, click Add Disk. After selecting a device, the function will be activated.
You can restore the Windows 10 system again through using restore points. In this case, the system will roll back to the moment when it was unimpeded booting and working without failures. This recovery method is described at the beginning of the article.
If the OS does not boot, then a warning table appears on the screen with the key "Additional recovery options"... Click it and select "Diagnostics" - "System Restore"... We make a choice of the Windows restore point, wait for the system rollback and reboot.
If such operations did not help and the computer continues to work incorrectly, you can roll back to the basic settings. Some programs and utilities, personal PC settings will be reset, and personal data will be deleted.
This technique is rarely used if the other options described above do not help. The algorithm of actions is as follows:
- "Start" - "Parameter selection" - tab "Updates and Security";
- Paragraph "Recovery" - button "To begin";
- We choose to delete all files or keep them partially.
It will then take 40-90 minutes to roll back the system.
Resume using the installation disc
One of the radical methods of fixing the error involves using an installation disc. After launching it in BIOS, click System Restore. Under Troubleshooting, specify the desired action. Then follow the prompts of the system to complete the process.