We have an RB751U router at our disposal, which in turn is connected to the Interzet provider. Our task includes, in a standard way, configure the connection to the provider's network, local and wireless networks, firewall rules for safe work on the Internet, well, and learn other useful tricks that will be useful to us in future work.
For a better understanding of the configuration process, in addition to the traditional screenshots of the RouterOS interface through Winbox, I will simultaneously post CLI commands, as if the configuration was done in the terminal or via SSH.
![]()
Then go to the Advanced tab and set the values \u200b\u200bas in the picture.
 On the HT tab, change the following parameters.

Click OK. Then go to the Security Profiles tab and select the default profile.
 We set the mode and type of encryption, set the password. Click OK.

Then go to the Interfaces tab and enable the wlan1 interface.

To perform the same operations through the terminal, we type the following commands:
/ interface wireless set wlan1 bridge-mode \u003d enabled name \u003d wlan1 disabled \u003d no mode \u003d ap-bridge band \u003d 2ghz-b / g / n channel-width \u003d 20 / 40mhz-ht-above ssid \u003d Mikrotik wireless-protocol \u003d 802.11 frequency -mode \u003d regulatory-domain country \u003d russia wmm-support \u003d enable distance \u003d indoors periodic-calibration \u003d enabled hw-protection-mode \u003d rts-cts adaptive-noise-immunity \u003d ap-and-client-mode ht-rxchains \u003d 0, 1 ht-txchains \u003d 0.1 ht-guard-interval \u003d long / interface wireless security-profiles set default mode \u003d dynamic-keys authentication-types \u003d wpa2-psk wpa2-pre-shared-key \u003d 12345678
This completes the wi-fi setup.
5) Configuring the security of access to the router
Disable unnecessary management services to access the device. To do this, go to the IP \\ Services menu and sequentially disable them by clicking on the cross.

We will also set the filter for connections from a specific ip-address or network by setting it in the "Available From" field.

In the terminal, the procedure is similar: Display a list of services, disable unnecessary ones, allow access to a specific service from the 192.168.3.0/24 network
/ ip service print / ip service disable 0,1,2,4,5,7 / ip service set www port \u003d 80 address \u003d 192.168.3.0 / 24 / ip service set ssh port \u003d 22 address \u003d 192.168.3.0 / 24
Disable the search for other devices (neighbors) using the MNDP and CDP protocols on external interfaces. It is also advisable to disable it on internal interfaces, but if you need access to the router by the mac-address, then we leave the local interface. To do this, go to the IP \\ Neighbors \\ Discovery Interfaces menu and disable everything except the internal LAN (ether2) or Bridge interfaces by clicking on the Disable button.

/ ip neighbor discovery print / ip neighbor discovery set 0,1,2,3,4,5 discover \u003d no
Then we go to the Tools / MAC Server menu and on the Telnet Interfaces and WinBox Interfaces tabs we also leave only the internal interfaces and disable the "* all" interface. We leave Bridge, because again access via Winbox stops working.

/ tool mac-server disable 0,1,2,3,4,5,6 / tool mac-server mac-winbox disable 0,1,2,3,4,5
Change username and password account administrator in the System \\ Users menu. In the Group field, set the access rights. Possible options: full - full administrative access, read - view information about settings and events and execute commands that do not affect the configuration of the router, write - change settings and policies, except for the settings of system users.

/ user set supermicro password \u003d 12345678 group \u003d full
6) Configuring traffic filtering, Internet access
By default, the standard script configures the firewall in such a way as to pass from local network outside any traffic (mascarading), and outside only that which is requested by local hosts (dnat), as well as ping.
Starting with RouterOS 6.23, the autotuning script prescribes 6 filtering rules. And now, in one rule, you can set several connection states, as well as a new connection state that is responsible for network address translation (connection NAT state).
At the very beginning, we will create a rule that prohibits access to the wan interface from IP addresses that should not be used in Internet routing tables. (bogon networks). To do this, first set a list of these networks in IP \\ Firewall \\ Address Lists:

/ ip firewall address-list add address \u003d 0.0.0.0 / 8 disabled \u003d no list \u003d BOGON add address \u003d 10.0.0.0 / 8 disabled \u003d yes list \u003d BOGON add address \u003d 100.64.0.0 / 10 disabled \u003d no list \u003d BOGON add address \u003d 127.0.0.0 / 8 disabled \u003d no list \u003d BOGON add address \u003d 169.254.0.0 / 16 disabled \u003d no list \u003d BOGON add address \u003d 172.16.0.0 / 12 disabled \u003d no list \u003d BOGON add address \u003d 192.0.0.0 / 24 disabled \u003d no list \u003d BOGON add address \u003d 192.0.2.0 / 24 disabled \u003d no list \u003d BOGON add address \u003d 192.168.0.0 / 16 disabled \u003d yes list \u003d BOGON add address \u003d 198.18.0.0 / 15 disabled \u003d no list \u003d BOGON add address \u003d 198.51 .100.0 / 24 disabled \u003d no list \u003d BOGON add address \u003d 203.0.113.0 / 24 disabled \u003d no list \u003d BOGON add address \u003d 224.0.0.0 / 4 disabled \u003d no list \u003d BOGON add address \u003d 240.0.0.0 / 4 disabled \u003d no list \u003d BOGON
But pay attention that our provider gives us network settings, ip-address and dns-server, which just fall into some of the ranges. Therefore, we disable them, otherwise the Internet will not work for us :) Then add the rule itself:
/ ip firewall filter add action \u003d drop chain \u003d input in-interface \u003d ether1 src-address-list \u003d BOGON comment \u003d "boggon input drop"
The next rule is protection against IP spoofing (reply with an RST packet to a SYN-ACK packet if it is the first in the connection):
/ ip firewall filter add action \u003d reject chain \u003d input reject-with \u003d tcp-reset protocol \u003d tcp tcp-flags \u003d syn, ack connection-state \u003d new comment \u003d "ip spoofing protect"
/ ip firewall filter add chain \u003d input protocol \u003d icmp comment \u003d "ping"
Then we allow traffic to pass to the router (: input chain) of already established and related connections:
/ ip firewall filter add chain \u003d input connection-state \u003d established, related comment \u003d "accept established & related"
And we prohibit any other incoming connections to the router.
/ ip firewall filter add chain \u003d input action \u003d drop in-interface \u003d ether1 comment \u003d "drop input"
Then let's allow traffic to pass through the router (: forward chain) of already established and related connections:
/ ip firewall filter add chain \u003d forward connection-state \u003d established, related comment \u003d "established forward & related"
We prohibit any other traffic in the forward chain:
/ ip firewall filter add chain \u003d forward action \u003d drop connection-state \u003d invalid comment \u003d "drop forward"
At the output, we get the following picture:

To configure Internet access / masquerading (NAT) for computers specified in the "lan-access" group, add the following rules:
/ ip firewall address-list add address \u003d 192.168.3.10 / 31 disabled \u003d no list \u003d lan-access / ip firewall nat add action \u003d masquerade chain \u003d srcnat out-interface \u003d ether1 list \u003d lan-access
As a result, computers with IP addresses 192.168.3.10, 192.168.3.11 will be allowed access to the network.
If you need to forward ports from the Internet to an internal server / service in the local network (dnat), add the following command:
/ ip firewall nat add chain \u003d dst-nat in-interface \u003d ether1 protocol \u003d tcp dst-port \u003d 80 action \u003d dnat to-addresses \u003d 192.168.3.10 to-ports \u003d 80 comment \u003d "http redirect" disabled \u003d no

If you need to rigidly set the ip-address from which you can connect, then specify it in the Dst.Address field.
7) Connecting and configuring the Yota 4G usb modem
Wireless connection via yota modem we will have it as a backup channel in case of failure of the main provider.
We insert the modem into the usb port of the router. The list of interfaces should show new interface lte1.
Now go to the ip \\ dhcp-client menu and select the lte1 interface from the list.
 In field Add Default Router if you leave yes, a default route will be created, which in turn will disable the route by the main provider, if any. Whatever this happens, and the Yota route was registered as an additional one, we are in the field Default Route Distance we can set the value to 2 and then the route will take the form of disabled and will remain so until the main route for which Distance - 1. But such a route cannot be edited later (for example, add a comment), so for now, in the Add Default Router field, put no and create the route ourselves.
On the Status tab, make sure that the router has received all the necessary settings from the DHCP server of the modem.
 Go to the IP \\ Routers menu. Create a new route, in the Gateway field, specify the address - 10.0.0.1. Distance - 2 and comment - gw2.
 Click OK. We get approximately the following picture.
 Here I have the first route (gw1), just the same priority and working, just disabled and therefore in the unreachable status, and the "etovsky" one is just active.
Then we add two rules to the firewall. One rule is for masquerading (snat), the other is to deny any unauthorized inbound traffic on the lte1 interface.
/ ip firewall nat add action \u003d masquerade chain \u003d srcnat out-interface \u003d lte1 / ip firewall filter add chain \u003d input action \u003d drop in-interface \u003d lte1 comment \u003d "drop input yota"
7) Configuring SNTP client.
To display the correct time on the device, you need to configure the SNTP client, which in turn will receive exact time from external ntp servers. To do this, go to the System \\ SMTP Client menu, check the Enable checkbox and enter the ip-addresses of the primary and secondary time servers. Click OK to save the settings. To get the addresses themselves, we will use the nslookup command, for example, to the address ru.pool.ntp.org.
 But in order to set the correct time zone, you cannot do without entering commands. To do this, in the terminal, type:
/ system clock set time-zone-name \u003d Europe / Moscow
In addition to the above command, add the time servers themselves:
/ system ntp client set enabled \u003d yes primary-ntp \u003d 188.134.70.129 secondary-ntp \u003d 46.8.40.31
View time on device:
/ system clock print
8) IPTV setup
In order to configure IPTV on a microtik router, you must first add the multicast module. To do this, go to the manufacturer's website. We select a series of devices for which the package will be downloaded. In this case it is mipsbe ... RB700 series... Select All package and download the file all_packages-mipsbe-x.xx.zipto your computer. Make sure the package version matches the current RouterOS version, otherwise you will have to update the system too. (see below).
Opening the archive all_packages-mipsbe-x.xx.zip and extract the file from there multicast-x.xx-mipsbe.npk.In Winbox, go to the Files menu and drag our file with the mouse to the Files List window. We are waiting for the end of the download process. Reboot the router.
Check that the package multicast installed in System \\ Packages.
![]() This, in turn, activates a new additional IGMP Proxy menu in the Routing section. Open Settings and check the Quick Leave checkbox, which in theory should increase the speed of channel switching, click Apply to save the settings.
This, in turn, activates a new additional IGMP Proxy menu in the Routing section. Open Settings and check the Quick Leave checkbox, which in theory should increase the speed of channel switching, click Apply to save the settings.

/ routing igmp-proxy set query-interval \u003d 1s query-response-interval \u003d 1s quick-leave \u003d yes
Then we press "+" and create two IGMP Proxy interfaces, one for the external network, which will receive the multicast stream from the provider, one for the internal network behind the microtic, where traffic will continue to flow to the devices on the local network.
We create the first IGMP proxy interface that looks into the provider's network, in our case it is ether1 (WAN), in the Alternative Subnets field we indicate the IPTV broadcast network (if known), if not, then we put 0.0.0.0/0. Check the box next to Upsteam.
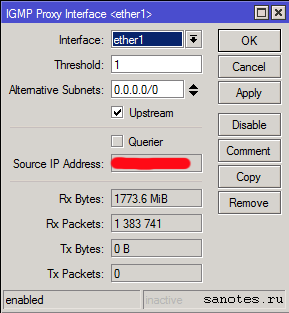
/ routing igmp-proxy interface add alternative-subnets \u003d 0.0.0.0 / 0 comment \u003d "" disabled \u003d no interface \u003d ether1 threshold \u003d 1 upstream \u003d yes
Now let's add a second IGMP proxy interface to which devices on the internal network, a computer or an IPTV set-top box are connected. We set the internal local interface, click OK.

/ routing igmp-proxy interface add comment \u003d "" disabled \u003d no interface \u003d bridge1 threshold \u003d 1 upstream \u003d no
The next step is to create a rule on the firewall to allow incoming IGMP traffic, otherwise nothing will work. To do this, in the IP - Firewall menu, on the Filter Rules tab, add an entry: Chain - input; Protocol- igmp; Action - accept. We place the created rule at the beginning of the list, before the deny ones.
/ ip firewall filter add chain \u003d input action \u003d accept protocol \u003d igmp
If we configured everything correctly, then dynamic rules should appear on the IGMP Proxy \\ MFC tab, as well as the packets going through them.

For IPTV to work via wi-fi, you need to set the Multicast Helper parameter to Full in the properties of the wlan1 wireless interface on the Wireless tab.

/ interface wireless set wlan1 multicast-helper \u003d full
9) MikroTik RouterOS update
To complete the RouterOS update procedure, download the firmware from the official website. We select for which series of devices we will download the update package. We are interested in mipsbe ... RB700 series... We select the Upgrade package. Download the npk file.  Then, go to the Files menu and drag our file with the mouse to the Files List window. We are waiting for the end of the download process, after which the file should be displayed in the Files List window.
 Then, we overload the router. After reboot, RouterOS version will be updated.
This publication is detailed manual, describing in detail the configuration of one of the most popular routers among users "mikrotik rb951g 2hnd". Also, the owners of other models of Mikrotik routerboards can use the instructions below, this is possible due to the use of the same operating system in them.
Users of routers of this brand always face numerous difficulties when making settings. For this reason, mikrotik rb951g cannot boast of wide popularity among private users as a home router, who are forced to turn to specialists for help.
However, if there is detailed instructions this task becomes easily solvable even for people whom specialists call among themselves "dummies".
How to connect the device?
In order to connect mikrotik rb951g 2hnd, you need to do the following sequential steps:
How to enter the “routerboard” device settings?
To solve the question posed, you must perform the following step by step instructions:

After that, the procedure for adjusting the parameters of the router is performed according to sequential algorithms.
To debug communication using the Winbox application, several steps are required:
- Download the application, install it on the computer and open the main menu of the utility;
- Then press the key in the form of an ellipsis (marked with the number "1" in the figure);
- Then specify the device and click "Connect";
- Dial Login and Password.

How do I reset to factory defaults?
In case of difficulties with the connection, it may be necessary to reset the settings. This procedure is also used by users who have lost the access code to the router board.
You will need to do the following two operations:
- Arm yourself with a straightened paper clip, a thin match or wire;
- Press the "Reset" button of the rb951g 2hnd router for about 15 seconds.
 This operation will restart the device and return it to the factory settings.
How to connect to the world wide web?
To solve the problem with this issue, you will need to carefully follow several instructions.
Open the "Winbox" utility and specify the "WAN" parameter for "ether1":

Assign "LAN" to the next 2nd:

How do I adjust the "MAC" of the WAN port?
This will need to be done to users whose provider has blocked access through the MAC address, so you need to replace it for the WAN.
Reopen software "Winbox" and in "NewTerminal" type "/ interface ethernet set ether1-gateway mac-address \u003d АА: 01: 02: 03: 04: 05", here "ether1-gateway" is the name of the WAN, and АА: 01: 02: 03: 04: 05 is the MAC address.
To go back to the old address, you need to use "/ interface ethernet reset-mac ether1-gateway".
How do I set up a dynamic IP address?
If the user has data from the provider about the network, it is required to configure the WAN for a DHCP connection:

How do I set up a static IP address?
When static address it is necessary to use the following sequence of actions:

For the main MicroTic gateway, the following procedure is required:

After that, you need to enter the DNS servers:
PPPOE Settings and Connection Procedure
To complete PPPoE settings, you need to take the following sequential steps:

 To analyze the correctness of the actions performed, four steps must be taken:

Conclusion
Despite the multistage instructions, the instrument setup procedure is not very difficult. The owner of the router only needs to strictly follow the prescribed steps of the manual after implementation, which the user only needs to enter the firewall and local network settings. Then you can start full-fledged work on the Internet.
In this article, I will consider in detail the issue of basic configuration of mikrotik routers using the example of the budgetary and most popular model. This manual will fit almost any model, since they are all based on the same operating system.
Introduction
Mikrotik routerboard routers appeared on the market for a long time, but they still have not gained much popularity. Although they occupied their niche. Personally, I think this is an excellent router for the home, it has no competitors in terms of reliability. It is truly a router that can be set up and forgotten once. Personally, I have never come across a device that would have to be forced to reboot in order to get it out of a coma, as is often the case with other budget hardware.
Distribution to home users is held back primarily by the complexity of customization. And although it may seem to a more or less advanced user that there is nothing complicated here. But actually there is. And I often came across requests to set up a router at home for distributing the Internet via wifi, since users who bought on someone's recommendation themselves could not fully configure the necessary functionality, although there are enough instructions on the Internet.
I want to fill this gap and write detailed step-by-step instructions for setting up a microtic from scratch for dummies using the example of the most suitable model for the house. I have prepared a personal cheat sheet for a long time in the form text file... Using it, I literally set up the router in 10 minutes and give it to the user. That is, there is really nothing difficult if you know what you are doing. Based on this cheat sheet, I will write material.
Description Mikrotik RB951G-2HnD
Here he is, the hero of today's article -. Its description, reviews and cost can be quickly checked on the website. By the number of reviews, it is already possible to conclude about the certain popularity of this router.
The appearance of the device.
An important feature of this router, which I personally actively use, is the ability to power it using a special poe adapter.
![]()
In the image it is on the right. A standard power supply from a router and a poe adapter are taken. The power supply is connected to the adapter, and from the adapter already underway patch cord into the first port of the routerboard. The router can be hung anywhere on the wall, no need to be tied to an outlet. Immediately, I note that you can only power the router with a microtic poe adapter. It has a different standard and the usual 802.3af poe switches will not work.
There is a similar model RB951Ui-2HnD. It differs from the one described by me only in that it has 100Mb port, while RB951G-2HnD 1Gb... If these differences are not important for you, then you can buy a cheaper model. Otherwise, they are identical.
We will slowly move on. What is the easiest way to set up a microtic? I use the standard winbox utility for this. You can also use the web interface, but for me personally, winbox is much more convenient. So download it to your computer to proceed with the setup.
Resetting the router settings
We connect the router to the network, supply power and run winbox on the computer. Go to the tab Neighbors and wait for the utility to find our microtic. This may take a while. Just in case, you can click Refreshif the router is not found for a long time.

Click on the mac address of the device, it should be copied into the field Connect to... The default password for entering mikrotik routers is empty,and the user - admin... Enter the username, leave the password field blank. Click connect. We are greeted by an information window, which contains a description of the standard settings.

Here you can either leave them or delete them. I always delete, as the default settings are often not suitable for a specific situation. Here are some examples of why this is so:
- I powered my router on the first port through the poe adapter and therefore I have to use this port as a local one. In the default settings, this port is used as the wan port for receiving Internet from the ISP.
- The default settings are set to automatically receive settings from the provider via dhcp. If you have a different type of connection, then you standard setting does not fit.
- The default address space is 192.168.88.0/24. I personally do not like the default grids, because if you accidentally insert a new device into them, where the default address is also hammered, then problems will begin on the network. At home this may not be relevant, but in commercial organizations I had to deal with this. Therefore, just in case, I always change the grid.
So we push Remove Configurationto delete the settings. After that, the router will reboot. We wait about a minute and connect to it again.
If for some reason you did not immediately delete the presets, then you can reset the settings in mikrotik to the factory settings later. To do this, you must first type in the terminal system, and then reset... You will be asked for confirmation and after that the routerboard will reboot with factory settings.
Firmware upgrade
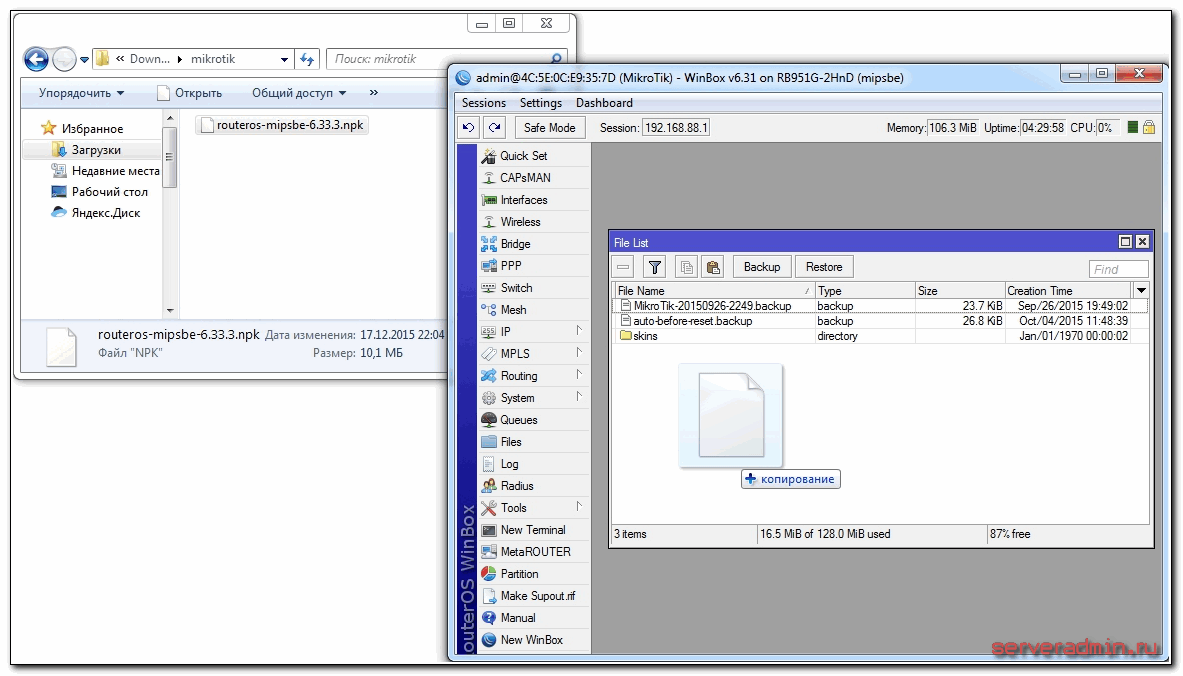
After clearing the settings, I recommend that you immediately update the firmware of the Mikrotik router. To do this, go to the Download section of the official website and download the required file. In this case, this is the platform mipsbe, package to download Main package... Download it to your computer and connect to the router using winbox. Select the section on the left Files... Then we open two windows side by side - one with the firmware file, the second with winbox and drag the file from the folder to the winbox into the file list with the mouse.
We are waiting for the end of the firmware download and reboot the microtic. The firmware will be updated when the router boots up. You will have to wait 3 minutes. After that we reconnect to the device. After updating the firmware, you need to update the bootloader. This is done in the menu item System - RouterBoard... Go there, check the lines Current Firmware and Upgrade Firmware... If they differ, then press the button Upgrade... If they are the same, then you can do nothing.

Check version installed firmware you can in the section System - Packages.

In my case, the firmware version is 6.33.3. In the future, when the Internet is configured on the router, you can update automatically in this section by clicking on Check For Updates.
The firmware has been updated, you can start setting up.
Port Trunking
One of the features of mikrotik routerboard routers is the lack of preset port settings. I explain on my fingers what it is. When buying a regular budget router, you will see port signatures. One of them will definitely say WAN, on the others either nothing will be written, or LAN. That is, you will already have one port configured in a certain way for connecting the Internet and the rest of the ports will be combined into a switch for the convenience of connecting equipment.
This is not the case with Mikrotik. There, all the ports are equivalent and absolutely any WAN port you want can become. Since I use the 1st port to connect power, the 5th port will act as a WAN. And I will combine all the rest into a single network using a bridge and add a wifi interface to them.
We will assume that the 1st port is the master port, although this is not necessary, any free port can become the master port. We will tell all other ports to use it as a master. To do this, in winbox, go to the section Interfaces, choose ether2, double-click on it with the mouse and get into its settings. We are looking for a field there Master port, in the drop-down list, select ether1.

We save the setting. We do the same for all other ports, except for the 5th one. The letter should appear next to the configured port S.

We combined ports 1 through 4 into a switch, now we will combine them with a wifi interface in a bridge. To do this, go to the section Bridge, click on the plus sign and click OK. Leave all settings as default.

We now have bridge1. Go to the ports tab and click the plus sign. We choose ether1 and click OK.

You will be disconnected from the router. This is as it should be, connect again. We go to the same section and press the plus again and add the interface wlan1... It should look like this:

We have combined all the necessary interfaces into a bridge to organize a single space for all connected devices.
Static IP configuration
Before that, we connected to the router at the MAC address. Now you can assign it a static local ip address, at which it will be available on the network. To do this, go to the section IP -\u003e Addresses and press the plus sign.

Specify any subnet in the Address section. I chose 192.168.9.0 ... Accordingly, we assign the address to Mikrotik 192.168.9.1/24 ... Select as the interface bridge1... The Network field can be left blank, it will be filled in automatically. Now our router is available via both local interfaces and wifi (which has yet to be configured) at 192.168.9.1.
Setting up the Internet in Mikrotik
Now is the time to connect to your ISP and set up the internet. It is difficult to cover all possible connection options here. There can be many of them. I'll cover two of the most popular ways:
- You get settings from your provider automatically via dhcp.
- The provider gave you ready-made settings and you enter them manually.
As I wrote earlier, we will use the 5th port to connect to the provider. Connect the provider wire.
To get settings via dhcp go to winbox in the section IP -\u003e DHCP Client and press the plus sign. Choose an interface ether5 and click OK.

If you did everything correctly, you will see which IP address you received. In chapter IP -\u003e Addresses there will be information about the settings.

Consider the option when the provider has issued all the settings and you need to set them yourself. Let's assume that our Internet settings are as follows:
First, let's specify the IP address. We do everything the same as in the previous paragraph when setting up a static IP. Only now instead of the interface bridge1 indicate ether5 and enter the corresponding address - 192.168.1.104/24 ... Here we immediately indicated both the address and the subnet mask.

Next we need to set the default gateway. Without this mandatory step, the Internet will not work. We go to the section IP -\u003e Routes and click the plus sign to add the default gateway. AT Dst. Address we leave it as it is 0.0.0.0/0 , and in the field Gateway enter the provider's gateway and click OK.

Already now the Internet should work, but without specifying DNS servers can only be accessed by direct ip addresses. For example, you can ping the ip address of Google servers. Open New Terminal and check.

Now let's install the DNS server. To do this, go to IP -\u003e DNS, in field Servers enter the dns address of the provider's server. If you have two of them, then by clicking on the triangle pointing downwards, you can enter another value. Be sure to check the box next to Allow Remote Requests.

That's all, we have completely installed the settings of the Internet provider. You can check and ping the familiar site address.

The router itself already has an Internet connection. We need to configure it for users. To do this, we continue to configure mikrotik.
Setting up a dhcp server
In order for the connected devices to receive network settings automatically from the router, a DHCP server must be configured on it. It is not difficult to do this, I will now write everything down step by step. Go to IP -\u003e DHCP, go to the DHCP tab and click DHCP Setup... We are offered to choose the interface on which the server will run. We choose bridge1.

Click next. Now you need to select the address space from which ip addresses will be issued. By default, the subnet is indicated, which includes the ip address of the router. Suitable for this, we leave the default value 192.168.9.0/24 .


Now you need to specify the range of addresses that will be issued to clients. If it doesn't matter to you and you don't know why you need to change it, then leave it as it is. All free subnet addresses will be used.

At the last stage, we enter the dns server address that will be issued to clients. It can be either the microtic itself or the provider's dns server. This is not important, but it is better to specify the router itself. So we write the local address there 192.168.9.1 .

Leave the next parameter by default and click Next. This completes the configuration of the dhcp server for the local network.
If we now connect any client to mikrotik with a wire, then he will receive network settings, but he will not be able to access the Internet. Another important setting is missing - NAT.
NAT setup
NAT is a translation, or as they say, translation of network addresses. I will not tell you what it is, you can read it yourself on the Internet. All modern routers have a NAT function to provide subscribers with access to the Internet. So we will also configure NAT in mikrotik.
We go to the section IP -\u003e Firewall, open the NAT tab and click the plus sign. On the General tab, we specify only one parameter Out. Interface - ether5 (interface for connecting to the provider), do not touch everything else.

Go to the Action tab, select in the drop-down list masquerade... Do not touch the rest and click OK.

Everything, NAT configured. Now if you connect the client with a wire to one of the ports, then he will receive network settings via DHCP and will have access to the Internet. The only thing left for us is to configure wifi to connect wireless clients.
Setting up a wifi access point in mikrotik
Our router is almost ready to go. It remains only to set up a wi fi access point and you can forget about it :). Setting up wifi in Mikrotik deserves a separate article. There are a lot of nuances and possibilities. We will now make the simplest setting that will fit and fully satisfy the needs of the home wifi router... And for deeper knowledge, you can use a separate material on this topic.
The first step is to activate the wireless interface. It is disabled by default. We go to the section Wireless, select wlan1 and click the blue checkmark.

The interface will turn from gray to light. Go to the Security profiles tab, double-click on the line with the default profile. In field Mode choose dynamic keys... Check the boxes opposite WPA PSK and WPA2 PSK and aes ccm... Into the fields WPA Pre-Shared Key and WPA2 Pre-Shares Key enter the password from the future wireless network.

We save the settings. Back to the tab Interfacesand click on wlan1 twice, open wifi settings microtic interface. Go to the Wireless tab. We expose the settings as in my screenshot.

Pay attention to the following settings:
- SSID - the name of your wireless network. Write what you want.
- Frequency - frequency corresponding to one of the 12 channels. The very first value is the first channel and so on. Here it is recommended to select the channel that in your particular case is least busy with other access points. If you do not know what these channels are and how to check them, then do not pay attention, you can choose any value from the list.
Save the settings by clicking OK. Everything, the wifi access point on the mikrotik is configured, you can check. Launch any device, look for your network, enter the access password and check the Internet. Everything should work.
This completes the basic setup of the microtic, but I recommend performing a few more settings for convenience and safety.
Changing the default administrator password
As I wrote earlier, the default administrator password in mikrotik is not set, it is empty. Username - admin... Let's set our password to restrict unauthorized access to the settings. To do this, go to the section System -\u003e Users... Selecting a single user admin, click right click mouse and select the very last item password.

In the window that opens, enter your password 2 times and save it. Now, to connect via winbox, you will need to specify not only the admin user, but also the set password.
Time setting
I recommend setting the correct time and turning it on automatically. This can be useful if you need to look at some logs and compare the time. If it is not installed, it is difficult to do so. So let's set it up. Go to System -\u003e Clock, set manually the time, date and time zone.

We will make it so that the time is automatically updated via the Internet. We go to the section System -\u003e SNTP Client... Check the box Enabled, in the field with server addresses, enter 193.171.23.163 and 85.114.26.194 ... Click Apply and observe the synchronization result.

Now the router clock will always have the current time.
This is the basic setup of the mikrotik router for home use finished. You can put it in place and use it.
Video
Mikrotik equipment enjoys a well-deserved popularity among professional network engineers due to its rare combination of rich functionality, stable performance and low price. However, what is good for an engineer is for an ordinary user - if not death, then pain and suffering at least. Mikrotik - equipment from geeks for geeksso it's much more difficult to customize than competing products. At the stage of initial configuration, the majority of users who decide to participate in Mikrotik "fall asleep".
Nevertheless, the process, although not trivial, is quite mastered. Let's look at a small device-based example.
Training
1. First, download WinBox - utility for managing Mikrotik devices. It is much more convenient to work with it than through the web interface; it does not require installation. We take from here: http://www.mikrotik.com/download
2. Turn on the router, connect the cable of the Internet provider to the 1st port, computer - to any other.
3. Launch WinBox. In the lower section in the tab Neighbors, even if there is no IP connection to the router, it will be visible by the MAC address:
The default login is admin, no password. Select our device and click Connect.
4. After entering the device, the RouterOS Default Configuration window will open to us. Removing the default configuration, Pressing Remove Configuration:

He will throw us out of the admin panel, we enter again, as in p. 3.
Configuring network interfaces in Mikrotik RB951Ui-2HnD
1. We open Interfaces, we see the following picture:

2. Default all wired network interfaces in Mikrotik are called etherN... It is inconvenient to operate with such names, therefore open the ether1 interfaceto which we have the provider's cable connected, and rename it to WAN... In principle, this is not necessary - the name does not affect anything. But it greatly simplifies the administration of the router in the future.

3. Open the ether2 - ether5 interfaces one by one, rename them to LAN1 - LAN4. On the LAN1 interface, leave the Master Port parameter in the "none" position, and on the LAN2 - LAN4 interfaces, switch the Master Port parameter to LAN1 :

Let's decipher what was done: by default, ports in Mikrotik routers are not combined into a switch, i.e. do not know how to communicate with each other. A special hardware switching chip is responsible for the operation of the switch, which allows unloading the CPU of the device from switching packets between the switch ports. However, it will work only if Master and Slave ports are assigned (which we did).
The second option for creating a switch - software - provides for the bundling of ports in Bridge. In this case, the CPU will deal with packet switching, and the speed of the device will be significantly lower than the maximum possible, which is especially noticeable on gigabit ports.
4. At the same time turn on the wireless interface... We'll come back to setting it up later:

5. We give it a more understandable name:

6. Create a new Bridge. To do this, open the menu item Bridgeand click + :

7. Name the bridge - LAN (since packets will "walk" along the contour of our local network inside this bridge):

8. Go to the tab Ports, click on + to add ports to the bridge:

From the cluster of LAN1 - LAN4 ports, it is enough for us to add only LAN1 to the bridge, since for LAN2 - LAN4 it is already the master port (see item 3 of this section). Respectively, interface parameter - LAN1, Bridge- LAN... We repeat the same action for the WLAN interface:

9. Thus, we get the following list of ports inside the LAN bridge:

Configuring TCP / IP parameters on Mikrotik
1. Assign an IP address to the router... In our example, it will be 10.20.30.254 with a mask 255.255.255.0 (or / 24; in general, / 24 is equivalent to /255.255.255.0, RouterOS understands both options. Details of classless addressing can be found here: https://ru.wikipedia.org / wiki / Classless_addressing). For this in the IP menu -> Addressesadd new address and assign it to the LAN interface (previously created bridge):

2. Let's assign an IP address to the external interface of the router. In this example, we are considering a scenario where the ISP gives us direct access to the network with a white IP address. To do this again click on + on the menu IP-> Addresses, enter the address and mask issued by the provider, and select WAN as the interface:

3. Our address list looks like this:

4. We indicate to the router, what DNS servers to use for himself through the IP -\u003e DNS menu:

5. We indicate the gateway of the Internet provider... To do this, create in the menu IP-> Routes new route by clicking + , assign the parameter Dst. Address - 0.0.0.0/0 , Gateway- issued to us by the provider:

Configuring DHCP on Mikrotik
1. It's time to set up a DHCP server that will distribute IP addresses on the local network. For this open IP -> DHCP Server and press the DHCP Setup button:

2. Choosing an interface, on which IP addresses will be distributed. In our case - LAN (do we want to distribute IP addresses only within the local network?):

3. We enter the network address and its mask:

4. Enter the network gateway address, i.e. our router:

5. Enter the pool of addresses that the router will distribute to devices connected to the network:

6. Enter the addresses of the DNS servers (in the screenshot - Google DNS servers):

7. Enter the period for which addresses are issued to devices (in the format DD: HH: MM):

8. And after pressing the Next button again, the DHCP configuration wizard ends:

Configuring NAT on Mikrotik
1. Configuring NAT. On the menu IP-> Addressesin the tab NATwe press +. In the tab Generalparameter Chainput in position scrnat, Out. Interface - at WAN:

2. Go to the tab Action, and set the parameter Actioninto position masquerade:

Now we should have access to the Internet:

Configuring Wi-Fi on Mikrotik
1. Now let's set up Wi-Fi. Recall that in point 4-5 of the section "Configuring network interfaces in Mikrotik RB951Ui-2HnD", we have already enabled the wireless interface and assigned a new name to it.
Now open the menu Wireless, tab Security Profiles, and in it - a profile default.
We mark with checkboxes:
Authentication Types - WPA2 PSK
Unicast Ciphers and Group ciphers - aes ccm and tkip
In field WPA2 Pre-Shared Key introduce desired wireless password:

2. Now open the WLAN interface, go to the tab Wireless, choose Mode- ap bridge, Band- 2GHz-B / G / N, we introduce SSID- wireless network name:

If you have a Wi-Fi computer close at hand, after that you can see on it new network:

We direct the marafet
1. We are at the home stretch. Set up the time zone across System-> Clockwhere take offtime zone autodetection - Time Zone Autodetectand select the desired time zone (in our case - Europe / Moscow):

2. Set the administrator password. To do this, go to System-> Passwordwhere and enter a new password:

3. And, finally, we will disable unnecessary access services in order to make our Mikrotik less vulnerable. All services can be considered superfluous, except WinBox, but in this case, you should proceed from your specific situation. Their list is in IP-> Services... We leave the necessary ones, turn off the unnecessary ones with a cross:

This completes the basic setup process! "How long is skillful" (s).
If you need help configuring Mikrotik of any complexity, then in this case we have certified specialists who.
Configuring routers MikroTik RouterBoard RB751U-2HnD, MikroTik RouterBoard RB751G-2HnD, MikroTik RouterBoard RB750, MikroTik RouterBoard RB750GL, MikroTik RouterBoard RB951G, MikroTik RouterBoard RB450G, MikroTik RouterBoard RB433, MikroTik RouterBoard RB 493, MikroTik RouterBoard RB800 and other routers MikroTik on mipsbe platform powerpc.
MikroTik router connection
For settings Wi-Fi router MikroTik you will need:
- cable from internet provider;
- stationary computer or laptop with a Wi-Fi card;
- router MikroTik RB751G-2HnD. It will distribute the Internet via cable, as well as via Wi-Fi to a laptop, smartphone, TV or tablet.
MikroTik router connection diagram:
- we connect the cable from the Internet provider to the first port of the router (POE);
- we connect the computer to the MikroTik router with a network cable to any Ethernet port from 2 to 5;
- laptop and others wireless devices we connect via Wi-Fi;
- plug the power supply into the "Power DC 8-30V" connector of the MikroTik router
Configuring a computer network card
So that you can go to the Mikrotik router settings on your computer, we will configure the network card to receive automatic settings.
If network Card does not automatically receive an IP address from the 192.168.88.x subnet, try to specify it manually (for example: 192.168.88.21) or reset the Mikrotik router to factory settings.
Entering the MikroTik router settings for control via the Web interface
Open your browser Internet Explorer (or any other) and write the address 192.168.88.1 - this is the default IP address for the MikroTik router.
Attention! The proxy server should not be specified in the browser settings
You can configure the MikroTik router in different ways:
- Winbox - setting using a special program for Windows;
- Webfig - configuration via the Web interface;
- Telnet - setting via telnet.
We will configure the Mikrotik router using the Winbox program, so in the browser window, select Winbox, save the program and run.
We connect to the MikroTik router:
- Push … to display available MikroTik devices;
- Select our router from the list;
- You can connect to the router via WinBox by MAC address or IP address;
- Push the button Connect. Login default admin, the password is empty.

Resetting the router settings
Let's reset all the settings of the MikroTik router through the Winbox program:
- Select the menu on the left New Terminal;
- In the terminal, enter the command system press Enter to confirm;
- Then we enter the command reset;
- We recruit y on the keypad to confirm the reset.

Alternative option:
- Select the menu on the left System - Reset Configuration - Reset Configuration;

After rebooting the device, go back to the MikroTik settings using the Winbox program.
In the window that appears, press the button Remove Configuration and wait for the router to reboot.

Description of network interfaces
The configuration of MikroTik network interfaces will look like this: the first port will be connected to the provider (WAN port), the rest of the ports will work in switch mode to connect computers on the local network.
In order not to confuse the network interfaces, we will describe them using comments.
We enter the MikroTik settings using the Winbox program.
We write down the comment "WAN" for the first ether1 port:
- Open the menu Interfaces;
- Opening Select the first interface ether1;
- Press the yellow button Comment;
- WAN«;
- Push OK.
- Opening the interface ether1 in the tab General in line Name change the value to ether1-gateway
- Push OK.


We write down the comment "LAN" for the second ether2 port:
- Choosing the first interface ether2;
- Press the yellow button Comment;
- In the window that appears, enter the comment “ LAN«;
- Push OK.
- Opening the interface ether2 in the tab General in line Name change the value to ether2-master-local
- Push OK.


Now their purpose is clearly visible in the list of interfaces.

Configuring the MikroTik WAN interface
Changing the MAC address of the WAN port
If your ISP blocks access to the network by MAC address, you must first change the MAC address of the WAN port (interface ether1-gateway) of MikroTik router. To change the MAC address of the MikroTik port, open the menu in the Winbox program New Terminal and enter the command:
/ interface ethernet set ether1-gateway mac-address \u003d xx: xx: xx: xx: xx: xx
Where ether1-gateway - name of the WAN interface, xx: xx: xx: xx: xx: xx - the assigned MAC address.
To return the native MAC address of the port, you need to run the command:
/ interface ethernet reset-mac ether1-gateway
where ether1-gateway - interface name.
Dynamic IP Configuration
If the Internet provider gives you network settings automatically, then you need to configure the WAN port of the MikroTik router to receive network settings via DHCP:
- Open the menu IP;
- Selecting a submenu DHCP Client;
- In the window that appears, click Add (red cross) add New DHCP Client;
- In a new window listed Interface: select the WAN interface ether1-gateway;
- Push OK to save the settings and automatically close the window, or Apply to apply the settings.

Now we have received an IP address from the provider, which is displayed in the column IP Address, column Exprires after shows the reservation time for this IP address.
Let's make sure there is an internet connection:
- Open the menu New Terminal;
- In the terminal we type the command ping ya.ru (ping the site ya.ru).

Configuring Static IP
If you are using a static IP address and other network settings, you need to manually configure the WAN port of the MikroTik router.
Let's configure the static IP address and subnet mask of the MikroTik WAN port:
- Open the menu IP;
- We choose Addresses;
- In the window that appears, click Add (red cross);
- In the opened window New Address in field Address: prescribe static IP address / subnet mask;
- In the list Interface: select the WAN interface ether1-gateway;
- To save the settings and close the window, click OK.

Set the IP address of the main MikroTik gateway:
- Open the menu IP;
- Selecting a submenu Routes;
- In the opened window Routes List click Add (red cross);
- In a new window in the field Gateway: prescribe Gateway IP address;
- Push OK to save the settings.

Add DNS server addresses to MikroTik:
- Open the menu IP;
- Selecting a submenu DNS;
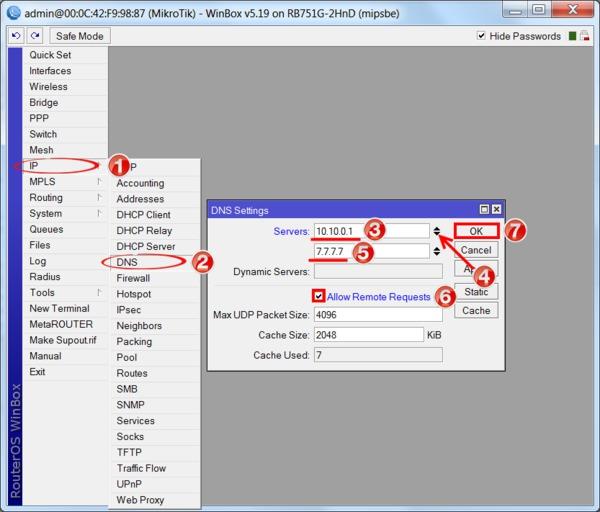
- In the opened window DNS Settings in field Servers: register the IP address of the preferred DNS server, for example: 10.10.0.1;
- Press "down" (lower black triangle) to add an additional input field;
- In the new field, write the IP address of the alternative DNS server, for example: 7.7.7.7;
- Check the box Allow Remote Requests;
- Push OK to save the settings.

- Open the menu New Terminal;
- In the terminal we type the command ping ya.ru (ping the site ya.ru).
As you can see, there are pings of 11-13ms, which means the Internet is connected and working. You can stop the execution of the command by pressing Ctrl + C.
Attention! On computers connected to the MikroTik router, the Internet will not work until you configure the local network, Firewall and NAT.
PPPoE setup
Attention! If you are using an ADSL modem to which a MikroTik router is connected via a network cable, you first need to configure the ADSL modem in Bridge mode.
Let's configure a client PPPoE connection on a MikroTik router:
- Choosing a menu PPP;
- Click Add (red cross);
- We choose PPPoE Client.

We configure the PPPoE parameters of the MikroTik connection:


After creating PPPoE connection on the tab Interface a letter should appear opposite it Rindicating that a connection has been established.

Let's check that there is Internet access:
- Open the menu New Terminal;
- In the terminal we type the command ping ya.ru (ping the site ya.ru).
As you can see, there are pings of 11-13ms, which means the Internet is connected and working. You can stop the execution of the command by pressing Ctrl + C.
Attention! On computers connected to the MikroTik router, the Internet will not work until you configure the local network, Firewall and NAT.
Configuring ports in switch mode
Let's combine the LAN ports of MikroTik ether2-ether5 into a switch:
- In the tab Interface List Select the interface by double clicking ether3;
- In the list Master port choose ether2-master-local (main port of the switch);
- Push OK.
We repeat this operation by analogy for ether4, ether5 interfaces.

As a result, the letter S (Slave) should be in front of the ether3-ether5 ports.

Combining Wi-Fi and wired interfaces into a local network
If you are using a MikroTik router without Wi-Fi (RB750, RB750GL, RB750UP, RB450G or any other router not equipped with a Wi-Fi module), then skip this step.
In order for computers connected to the router via cable and Wi-Fi to "see" each other, it is necessary to combine wireless and wired interfaces MikroTik.
We create bridge-local (local bridge);
- We open Bridge;
- Push Add (red cross);
- In the opened window New Interface in field Name write the name of the new bridge bridge-local;
- Push OK.

Add to bridge-local Ethernet ports:
- Go to the tab Ports;
- Push Add (red cross);
- In the opened window New Brige Port In the list Interface ether2-master-local;
- In the list Bridge choose the name of the existing bridge bridge-local;
- Push OK.

Add to bridge-local Wi-Fi interface:
- In the tab Ports;
- Push Add (red cross);
- In the list Interface select the main Ethernet port of the switch wlan1;
- In the list Bridge select the name of the existing local bridge bridge-local;
- Push OK.

Assigning an IP address to a local network
Let's configure the IP address of the MikroTik local network:
- Open the menu IP;
- Selecting a submenu Addresses;
- In the opened window Address List push Add (red cross);
- In the opened window New Address in field Address enter the address and mask of the local network, for example: 192.168.88.1/24;
- In the list Interface choose bridge-local (if you are using a MikroTik router without Wi-Fi (RB750, RB750GL, RB450G), then in the list Interface ether2);
- Push OK.

DHCP server configuration
In order for computers connected to the router to receive network settings automatically, we will configure the MikroTik DHCP server:
- Open the menu IP;
- Selecting a submenu DHCP Server;
- In the opened window DHCP Server push DHCP Setup;
- In the list DHCP Server Interface choose bridge-local (if you are using a MikroTik router without Wi-Fi (RB750, RB750GL, RB450G), then in the DHCP Server list Interface select the main interface of the switch ether2);
- Push Next;


Now network cable disconnect the computer from the router and reconnect to it.
Customization Wi-Fi points MikroTik access
First you need to turn on the Wi-Fi module:
- Open the menu Wireless;
- In the opened window Wireless tables choose the Wi-Fi interface wlan1;
- Push Enable (blue check mark) or d on the keyboard in the English layout.

Create a password to connect to the MikroTik access point:
- Open the tab Security Profiles;
- Press the Add button (red cross);
- In the opened window New Security Profiles in field Name: specify the name of the security profile;
- For better safety in Authentification Types we leave only registration by protocol WPA2 PSK;
- AT Unicast Ciphers and Group ciphers install aes ccm (AES (Advanced Encryption Standard) is a newer encryption algorithm that replaced TKIP. The standard works with 128-bit blocks and supports 128-, 192- or 256-bit keys (AES-128, AES-192 and AES-256 We recommend using this algorithm whenever possible (with the support of all devices))
- In field WPA2 Pre-Shared Key enter the password for client devices to access the Wi-Fi point;
- Push OK to save the settings.

We configure the Wi-Fi parameters of the MikroTik point:
- Open the tab Interfaces;
- In the opened window Interface List (An alternative way is Wireless — Wireless tables) double click on the Wi-Fi interface wlan1to go to its settings;
- Go to the tab Wireless;
- Go to advanced mode by pressing Advanced Mode
- In the list Mode: select the operating mode ap bridge (access point in bridge mode);
- In the list Band: we choose in what standards the Wi-Fi point will work, we choose the universal option 2GHz-B / G / N;
- In the list Channel Width: choose the channel width, we choose the universal option 20MHz (For modern devices supporting the N standard, it is better to choose 20 / 40mhz-ht-above);
- In the list Frequency: select the initial frequency for the channel width in the range 2412-2472 (to expand it, include in the list Frequency Mode: select the mode superchannel for channel widths in the range 2192-2734);
- In field SSID: write an arbitrary name of the access point for example ap;
- In the list Wireless Protocol: choose 802.11 wi-fi mode for connecting any devices;
- In the list Security Profile: select the name of the security profile we created earlier;
- In the list Frequency Mode: select the mode superchannel includes an extended frequency range;
- Check mark Default Authenticate - allows wireless clients to connect to the point without a password;
- Check mark Default forward - allows wireless clients to exchange data with each other, if you uncheck the box, then one wireless client will not be able to access the resources of another. Works only when laptops and communicators are connected to a wireless network;
- Push Apply to apply the settings.

Now you can connect to the router via Wi-Fi using the Selected encryption type and password.
We configure the rest of the Wi-Fi parameters of the MikroTik point:
- Open the tab Advanced;
- In the list Periodic Calibration you need to enable it, install enabled in the dropdown list.
- AT Calibration Interval you need to set 10 seconds in the format 00:00:10 ... The device will scan the air every 10 seconds and determine the noise level, this will allow the point to operate at maximum speeds and as stable as possible in conditions of a changing level of interference from other wireless networks;
- AT Preamble mode need to install short, and more optimal both (when choosing short mac computers based on Broadcom wireless chipsets in the range n do not connect)
- Push OK to save the settings.

Attention! On computers connected to the MikroTik router via Wi-Fi, the Internet will not work until you configure Firewall and NAT.
Configuring Firewall and NAT
In order for computers to access the Internet, you need to configure Firewall and NAT on the MikroTik router.
Manual configuration of a MikroTik firewall requires deep knowledge in this area. Therefore, we will configure more in a simple way - automatically.
We open internet browser Explorer (or any other) and enter the IP address of the router

Enter username admin and press Log In

Go to the tab Firewall and perform the following actions:
- In the list Public interface: select the WAN interface ether1to which the internet comes. If you are using PPPoE connection, you need to select in Public interface: PPPoE connection name;
- Put a tick opposite Protect router: (protect the router);
- Put a tick opposite Protect LAN: (protect the local network);
- Put a tick opposite NAT: (enable NAT);
- Push the button Apply to save the settings.

After that, the Internet should appear on the connected computers.
Attention! If the Internet does not appear on computers, restart the MikroTik router and the network interfaces of the computers so that they receive the new network settings via DHCP
Changing the password to access the MikroTik router
To change the password for accessing the MikroTik router, follow these steps:
- Open the menu System;
- Selecting a submenu Users;
- Make a double click on the user admin;
- Push Password ...;
- In the opened window Change password in field New Password enter a new password;
- In field Confirm Password confirm the new password;
- Push OK;
- In the window User

Resetting MikroTik router to factory settings
To reset MikroTik to factory settings, do the following:
- Turn off the power of the router;
- Press and hold the button Reset;
- Power on the router;
- Wait for the indicator to flash ACT and release the button Reset.
After that, the router will reboot, and you can enter its settings with a standard username admin no password.
If you enter the settings using the Winbox program, the following window will appear:
With help OK you can perform a quick setup using the default router configuration.
Choice Remove Configuration allows you to reset all settings for the subsequent manual configuration of the router.
Connecting an external antenna to MikroTik RB751
On the back of the MikroTik RB751G or RB751U case there is an MMCX connector (female) for connecting an external antenna.
To connect an external antenna to this connector, you will need an adapter (pigtail), which on one side will have an MMCX connector (male), and on the other side there will be a connector for your antenna.
MMCX connectors (male) are of the following types:
- straight MMCX connector (male);
- L-shaped MMCX connector (male).
Pigtails with MMCX connectors are usually short (about 20 cm). Therefore, if you need to mount the antenna at a greater distance, you will have to use two pigtails. For example, to connect a Parabolic 24 antenna with an N-type connector (female, mother) at a distance of 3 meters, you will need an AC / MMCX pigtail (female, mother) and a three-meter N-type pigtail (male, father) - N-type (male , dad).
The principle of operation of antennas in MikroTik RB751
Before you start configuring the MikroTik RB751 router to use an external antenna, you need to understand the principle of operation of the built-in antennas and their modes of operation.
The router has three built-in antennas and one MMCX connector for connecting an external antenna. Antenna No. 1 works only for reception, Antenna # 2 works only for transmission, Antenna No. 3 works for reception and transmission. With the help of such an organization of antennas, the MIMO 2 × 2 technology (2 receivers and 2 transmitters) is implemented, which allows data transmission over Wi-Fi in two streams at a higher speed than a single Wi-Fi antenna can transmit.
The MikroTik RB751 router has the following antenna modes:
- antenna a - the router uses only internal antennas (Antenna # 1, # 2, # 3) for receiving and transmitting data via Wi-Fi;
- antenna a - the router uses two internal antennas (Antenna # 1, # 2) and one external one for receiving and transmitting data via Wi-Fi. Antenna # 3 is disabled in this mode. The MikroTik RB751 router can also be configured to use only internal or external antennas using the settings Chain.
- tx-a / rx-b - the router uses the internal Antenna # 2 for transmitting and the external antenna for receiving.
- rx-a / tx-b - the router uses an external antenna for transmitting and Antenna # 1 for receiving.
Configuring MikroTik RB751 to use an external antenna
After connecting an external antenna to the router, you need to make settings in order to use it.
We launch the WinBox utility and connect to the MikroTik RB751 router.
Turn on the use of an external antenna:
- Open the menu Wireless;
- In the window Wireless tables do double click mouse on Wi-Fi interface wlan1;
- In the window Interface
- In the list Antenna Mode: select the mode antenna b;
- Push OK to save the settings.

The external antenna will now operate in parallel with the internal antennas.
- If you want only the external antenna to work, uncheck the chain0 and leave only chain1.
- Push OK to save the settings.

Setting the power of the Wi-Fi transmitter
The MikroTik RB751 router has the ability to manually adjust the power of the Wi-Fi transmitter. This function may be needed when transmitting Wi-Fi signal over long distances using an external antenna.
To adjust the Wi-Fi power of MikroTik transmitter do the following:
- Open the menu Wireless;
- In the window Wireless tables double click on the Wi-Fi interface wlan1;
- In the window Interface mode must be enabled Advanced Mode;
- Click the tab … and select Tx Power.

After that, a window will appear in which you can configure the Wi-Fi power of the MikroTik wlan transmitter wlan.
- In the list Tx Power Mode select the power setting mode card rates
- In field Tx Power: we indicate the power.
- Push OK to save the settings.
Attention! Installing a high power Wi-Fi transmitter can lead to overheating of the chips and their failure. Use only power ratings that your router supports.

Types of modes Tx Power Mode:
- default - default mode - power is selected from a special table in the memory of the MikroTik router;
- card rates - power is selected according to a special algorithm that uses the power value set by the user;
- manual - for each speed, you can manually specify the transmission power;
- all rates fixed - one power level set by the user is used for all speeds. This mode is not recommended because high speeds data transmission errors may occur, overheat and damage to the router chips.