Most USB flash drives available today come with the FAT32 file system. This is the most versatile file system. Most devices that have a USB port will be able to read it.
The main drawback is the inability to store documents that are larger than the 4 Gigabyte mark. This is not critical until it becomes necessary to record something larger than 4 GB in size.
Scenarios When the flash drive is not recognized. There are many technical and non-technical issues that are not recognized. It should also be noted that before applying any solution, the user must ensure that the root cause is analyzed and that the user identifies the correct problem. The last part of this introduction will list the first 5 scenarios that users have encountered. The main scenarios that lead to problems are as follows.
Below are some of the factors that can lead to this problem. It should be noted that these issues should be resolved as soon as possible to ensure that the user does not face a long-term issue. The error message states that formatting could not be completed.
The NTFS (New Technology File System) file system will help you to manipulate files of this size. This development is newer than FAT. Differs in huge maximum size one file.
This is a number with eighteen zeros, so you don't have to worry about exceeding this figure. A number of multimedia devices do not support the file system (FS) (DVD players, PS3, Xbox 360), but compatibility with PC operating systems is high.
Driver problem: Parallel port drivers are either not available or need to be updated. The only solution is to update the components. Port related problems. It can be either hardware or software. Then open the "Properties" section.
Format change without data loss
Both options must be selected here and the start button must be pressed to scan the device and fix the problem. The user will navigate to the device manager. The user then needs to locate the Universal Serial Bus controllers.
That is, if there is no need to transfer large filesthen you don't need to worry about the file system. And if the need nevertheless arose, then you can format the FS of the flash drive in different ways: using standard operating system tools and using the command line.
Let's consider each of them in more detail.
Formatting a USB flash drive using Windows
With this method of changing the file system, everything stored on the USB flash drive will be irretrievably erased. So it's better to do backup on hDD PC, if, of course, this is the required data. Otherwise, you don't have to worry about the contents of the flash drive.
Method 1: manual connection problem
The user now needs to make sure the Check for Updates option is selected. The user then needs to restart the system to make sure the problem is fixed. The process is simple if it is allowed according to the instructions below.
Devices must have the option marked in the screenshot below selected. This is a one step process in which the user needs to find the key as shown in the screenshot below. The system will do the rest by itself. This is a general and simple process that should be followed as described below.
First of all, you need to connect the USB drive itself to the PC. Then in "My Computer" click on the flash drive icon right click... In the drop-down menu, find the "Format" item and click on it.
The formatting settings window will open. Select NTFS in the drop-down menu, as shown in the image. No further changes are required. Now you can press the "Start" button.
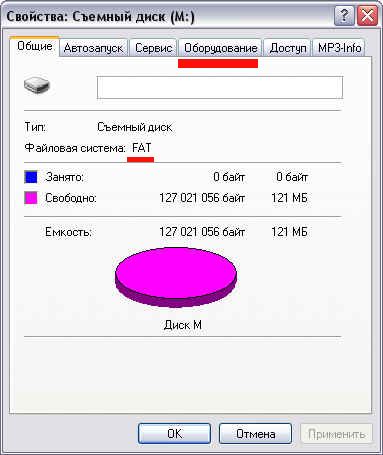
Well, yes, physically any such disk is removable, but some of them are considered as local drivesalthough they can be removed physically. There select the drive in the list and click the Properties button. Getting the hardware properties of a removable disk.
On the next screen, select the Policies tab and select Optimize for Performance. Always remove the drive safely. Only when it says it's safe to remove the drive, unplug it. If you disconnect the drive without using the Safely Remove Hardware icon, there is a high risk of data corruption on the removable drive, so it's best not to skip this step.
Before starting the process, the system will once again warn about the irrevocable deletion of all information from the USB drive.
After confirming the operation, the flash drive will be quickly formatted in NTFS under Windows OS. Upon completion, the media file system will be changed.
Format USB stick on command line
Note! Formatting the flash drive to NTFS on the command line (using the convert utility) allows you to change file system devices without data loss. The word "conversion" is more suitable for this process than "formatting".
One of the main advantages of this file system is that almost all operating systems can read and write from it. Therefore, if you have a drive that you want to format, it will be smaller. After installing it, it will be much easier to format large files.
How to format a USB flash drive to NTFS using the command line
Step When it opens in the center, you will be prompted to select the drive, volume, image you want to format. Step Move your cursor to the upper left corner and select the drive you want to format. This will bring up a command dialog box that will give you options to format your drive.
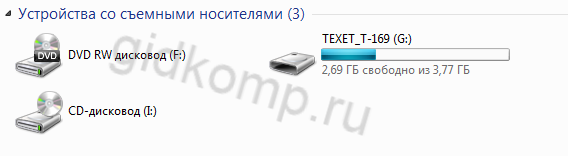
So, first you need to connect the media to your computer. Looking into "My Computer", you can find its icon, below it is the volume label assigned to the disk by the system. In this case, it is (F :).
For a number of reasons and factors, the volume label can be different. In any case, it must be remembered. Next, you need a command line. It opens in different versions of operating systems in different ways.
Your problem almost becomes a solution if you are still tracking these steps. When you're here just relax and wait for the process to complete before you remove the disc. Both of them are first installed on the computer. Since you inserted your external drive, so it will appear in the right upper corner screen. You can also choose to rename your drive if you like. Be patient when the drive is formatted, when it's done, you're good to go.
Can I format to NTFS?
Now you can read and copy paste items to your disk. The dialog box will be visible at the bottom of it with four commands. Select the option where you want to format the drive. This is not the case, anyway, since everyone has their own preferences. Whichever option you choose, you will still format your drive according to your wishes.
Windows 7:
To access the interpreter windows commands 7, you can use the same method as for the previous OS. In the Start menu, in the Standard folder, you can also open a command line.
The information in this article will be useful to you even if you are not going to format the USB flash drive for the NTFS file system.
The fact is that sooner or later you decide to buy a USB flash drive for some of your needs. And if earlier, when USB drives were less than 4Gb, then everything was in order even with the FAT32 file system, because anyway, a larger file could not be written there.
But that's not a problem on removable drives
This is not a manufacturer's fault. If the computer loses power in the middle of the file being written, the system will not need a long Scandinavian operation to recover. System files may be read-only so typical programs cannot touch them, users may not be allowed to view other users' data, etc. In fact, logging can result in additional entries that could shorten the life of the flash drive. In fact, this can cause problems when moving removable devices between different machines. In this case, file permissions don't really add security - just additional complexity.
- The device also doesn't need file permissions.
- This will work fine as long as the disk remains inside your computer.
Now there are flash drives of 32Gb and more. In this case, if you decide to copy a movie onto it in one file that weighs more than 4Gb, then this will not work with the FAT32 file system.
But it will be possible if you reformat USB stick under NTFS... Below there will be detailed information on how this is done for different versions of Windows operating systems.
Ultimately what you probably want to do is leave the drive formatted with the filesystem it came with. Access, edit, store and transfer files seamlessly. After your purchase is confirmed, your product key is sent to the address emailassociated with your order.
Immediately after purchase, you receive a download link that has a limited number of downloads. The program will now start cloning the device metadata to the specified file. In general, there is no reason it shouldn't work as expected. When you check it out in disk management it might be great, but it might not have a file system and drive letter.
Formatting a USB flash drive for NTFS in Windows Vista, 7 or 8
After we put the flash drive into the USB port of the computer, go to "My Computer". This can be done either by clicking double click mouse on the shortcut on the desktop. Or, if there is no shortcut to there, then go to the start menu and select "Computer".
Resize the partition
Delete the partition, then repeat the previous steps to create and format the partition. Delete the partition, resize it, or change its name. You can create first backup of your information, since deleting a partition erases all the data it contains. If the work area displays a disc, pen, or card, you can also format it.
Setting optimization for USB storage operations
We have three options. However, there is a medium size problem. The disk size must not exceed 8 terabytes. This shouldn't be a problem for most. But one file cannot be more than 4 gigabytes. Fast formatting is sufficient and provides the fastest results. Formatting starts from the beginning. In the end, we can immediately use the disc or card.
In the list of our removable drives, we hover the cursor over our newly connected USB flash drive, right-click and choose "format".
Select the "NTFS" file system and click "Start". Other parameters can be left unchanged.
For formatting, all data will be lost to the disk. This requires special tools. After installation, launch the program and select "Partition Wizard". All connected storage media are listed immediately. This may take some time depending on the size of the data carrier, but after that all data is saved and the drive is in the desired format.
You can call it by typing the command line
It does not require any additional software, formatting can be done comfortably. Then a small window appears that offers you additional customization options. The most important point here is the "file system". Then the checkbox can be set to. It simply means that the existing content hard disk removed as quickly as possible. Those who prefer a more thorough option can also remove the hook, but must also take longer charging times. This may take a few minutes, depending on the capacity of the external hard drive.
Good to know:
iso is a disk image format, read and what it is used for.
Then the formatting process can be started by clicking "Start". Then the hard disk can be used in normal mode... Then it is easy to read as many systems as possible. Thus, removing the disc while recording can cross the file system easily and efficiently. Therefore, always take out a beautiful clean one.
There are several ways to solve this problem.
We store our photos and videos of our son on a shared hard drive. This has been working very well for several years now. This also applies to the storage subsystem, which can now be managed in a consistent manner via command line or through scripts.
It would seem easy to make a line in the text, but some I don't know. If you are also interested, then we will tell you.
We format a USB flash drive for NTFS in Windows XP without additional programs
It would seem that any operating system without additional programs should format storage media for the NTFS file system, but here Windows XP refuses to do this by default.
They are only suitable for automating tasks because they don't work well. On the other hand, calls to longer commands can be combined because the objects that generate the cmdlet can be passed to others through the pipe. This opens up the possibility of automating processes. Finally, there are also comfort features such as autocomplete commands or output formatting. Last but not least, most tasks can also be done remotely.
Removable media context menu
Regardless of this tool, the first step always selects a specific drive for scheduled operations. Without the named parameters, all disks are visible. operating system... If you only want to edit the ones that don't have sections yet, you give. If, for example, all non-segmented hard disks of a certain type, they can be initialized in the next step. At this stage it is also determined whether it is needed.
But if you dig deeper and understand more carefully, it turns out that this is doable and the limitation can be circumvented if you know how.
Let's go through the points:
Now one important point - return the point in the properties "Optimize for quick removal", which we rearranged in point 3.
Enlarging and reducing partitions
It would highlight everything free place on each drive to a new partition, which will also receive the next free drive letter. Another mandatory requirement is new size... This command shrinks the partition to the smallest possible size. As expected, you have to tell him which section or volume means. However, opening or copying files works smoothly. In this case, there are 3 ways to solve this problem: formatting, using an additional software or network integration.
We format with the program
You can also use third-party software to format for NTFS in Windows XP.
For this (76 kb) you can download convenient program HP USB Disk Storage Format Tool Russian version 2.2.3.
Start the HPUSBFW-2.2.3 software by double-clicking the left mouse button.
If an error occursthen right click and select "Run as administrator".
This is the most merciless option, as the data still stored on this hard drive is lost. Moreover, this method does not require additional equipment. If you have data on this hard drive that you want to keep, please back it up first.
Before formatting your hard drive, make sure you have transferred all data and that it works! Formatting cannot be undone later. Requires Disk Utility. There you can select your external hard drive in the left column and select the Delete tab on the right. Then you must choose the correct format.
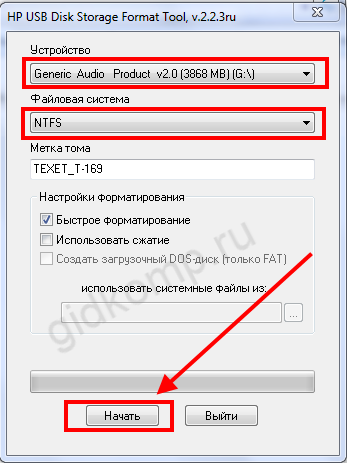
Select your USB flash drive from the list of devices. be careful - do not confuse it with another drive.
In the list of file systems, select NTFS and click "Start".
That's all. We are waiting for the formatting to end and we are happy to be able to write to a USB flash drive files larger than 4GB if it is larger.