It so happens that when installing the operating system, at the stage of breaking hard disk into sections, the user is short-sightedly greedy, taking under system files 30 gigabytes of disk space. Especially greedy individuals highlight even less - they were the first to read this article. But it doesn't matter why it happened that there is not enough space on the system drive (usually drive C). It is important what to do while doing this. And you can do this: delete extra programs and clean up the desktop. But practice shows that this measure is temporary and tangible relief will last for a short time - a month, two - at best. The cardinal solution is to format C and repartition the physical disk again, without repeating the mistakes made in the past. But as a rule, this process is laborious, this is one, and laborious is two. And three. You will have to restore everything that was installed on the C drive (many users unwittingly store personal and hardly collected information on the desktop, or in the "my documents" folder), search for drivers again, configure the system ...
Better to go the third way, choosing the middle ground. We will tell you about how to increase the volume of the system disk at the expense of free space on other disks without reinstalling the system or deleting information. Moreover, this operation can be carried out by system means without resorting to third-party programs.
For this we need an external hDD, to which it will be necessary to transfer (temporarily) all the information from the disk on which we decided to select free space. But first things first:
The question of how to increase the C drive is solved identically in two operating systems - in Windows7 and in Windows8.
First, we transfer all the information from volume D to another medium, then open "Disk Management". For this
in Windows7: click "Start", and in the search bar, enter diskmgmt.msc,then press ok. Or: on the desktop right key mouse click on "Computer", select "Management" then "Disk Management".
In Windows8: in search we write diskmgmt.msc, then approx. Or: on the desktop, right-click on "Computer", select "Management" then "Disk Management".
2 Click on volume D with the right key and select "Delete volume".
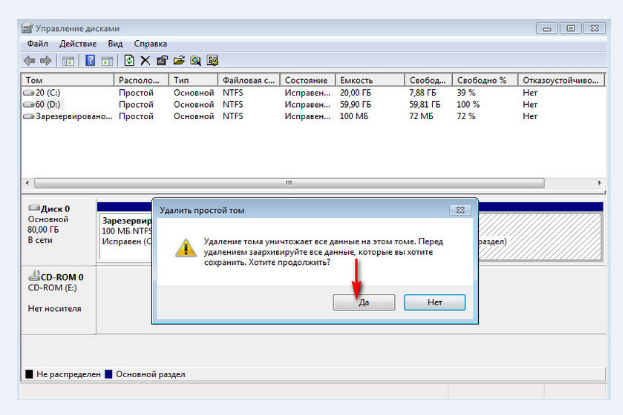
3. We confirm the deletion.

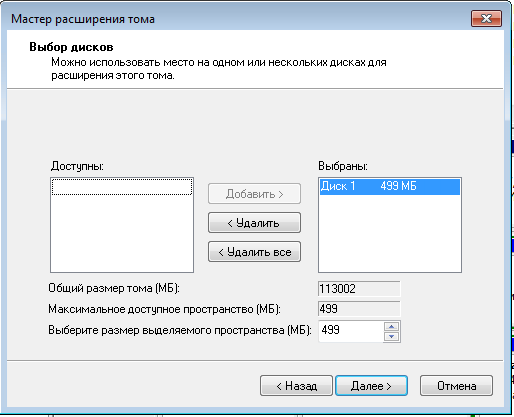
4. Select with the right key volume C, and in the drop-down menu select "Expand volume".
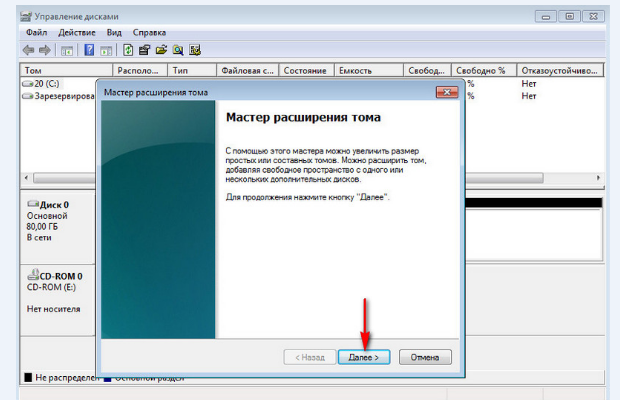
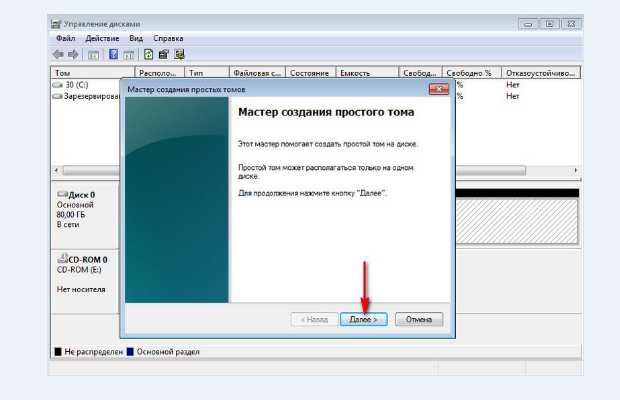
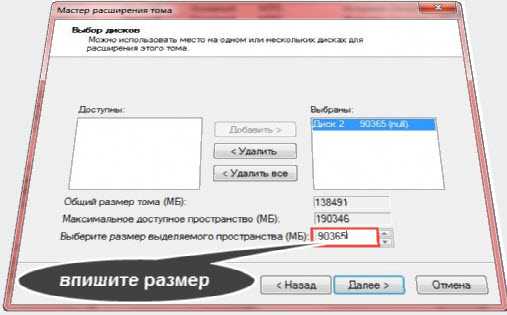
5. The "Volume Expansion Wizard" starts, click "Next".

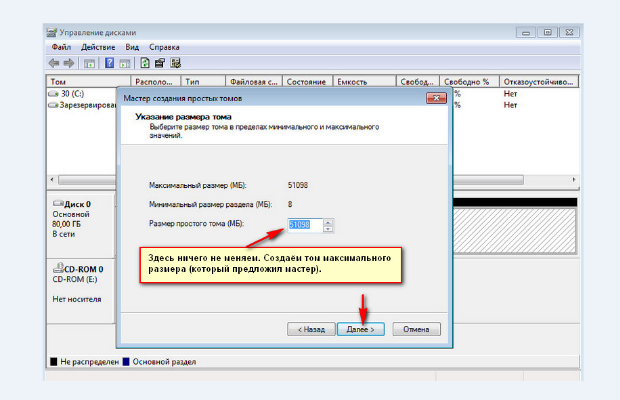
6. In the dialog box that opens, indicate the value of the capacity by which we want to increase system disk... Click "Next".
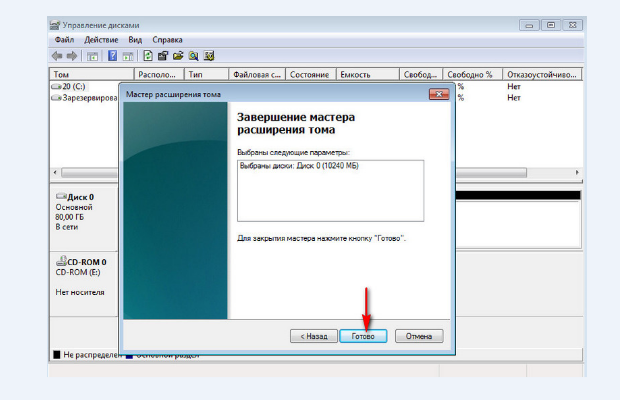
7. Click the "Finish" button.
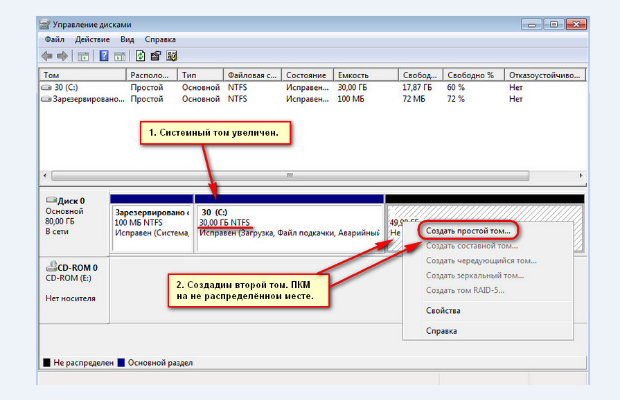
8. Done, the system disk is enlarged. Now you need to use the unallocated space in order to create disk D (otherwise the system simply will not see the free space and will not be able to use it). Click on the unallocated space, and in the drop-down menu select "Create Simple Volume".
9. Open the wizard again, and click the "Next" button.
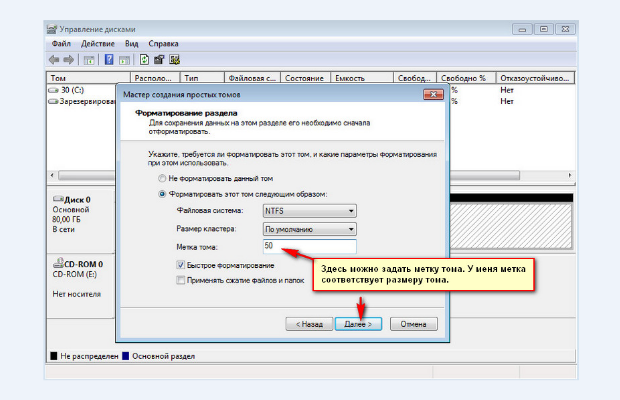
10. In the dialog box that appears, leave the default settings and click "Next" again.

11. We leave the letter proposed for the new volume (Letter D).
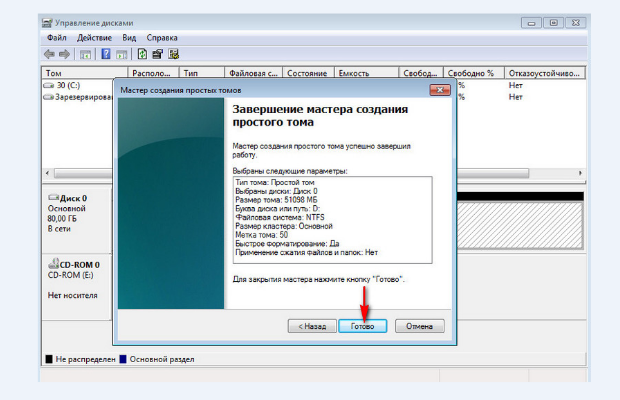
13. To complete the work, click "Finish".
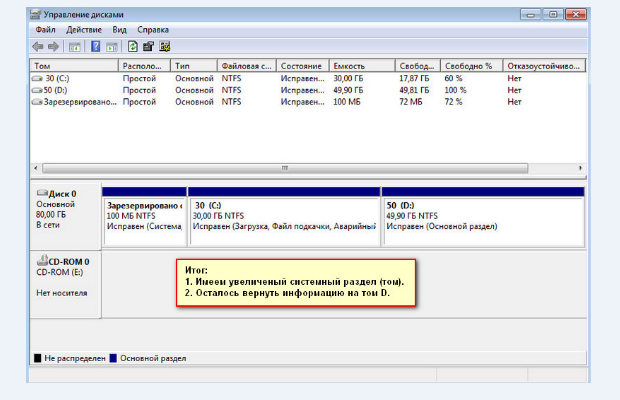
The process is complete. We have an enlarged section C, and new volume D smaller. It remains to transfer the old information to the new section D.
Sooner or later, any computer user is faced with a problem such as a shortage free space on the system partition of the hard drive. This is where the question arises: "How to expand the C drive?" Basically, it overflows for a variety of reasons. Every person is different. Either too many programs are installed, in particular games. It is on the system partition. Someone constantly deletes files and at the same time forgets to empty the trash. Someone initially made a mistake and when installing the operating system set the system partition too small. More advanced users try to expand their C drive space by removing unnecessary programs and But sooner or later, even such actions cease to bring the desired result, and we start looking for a way to expand the hard disk. It becomes clear that the size of the system partition must be increased. Next, we will consider in detail how to expand the C drive and not harm the information stored on it.
The ways
We will try to do this in two ways. First, by the operating system itself. In Windows 7, expanding the C drive is quite simple. All this is done relatively quickly. The main thing is to save the information you need on some other medium. This is done in case of some kind of failure or force majeure when it is impossible to expand the C drive.
Windows 8 provides the same tools for increasing space. Therefore, this method is also applicable on this operating system. The second method will be with the involvement of a third party software... It is light and free utilitywhich will help you quickly decide this problem... Now let's talk about everything in more detail.
Operating system tools
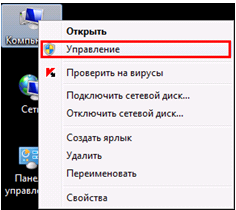
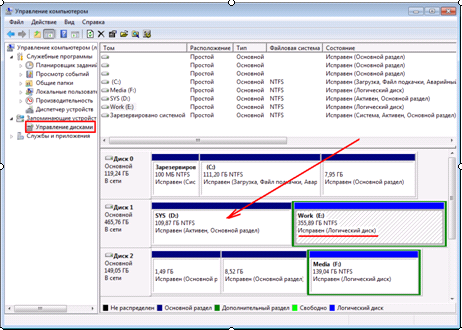
First we need to go to the Computer Management tab. To do this, click right click mouse on the "My Computer" icon and go to the "Management" tab. In the left menu, we need to select the item When this tab opens, you will see in the window all the media that are currently connected to the computer. Each hard disk can be split into several logical ones. The very first will be "Disc 0". The system-reserved space and logical partitions (C, D, E, F, etc.) will be displayed on the right. If you have only one C drive and it is full, then you will not be able to expand the space. In this case, you need to install another physical disk. If you have several logical partitions, then move on.
Disc division principle
The principle of action is as follows: we must expand the C drive at the expense of an adjacent logical partition. This could be drive D, E, and so on. In the same way, you can enlarge not only the C section, but also others, if you have such a need.
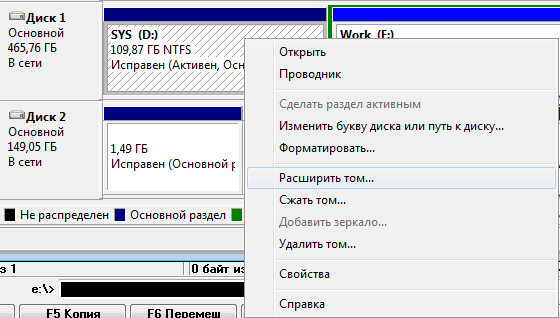
So, we delete the adjacent disk, for example, D. Click on it with the right mouse button and select the "Delete volume" option. Click OK. Immediately after that, this volume should be displayed in black. It should display "Volume not allocated". Now you can add the space we need to the C drive. To do this, right-click on the C partition and select "Expand Volume". Click "Next" and select the size you want to add.

Can be used maximum size, as will be suggested by default, or choose at your discretion. Click "Next" and then "Finish". If no additional windows pop up, then the operation was successful. You have learned how to expand the C drive using Windows 7. The main thing to remember is that the system partition can only be enlarged if there is free space to the right of it. Otherwise, nothing will work.
Possible difficulties
What other difficulties can there be? Let's say we have five volumes. We want to configure them in such a way that we add part of the space to drive C, and another to drive D. When deleting one of the partitions, the "Delete volume" function may not be active, and the "Expand volume" function is not available on volume C.
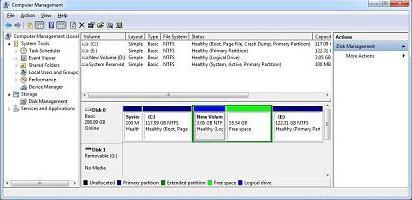
The point is that the MBR partition style can be used. This is an outdated style. In this case, two adjacent volumes can be linked with a green border. This means that more than four volumes cannot be created with the MBR partition style. Now you have learned how to expand the D drive or split it into several parts. Now let's talk about additional features.
Additional programs
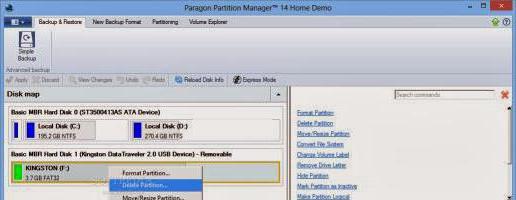
There is a program like Paragon. On the official website, you can download a utility called Partition Manager. Download and install it on your computer. Can be downloaded to a USB stick. The program is free, but to get an activation key, you need to register. You can do this directly from the installer by clicking on the link.
Beginning of work
Having opened the program, we find ourselves in a menu where you can select five operations. We need a second Resize Partition. This means resizing the partition. Click the Next button and get into the control window. It displays a similar picture that we saw in the Windows 7 Disk Management section. You can expand the C drive here in the same way.
You will see a scale that shows all of your physical media and logical partitions on them. Also from left to right. First the space reserved by the system, then the C drive and the next volumes, if any. The section style and media number will also be indicated at the top. This program is still easier than the operating system. We need to click on the sections of interest to us. They will be highlighted with a red frame and then opened in a separate window. Here we will not need to delete volumes and then recreate something. Everything is done much faster.

There is a dedicated slider at the bottom. We can move it to the right or to the left. We just need to move the slider to the desired position in order to increase the size on one section, and decrease it on the other. We can also visually observe an increase in the system partition. Next to the slider there are numbers with which we can navigate how much we increase the volume. If desired, they can be entered manually for each section. To enter in the third way, you need to move the mouse cursor over the volume border and left-click. Arrows will appear in the window. Now, moving to the left or to the right, you can move the division boundaries, increasing or decreasing the size of the required volume. Everything is very simple.
Next, click the Next button. Here we are warned to apply the changes. Select the top item "Yes, apply the changes". We are also informed that the computer will be rebooted, and the process of allocating disk space may take a long time. It depends on how fragmented your disk is and how it gets filled with garbage. Next, click the Next button, then - "Restart the computer".
Restart your computer
Make sure all other programs are closed and all documents are saved. After rebooting you will see the program window. There is no need to take any action. Everything will happen automatically. During this process, do not restart or turn off your computer. This can result in the loss of all data on hard drives. At the end this process another restart of the computer will occur. Now you need to go to the hard drive explorer and check if the changes have occurred. Thus, you have learned how to expand the C drive on your computer using special utilities.
conclusions

Another important aspect is never to interrupt your computer during a disk partitioning operation. This is guaranteed to result in data loss and a system crash. You will have to format the disk and reinstall the system. Of course, there are programs for but that's another story altogether.
The editorial office of our portal has more than once received questions like how to increase disk space with or how to increase the volume of disk c at the expense of d, and so on. In today's article, we will try to answer these questions in as much detail as possible and we will make some instructions for you, with the help of which everyone can increase the size of the required local disk painlessly and without losing data.
Why is disk space running out?
Family operating systems Microsoft Windows have one unpleasant property, over time the size they occupy grows and increases, thereby filling up the free disk space. Both temporary and system files, which grow depending on the needs of the system, can take up space. Sooner or later a moment comes when there is simply not enough space on the system disk and operating system starts to "glitch" and work slowly. You can clean and remove unnecessary files, configure the swap file, but what to do when there is nothing left to delete. In this article we will tell you how to increase the space of the System disk at the expense of other logical volumes.
Two methods to painlessly transfer free space from one disk to another
- Method 1- if you are using an operating system Windows 7 or 8 , then you have the opportunity to use the standard utility for viewing and changing partitions of the hard drive.
- Method 2 - otherwise you will have to use programs such as Acronis Disk Director or Partition Magic.
How to increase the size of the system drive with Windows 7 or other OS - Method 1
We need utilities "In order to run this utility, right-click on the" Computer "icon and select" Control ".
In the window that opens, find and run the Disk Management utility. This component of the operating system allows you to manage all storage devices, be it a hard drive, flash memory or "balvanka".
In order to increase the space on the C drive at the expense of the local D drive or any other, we need to transfer the available free space from one local drive to the system one (that is, on the one where the operating system Windows 7 or another is installed). Before doing this, check your local disk for free space and calculate how much you would like to transfer.
To free up space, right-click on it and select "Shrink Volume".

In the next window, we will need to specify the size of the space that we want to transfer to another volume. Set its "Compressible space size (MB)" field.

After the performed actions, free space should appear on our hard disk, which we can transfer to the system disk.
In order to add free space to the system disk, right-click on it and select "Expand volume" in the context menu.
After that, a wizard will start that will help you resize our volume. In the wizard window, you will need to select the volume to expand and the amount of space to add.
Having done this, click "Next" and after a short wait you will get a system disk with a lot of free space. After that it is worth restarting your computer.
Increasing Disk C Space Using Acronis Disk Director - Method 2
Acronis Disk Director is a very powerful product for robots with rigid and local drives computer. It is worth reading the system messages very carefully so as not to accidentally make a mistake and destroy the data.
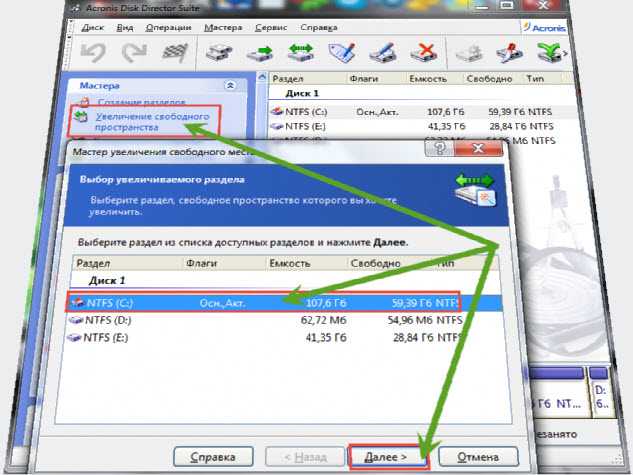
Upon entering the program, we are greeted by an intuitive interface in which we can select disks and perform operations with them. To increase the size of the volume, select the drive and click "Resize Volume".
![]()
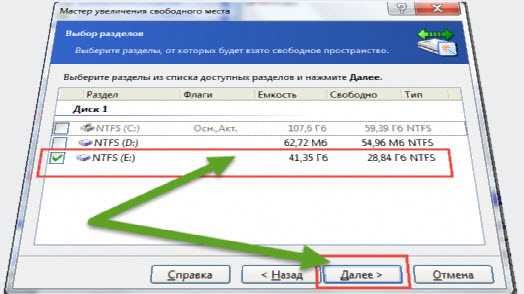
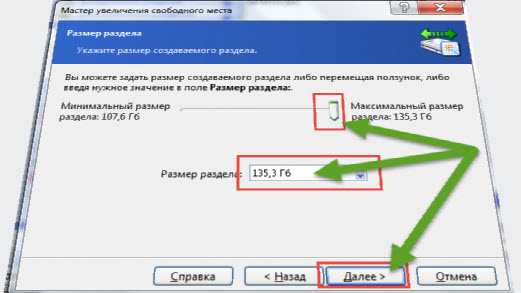
In the window that opens, check the boxes next to "Add unallocated space to volume" and "Take free space from other volumes". By clicking on the button next to the window with percentages, select how much space you want to take from other drives. After freeing up space, change the "Volume Size".
After making all the changes, click "OK" and apply the actions. The system will ask you to reboot and after the reboot you will have a disk with a large amount of free space.
An improperly partitioned hard drive into several smaller local hard drives brings more problems than benefits. An example of this can be a small amount of memory on the system drive C, which will run out very soon if you actively use your computer and install different programs. But nothing is unreal. Today we will learn how to increase the C drive.
The essence of the problem
The need to add several gigabytes to the C drive is quite common. This problem occurs when during the initial installation of the operating room windows systems incorrectly divide disks and set the system drive C to no more than 20 GB. 10 years ago, that would have been quite enough. However, now computers are more powerful, and the list of programs has expanded significantly, not to mention online games and updates, which weigh tens of gigabytes. Therefore, 20 GB, taking into account the fact that Windows has just been installed, will be enough at best for a month of work, after which the PC user will begin to seriously think about how to increase the C drive. The C drive means the system drive, i.e. the one on which the operating system is installed, since in most it is he who performs this role.
In fact, this is much easier than it might seem. There are a large number of utilities that relate to hard drive partition managers and are able to manage them, including increasing the capacity of one by taking a piece of memory from another. A good program for managing your hard drive is Acronis Disk Director. The only downside is that it is paid. You can certainly find a pirated version, but why break the law if there is a good, absolutely free utility AOMEI Partition Assistant Standart Edition.
A couple of lines about the program

AOMEI Partition Assistant Standart Edition is an excellent utility for hard disk management. The license is absolutely free for both home and commercial use. The utility is completely in Russian, as a result of which problems with use should not arise. In addition, its interface is similar to Acronis Disk Director, and those who used Acronis will hardly feel the difference and will not have to think long about how to increase the C drive. But those who are faced with this for the first time will be able to intuitively level to understand what and how. This utility has done its best, as evidenced by a bunch of positive feedback on a variety of sites and blogs.
Without preparation, nowhere
Before increasing the C drive, you need to download and install this utility. We go to the official website of AOMEI, we find the desired program and download. We start the installation process. Click "Next" and wait for the end. If it was downloaded not from the official site, but from a third-party, then the installation process must be controlled so as not to install Sputnik Mail and the Amigo browser for yourself. The utility is installed, but we are in no hurry to launch it.
Create a backup
Before increasing the C drive in Windows 7, you need to make a system backup. Backup is a function that creates a copy of data (a restore point) of one or more disks to return to this point in case of problems. This is done very simply:
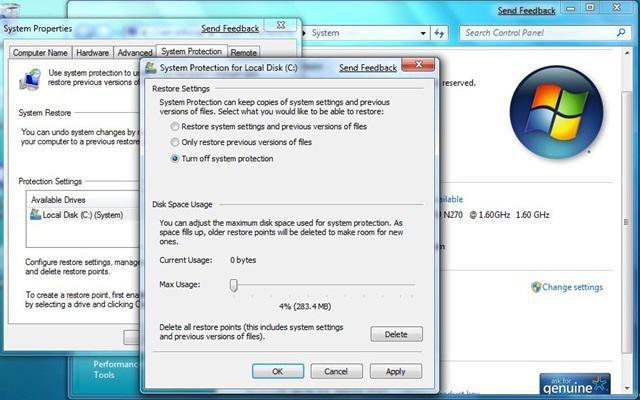
- Open the properties of my computer, where you can find the section " Extra options systems ".
- When the parameters window appears, click on the "System Protection" tab, where the available disks and information about their security should be displayed, ie. whether a restore point has been created on them or not.
- Select drive C, click "Configure". Here we put a tick on "Restore system parameters ...", if not, and allocate space for the backup (5-10 percent). This must be done so that you can save several restore points and roll back from an earlier one, since they constantly replace each other. Click "OK".
- Now click on the "Create" button. Give a name to the future backup, click "Create".
- The same procedure can be done with the D disc.
You can view the newly created restore point in "Start", then "standard: / service: / system restore".
Of course, it is absolutely not necessary to make a backup before increasing the hard drive C. But it is worth remembering that AOMEI Partition Assistant Standart Edition is a hard drive manager, and if any error occurs, then all information can be damaged.
How to increase the C drive?
We launch the program. You can immediately notice that it displays all the disks on the hard drive plus the reserved area. So, our goal is nothing more than to increase the C drive with the D drive (Windows 7) without losing data. To do this, right-click on the D drive and click on the first item from the "Resize Partition" list. Now we either move the delimiter from left to right, marking how much to separate, or in the "Unallocated space before" column we type the required number of gigabytes. Click "OK".

As you can see, the picture has changed somewhat: an unallocated area has appeared, which needs to be attached to C. We click on it with the right and act in the same way as with D, - "Resize the partition". Here, a window already known to us opens, in which you need to move the delimiter slider to the right to the end. To start the process, click "Apply". But before increasing the C drive at the expense of the D drive, let's double-check the operation parameters in the window that appears. If everything is in order, click "Go" and "Yes". After that, the process of transferring free space to C. will begin. This is, in fact, the whole operation for the separation.
Acronis Disk Director
As described above, Acronis has a similar interface to AOMEI Partition Assistant Standart Edition. However, the problem regarding how to increase the C drive at the expense of the D drive (Windows 7) is solved here a little differently.

First you need to have a license for this utility, since the demo version only allows you to transfer a few gigabytes. Install, create a restore point, run. Select drive D and click on the left toolbar "Resize Volume". Up to this point, it was necessary to decide how to increase the C drive at the expense of the D drive (Windows XP or 7). Drag to the right as needed for C. After clicking on the "Apply pending operations" button, which is distinguished by a black flag. As you can see, the utility has started to separate space.
We do the same with the C disk, namely, go to the section for resizing the volume and move the slider to the maximum to the right. The only difference is that here you need to check the box "Add unallocated space to volume". After that, click on the black flag in the same way. However, after splitting memory with this utility, you will need to restart your computer.
It is also best to do disk partitioning with Akronis using boot disk or a flash drive with the program. The program itself will help to do this.
Having bought a laptop or computer, over time, you may find that it sorely lacks space on the female drive "C" or "D".
The space of the hard disk partitions can be easily increased by taking memory from one and adding to the other (if there is, of course).
You can perform such an operation (expand the volume without losing data) in several ways - standard and using programs.
I will give three ways here. The first standard is, therefore, completely free in Russian.
The second is with the excellent program "acronis" (it always increases the size of the space ideally - only it is paid).
For the third way to resize disk windows you will also need a program, only this time free - "EASEUS Partition Master Home Edition". Now in order.
How to increase the size of the hard drive c and d without losing data using standard windows 7 or windows 8 tools
First of all, go to the "administration" section, click on the "computer management" line and click on "disk management".
Now, if you need to enlarge the "C" partition, right-click on the secondary drive "D" or "E" and select delete volume.
All content will be deleted, so save important data beforehand - you will receive a warning about this.
After that, right-click on the C drive partition, select expand the volume (you may have different letters, but the principle is the same) and click "next".
Now you need to specify the size of the disk space expansion.
Right-click on it and select "create simple volume".

There is no point in describing further actions. Do everything that will be offered to you (assign a letter) and the "master" will do everything. You will have remote disk again, only with a smaller size.
How to use acronis to expand the space on disk c or d without losing data
I will be writing about acronis version 10. It "weighs" 14 MB, but there is a new 11 - at least ten times larger. The work in them is slightly different, but knowing the principle you can figure it out - they are in Russian, but paid.
Now you have to put a tick in front of the section from which the container will be selected and go forward by clicking "next".
The window will change to something else. In it, using the slider or manual mode, indicate how much to write off (you can completely write off) and, as always, press "next".
Next, you will be prompted to restart your computer. Do not be alarmed if incomprehensible symbols start popping up, like these: ########## ####### ######. It should be so, just do not touch anything - the system will do everything on its own.
How to change the memory size of a creepy disk c or d with EASEUS Partition Master Home Edition
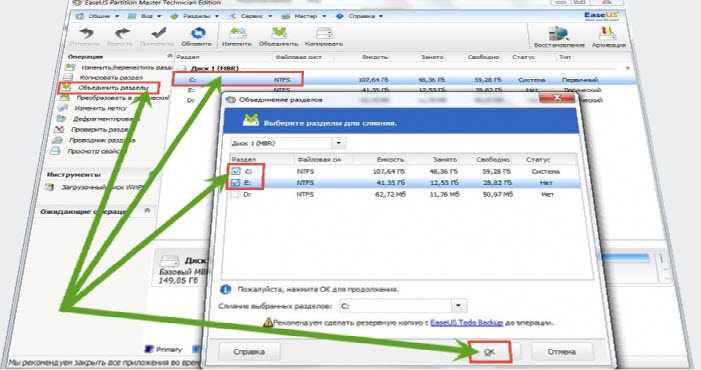
This program is free, only in English, but you can easily find a crack on the net. There are two ways to resize a female disk in it: combine two partitions into one, or simply increase it by a certain size.
For the first option, click on the required disk and on the left side, click "deplete partitions". Then "OK" and the wizard will do everything.
In the second case, you will need to remove the secondary disk first (right in the program). Then, when free space appears, click on the C or D partition and select the option: change / move the partition (the first one from the top).
I will not describe the process in more detail - I do not want to break the disks again. The only thing I can say is that during the operation there will be a delimiter at the top.
With it, you can increase or change the size of the desired section by moving the sliders to the right / left.
At the very end, a reboot will be offered - it will visually show how the hard disk partitions are changed.
That's all. All three methods are fully functional. Each of them has pros or cons. How to use, analyze based on the above.
I can only say for myself - I use the second, the agronix program, only it is paid. If difficulties arise, write in the comments or by mail (the contacts menu is at the very top in the center) - how I can help. Good luck.