We clean system disk Windows XP
Whatever the volume of your hard disk, as a rule, sooner or later the place on it ends. If the disk is a system disk, then the lack of space can lead to partial or complete inoperability of the computer, because during operation, the operating system and most programs actively use it to create temporary files.
To avoid such problems, you need to monitor the availability of free disk space and periodically delete temporary files.
There is a special tool for deleting temporary files in Windows XP - Disk cleanup... To start it, click right key mouse on drive C and from the drop-down menu select the item Properties
In the tab General push the button Disk cleanup and wait a few minutes while the system compiles a list of files to be deleted

Then we are given a list of what the system thinks is superfluous and can be deleted
If you wish, you can see in more detail what exactly we are proposed to delete. I usually just mark all the items, the system will not delete the excess. We should also mention the item Compressing old files... Here files that have not been used for a while are not deleted, but placed in the archive. This way you can free up a lot of disk space, but I mark this item only as a last resort, because the archiving procedure is very lengthy.
We can go to the tab Additionally and remove unused Windows programs and components, as well as System Restore Checkpoints, although I prefer to do this separately from Control Panel

Then click OK and watch the process

If there is enough space freed up as a result of cleaning, you can finish there, but if not, then move on.
Right-click on the icon My computer and select the property item, then go to the tab System Restore

Here we can reduce the space occupied by restore checkpoints or disable System Restore altogether.
Then we turn off the hibernation option, since disk space is reserved for it. To do this, go to Start-Control Panel-Power Supply and in the tab Sleep mode remove the checkbox allowing its use

And finally, we manually delete everything that is still not deleted. To do this, we need to enable the display of hidden and system files in folder properties. Go to My Computer - Tools - Folder Options and select the tab View

Then follow the path C: \\ Documents and settings \\ Username \\ Local Settings

In the folder Temp contains the user's temporary files, and stores temporary files in the Temporary Internet Files folder Internet Explorer, so we delete all content from them, it is better to leave the folders themselves. If several users work on the computer, then the procedure is repeated for each of them. Sometimes it happens that the system displays a message that the file is in use and cannot be deleted. In this case, you need to reboot, after which everything will be fine.
Then go to the folder C: \\ windows \\ temp , the operating system stores its temporary files here. We delete everything from it too. Also in the Windows folder you can see many folders of the following form

These folders are created when installing updates as insurance so that in case of problems, you can roll back the changes. If the updates have already been installed and no problems have arisen with them, then these folders can also be deleted, especially since they take up quite a lot of space. Well, there you can also delete the installation log files and free up some more space.

Now we have deleted everything that is possible (and even a little more) and our system disk is clean. Well, as a final touch in the properties of the disk, select the tab Service and run defragmentation. This procedure will not add free disk space, but it can significantly speed up its work.
While working at the computer, a lot of unnecessary information accumulates on the hard disk. These are all kinds of temporary files downloaded from the Internet web page, as well as unused application files. Than more programs you install and run, the more often you go to the Internet, the more chances there are of various useless garbage on your hard drive that takes up precious free place... To maintain order on your PC, you need to periodically clean up. The Windows XP operating system provides the user with many useful utilities, including a program called Disk Cleanup.
This utility first appeared in Windows Millennium and has become very popular among users due to its convenience and simplicity. Subsequently, the program was included in the utilities of newer versions. operating systems Windows family. Thus, the Disk Cleanup Wizard migrated to Windows XP. Let's move on to an example of the Disk Cleanup Wizard in order to appreciate all the advantages of this utility, and at the same time learn how to use it effectively.
The Disk Cleanup utility is located in the standard set of service windows programs XP. To launch it, activate Start, Programs, Accessories, System Tools, Disk Cleanup. Otherwise, the program can be run from the command line by typing its name: cleanmgr. After launching the utility, the program working window will appear on the screen.
To continue working, you must select a logical disk that will be cleaned up. By default, the selected drive is always (C :). You can also start the cleaning wizard by going to "My Computer", selecting the appropriate drive, and by clicking on it right click, activate the "Disk Cleanup" tab. Then the cleaning procedure will be immediately launched specifically for the selected disk. Once you've identified the drive you want to clean up, you can click OK. In this case, the Disk Cleanup Wizard will proceed to the procedure for checking the status of files on this disc... A little patience is necessary, as this procedure usually takes a long time.
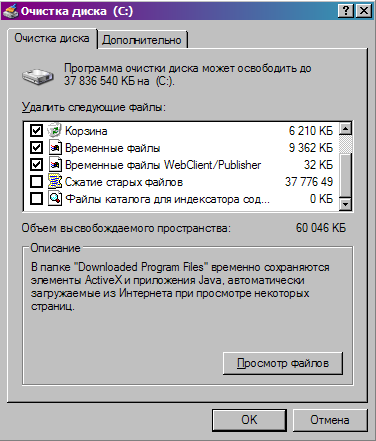
After completing the analysis of the current state of the disk, the utility will present a report on the work done, indicating how much space can be freed. In addition, the wizard will display a summary of how disk space can be freed. Let's try to understand this report by analyzing the information provided by the Disk Cleanup Wizard line by line.
The wizard displays a list of file categories that can be deleted or compressed without affecting system operation. However, the user is encouraged to independently determine what should and should not be deleted. The tick marks the groups of files to be deleted. At the end of each line, the amount in kilobytes that can be freed up by deleting this category of files is displayed.
In order to confidently make his choice, the user needs to understand what the listed filegroups are. So, the Disk Cleanup Wizard offers to subject the following to the removal procedure:
- downloaded Program Files
- temporary files from the Internet (Temporary Internet Files);
- files in the Recycled Bin
- temporary files of applications (Temporary Files);
- temporary offline files;
- offline files;
- stand-alone web pages (WebClient / Publisher);
- setup log file
- compressed files that have not been accessed for a long time;
- content indexer catalog files used by the OS during the last indexing.
Let's take a closer look at each group. The Downloaded Program Files folder is for temporary storage of ActiveX controls and Java applications that are automatically downloaded from the Internet when you download and browse various web pages. The folder can be cleaned up at any time.
The Temporary Internet Files directory contains web pages that are automatically saved to your hard drive while you browse the Internet for quick viewing when you revisit them. With a good connection, the loading time of pages in a new way is not very long, and therefore it makes no sense to protect the contents of this folder. Since a large number of files accumulate in it, you should try to clean it up regularly enough.
Files are placed in the Trash after they have been deleted from the disk. This is the final frontier before the files are permanently deleted and can be restored before the Recycle Bin is emptied. Absent-minded user who unintentionally deleted required files, can easily find them here. The name of the Recycle Bin speaks for itself - it is intended for garbage and should be monitored for overflow. Emptying the Recycle Bin will rid the disk of previously deleted files.
Some programs very often store temporary information in files, in a specially designated TEMP folder. As a rule, these files are usually deleted before closing such programs. However, this does not always happen, and therefore a lot of unnecessary information can accumulate in the folder. Temporary files that are stored for more than a week can be safely deleted.
Temporary Offline Files are local copies of recently used network filesautomatically cached. This makes it possible to access them in a disconnected state.
Offline files are essentially the same as temporary offline files, with the only difference that they are local copies of network files that were explicitly requested offline access. Both those and others can be safely removed without negative consequences for the operation of the system.
The WebClient / WebPublisher service saves appropriately accessed files to disk. They are necessary to increase performance, and therefore can be painlessly removed.
One way to save space is to compress files that have not been accessed for a long time. At the same time, Windows retains the ability to access these files at any time, and no information is deleted. However, the information about the freed space in this case will be approximate, since the files are compressed with varying degrees.
The indexing service is designed to speed up the search for files on disks. By creating indexes of files existing on the disk, this service greatly expands the possibilities of finding the necessary information. However, old indexes may be retained from the last indexing operation and should be dropped.
Thus, by reviewing the report of the Disk Cleanup Wizard, you can determine which of the detected files should be deleted. If necessary, by highlighting any group of files from the proposed list, you can view its contents. To do this, just click the "View files" button. This is useful when only a few files from the entire group need to be saved. They can be rewritten to another directory, and the rest of the files can be mercilessly deleted. It should also be noted that the composition of the components proposed for removal depends on the type of disc. For example, for non-bootable logical drives, the report typically only lists the contents of the Recycle Bin and the content indexer catalog files.
Using the More Options tab, you can free up additional disk space by removing unused Windows components or installed programs. Each user should try to determine what kind of applications he uses when working at a computer. Anything else can be deleted.
After you have identified all the information to be deleted, you can safely click OK in the report window of the cleaning wizard. All selected files will be deleted and Disk Cleanup will automatically exit.
In conclusion, I would like to note that there are many different utilities that allow you to perform the disk cleanup procedure. Some developers offer comprehensive optimization solutions windows work (Norton Utilites, Fix-It Utilites, System Mechanic etc.). There are also programs specially designed for this purpose. Nevertheless, it makes no sense to dwell on their descriptions in detail, since the differences in the operation of such programs are not significant. Experience has shown that the standard Disk Cleanup utility is the most convenient and safe way to free up disk space. In addition, it is not always possible to free up enough space by deleting only useless information. In this case, no utilities will be able to help, and you will have to figure out how you can get additional free space. Over time, each user gains enough experience in order to get rid of unnecessary and useless information on their own, so to speak "by hand", simply by deleting unnecessary files and without fear of damaging the system. This is the most effective method maintaining order on the computer. And at the initial stage, the Disk Cleanup Wizard will always help you with this problem. Moreover, he is always at hand. Happy cleaning!
Additional tips for using the Disk Cleanup utility:
- The System Volume Information folder is used by System Restore. This is where the so-called restore checkpoints are stored. By default, the size of this folder is 12% of the disk space - that is, quite a lot. You can change the size of the reserved space, disable monitoring of one of the disks, or completely disable the restore function. The size of the reserved space can be changed in the control panel on the "System Restore" / "System" tab. Recovery milestones can be removed by running Disk Cleanup. After selecting a disk, you must go to the "Advanced" tab, then "System Restore" and click the "Clean" button. The operation allows you to very significantly free up disk space.
- You can pre-configure the configuration of the Disk Cleanup Wizard.
To do this, you must run the cleanup wizard from the command line using the Run procedure from the start menu. In this case, the line will look like this:
cleanmgr / sageset:<числовое значение от 0 до 65535>
The / d switch specifies the disk to clean up. If this parameter is absent, all disks in the system will be cleaned up. The / sageset switch describes the set of parameters in the cleanup wizard report dialog box. The numerical value of this key describes different sets of parameters.
Unfortunately, after starting the wizard from the command line, an annoying window will still appear on the screen showing the cleaning process.
- If the Disk Cleanup Wizard didn't please you for some reason, you can add another utility to the system instead. To do this, you need to start the editor using the "Run" procedure windows registrytyping in command line regedit. Then you need to open the HKEY_LOCAL_MACHINE SOFTWARE section Microsoft WindowsCurrentVersion ExplorerMyComputer. This section contains subsections for disk utilities. The CleanupPath subkey must be created for the Disk Cleanup Wizard. By default, the following value is used: "% SystemRoot% system32cleanmgr.exe / D% c" This line can be changed by specifying the path to another, own disk cleanup utility with its own parameters. In addition, in this line you can enter the parameters for launching the Disk Cleanup Wizard itself, described in the paragraph above.
Many people are familiar with the situation when a recently purchased hDD, as it seemed, simply of an unrealistic size, quickly turned out to be crammed to capacity, which the OS persistently reminded of. It's a shame when you don't even have a clue where the disk space is going, as if it is being eaten.
All kinds of caches, temporary files, settings files have a good purpose: to make the user's work as convenient and fast as possible. Unfortunately, in many cases, the program does not delete these files after shutdown. It is believed that they will be needed in the future, due to which some process will be accelerated, but someday it is necessary to put things in order.
Temporary OS files
To begin with, logging into the system with administrator rights, check the disk for errors ("My Computer" → "Service" → "Check"), since it is quite possible that there is simply an error in recording the amount of free space.
Now you can use the built-in utility to clean the disk ("Start" → "Programs" → "Accessories" → "System Tools" → "Disk Cleanup"). Here you should pay attention to two sections: "Temporary files" and "Temporary Internet files" (Did you forget to clean the Trash?). It is better not to touch the rest of the menu items - for example, cleaning Downloaded Program Files can lead to the need to re-download large ActiveX and Java applets, for example - Shockwave. However, press the View button and make sure that nothing extra is left on your PC. Do the same with the remaining sections.
Next, you need to manually clear the Temp and Temporary Internet Files folders (you can also clear History, but its volume is not large). The problem is that even if only one person is working at the computer, "garbage" may appear in such profiles as Administrator, Default User, All Users. In addition, the utility for cleaning disks does not delete all temporary files, but only those that are older than a week. This is done for greater reliability, so as not to inadvertently delete something needed. Therefore, we turn on the display of hidden and system files and go to the C: \\ Documents and Settings folder, where we see a list of all users. In the folder of each user, go to the Local Settings directory and find the Temp and Temporary Internet Files we need. They can be safely cleared by first completing the execution of all programs. The exception is cookies in Temporary Internet Files - some of them are needed to visit some sites and their deletion will entail minor problems, for example, you will have to remember your login and password to the forum in which you are registered. Do not forget about the "system" Temp folder, it is usually located in the C: \\ Windows directory.
One of windows features XP is the ability to view graphic files directly from Explorer without opening them. You just see thumbnails of the images. Such copies are called thumbnails and they are stored in a hidden temporary file thumbs.db, which is created in each folder with pictures. The size of this file depends on the number of photos in the folder. "Overgrown" thumbs.db files can be periodically deleted manually, which is quite tedious, because the next time you open the directory with pictures, the OS will create a similar file again, or you can completely disable thumbnail caching ("Folder Properties" → "View").
The built-in screw burner can also leave its cache in the C: \\ Documents and Settings \\ Username \\ Local Settings \\ Application Data \\ Microsoft \\ CD Burning folder - which is as much as 700 meters for a CD!
It is only necessary to note that the folders with temporary files will be filled up again soon after your inspection, so they will have to be cleaned again after a while. Therefore, it is much more convenient to clean them using a special bat file. You just need to type a few lines in Notepad, taking into account the peculiarities of your system and save the file with the .bat extension:
Erase / S / Q "C: \\ Documents and Settings \\ USERNAME \\ Local Settings \\ History"
Erase / S / Q "C: \\ Documents and Settings \\ USERNAME \\ Local Settings \\ Temp"
Erase / S / Q "C: \\ Documents and Settings \\ Default User \\ Local Settings \\ History"
Accordingly, instead of USERNAME, you need to substitute the username on your computer. Nobody forbids registering other paths for cleaning any directories on the computer.
Temporary application files
Pay attention to the Application Data folder in the Local Settings directory and to the folder of the same name in the root section of each user. This is where many programs like to store their temporary files, which often remain even after the program itself is uninstalled. By the way, opera browsers and Mozilla, it is in them that they store their cache - if you use them, you should clean not only Temporary Internet Files, but also look for a similar directory in Application Data.
In particular, the folder C: \\ Documents and Settings \\ Username \\ Application Data \\ Microsoft \\ Office \\ Recent Files stores shortcuts to recently opened files Microsoft Office - the volume of each is small, but the number is sometimes simply huge.
If you are using Messenger2, then look in C: \\ Documents and Settings \\ Username \\ Messenger2 \\ Profiles - there are folders with names that match the numbers of ICQ accounts, in each of which you can find the files directory - it contains files transferred to you via a pager (unless you specified a different path when receiving the file). There is also a logs folder with the history of all dialogs. So look here more often, this will not only help save disk space, but also save the meaning of your negotiations from prying eyes. A similar ICQ directory is C: \\ Documents and Settings \\ Username \\ Application Data \\ ICQLite.
AT latest versions popular program ACDSee has a database with an icon cache. It can grow up to several hundred megabytes, and it contains just temporary files that can be safely deleted, so do not go past the folders C: \\ Documents and Settings \\ Username \\ Application Data \\ ACD Systems \\ Catalogs \\ 80 \\ Default and C : \\ Documents and Settings \\ Username \\ Local Settings \\ Application Data \\ ACD Systems \\ Catalogs \\ 80Pro \\ Default - all their contents can be safely deleted. Picasa 2 stores its files in C: \\ Documents and Settings \\ Username \\ Local Settings \\ Application Data \\ Google \\ Picasa2 - there you will find a db folder containing the program's database files and a tmp folder with temporary files.
Pay attention to the folders "My Documents". Many programs save their temporary files in them. For example, the popular AquaMark test package puts the results of each test in the C: \\ Documents and Settings \\ Username \\ My Documents \\ AquaMark3 folder. After prolonged use, the size of this folder can be hundreds of megabytes.
The well-known Need For Speed \u200b\u200bUnderground game saves its files in the C: \\ Documents and Settings \\ All Users \\ Application Data folder, where the files for profiles, settings and saves are located. Subsequent versions of the game save their files to the C: \\ Documents and Settings \\ Username \\ My Documents \\ NFS Underground 2 and C: \\ Documents and Settings \\ Username \\ My Documents \\ NFS Most Wanted folders, respectively.
Thus, clearing the Application Data of all unnecessary will free up a significant amount, but you need to act very carefully.
Do not forget, however, to look directly into Program Files - after uninstalling programs, a lot of garbage also remains here. If you find a folder with the name of a program that has been deleted, or its developer company, you can delete it, just before that, look inside, maybe there really is something you need. Study also C: \\ Program Files \\ Common Files - the remnants of the remote software can be found here too. However, there are examples of another kind, for example, the WhereIsIt cataloging program creates it every time the directory changes. backup, which, like the directory itself, can reach hundreds of megabytes. Such files are stored in the C: \\ Program Files \\ WhereIsIt \\ Catalogs folder.
System Restore
Built-in Recovery Service Checkpoints windows systems XP takes up a lot of space - by default, 12% of the hard disk space is reserved. In fact, such a service is only needed during the initial system configuration and driver installation. When the OS is set up, it is sufficient to have only one - the last rollback point. Run the Disk Cleanup utility again - on the Advanced tab in the System Restore section, you can easily delete all checkpoints except the last one. Disabling the recovery service on all drives except the one where Windows is installed is also a good option.
If you use more reliable software, for example, Acronis TrueImage, then it is better to disable the recovery system altogether. To do this, go to the "Properties" of "My Computer" and on the "System Restore" tab check the box "Disable system restore on all disks". Now you can delete already existing checkpoints. The easiest way is directly in Explorer, in the context menu of the System Volume Information folder, select Properties → Security, enter your account to the list, give it full access rights and then delete the contents of this directory in the usual way.
Deleting a memory dump
The developers of Windows XP provided for the ability to find out the cause of the system failure, for which, with each fatal error, a dump (content) is saved to the hard disk random access memory... Usually, each failure entails saving 64 KB of RAM (small memory dump), but depending on the settings, another option is possible: saving a full dump, which can take hundreds of megabytes.
For any normal user this function it's better to disable it altogether. Open "Control Panel" → "System" → "Advanced" → "Startup and Recovery" → "Options" and in the section "Write debug information" in the drop-down list, specify "(Missing)". Now delete the already existing memory dumps - they are saved to the C: \\ Windows \\ Minidump folder (if the save small memory dump mode was selected) or to the C: \\ Windows \\ Memory.dmp file (when saving a full RAM dump).
Removing the driver cache
When installing Windows XP, a set of standard drivers supplied with the OS is copied to the hard disk. In most cases, the need for them disappears after complete installation and system settings. You can safely remove such drivers and free up another 80-100 MB. If you need a standard driver to install a device in the future, nothing bad will happen, since the OS will ask you to insert the installation CD - if it is at hand, then you can safely empty the C: \\ Windows \\ Driver Cache \\ i386 \\ folder.
Deleting the cache of protected system files
Another function of preventing OS crashes is backing up protected system files. If the original files are damaged, the system replaces them with files from the backup copy (which is about 200-400 MB on disk). This is a very useful thing, but after a complete setup of the OS, with the proper level of its operation (if you install few programs, use only proven software and certified drivers), this function is unlikely to be needed, so you can disable it if you really want to. In the command line, type sfc / cachesize \u003d N, where N is the maximum allowable cache size, if this size is set to 0, then the cache will be disabled. Now you can delete (or better - copy to CD) an existing backup copy of system files - the C: \\ Windows \\ system32 \\ dllcache folder. But once again we draw your attention - do this only in case of urgent need, this function is very, very useful. If you decide on this, then the logical continuation of deleting the cache will be to disable the entire protection service windows files XP SP2. Copy the file% SystemRoot% \\ System32 \\ SFC_OS.DLL to the temporary folder, open it in a hex editor, and at offset 0xECE9 change 33C040 to 909090. From under the recovery console or another OS, replace this file with the version you patched wherever you find it on the disk. To registry key
HKEY_LOCAL_MACHINE \\ SOFTWARE \\ Microsoft \\ Windows NT \\ CurrentVersion \\ Winlogon
add the parameter (if not present) "SFCDisable" of type REG_DWORD with value "FFFFFF9D". Reboot your PC.
OS update files
In the Windows folder you can find directories with the name like $ NtUninstallQnnnnnn $, $ NtUninstallKBnnnnnn $. They store the information necessary to return the OS to the state before the update was installed. Usually a couple of weeks after installing an update is enough to detect possible problemsafter installation. If there are none, then these folders can be deleted. To do this, it is convenient to use the Remove Hotfix Backup utility, although in some cases it removes far from all such folders, in which case the case can be completed manually. But delete not only the folder on the disk, but also in the registry key HKEY_LOCAL_MACHINE \\ SOFTWARE \\ Microsoft \\ Windows \\ CurrentVersion \\ Uninstall, delete all parameters except Default in the section corresponding to this update, otherwise the Add or Remove Programs dialog will remain inoperative command.
In addition, after installing hotfixes, another windows folder\\ $ hf_mig $. In addition to copying new files to system folders, they are copied to the $ hf_mig $ folder. This is to ensure the correctness of future updates. For example, if in the future you will install an update containing some files more early versionsthan those that were already installed, then the installation will take the files of the new versions from the $ hf_mig $ folder. That is, this folder can be deleted (or better, copied to a CD) if you do not make regular OS updates from the Windows Update website.
Optimizing the paging file
Limiting the size of the paging file is usually undesirable. An exception can be cases when the RAM is more than 1 GB - Windows XP can reserve more than a gigabyte of disk space for the swap file. In such a situation, it is permissible to set hard limits on the size of the paging file - by specifying, for example, 600-800 MB. Please note only that it all depends on what programs you are working with, therefore the best solution is, nevertheless, transferring the paging file (without setting restrictions on its size) to a specially allocated hard disk or a hard disk partition with a volume of two to three GB. In extreme cases, even just a different partition with data is suitable - the main thing is that the swap is not on the same partition as the Windows folder. This placement is recommended by Microsoft Support as it improves system performance. To configure virtual memory, look in "Control Panel" → "System" → "Advanced" → "Performance" → "Options" → "Advanced" → "Virtual Memory".
Hibernate file
Think about how often you use hibernate mode? And do you really need it? The fact is that when Hibernate support is turned on, the contents of the RAM are copied into a special file on the hard disk - hyberfil.sys. This file is practically equal to the amount of RAM installed in the computer and is located on the system disk, even if you have never transferred your PC to Hybernate. This file cannot be moved to another section. Therefore, if disk space is more important to you, then you can disable hibernation through the menu "Control Panel" → "Power supply" → "Hibernation".
User files
Not only OS and programs are capable of hammering the system partition to failure in a couple of months of active operation. The users themselves have done quite well in this. Look for a start in the list of "Add or Remove Programs". You will find a lot of interesting things: programs whose names have never even been heard, utilities that were installed “in order to watch” and “in order to have”, a dozen games that no one plays anymore. Delete the unnecessary, and then, as already mentioned at the beginning, look into the folders in which these programs were installed, as well as in the Application Data directory. By the way, if you use the Ashampoo Uninstaller instead of a standard tool to uninstall programs, then there will be practically no garbage on the disk.
Next, scan the hard disk for duplicate files - for this you can use free utility Duplicate File Finder. Just do not delete duplicates in system folders - most of them are needed, scan only folders with user files in order to identify mistakenly left and forgotten copies of documents. If in your search you find a "non-removable" file occupied by some mysterious application, try the Unlocker utility.
Understand your media files. This applies to both your own collection and multimedia files that appear as a result of the work of various programs. For example, many converters, grabbers, peer-to-peer exchange programs, by default, save to disk not only ready-made files, but also temporary ones, and in the folder or its subdirectory where the program is installed.
Of course, you have to look through a lot of folders and files. different types, so to speed up and simplify this process, use the Scanner utility, it will graphically display the sizes of each folder and file, allowing you to identify the largest disk space leaks. After completing this set of activities, you will free up a few more hundred megabytes.
Completion of cleaning
At the end of cleaning the hard disk, it is advisable to perform a few more operations. First of all, you need to repeat the procedure for checking the hard drive, and then defragment it. You can defragment a disk using the standard utility, but it is better to use more powerful programs or at least defragment the paging file with the free FileDeframenter utility.
Order has been achieved, now it is necessary to maintain it. To do this, you need to occasionally clean up all "temporary" directories. Manually repeating such operations is rather tedious, so it makes sense to use the special utility WinTools. It will help you to correctly uninstall programs, find and delete temporary files on the entire hard drive, or completely clear certain directories. In this case, you yourself can make a list of temporary file extensions (all kinds of .tmp, .bak, .gid, and so on), or use a ready-made list, which should be noted, compiled quite sensibly.
For advanced
Of course, these are far from all the possibilities for cleaning a disk. For example, you can remove Windows components that are initially missing from the Add / Remove Programs list - Installing Windows". To do this, in the file C: \\ Windows \\ INF \\ SYSOC.INF, after saving a backup copy of it, remove the words HIDE, wherever they occur. After that, in the "Windows Components" menu, all OS components will appear and unnecessary ones can be removed, including MSN Explorer and Windows Messenger. Delete only what you understand the purpose of and are sure that you will not need it! Windows Messenger can also be removed with this direct command:
RunDll32 advpack.dll, LaunchINFSection% windir% \\ INF \\ msmsgs.inf, BLC.Remove
HKEY_LOCAL_MACHINE \\ SOFTWARE \\ Policies \\ Microsoft \\ Messenger \\ Client
"PreventRun" \u003d dword: 00000001
"PreventAutoRun" \u003d dword: 00000001
"PreventAutoUpdate" \u003d dword: 00000001
"PreventBackgroundDownload" \u003d dword: 00000001
"Disabled" \u003d dword: 00000001
After removing the excess, replace the original sysoc.inf file.
You can also (not forgetting about the backup) to clear the folders C: \\ Windows \\ SERVICEPACKFILES \\ and C: \\ Windows \\ $ NTSERVICEPACKUNINSTALL $ - the first stores the service pack files, and if you have its distribution kit, then there is no need for it, and the second allows you to uninstall an already installed service pack.
You will find quite a few temporary files in C: \\ WINDOWS \\ Installer, where distributions of some programs are saved. However, if you clear it, then when you try to reinstall, update or remove one of these programs, you will receive an error. Therefore, it is also necessary to delete the subsection corresponding to this program in HKEY_CLASSES_ROOT \\ Installer \\ Products. If you uninstall programs using Ashampoo Uninstaller, then there will be no problems. A similar dump of distributions ever installed programs you will find it in the C: \\ Program Files \\ InstallShield Installation Information folder - it is created by a different type of installer. But here the special utility InstallShield Installation Information Manager will help - it will take all the trouble of correctly removing unnecessary distributions on itself.
For the most advanced users, we also suggest thinking about issues such as indexes system service search and other search programs - they may remain on the disk even after disabling and uninstalling these utilities. For each scanned file, Kaspersky Anti-Virus creates an alternate stream in which it writes its checksum - after uninstalling the application, this data may also remain on the disk. In this case, it is advisable to reinstall the antivirus and uninstall it using the option to remove these streams. All kinds hidden files, alternative streams and rootkits can be identified using the Streams and RootkitRevealer utilities. For example, some programs (for example, from Symantec) create a Recycle Bin hidden from the user, where all deleted files are placed.
Finally, you can more actively use the system function to compress rarely used folders on NTFS volumes.
Cleaning the registry
It is equally important to put in order the main OS database - the system registry. After deleting so many files, many registry keys simply link to nowhere. You can clean the registry using utilities such as Norton WinDoctor or WinTools - there are quite a few programs to identify invalid registry keys. There are even programs for experimenters - RegDelNull. Defragmentation and small reduction in the size of the registry can be done with the RegCompact utility.
- www.dougknox.com
- www.ashampoo.com
- www.brooksyounce.com
- ccollomb.free.fr/unlocker
- www.steffengerlach.de/freeware
- www.sysinternals.com
- www.wintools.net
- loonies.narod.ru/releasesr.htm
- www.sysinternals.com/Utilities/RegDelNull.html
- www.experimentalscene.com
From clogging up your local disk, all processes on the computer may become slower, and there will be no more space for anything new. You can clean Disk C manually by going through folders one by one, but it's better to use special programswho will help you with this. Don't forget about the cache, registry cleaning and timely deletion of the contents of the recycle bin. In this article, you will learn how to erase the contents of a local disk as quickly and conveniently as possible, as well as how to format it completely. You may need to format your hard drive for various reasons, and this process will not take much time. Take on board all the tips in this article.
How to clean local drive C
Even if you don't have a lot of information stored on your hard drive C, it can get clogged and inevitably cause problems when using your computer. To complete the complete cleaning process, you need to follow these steps:
- Manually clear folders from unnecessary media.
- Erase downloads.
- Delete old unnecessary programs.
- Clear computer cache.
- Clean up the registry.
After that, you can free yourself from several gigabytes to hundreds, depending on how many unnecessary files you have accumulated.
Empty your media folders
You may have downloaded movies to watch, music, and lots of pictures. It's time to delete all these files, especially if you no longer use them.
Delete any files that may be in the Pictures, Videos, or Music folder. You can also have your own folders for this purpose.

Erase downloads
The Downloads or Downloads folder always contains a ton of old files. You may not even remember about the existence of such a folder if you changed the download settings, and now all downloads are saved on your desktop. Go to "Downloads" in the "Users" folder and clear it of old files, sort the ones you need, and just delete the rest.

Empty the basket regularly
The basket needs to be cleaned regularly, and if you remove large files - At once. After cleaning downloads, media and other large files, immediately click right mouse on the trash can icon and click on the "Empty Trash" item.

The size of the files in the recycle bin may surprise you a lot. As you can see, in the screenshot below, 25 Gigabytes of files fit into the basket.

Download CCleaner and clear your cache
The most convenient program to clean your computer from all possible - CCleaner. With it, you can not only clean the system and application cache, but also delete files you do not need.
- Download the program from the link and install it on your computer.

- Once you open the utility, go to the "Tools" section. It displays a list of all programs that are installed on your computer. Select the one you don't need for a long time and click on the "Run Uninstaller" button. Repeat for each program.

- Now go to the "Cleaner" tab and first clean the contents of the "Windows" section by clicking on the "Run Cleaner" button.

- And then the Applications section, repeating the steps. This not only uninstalled unnecessary programs, but also cleared the cache on your computer.

Clean up the registry
This is an important point, but it is also the most crucial. If you click on the wrong folder and delete it, the consequences can be dire. Follow the instructions exactly.
- Open Start and type Regedit into the search bar. A file will appear at the top to click on.

- Wait until the Registry Editor window opens in front of you. Open the "HKEY_CURRENT_USER" folder. Look closely at the title.

- Here in a long list you will see the "Software" subsection, where all residual files from uninstalling programs are located. The user does not always know that by uninstalling a program, he still leaves data about it on the computer. To get rid of them completely, you need to clean the registry. Find the folder with the name of the program you deleted and erase it. Repeat this with all the folders that bear the names of already deleted programs.

How to clean drive C completely
When it comes to fully formatting the system, everything is extremely simple:
- You need to go to your computer.
- Right-click on the local drive.
- Select the line "Format".
If you do this for a complete reinstallation of the system, then formatting can be done during the reinstallation, and not beforehand. It is better to take a USB flash drive and first drop your important files onto it.
