Good day!
I present to your attention an overview, installation and configuration of the wonderful package iRedMail based on Debian Lenny.
iRedMail - this is:
1) Full-fledged mail server.
2) Works under Red Hat® Enterprise Linux (5.x), CentOS (5.x), Debian (5.0.x), Ubuntu (8.04, 9.04, 9.10), FreeBSD (7.x, 8.0).
3) Works both on a conventional system and under control virtual machine: pr. VMware, OpenVZ, Xen.
4) Support for i386 and x86_64 architectures.
5) Uses compatible components for installation and configuration, such as Postfix, Dovecot, SpamAssassin, etc.
6) When installing, it uses binary packages from your distribution.
7) Open source project licensed under the GPL v2.
8) Support for two backends for storing virtual domains and users: OpenLDAP and MySQL.
9) Unlimited number of support for domains, users, mail aliases.
10) Support for two Web-Interfaces (RoundCube and SquirrelMail).
This package is very easy to configure and install.
1) This package is convenient in that:
and. You don't need a lot of knowledge, i.e. the installation and configuration process is not complicated at all.
b. Requires a minimum of time to turn corporate mail. I spent literally 20 minutes installing this assembly.
at. The set includes all the necessary software for the mail server. (Antivirus, Antispam, 2 Web-Interfaces (optional)
2) There are no analogues of this package.
How iRedMail works:
Anti-Spam and Anti-Virus.
2 popular packages act as antispam and antivirus, these are SpamAssassin and ClamAV
What iRedMail supports for email security:
1. Support for SPF (Sender Policy Framework).
2. Support for DKIM (DomainKeys Identified Mail).
3. Greylist support.
4. Support for "White Lists" (based on DNS name and IP address)
5. Support for "Blacklists" (based on DNS name and IP address)
6. Support for the "Blacklist" of HELO requests.
7. Support for HPR (HELO Randomization Prevention)
8. Spamtrap support.
9. SpamAssassin integration
10. ClamAV integration, virus database auto-update.
Email client support:
Email clients with POP3 / POP3S and IMAP / IMAPS support. For example: Mozilla Thunderbird, Microsoft Outlook, Sylpheed.
Installing iRedMail.
I chose iRedMail as the mail server. This is Postfix + LDAP (MySQL) + SpamAssassin + ClamAV + AmaViS + Dovecot + RoundCube (SquirrelMail) etc. In this article, we will be looking at setting up this awesome OpenLDAP server.
Attention! Remember to change example.com to your domain name.
Let's fix our hostname a bit:
vi / etc / hosts
127.0.0.1 mail.example.com localhost localhost.localdomain
Vi / etc / hostname
mail.example.com
We save the changes with the command:
/etc/init.d/hostname.sh start
Check the FQDN of the hostname:
hostname –f
The entire installation is done under the root user!
Download this file to the / tmp directory:
Cd / tmp && wget iredmail.googlecode.com/files/iRedMail-0.6.0.tar.bz2
Install the archiver:
apt-get install bzip2
You need to unpack this archive:
tar -xvjf iRedMail-0.6.0.tar.bz2
Go to the /tmp/iRedMail-0.6.0/pkgs/ directory and run the installation script:
bash get_all.sh
The required packages will download.
For dovecot to work, you need to install the Candidate version of the package. It won't work with another one!
apt-cache policy dovecot-common dovecot-pop3d dovecot-imapd | grep "Candidate"
The command will return an empty result.
Go to the installation script directory:
cd /tmp/iRedMail-0.6.0/
Run the installation script:
bash iRedMail.sh
The installer window will appear: 
We choose the path where all our mail will be stored: 
We select the backend for our server. MySQL and OpenLDAP are supported. We'll choose OpenLDAP: 
LDAP suffix for our server is added like this: dc \u003d example, dc \u003d com 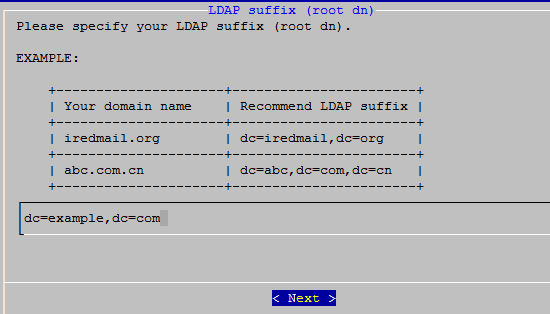
Let's enter the password for the LDAP server administrator. The default administrator account is /etc/ldap/slapd.conf. This is usually: cn \u003d Manager, dc \u003d example, dc \u003d com 
Enter the name of our domain:
Enter the administrator password (postmaster): 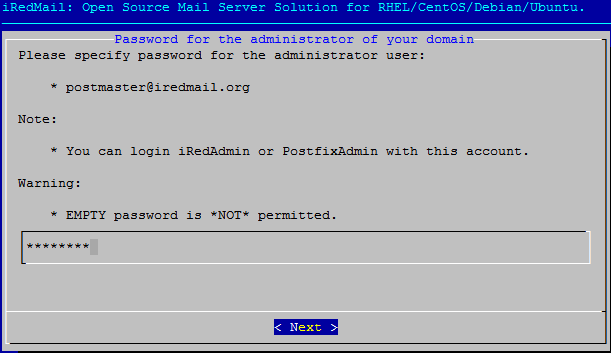
The first user to be created is the user: [email protected] We need to come up with a password for it: 
Turn on SPF check and DKIM check function: 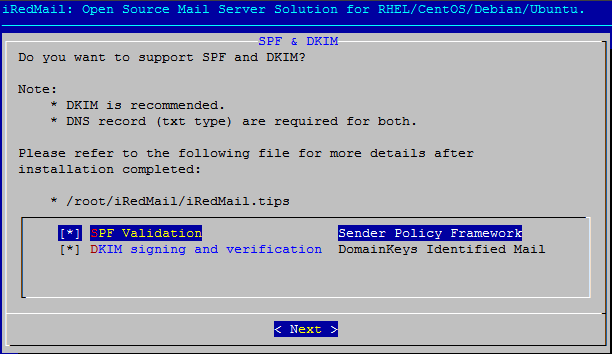
We put extra. Components: 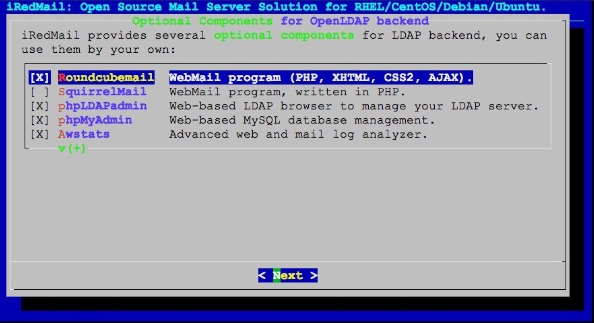
Let's make an alias for the root user: 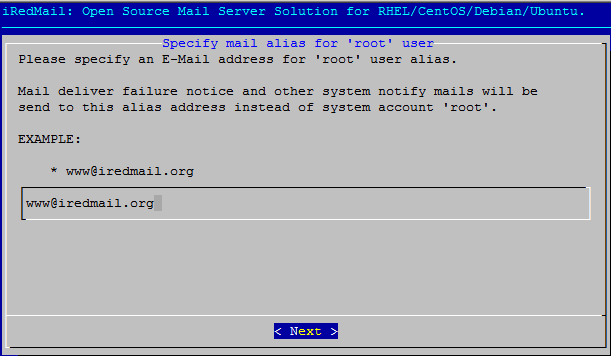
The configuration is complete.
The message appears.
Today, when email is the backbone of business processes, companies need a reliable, high-performance email system that protects against viruses and spam, can authenticate users, encrypt traffic, and offers many convenient features. The presented solutions allow you to achieve such a result with a minimum of effort.
iRedMail
Name: iRedMail
License: GNU GPL
Platform: * nix
Mail servers on * nix impress with their openness, performance and security, but for a beginner, deployment from scratch and subsequent maintenance can turn into a real nightmare. The iRedMail project aims to solve this problem. In fact, this development is a set of scripts and ready-made configs that simplify the process of deployment and initial configuration of a Postfix / Dovecot-based mail server with support for the SMTP, POP3 and IMAP protocols. After starting the script, it will download and install the necessary packages by itself, create the first virtual domain (by asking a minimum of questions) with the administrator and the user. The deployment process itself takes about ten minutes, after which it will be possible to send and receive mail. You won't have to read the documentation and delve into the settings, and you won't need any specific * nix knowledge. Accounts can be saved in OpenLDAP or MySQL, this is selected during the installation phase. Then you can create any number of domains, mailboxes and aliases, that is, there are no restrictions. To protect mail from viruses and spam, SpamAssassin and ClamAV will be automatically installed, as well as tools that provide support for SPF (Sender Policy Framework), DKIM (DomainKeys Identified Mail), HPR (HELO Randomization Prevention), Spamtrap and white, black, gray lists ... To block attempts to brute-force a password, set iptables Fail2ban. The project proposes its own development iRedAPD (Access Policy Delegation), which allows you to manage Postfix policies by delegating authority between users. Management is carried out using the Roundcube WebMail web interface; in parallel, the phpLDAPadmin, PostfixAdmin, phpMyAdmin service management tools and the AWStats log analyzer will be installed to view statistics. A localized proprietary administrator interface is also available - iRedAdmin, in two versions: free Open Source and commercial iRedAdmin-Pro. The first allows you to manage only accounts and domains, the second solves all issues related to the administration of the mail system. All components are put on one "clean" server; if you already have a working MySQL, you can connect to it only if you make the necessary settings manually (requires some experience).
Installation on i386 / x86_64 versions of Red Hat Enterprise Linux, CentOS, Gentoo Linux, Debian, Ubuntu, openSUSE and Open / FreeBSD is supported. Several guides are available on the project website to help you quickly navigate.
IndiMail
Name: IndiMail
License: GNU GPL
Platform: * nix

A messaging platform for SMTP, IMAP, POP3, supporting QMQP, QMTP, DKIM and BATV (Bounce Address Tag Validation) and email spam and virus checking. Based on several Open Source solutions: Qmail, Courier IMAP / POP3, serialmail (mail delivery over dial-up connections), qmailanalog (mailing lists), dotforward, fastforward, mess822, daemontools, ucspi-tcp, Bogofilter, Fetchmail and others. Provides a set of tools for managing virtual domains and user accounts of its own design. Provides routing for SMTP, IMAP and POP3, which allows you to host a mail domain on multiple servers with communication between them or as a proxy. This is very convenient if the organization consists of several remote offices. Using the hostcntrl utility, you can add individual addresses from other domains to the service. This allows IndiMail to be used in a heterogeneous environment without having to host multiple domains or moving from a proprietary solution. Multiple servers with data synchronization make it easy to grow the structure. To provide better scalability and performance, several components have been changed (notably Qmail). IndiMail uses several so-called queue collections, each of which runs its own qmail-send / qmail-todo process and can store data on a separate hard drive. This architecture allows requests to be processed faster than the original Qmail.
Developers give complete freedom in settings, almost all parameters can be redefined through variables (and there are about 200 of them). For example, the CONTROLDIR variable points to the directory with configuration files, QUEUEDIR is the directory with queues. That is, you can run multiple copies of IndiMail on the same server with different settings for each queue, sender, recipient, and host. But it's not necessary to understand all the variables: it only takes a few edits to get IndiMail up and running. Newbies can manage installations using the FLASH menu (built with Ncurses). MySQL is used to store data about virtual users, address books can be stored in OpenLDAP. Recent releases are fully compatible with systemd. The developers pay a lot of attention to the security of both the server itself and the services - minimal use of SETUID, clear separation between programs / addresses / files, five-level trust partitioning, automatic local IP recognition, access-list, tcprules, content filter, TLS / SSL and much more ...
IndiMail can be installed on any 32/64 * nix platform. Sources, packages and repositories are available for download for some popular Linux distributions (RHEL / CentOS 5/6, Fedora, openSUSE / SLE, Mandriva, Debian and Ubuntu). To manage the server, about 45 programs for various purposes are offered (most are located in / var / indimail / bin), accounts can also be configured using the iWebAdmin web interface (built on QmailAdmin), which must be installed separately.
Rumble
Name: Rumble
License: GNU GPL
Platform: * nix, Win

A mail server that supports SMTP (ESMTPSA), POP3 and IMAP. It is very easy to manage, a web interface is used for administration. Perfect for small organizations with multiple domains. It is written in C / C ++, its own API (Lua and C / C ++) is offered for scripts. The architecture allows you to increase server performance by clustering servers for one or all domains. Supports SSL / TLS, SQLite and MySQL, authentication (MD5 / PLAIN / STARTTLS), white / gray / blacklist, SpamAssassin, BATV and VERP (Variable Envelope Return Path) technologies are included to protect against spam. The settings provide the ability to limit maximum size messages.
The site contains source codes and x86 / x64 binaries for installation on Linux (Generic, Ubuntu, Debian). To start the server, you need to unpack the archive and execute the script, the program will do the rest by itself. For convenience, the source texts and configuration files can be distributed to the appropriate directories and provide autoloading at OS startup. Server parameters and modules are included in rumble.conf file. To be able to register via the web interface (port 2580), delete the automatically generated modules / rumblelua / auth.cfg file (it contains the admin password), then open the web browser and specify a new password. Now you can manage domains, accounts and mailboxes, server settings, view logs and statistics.
By default, SQLite is used as a database, if its capabilities are not enough or the organization already has a working MySQL, then you can easily switch the server to work with this DBMS.
Three levels are used for server administration - server administrator, domain administrator, and user. The server administrator interface allows only creating and deleting domains, plus a number of specific settings are available. After creating a domain, in the RumbleLua User menu you need to add new account and specify this domain in its settings. This will be the domain administrator who, after registering in the system, will be able to create mailboxes, aliases, bind the address to the module, set the program that will be launched when a letter is received to a specific address, and configure the relay. The interface is not localized, although everything is very simple and straightforward.
Zentyal - out of the box mailer
Newbies who are intimidated by the very word Linux and the need to enter commands in the terminal need a simple solution that allows you to quickly deploy without reading the documentation post service... Alternatively, here you can recommend Zentyal - a specialized distribution built on the basis of Ubuntu Server (the latest release is based on Ubuntu 12.04 LTS) and allows you to perform all the necessary installations and settings using a graphical interface. Zentyal is a general-purpose distribution kit that can be used as a router with UTM functions, an office server or a message server. All necessary functions are implemented using installed modules / packages. There are currently more than thirty modules available from five categories, which can be added with one click. Zentyal can be installed as a standalone server using its own user base, or work in a master / slave link with the ability to replicate between several servers and synchronize credentials with LDAP / AD.
Axigen
Name: Axigen
License: GNU GPL
Platform: Linux, FreeBSD, Solaris, Windows
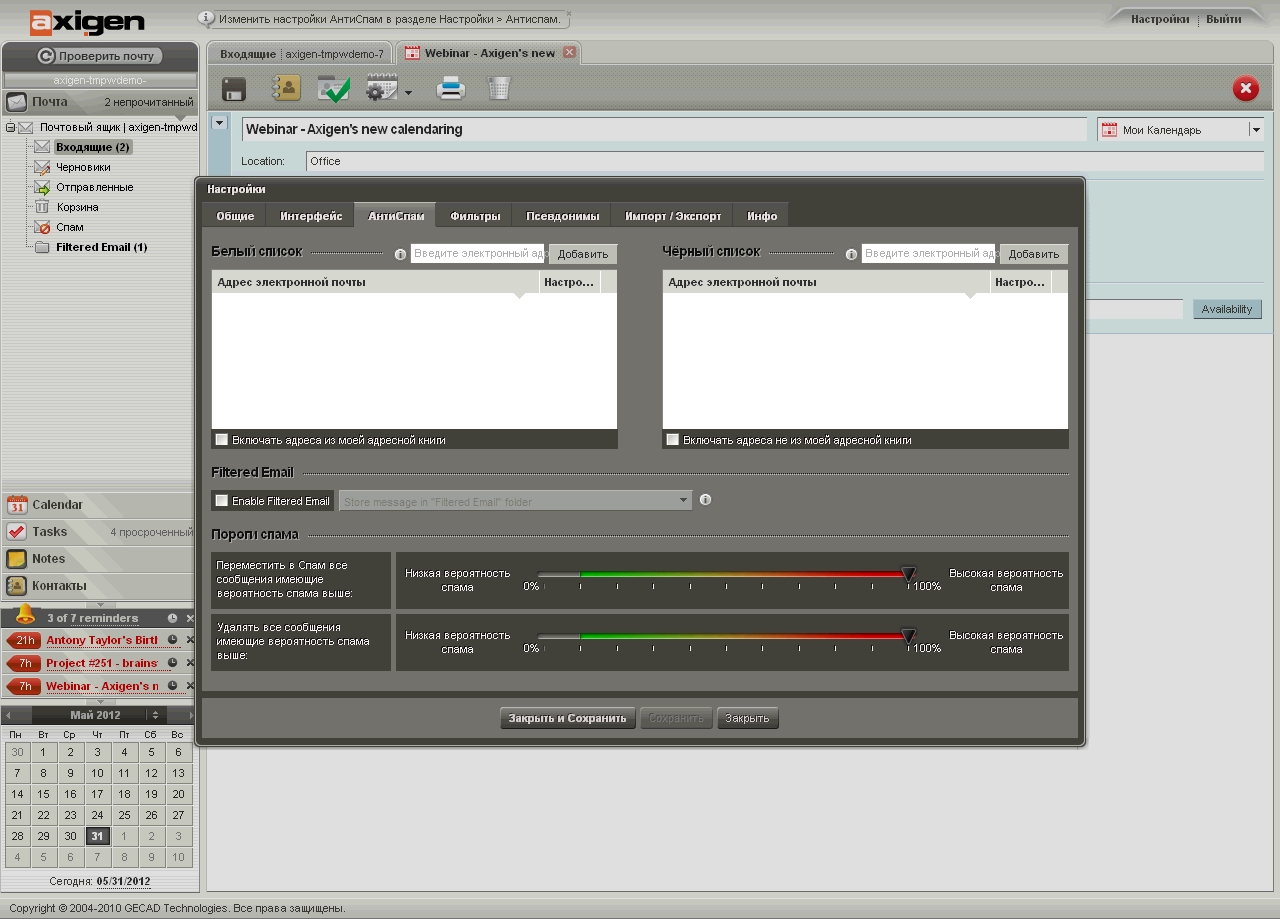
Multifunctional, fast, secure mail server (SMTP / POP3 / IMAP) with functions working together, calendar, to-do list and notes, developed by the Romanian company Gecad Technologies. Users can work with messages through an email client or using a localized (and very nice) web interface built using Ajax technology - it can be completely customized. Hotkeys are supported, further enhancing the experience of working with a regular desktop application. Available in the settings: collecting mail from external boxes, answering machine, mail filter, setting aliases and more. User can also export / import contacts to CSV file for transfer to other applications. In addition to the standard one, a simplified one for mobile devices interface, support for ActiveSync to synchronize messages, contacts and calendar. An extension for working with shared folders is installed as an add-on.
Administration is performed using command line or via a web module (works on port 9000), understandable even for a beginner. At the same time, certain rights on settings are finely delegated to other users.
Integration with an LDAP server (the documentation describes OpenLDAP and eDirectory) or Active Directory is possible, for this you need to install special extension schemes. Implemented modules for backing up and restoring information, mailing lists, cluster and load balancing support, MAPI interface, POP3 and IMAP proxies. The server can serve several domains with different settings. The documentation describes how to integrate a Jabber / XMPP-based IM service. In addition, Axigen has an advanced reporting system with the output of all kinds of charts; in total, about a hundred templates have been prepared. TLS / SSL can be used to protect information, all popular authentication mechanisms are supported: plain, login, cram-md5, digest-md5, and so on. Integration with fifteen solutions to combat viruses (Kaspersky, DrWeb, Symantec, ClamAV and others) and spam (including SpamAssassin) is possible. Supported technologies SPF, DKIM, black / gray / white lists and filtering by IP / country of the sender. All this can be connected with just one click from the admin interface. Data exchange between Axigen and MS Outlook is possible, for this you need to install a connector.
A big plus of Axigen is the ability to run the server on multiple operating systems. The download page provides packages for Debian, Red Hat Enterprise Linux and CentOS 5/6, SUSE Linux Enterprise 10/11, Fedora 12 and 13, OpenSUSE 11.2 and 11.3, FreeBSD 7.x / 8.x, Solaris 10 x86 / SPARC and Win2k3 / 2k8 (x86 / x64). Also prepared Virtuozzo - containers for rapid deployment in virtual environments. Installation is very simple and is done using a GUI interface, in which you have to select services, set ports and specify network interfaces for user and admin connections. With proper skill, the whole process will take no more than 10-15 minutes. The project site contains detailed documentation and several videos showing the installation and administration process. In addition, user and administrator demo interfaces are available. Axigen Free Mail Server (Office Edition) is free and supports up to one hundred e-mail accounts and five calendars.
CommuniGate Pro
Name: CommuniGate Pro
License: Free / paid
Platform: * nix, Windows, Mac OS X
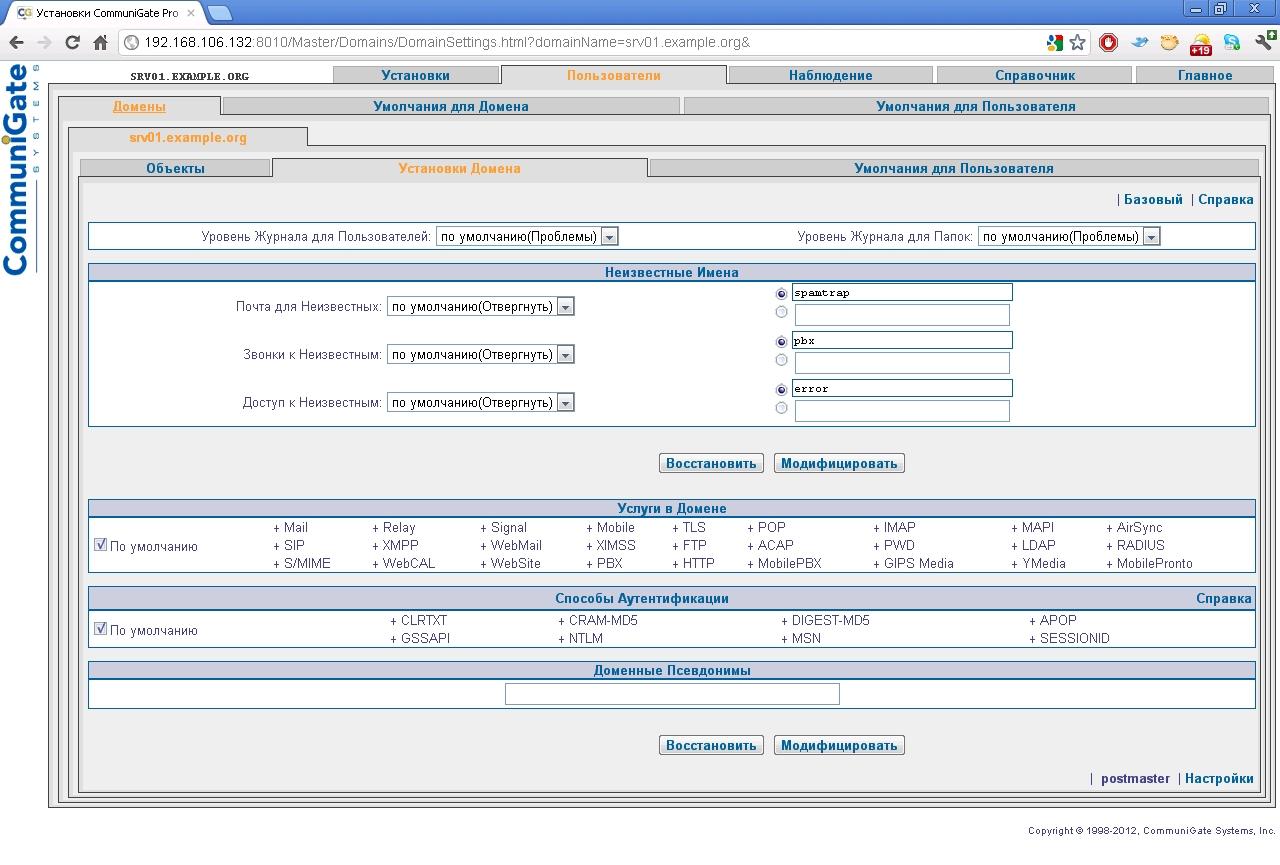
Popular exchange platform by email, IM, VoIP, with calendar functions and collaboration automation. For example, VoIP provides voice / video and provides capabilities such as conferences, auto attendant (IVR), automatic call distribution, call queue management, and voice mail. At the same time, CommuniGate supports installation on a large number of operating systems and architectures (about thirty in total), IPv4 and IPv6, standard protocols SMTP, SIP, IMAP, XMPP, LDAP, RADIUS, XIMSS, CalDAV, WebDAV, MAPI and others. The Session Border Controller ensures correct operation through NAT devices. The LDAP server included with CGP can be used by other applications as well. It is possible to synchronize data with BlackBerry using AirSync (a license for each device is purchased separately). Mailing list manager allows you to automate newsletters with the possibility of self-subscribing by the user. The mailing list is created by the administrator, and further controlled by one of the server users.
Users can connect through any client program that supports these protocols or a localized web interface. Moreover, the web interface is very easy to configure in such a way that it takes the form of a regular mail client (to make the users less confused). It is also possible to use a simplified interface to save traffic when working with PDA and access via WAP with mobile phones... You can call a user for a VoIP conversation with one click from the web client or address book. The administrator in the settings sets the functions available to the user - sorting and forwarding mail, an autoresponder, downloading letters from external POP3 boxes, a list of contacts, tasks and a calendar.
The settings allow the user to open access to his mailbox or individual folders to other server users. This is useful when the organization needs to have an official account for customer communication that is used by several people.
One server can serve multiple domains. Cluster nodes are able to process only a certain type of traffic (for example, by region); SIP Farm technology is used to distribute requests. The solution is easily scalable to any size. By the way, the SIPNET operator's IP-telephony network is built on CommuniGate Pro.
User authentication is possible using an internal database, Active Directory or an external program, including client certificates are supported. In the settings, you can specify the IP addresses from which client connection is allowed or denied. All information stored on the server and transmitted between the client and the server can be encrypted using SSL, TLS, S / MIME and others.
Open APIs simplify integration with billing and management systems. Plugin support allows you to connect third-party solutions for filtering spam and viruses. Integration with solutions from Kaspersky, Sophos, McAfee, MailShell, Cloudmark is currently supported.
Implemented and standard protection means - check return address sender, support for DNSBL (RBL), prohibiting the receipt of mail from certain IP addresses and networks, checking a specific line in the header or body of the message. Installation in any OS is not difficult, in fact, you just need to unpack the archive and start the server. All settings of the server, domains and accounts are made using the web interface (it works on port 8010, after starting you need to connect to it within ten minutes and set the administrator password). The system of rights allows you to delegate domain administration to other users, specifying only those functions that they really need.
Several versions of the server are currently available with different licenses. The Community Edition is offered free of charge, with five active accounts, while the Corporate Edition and Service Provider with additional features are offered for a fee.
WARNING
After the first launch of CommuniGate Pro, you need to connect to port 8010 within ten minutes and set the administrator password.
Conclusion
Deploying a mail server using the described solutions is not so difficult, depending on the experience of the administrator and the number of settings, it will take half an hour to launch. On which specific decision to stop, you choose. For a mid-sized organization, iRedMail, Axigen, and Rumble are great; in the case when the company consists of several geographically remote offices, you should take a closer look at Axigen, IndiMail and CommuniGate Pro. The latter also provides VoIP.
For the mail server to work properly, it is important to have a properly configured DNS zone. In we have already touched on some aspects related to the DNS system, today we will dwell on this issue in more detail. Configuring the DNS zone is a preparatory operation before deploying the mail server and the operability of the e-mail system directly depends on it.
Incorrect settings can prevent mail from being delivered to your mail server or recipient servers to reject your mail. Indeed, if your zone records do not contain information about the mail server, where should the mail be sent to? To grandpa's village? You can, of course, ask to configure the DNS zone of your provider, but it is better to do it yourself.
What do we need? Dedicated IP address (let's say 11.22.33.44), which you should get from your ISP. Domain name (for example example.com), it can be registered with any registrar or their partner. When registering with a partner, check whether he provides access to DNS zone management, otherwise you will have to spend additional time, nerves and money on transferring the domain to the registrar.
If you already have a domain and, most likely, a website is functioning on it, check if it is possible to manage the DNS zone from the hosting provider's panel, otherwise it is better to transfer the domain to the registrar, for this contact the provider's support.
So, we have the domain. What records does its DNS zone contain? First, this is the SOA record - the description of the zone. We will not analyze all the records in detail, this is beyond the scope of our article, but it is necessary to have a general understanding of them. There should also be two NS records pointing to nameservers ( DNS servers) serving this domain, these will be the registrar's servers or hosting provider.
The first entry to add will be an A entry or a name entry. It should point to the IP address of your server, if you decide to serve all requests to the domain on your own, or to the IP address of the hosting provider, if you decide to host your site. When a site is hosted by a hoster, the domain is usually delegated to its DNS server (the corresponding NS records are registered) and the A record will be made automatically when the domain is parked.
This is most common, but you can always create an A record yourself if needed. This entry has the form
Example.com. IN A 22.11.33.44
In our example, 22.11.33.44 is the address of our hosting provider that hosts the site. Pay attention to the period at the end of the name, this indicates that the name is absolute, in the absence of a period, the name is considered relative and is added to it domain name from SOA. You can check the record with the command nslookup.
For the mail server to work, you need to create an MX record, which should point to our mail server. To do this, let's create a record:
Example.com. IN MX 10 mail.example.com.
You can also write simply:
Example.com. IN MX 10 mail
To such a name (without a dot at the end) example.com will be added automatically. Number 10 defines the server priority, the lower it is, the higher the priority. By the way, the DNS zone may already contain an MX record of the form:
Example.com. IN MX 0 example.com.
Usually this entry is automatically created by the hosting provider when the site is placed, it must be deleted.
Now let's create an A record for mail.example.com
Mail.example.com. IN A 11.22.33.44
Now all mail for the example.com domain will be forwarded to the mail host at 11.22.33.44, i.e. your mail server, at the same time, the example.com site will continue to work on the provider's server at 22.11.33.44.
The question may arise, why is it impossible to immediately specify the IP address of the mail server in the MX record? In principle, you can, some do, but this does not correspond to the DNS specifications.
You can also make aliases for a mail server like pop.example.ru and smtp.example.ru... Why is this necessary? This will allow the client not to depend on the specifics of your infrastructure, having once registered the settings. Let's say that your company has grown and dedicated a separate mail server to serve external clients mail1, all you need is to change two DNS records, clients will not notice that they are working with the new server. CNAME records are used to create aliases:
Pop IN CNAME mail.example.com.
smtp IN CNAME mail.example.com.
This completes the configuration of the forward DNS zone, the most interesting thing remains - the reverse zone. The reverse zone is controlled by the provider who gave you the IP address and you cannot manage it yourself (unless you are the owner of the IP address block). But you must add at least one record to the reverse zone. As we wrote in the last article, many mail servers check the PTR records (reverse zone records) for the sending server, and if they are absent or do not match the sender's domain, such a letter will be rejected. Therefore, ask the provider to add an entry for you like:
44.33.22.11.in-addr.arpa. IN PTR mail.example.com.
A bit weird, isn't it? Let's take a closer look at the structure of the PTR record. The special top-level domain in-addr.arpa is used for reverse name resolution. This is done in order to use the same programming mechanisms for forward and backward name translation. The point is that mnemonic names are written from left to right, and IP addresses from right to left. So mail.example.com. means that the mail host is in the example domain, which is in the top-level domain com., 11.22.33.44 means that the host 44 is in subnet 33, which is in subnet 22 of network 11. To keep the same order, the PTR records contain the IP address " back to front "top-level domain padded in-addr.arpa.
You can also check MX and PTR records with the command nslookup using an additional parameter -type \u003d MXor -type \u003d PTR
And of course, do not forget that any changes in DNS zones do not occur instantly, but within a few hours or even days necessary for the propagation of changes in the global DNS system. This means that despite the fact that your mail server will start working 2 hours after the changes are made, your partner's mail may not be sent to you for a longer time.
Many Ubuntu users use the system for more than just home needs. This approach is quite justified, because on Linux systems it is much more convenient to do programming, create servers and websites. One of the conveniences is to create an email server. For beginners, this task may seem terribly difficult, but if you figure out how to install and configure a mail server for Ubuntu, the task will not seem so hard to you.
How to configure a mail server based on Ubuntu.
Before specific instructions and fermentation through the code, you cannot do without a share of theoretical material. It is important to understand what an email server is and how it works.
A configured mail server, to put it very simply, is a postman who receives a "letter" from one mail client and gives it to another. This, in principle, is the whole essence of the work of this software. A mail server is needed not only for sending e-mail. On websites, he is responsible for registering users, submitting filled out forms and other important actions, without which the site would become a kind of book, which you can only look at, turning the pages, but something is difficult to do.
Mail servers on Linux differ significantly from those on Windows and other systems. On Windows it is already ready closed program, which you just need to start using. Linux distributions assume self-configuration all components. Moreover, the server will eventually consist not of one program, but of several. We'll be using Postfix in conjunction with Dovecot and MySQL.
Why Postfix?
There are several email clients on Ubuntu, but we chose this one. Setting up Posfix on Ubuntu is much easier than setting up SendMail, which is important for a novice user. When combined with Dovecot, Postfix is \u200b\u200bcapable of doing everything that is usually required of mail servers.
Postfix is \u200b\u200bthe mail transfer agent itself. He will play the main role in the entire performance. It is open source and is the default for many servers and websites. Dovecot is a mail delivery agent. Its main role is to ensure the security of the server. MySQL is the ideal database management system (DBMS) for any website. It is needed to operate with information that we receive from users of our server.
So, the theoretical part is over. Now it's worth getting down to practice.
Creating a mail server
What should be configured before installing the mail server?
- MySQL;
- DNS zone, you must have a personal FDQN. Next, we will use namehost.
Installation
Install programs:
apt-get install postfix postfix-mysql dovecot-core dovecot-imapd dovecot-lmtpd dovecot-mysql
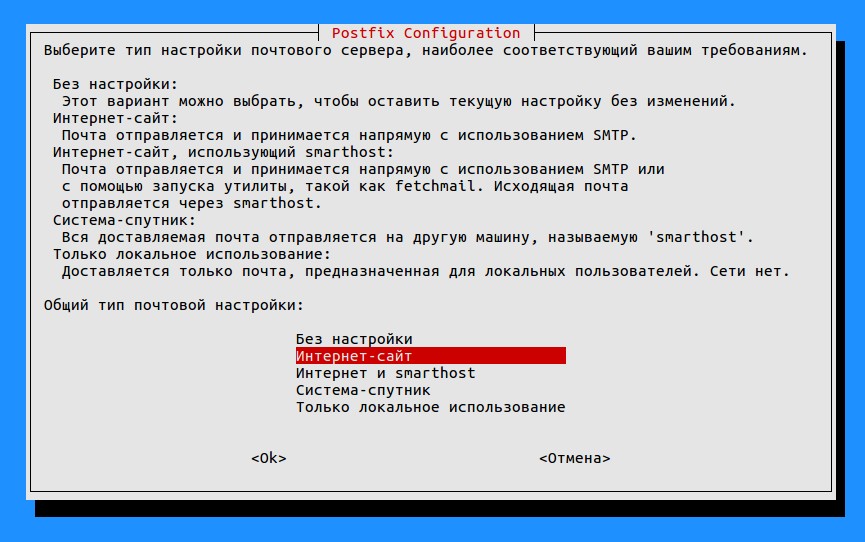
When the Postfix configuration window appears, we will need to select "Website".
Below we will be asked to enter a domain name, we will use “primer.ru”.
MySQL setup
Now we need to set up three tables for data in MySQL: for domains, for users, and for so-called Alias \u200b\u200b- aliases or additional user mailboxes. Here we will not go into detail about setting up a MySQL database.
Let's call the database examplemail. Create a base with this name:
mysqladmin -p create servermail
Login to MySQL:

Then we enter the password. If everything is done correctly, there will be such an entry in the terminal:
Let's create a new user specifically for logging into the network:
mysql\u003e GRANT SELECT ON examplemail. * TO ‘usermail’@’127.0.0.1’ IDENTIFIED BY ‘password’;
Now we restart MySQL to make sure that all changes have been applied successfully.
We use our database to then create tables based on it:
mysql\u003e USE examplemail;
Create a table for domains:
CREATE TABLE `virtual_domains` (
`name` VARCHAR (50) NOT NULL,
PRIMARY KEY (ʻid`)
Let's create a table for users:
CREATE TABLE `virtual_users` (
ʻId` INT NOT NULL AUTO_INCREMENT,
`domain_id` INT NOT NULL,
`password` VARCHAR (106) NOT NULL,
ʻEmail` VARCHAR (120) NOT NULL,
PRIMARY KEY (ʻid`),
UNIQUE KEY ʻemail` (ʻemail`),
) ENGINE \u003d InnoDB DEFAULT CHARSET \u003d utf8;
Here, as you can see, email and password are added. And each user is tied to a domain.
Finally, we create a table for aliases:
CREATE TABLE `virtual_aliases` (
ʻId` INT NOT NULL AUTO_INCREMENT,
`domain_id` INT NOT NULL,
`source` varchar (100) NOT NULL,
`destination` varchar (100) NOT NULL,
PRIMARY KEY (ʻid`),
FOREIGN KEY (domain_id) REFERENCES virtual_domains (id) ON DELETE CASCADE
) ENGINE \u003d InnoDB DEFAULT CHARSET \u003d utf8;
We have successfully configured MySQL and created the three required tables. Now we need to deal with domains and emails.

Domains, email addresses and aliases
Let's add our domain to the table with domains. FDQN must also be entered there:
INSERT INTO ʻexamplemail`.`virtual_domains`
(ʻId`, `name`)
VALUES
(‘1’, ‘primer.ru’),
(‘2’, ‘namehost.primer.ru’);
Add data about email address to the users table:
INSERT INTO ʻexamplemail`.`virtual_users`
(ʻId`, `domain_id`,` password`, ʻemail`)
VALUES
(‘1’, ‘1’, ENCRYPT (‘firstpassword’, CONCAT (‘$ 6 $’, SUBSTRING (SHA (RAND ()), -16))), ’ [email protected]’),
(‘2’, ‘1’, ENCRYPT (‘secondpassword’, CONCAT (‘$ 6’, SUBSTRING (SHA (RAND ()), -16))), ’ [email protected]’);
Now let's add information to the last table:
INSERT INTO ʻexamplemail`.`virtual_aliases`
(ʻId`, `domain_id`,` source`, `destination`)
VALUES
(‘1’, ‘1’, ‘[email protected]’, ’[email protected]’);
Close MySQL:
Postfix setup
Let's go directly to Postfix parameters. We need the mail client to be able to send messages on behalf of the users entered into the database and to process the SMTP connection. First, let's create a backup of the configuration file so that in case of anything we can return to the default settings:
cp /etc/postfix/main.cf /etc/postfix/main.cf.orig
Now open the configuration file:
nano /etc/postfix/main.cf
Instead of nano, you can use any text editor you like.
Let's uncomment the TLS parameters and add others. Free SSL used here:
# TLS parameters
# smtpd_tls_cert_file \u003d / etc / ssl / certs / ssl-cert-snakeoil.pem
# smtpd_tls_key_file \u003d / etc / ssl / private / ssl-cert-snakeoil.key
# smtpd_use_tls \u003d yes
#smtpd_tls_session_cache_database \u003d btree: $ (data_directory) / smtpd_scache
#smtp_tls_session_cache_database \u003d btree: $ (data_directory) / smtp_scache
smtpd_tls_cert_file \u003d / etc / ssl / certs / dovecot.pem
smtpd_tls_key_file \u003d / etc / ssl / private / dovecot.pem
smtpd_use_tls \u003d yes
smtpd_tls_auth_only \u003d yes
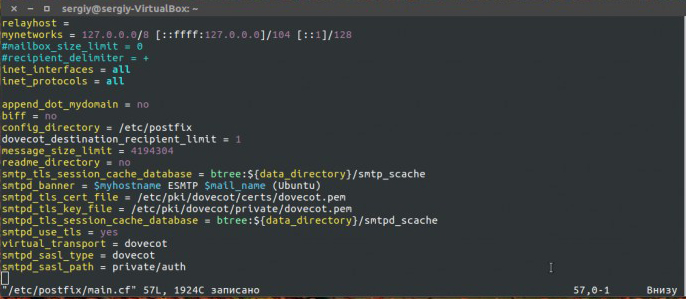
After that we add a number of parameters:
smtpd_sasl_type \u003d dovecot
smtpd_sasl_path \u003d private / auth
smtpd_sasl_auth_enable \u003d yes
smtpd_recipient_restrictions \u003d
permit_sasl_authenticated,
permit_mynetworks,
reject_unauth_destination
We also need to comment out the mydestination settings and change them to localhost:
#mydestination \u003d primer.ru, namehost.primer.ru, localhost.primer.ru, localhost
mydestination \u003d localhost
The myhostname parameter should contain our domain name:
myhostname \u003d namehost.primer.ru
Now add a line to send messages to all domains listed in the MySQL table:
virtual_transport \u003d lmtp: unix: private / dovecot-lmtp
We add three more parameters so that Postfix can connect to MySQL tables:
virtual_mailbox_domains \u003d mysql: /etc/postfix/mysql-virtual-mailbox-domains.cf
virtual_mailbox_maps \u003d mysql: /etc/postfix/mysql-virtual-mailbox-maps.cf
virtual_alias_maps \u003d mysql: /etc/postfix/mysql-virtual-alias-maps.cf
Configuring MySQL and Postfix Files
Create a file
mysql-virtual-mailbox-domains.cf
Add these values \u200b\u200bto it:
user \u003d usermail
password \u003d mailpassword
hosts \u003d 127.0.0.1
dbname \u003d examplemail
query \u003d SELECT 1 FROM virtual_domains WHERE name \u003d '% s'
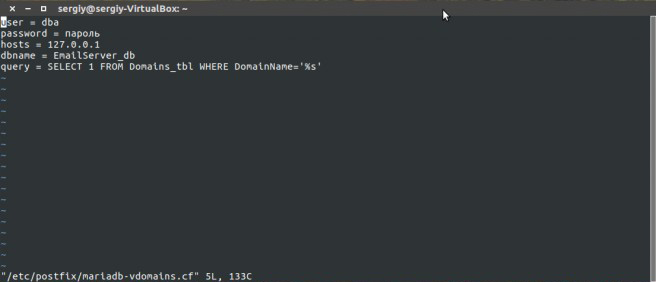
Restart Postfix:
service postfix restart
Testing the domain for Postfix:
postmap -q primer.ru mysql: /etc/postfix/mysql-virtual-mailbox-domains.cf
Let's create another file:
nano /etc/postfix/mysql-virtual-mailbox-maps.cf
user \u003d usermail
password \u003d mailpassword
hosts \u003d 127.0.0.1
dbname \u003d examplemail
query \u003d SELECT 1 FROM virtual_users WHERE email \u003d '% s'
Reload Postfix:
service postfix restart
Then we check Postfix again:
postmap -q [email protected] mysql: /etc/postfix/mysql-virtual-mailbox-maps.cf
If everything is done correctly, it should display
Create the last file - for aliases:
nano /etc/postfix/mysql-virtual-alias-maps.cf
user \u003d usermail
password \u003d mailpassword
hosts \u003d 127.0.0.1
dbname \u003d examplemail
query \u003d SELECT destination FROM virtual_aliases WHERE source \u003d '% s'
service postfix restart

We test for the last time:
postmap -q [email protected] mysql: /etc/postfix/mysql-virtual-alias-maps.cf
We make backup copies for seven files that we will change:
cp /etc/dovecot/dovecot.conf /etc/dovecot/dovecot.conf.orig
This is a sample command. We introduce six more of the same for these files:
/etc/dovecot/conf.d/10-mail.conf
/etc/dovecot/conf.d/10-auth.conf
/etc/dovecot/dovecot-sql.conf.ext
/etc/dovecot/conf.d/10-master.conf
/etc/dovecot/conf.d/10-ssl.conf
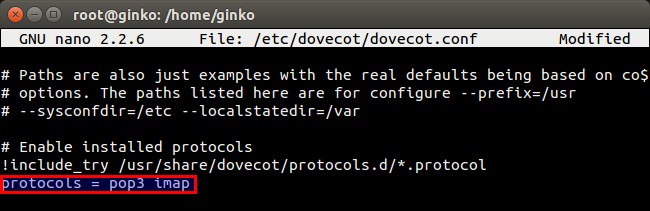
Opening the first file:
nano /etc/dovecot/dovecot.conf
Check if this option is commented out:
Include_try /usr/share/dovecot/protocols.d/*.protocol
protocols \u003d imap lmtp
Include_try /usr/share/dovecot/protocols.d/*.protocol line
Let's edit the following file:
nano /etc/dovecot/conf.d/10-mail.conf
Find the line mail_location, remove the comment, set the following parameter:
mail_location \u003d maildir: / var / mail / vhosts /% d /% n
Find mail_privileged_group, put it there:
mail_privileged_group \u003d mail
Checking access. We enter the command:
Access should look like this:
drwxrwsr-x 3 root vmail 4096 Jan 24 21:23 / var / mail
Create a folder for each registered domain:
mkdir -p /var/mail/vhosts/primer.ru
Create a user and group with an ID of 5000:
groupadd -g 5000 vmail
useradd -g vmail -u 5000 vmail -d / var / mail
Change the owner to the VMail user:
chown -R vmail: vmail / var / mail
Let's edit the following file:
nano /etc/dovecot/conf.d/10-auth.conf
Uncomment the authentication text and add the line:
disable_plaintext_auth \u003d yes
Change the following parameter:
Email is a service that allows you to exchange electronic messages through a computer network.
The main feature of e-mail is that information is not sent to the recipient directly, but through an intermediate link - an electronic mailbox, which is a place on the server where the message is stored until the recipient requests it.
A mail server is a computer program, designed to organize the exchange of e-mail between computers. Its main functions are receiving letters from clients and delivering them to addressees... Clients can be both users (a program - an e-mail client) and other mail servers.
Users, using the program - mail client (Outlook Express, Thunderbird, etc.), can create letters, send them to the server and collect mail from their mailboxes on the server.
Communication between the server and the client takes place using special mail protocols - Simple Mail Transfer Protocol (SMTP) - when sending letters to the server and Post Office Protocol v.3 (POP3) - when receiving letters from mailbox... Clients connect to the server through specific ports. For SMTP, the default is port 25, for POP3, port 110.
There are various mail servers. As an example, consider installing and configuring a mail server Courier Mail Server.
Courier Mail Server is a Windows mail server (e-mail server) for local area networks. It will help you quickly organize your email exchange in local network and on the Internet. Courier Mail Server does not require installation on the system. It is enough to download the archive with the program and unpack it to any folder on the hard disk of the computer, which will act as a mail server.
You can download the free version of Courier Mail Server 1.56 from the website http://courierms.narod.ru/. A more functional Courier Mail Server 2.05, but already a paid version (1650 rubles for 10 mailboxes, the demo version is limited to only 3 mailboxes), can be found on the website http://www.courierms.ru/.
In this example, we will be setting up and using the free Courier Mail Server 1.56.
Advantages of Courier Mail Server 1.56:
- gratuitousness
- easy to install and remove
- compactness
- ease of administration
- low consumption of system resources
- multithreading
- convenient graphical interface
- russian-language interface and documentation
- support for an unlimited number of mailboxes
The program runs under Windows 9x / ME / NT / 2000 / XP. Setting up the program is quite simple and accessible to the average user.
Note: In the example, all computers on the network are running Windows XP. All computers on the network are the same (there are no dedicated server computers). The teacher's computer is named server, the student computers are pc01, pc02, etc. All softwarediscussed in this section is placed in the C: \\ MyServers \\ usr \\ local \\ folder. If your computers have different names (and this is most likely the case :)), then take this into account when setting up the software. You can also choose a folder for your friend to install the program.
The CMS comes as a zip archive containing the executable and documentation. To install the server, create a folder in which it will function, extract the files from the archive to this folder and run the application CourierMS.exe.
At the first start, the server inside its folder will automatically create the subfolders and files necessary for its operation. The server does not make any changes outside its folder. Systemic windows registry only changes when registering as a service.
Courier Mail Server can be run as a standard application, as well as windows services... To start as a Windows service, start the CMS and from the Settings menu, select Start by Service. This will register the Courier Mail Server service in the system.
If the launch has occurred normally, the main server window will appear on the screen, and its icon will appear in the System Tray next to the clock.
.
If messages about starting SMTP and POP3 servers appear in the main window and there are no error messages, you can start configuring the server.
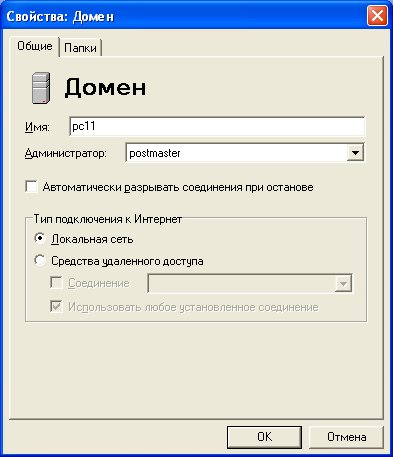
The next stage of configuring the mail server is reduced to entering local domains. To do this, do double click by the word "domain" and a tab for its configuration will open. Enter computer namewhere the mail server will run. In our example, this is server.If you have a computer name, for example pc11, then enter that name.
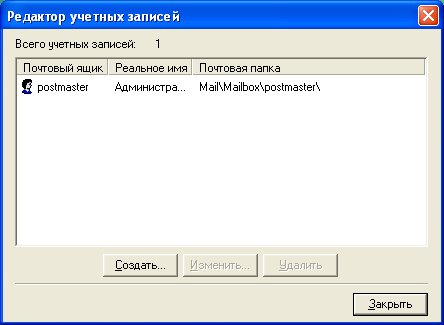
Any server program implies the input of users who will be served by it. Double click on "accounts" and the account editor will open. The account editor is designed to maintain a list of local users (accounts) of the server. When you create an account, a corresponding mailbox folder is also created. When you delete an account, the mailbox folder is deleted automatically with all its contents. The first time the server is started, a postmaster account is automatically created .
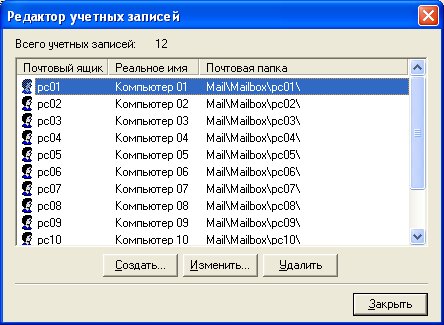
Create the required number of accounts for your users. It is enough to create one for each student's computer and for the teacher, although you can create a separate hotel account for each student.
Each account has the following parameters:
Real name: the name of the mailbox owner.
Mailbox name: the name of the mailbox. It is also the name of the user when connecting to the server. Do not use Russian letters and special characters in the mailbox name. some mailers do not work correctly with them. If the box name pc 01, local domain server , then the email address of this user pc [email protected] server.
Password: password to connect to the server.
We will not change other parameters.
We have 11 computers in the classroom (along with the teacher's), so we created 11 accounts.
You can restrict access to the mail server using the IP filter. Specify the range of IP addresses that are allowed to access. We have it 192.168.1.1-192.168.1.11 (Read about IP addresses and their settings in other articles of this). In your school, this range may be different, for example, the one that your Internet provider gave you (well, that's another article).
All! The mail server can be used. You can read about setting up and using other program features in the help (in Russian!).
You ask: "How can I use it? How to send and receive letters?" The answer is simple. We will send and receive letters using a program - mail client (Outlook Express, Thunderbird, etc.). And how to do this, read the next article: "".