Varese... Vareses are sites with cracked pirated software from which you can download programs for free. Try to avoid downloads from such sites, because you can never be sure that along with the program you will not be given a “gift” in the form of a virus, trojan, etc. Also, avoid sites offering downloads “Free on high speed” , this is usually the scammers write. The same goes for discs from trays in the markets.
Step 3
Installation... Enter the name of the program you need in the search engine, find the official website in the list and download the program. Always scan programs with antivirus before installing, because the developer's site cannot be insured against hacking. Always click on the “Save” button, not on “Run” (see picture). You can run the program for installation only from the folder in which it is saved. I will not describe the installation process. this operation is simple and slightly different for each program.
For those who have been using a computer for a long time, this topic may seem simple and uninteresting, because every user, in any case, has to do it (and learn along the way). Although, despite the seeming simplicity, not all install correctly, let alone uninstall applications (games or programs).
And for beginners, all the more, this topic will be very useful, if only for the reason that a huge part of the problems with the computer (braking, freezing, etc.) occurs due to incorrect actions during the installation and removal of applications.
I have already mentioned several times in my mailing list that even after correct deletion, in windows registry there are "tails" from those programs that we delete. And if, moreover, the deletion process went wrong, then these very "tails" in the long run can cause big troubles in the system.
Therefore, I want to tell beginners and remind more advanced users about these simple procedures in order to exclude unnecessary crashes in the computer (due to ignorance or stupidity).
Let's start, of course, with the installation (in the figures it is light program Alloy).
The installation process is started using special installation programs that either boot automatically (for example, after inserting a disc into the drive) or using a manual launch required fileswhich are usually called setup.exe or .
The installation process for most applications itself is simple and consists of the fact that you answer the questions of the installer and press the button Further... Usually, during the installation, the welcome window appears first, then the license agreement window, and then the choice of the location for installing the program.
Here (based on my experience) lies the most common problem for a beginner. The fact is that by default the computer offers to install the application in the folder C: Program Files,
which can be used without problems (and even sometimes desirable), but not always.
For most users, the hard drive is split into several logical drives (C, D, etc.). In this case, the C drive does not always have enough space to accommodate all the programs that you want to install. An inexperienced user often does not pay attention to this, and installs everything in this folder, which over time leads to an overflow of the C drive and, accordingly, to the computer slowdown (for the system, free place on drive C) and the inability to install other programs.
The second undesirable consequence of installing some programs in the above folder is that in the case of complete reinstall Windows, the C drive is completely cleaned up and naturally, all programs on it are deleted. All these programs, after reinstalling Windows, must be installed first. However, if they were on, say, drive D, then this would not have to be done.
It should be noted that this does not apply to all programs, because some "serious" programs register themselves in the registry (on the C drive) and will still need to be reinstalled. However, simple programs can be installed without problems, and even need to be installed on a disk that is not a system one.
To install the application on the D drive (or any other), you just need to press the button Overview (see the picture) and choose another location for installation (or type it manually):
Thus, you will get rid of the overflow of the system logical disk, which will have a good effect on its performance.
But this is not a very bad problem. The main cause of computer crashes due to incorrect installation is incomplete installation.
This can happen during a sudden power outage of the computer or if you suddenly decide to interrupt the installation process in some unusual way. One of the reasons for incomplete installation may also be the situation described on this page (see July 2008).
After an incomplete installation, "tails" remain on the hard disk, which are simply impossible to remove using standard methods. Therefore, you should try to complete the installation without crashes or interruptions. It is better to uninstall the application using regular methods than to interrupt the installation process!
Now let's talk about uninstalling programs correctly.
Many beginners believe that by simply moving the folder with unnecessary application in Shopping cart they thereby removed it. This is the worst mistake! You can only uninstall programs that you installed on the hard disk in the same way, i.e. using the usual copying method (for example, from the disk to which the program was copied from a friend's computer) If you installed the application using the installer, then you must remove it using the program designed for uninstallation (removal).
Such a program (usually called or uninst) can be found in the same folder where the uninstalled application is located. If you do not remember where it is, then you can click right click mouse on the application icon and select the item Properties... In the window that appears, you will see the path to the folder with necessary program:
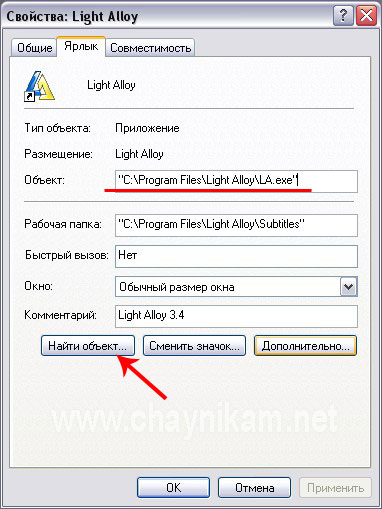
To quickly get into this folder, you just need to press the button Find Object ...... In this folder we find the required program (uninstall.exe) and by pressing it we activate the process of uninstalling this application.
Often such a program is located in the Start menu ( Start - All Programs - Application Name - uninstall).
There are applications that do not include uninstall programs. In this case, the most correct way to remove such applications would be to run a special program from the Windows system itself.
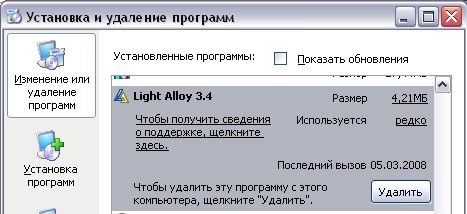
This is done like this: Start - Control Panel - Add or Remove Programs.
In the window that opens, we find the application to be removed, select it with a mouse click and press the button Delete:
After that, agreeing that you really want to remove the application with all its components, start the uninstallation process and wait for it to finish.
The methods described in this lesson are the simplest (but possibly the most reliable) ways to install and remove programs. Correctly installing and uninstalling programs and sometimes cleaning the system from unnecessary leftovers applications (I described how this can be done in the free mailing list), you will save yourself from most unnecessary Windows crashes.
It should be noted that there are special programs uninstallers that monitor the installation process (while maintaining all the data about each installed program) and during the uninstallation of applications very effectively remove all "tails" (although not a fact). But for a beginner, these programs will not always be clear (especially if they are on english language), and they take up a lot of space. Incorrect handling of such programs, on the contrary, can "litter" the computer. Therefore, the expediency of their use and development, I leave it to your discretion.
Instructions
If the computer where you want to install the program belongs to a local network, you can use a disk reader of another computer on the same network. To do this, you first need to open access to the CD / DVD drive for network users on the computer where it is installed. Then, if you are using Windows, right-click the My Computer icon on the desktop of your computer without an optical drive and select Connect network drive". The connection wizard will start, in which you need to specify the required device on the network using the dialog opened by clicking the "Browse" button. If an installation disc has already been placed in the device, then after the wizard finishes, the program-menu recorded on it will start immediately with a set of options for further actions, including installing the program.
Use the file containing the "image" of the installation disc if you cannot access the disc reader over the network. It is similar to a regular archive, but contains not only copies of files, but also exact copy structure of their placement on the source disk. This allows using special emulator programs to use the file in the same way as a regular optical disc. If you do not have a ready-made file with a disk image containing the desired program, you will have to create it yourself.
Install an application on your computer that can create images and restore them from files ("mount"). For example, it could be Daemon Tools Lite - free option programs that can be downloaded from the manufacturer's website (http://daemon-tools.cc/rus/products/dtLite). You need to install it on the computer on which the disk image will be created, and on the one where you need to install the program without using the disk. After installing the application, select the item "DAEMON Tools panel" in its menu, open the control panel and click on the button "Create image". Following the instructions of the program, create an image of the optical disc and any in a convenient way (via a flash drive, mobile phone, mp3-player, internet, etc.) copy it to the computer where you want to do without the installation disc.
Right-click the Daemon Tools icon in the notification area of \u200b\u200bthe taskbar of the second computer, go to the Virtual CD / DVD-ROM section of the drop-down menu and in the "Drive 0" subsection, select the "Mount image" line. The emulator will open a window in which you need to specify the file with the disk image and click the "Open" button. After that, you can use the virtual installation disk of the program in the same way as a regular optical disk.
For ease of use, distributions of programs, as a rule, are assembled into one installation, it is also an installation filethat expands the program on the user's computer when it starts. To date, the creation of installation packages is automated and easy.
Instructions
Now select files to be included in the installer.
Collect the installation file.
Related Videos
Virtual image disk is a complete copy disk- the carrier from which the image was actually created. With image disk you can perform exactly the same operations as with a regular disk, that is, install programs or games. But in order to work with virtual diskmi, the computer must have virtual drives, respectively. Only then can you use images disks and install programs from them. Appropriate applications are required to create virtual drives.
You will need
- - A computer;
- - Daemon Tools Lite program
Instructions
A very convenient and completely free program for working with images disks is Daemon Tools Lite. Download program and install on your computer. During the installation process, a dialog box will appear with the items "Free license" or "Paid license". Check the first item. After installation, restart your computer. Run program... After starting it for the first time, wait while it creates virtual drives. After that, you will be taken to the main menu of Daemon Tools Lite. As you can see, the Image Catalog window is still empty. To get started, you first need to add the image to the directory.
At the bottom of the toolbar, click on the image disk... In the window that appears, specify the path to the image diskfrom which to install program... Click on image disk left mouse button, and then click "Open" at the bottom of the window. The image will be added to the catalog.
Now in the main menu of the program, in the catalog of images, right-click on the added image. In the context menu that appears, select "Mount", then - the virtual optical drive to which you want to mount the image disk... There will be only one by default virtual drive.
Now go to "My Computer". There is now, in addition to the physical drive, also a virtual one. Click on the virtual drive icon with the right mouse button. In the context menu that appears, select the item "Install or run program from disk". The "Application Setup Wizard" will start. Then, following the prompts of the "Wizard", install program... The further installation process is no different, then installing the program from the usual disk.
If the Add Program Wizard does not start in this way, open the image disk and in the root folder find the autorun. Double click on it with the left mouse button, after that the "Program Installation Wizard" will start exactly.
To work with disk images, you must use a specific software... Naturally, you need to have the necessary skills in order not to make mistakes while working with this software.

You will need
- - Daemon Tools Lite;
- - Total Commander;
Instructions
Connect to the Internet and go to http://www.daemon-tools.cc/rus/products/dtLite. Download Daemon Tools Lite by selecting Free Download. Open the downloaded exe file and select " Free License". To perform most of the necessary ISO manipulations images it is absolutely not necessary to buy full version programs.
Restart your computer and open the Daemon Tools program. It usually starts automatically when you log into Windows. Find the utility icon located in the system tray (lower right corner of the screen). Right-click on it and select Mount'n'Drive.
In the menu that opens, click on the "Add file"(Icon disk with a plus sign). Select the required ISO file or image disk in a different format. Now right click on the name filea, which is displayed in the working menu of the program.
Select "Mount" and select the desired virtual drive. After a while, the disk will be detected by the system. Open the My Computer menu and navigate to the contents of the new virtual drive.
Run required programs or just copy the required files on hDD computer. If you do not need to use ISO- file as a virtual disk, but you just need to extract information from it, then use the Total Commander program or the 7z archiver.
Use these utilities to open the ISO file and copy the information you want to your computer hard drive or other media.
note
Programs such as Daemon Tools are more reasonable to use to create a copy of a disc using ISO images or to emulate a real disc with games. Sometimes this allows you to bypass some security systems.
To install the operating system, you must write diskwhich will be loaded before entering operating system... To create such a disk, it is recommended to use various utilities.
You will need
- - a computer with a DVD drive;
- - blank disc;
- - an image of the installation disk.
Instructions
First download the image of the installation disk with the files of the desired operating system. It is best to use an ISO image. Now download iSO program File Burning. it free utility, designed specifically for writing images to disk.
Install the program. Insert a blank DVD into your drive. Launch ISO File Burning and configure image burning options. First select the correct drive. Click the Browse button and select the downloaded ISO image.
Set the minimum write speed. This will allow you to run this disc on relatively old drives and will reduce the likelihood of errors during burn. After configuring the program, click the "Burn ISO" button.
Check the recorded files. To do this, restart your computer and hold down the F8 key. In the window that appears, select the DVD-Rom item and press Enter. Wait a while for the OS installer to start.
Sometimes to installation disk add programs and utilities. This allows you to store a complete set of files on one medium. If you have such a need, use the Nero program to burn the blank. Run the specified utility and open the DVD-Rom (Boot) menu.
Select the ISO tab and select the image file. Now click the "New" button. Find in the right window of the running menu required files and move them to the contents of the disc.
Click the "Record" button. Go to the tab of the same name. Select the disc writing speed, set extra optionse.g. skipping errors.
Now click the Burn button and wait for the files to be copied to disk. Check the quality of the recorded data. Remember that boot disks are created with a closed session. Those. you will not be able to add files later.
Related Videos
The Windows 98 operating system is an updated version of Windows 95. It is based on MS-DOS 7.1 and is a 16/32 bit hybrid product. Windows 98 can be installed using the appropriate installation disc.

Instructions
To install the system from scratch, you need to create a main partition hard disk and install on it file system... Windows 98 runs on FAT 16 and FAT 32 systems, which are different maximum dimensions sections. You can use the Fdisk program to create disk partitions.
Install the Windows 98 boot disk and restart your PC.
Select the menu item "Start computer without CD support", press Enter, a command prompt will open, type fdisk and press Enter. If the disk has a volume of more than 512MB, then a message about support for larger disks will appear, press Y to install the FAT 32 system and, accordingly, support for large disks.
The Fdisk menu appears. Use the "Create a DOS partition or a logical DOS disk" and "Create a basic DOS partition" section to create disk partitions. To the question "Use all available space for the main DOS partition?" press Y, then Enter. Press the Esc key twice.
Restart your computer. Select the menu item "Start computer without CD support" again, press Enter.
Enter the command format c: and press Enter. A message will appear stating that all data will be destroyed during the formatting process, press the Y and Enter keys. Format all disk partitions this way.
After partitioning and formatting the disk, you can start installing the system.
Install the Windows 98 boot diskette and restart your computer, select Start with Devices and Disks Support, press Enter.
Insert windows disk 98, in command line enter x: \\ setup, where x is the label of the CD drive.
Press the Enter key and follow the instructions on the screen.
Related Videos
note
A Windows 98 boot disk is included with the product.
Sources:
It is difficult these days to find a user who does not have to install computer programs... They can be downloaded from the Internet or found on disks. Programs can be in the form installation filepacked into an archive or run without installation at all. Installation any programs on notebook will be no different from a similar procedure for a conventional desktop computer.

Instructions
To install the program correctly, you need to make sure there is free space on your computer's hard drive. But don't worry - not every program can fill up all the free space on modern large hard drives. Your device configuration must also meet the system requirements programs... For example, powerful graphic editor or programs for video processing will be able to work normally only on sufficiently powerful computers.
If you have a program in the form of an installation file, run it and follow the instructions of the Installation Wizard. By default, the Installation Wizard offers the most optimal options and you just need to timely click the Next button and wait for the installation to complete. After completing these simple steps, a shortcut to the installed programsby double-clicking it, you can launch it.
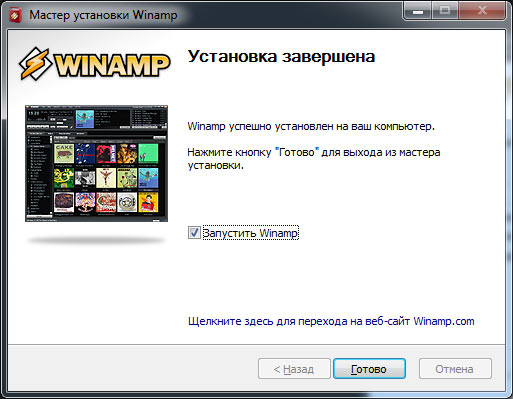
One of the everyday tasks of any user is installing programs. Despite their great variety and some differences in installation, the general process and basic points are the same. Let's take a look at the installation process using an example free software Winamp, one of the most popular music file players.
Stage one - download the file
To start installing the program, you need to "get" executable file, that is, containing a program that can be executed computer. Usually executables have .exe.In most cases, the first launch of such a file opens the installation program, and not the program itself immediately, but it also happens that installation is not required.
In our case, we download the Winampa executable file from one of the first links received in the search engine for the query "winamp". It is usually easy to tell the program itself from its installer by the .exe file icon. In the first case, the icon contains only a logo, and in the second case, this logo is on a box or other similar element. Compare the two icons, which one heralds the installation?
Stage two - launch and installation
Installing programs for the user is a series of dialog boxes, that is, those that require the user to participate: agree with something or disagree, select the necessary installation items, etc. Many, without reading, always click "Next", and then they are surprised that they have third party programsare often malicious.
Do not make common mistakes - follow the installation process, do not mindlessly click "ok" and "next"
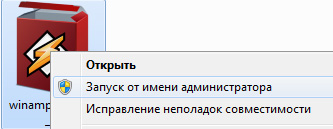
1. Programs often need access to important system folders a computer that is not provided to them by default. For correct installation, this must be done manually - run them as administrator... There is nothing complicated in this - just right-click on the executable file and select the corresponding item in the list, it will be marked with an icon with a shield
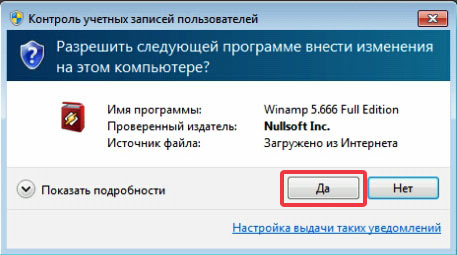
2. After that, a dialog box will pop up asking if this program can be changed, in other words, are you sure you want to install it? Click "Yes" if you haven't changed your mind
2.a The following dialog does not appear in all programs and not always at this stage: language selection
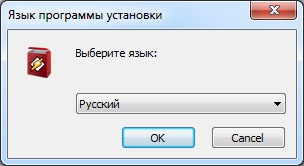
Having chosen the language you need from the drop-down window, click "ok" - this you confirm your consent.
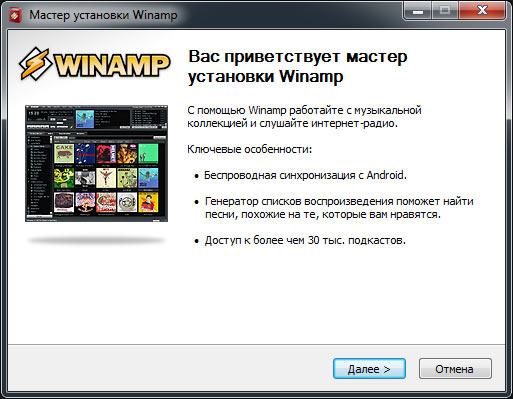
3. After agreeing to make changes, the welcome window of the installed program opens. It describes what kind of program it is or the latest innovations. In our example, the window looks like this:
4. Accept the license agreement. Let's not be naive - almost no one reads this point, everyone accepts the conditions in unison, perhaps selling their souls to the devil! But if the conditions are not accepted, the program will not be installed, so the choice is small.
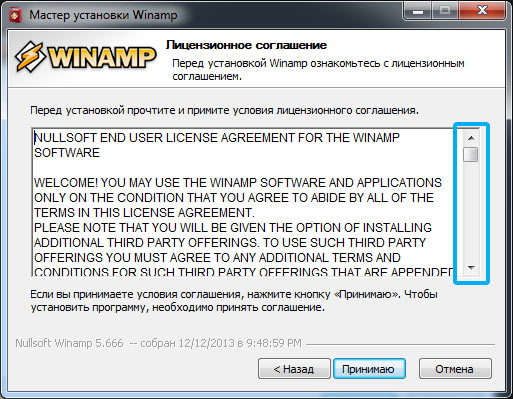 The button "accept" or the like is not always active immediately as above, sometimes you need to tick or drag the slider from the right downward, simulating attentive reading.
5. Choice of installation site. Standard item any installation program... By default, the installation goes to the programs folder located on your system disk (on where the operating system is installed). However, it is not always convenient to install it there (for example, little space)
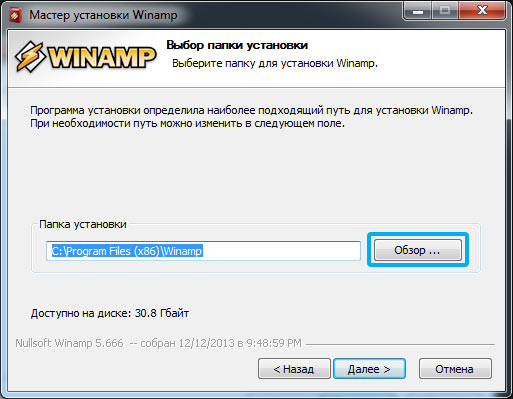
By clicking the "Browse" button, you can select any other folder on your computer. After selecting the folder, the installation itself occurs, that is, all files are unpacked and everything is prepared for further work.
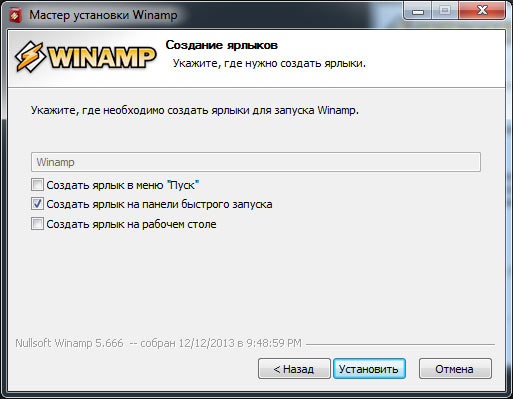
6. Create shortcuts. You are prompted to create shortcuts to quickly launch programs: in the start menu, on the taskbar or on the desktop. Choose those items that are convenient for you
7. Choice of file types. A special point that is characteristic of programs - players - the choice of playable file types. If you do not know what you need specifically, leave the default values.
8. Installation completion window. Everything! The program is installed. Some require a restart of the computer in order for all changes to take effect, but usually you can use it right away
Follow the installation points carefully!
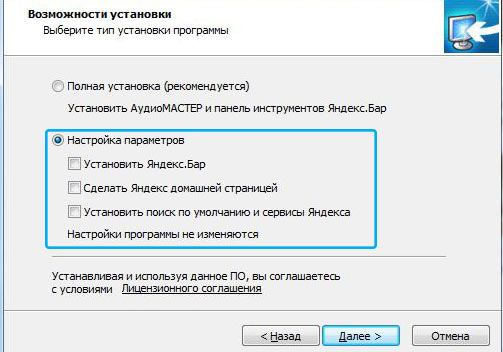
Unwanted programs are often slipped under the recommended installation. Here's an excellent example, installing the AudioMaster program (for recording sound) and with it slipping Yandex.Bar (a strip of tools into the browser, changes start page and the default search for Yandex is set), and imperceptibly, making the name of the installed one gray.
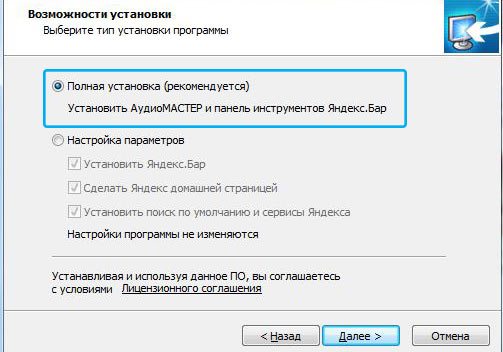
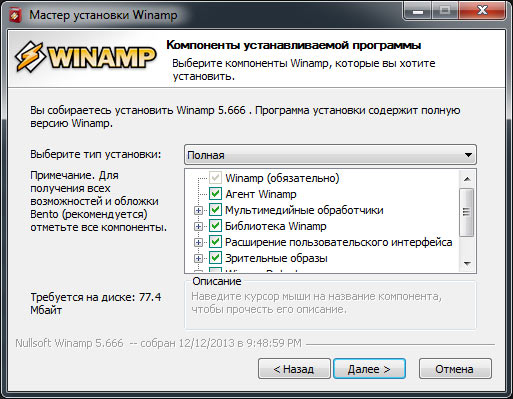
You have to manually not only change the installation type, but also uncheck all the boxes of the proposed components
There is nothing difficult in installing programs, the main thing is to be careful and follow the various unpleasant tricks of developers and advertisers who want to slip their product unnoticed.
How do I install the program on my computer?
In the modern world, almost everyone knows how to use a computer. Of course, almost every user knows how to install programs. But still, there are times when, for one reason or another, a person cannot figure out how to install a program on a computer. In this article, we will look at how to install programs on the operating room. windows systemwhat problems users may face when carrying out this procedure.
Ways to install the program on a PC
Installation using CD
- To install any program using a CD, you will need to insert the disc with the licensed version of the program into the drive.
- After that, a message may appear stating that windows firewall requires confirmation from the administrator to install the software. Confirm the installation or enter a password if required.
- Next, you need to open the installation package (installer) of the program and wait for the installation wizard to start. This type of installation is called automatic.
- But it may happen that the installation wizard does not take effect. Then you need to use a custom installation type. To do this, open the attached text file, which should contain instructions for installing the program, and follow it.
Installing the program using the Internet
Nowadays, most users mainly download programs, rather than install them from disk. To install the program using the Internet, 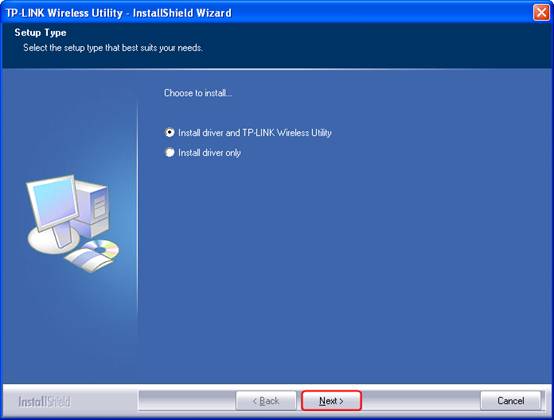 you just need to download it and then open the installer file.
Then repeat the steps described above, starting from the moment you start the installation wizard. I would like to draw your attention to the fact that on the one hand, this method is more convenient than installing programs using a disk, but at the same time it carries a certain risk. It is possible that the program you download from a network resource may be malicious. Therefore, it is recommended to download programs only from trusted resources.
Installing the program using a local network
Each user whose computer is connected to local networkmaybe  use it to install the program. To do this, open the Get Programs component.
Typically, this component is located in the Start-Control Panel-Programs-Programs and Features menu. In the last menu, select "Install new program from the network. "Then you just need to click the" Install "button and wait for the installation wizard to start.
Installation pitfalls
Recently, many users are faced with a number of "pitfalls" when installing a program. The fact is that many software manufacturers integrate into the installation wizard additional applications, many of which the user does not need at all. For example, when installing a program 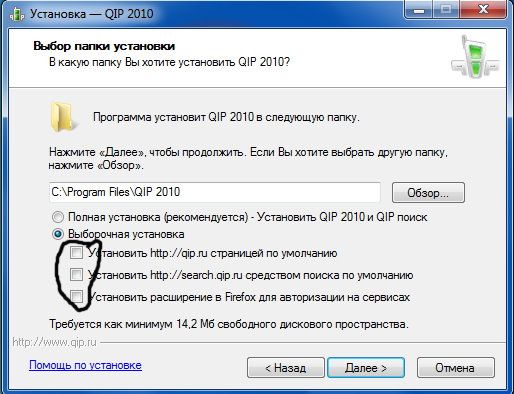 (AIMP or others), the user is prompted to install Yandex (or Mail) elements supposedly for better work programs.
Therefore, you should be more careful when launching the installation wizard, which necessarily asks the user about the need to install this or that additional software. You just need to uncheck the boxes in front of those products that you do not need. Even if the installation wizard strongly recommends them.