Install the latest (4.2.2) Android on the old man HTC Desire S
- Development for Android
HTC Desire S can rightly be called an old man, it has been on sale for more than two years. I have had a device for more than a year and a half. Nevertheless, this is a device with a very good "filling", a high-quality screen and a metal casing.
Surely, like all HTC fans, I was dragged away from their proprietary shell "Sense"... The stock apparatus included Android 2.3.5and Sense 3.0.
Then there was a whole epic in anticipation of the official firmware on Android 4, the completed version of which never came out. Even before the release of this firmware "for developers" my nerves gave way and "custom", unofficial assemblies began to pour into the phone one by one. Was tested and official with Android 4.0.4... Some time passed and the choice settled on CM10.1 from Android 4.2.2 and all its charms, for which hardware the device is enough.
Let's get started!
The instruction is relevant for Windows OS.
It is worth warning that you do all the manipulations with your device yourself, carefully and on your own initiative, the author of this post is not responsible for anything that may happen to your device in the process.
Also, during the flashing process, the data will be erased. Contact log, SMS, etc. The phone book is restored from account Google. It is impossible to restore the SMS archive as it could be done in "Sense". You need to take care of this before manipulating the phone. The data on the SD card will not be affected.
What do we need from software in the process of flashing:
1) HTC Sync drivers to work with the phone
2) Elements of Android SDK - drivers for working with the phone
3) Recovery - a program that allows you to work with a phone, memory card, firmware, etc., without an operating system on the phone itself
4) Firmware CM10.1 from Andromadus
5) GAPPS suite - a set of services from Google
6) just in case, I attach Recovery, the one that is on the phone by default. Useful if you need to roll back to official firmware. To rollback, you also need to lock the bootloader back (see point 3 - Unlocking the bootloader).
It should be noted that Desire S has other builds on Android 4.2.2, such as AOKP, PACman, AOSP, JellyTime, etc. For this article, I chose the CyanogenMod 10.1 build.
Go!
1) Install the HTC Sync package. He contains required drivers to work with the phone via a PC.
2) Unpack the archive android-tools.zip to drive C (you can do this anywhere, for our convenience, the address should be shorter, since the command line will refer to these files). Let, after unpacking, the files are at the address C: \\ android \\
3) Unlocking the bootloader... It is necessary to replace the standard Recovery and install custom assemblies. We look at how to unlock the bootloader. We do not pay attention to the fact that our model is not in the list, select - "All Other Supported Models". Step 5 and 6 instructions for unlocking the bootloader - skip, tk. we already have required files in folder C: \\ android \\.
4) Installing third-party recovery... Required to work with firmware files, direct installation firmwares, creating backups and formatting system memory and caches.
To enter bootloader phone, you need to pull out the battery for a couple of seconds, insert it back. Holding down the rocker button of the phone volume down press the power button. After a couple of seconds, a blue-red-green menu will appear bootloader"a.
We connect the phone to the PC, select the line with the volume rocker - fastboot (it is selected by default) and press the power button.
The archive from point 3 of the software for flashing - Recovery.zip is unpacked into C: \\ android \\.
We open the command line. If Windows XP: Start - run - cmd. If the later versions are: Start - in the "Find programs and files" field, write cmd, then run the found program.
Via command line go to the folder with our files C: \\ android \\... To do this, type in the command line:
cd c: \\ android \\
Enter the following code on the command line:
fastboot flash recovery recovery.img and press enter. After a couple of seconds, Recovery is installed.
5) Formatting the phone's system memory... To do this, we need to go to the new, installed Recovery... How to enter bootloader was discussed in the previous paragraph. On the menu bootloader"and select the green line with the volume rocker - Recovery and press the phone's power button. To be able to restore data and previous firmware, it is recommended to make a backup in the corresponding menu item Recovery.
IN Recovery (touch control) select the line wipe | format and choose further - wipe data / factory reset... In a few seconds system memory phone will be cleared.
6) Installing the firmware.... We copy the files from points 4 and 5 of the software for flashing to the memory card in the phone. To do this, in the main Recovery menu, select the item - toggle usb storage... After a couple of seconds, the memory card will be detected in the PC and the firmware file and GAPPS can be copied to it.
After copying is complete, click - Disconnect in Recovery and get back to the main menu. We choose install from sdcard, we find the copied firmware archive flinnycm101_saga_22 and install. After installing the firmware, install GAPPS in the same way. After the installation is complete, we go back to bootloader, for this now it is no longer necessary to do manipulations with the battery. In Recovery, select the bottom line - power menu and in it - reboot into bootloader
Is it done? left just a little bit.
7) Kernel firmware... To do this, open the archive on the PC flinnycm101_saga_22 from point 4 of the software and copy the file boot.img in C: \\ android \\.
Go to the command again windows string and enter:
fastboot flash boot boot.img press enter. Done. Now go to item fastboot menu bootloader"and we choose - reboot
The phone will boot from new firmware... It will be necessary to make the initial language setting, google account etc. Several screenshots: 


The system has many interesting settings, for example, setting the vibration response time of the touch keyboard.
Thank you.
I completely forgot, I learned it myself
Almost every user hTC phones on the Android platform is faced with the need to flash its own gadget. This allows you to save your phone from many problems and freezes, improve performance and change the interface.
However, this is quite difficult to do. In our article we will tell you how to flash htc android yourself.
Preparing your phone
Initially, the phone needs to be prepared for the firmware. To do this, follow these steps:
- Get ROOT rights. To do this, you need to download and install the z4root program.
- Download the Unrevoked program.
- Turn off Desire and start it in HBOOT menu mode. To do this, press the Volume Down and Power keys simultaneously.
- Connect the phone to the computer using a USB cable (you need to wait for the next text message - HBOOT USB PLUG).
- Open "Device Manager".
If you did everything correctly, you will see the unidentified there android device... Click on it right key mouse and select "Update drivers".
To exit the HBOOT menu, you need to turn off the phone, and then start it in standard mode.
Main part
- Download the required firmware. Recommended to download required files from the official website htc.com.
- Save all important information on your gadget. Please note that for reserve copy files and programs, you can use the utility Titanium Backup.
- Charge your phone (at least 60%).
- Clear all user information. To do this, you need to go to "Settings" through the phone interface, and then select "Privacy" and "Reset data". This is required so that there is no mismatch between the firmware modules.
Installation
- In recovery, select "install zip from sd-card".
- Find the downloaded zip firmware.
- We launch the program. If everything is fine, the installation will start and you will see the corresponding labels. When the firmware is finished, you will see the inscription "Installation completed".
- We reboot our phone and wait for the download to start.
As practice shows, HTC can be flashed in fifteen to thirty minutes. The first start after this operation can be lengthy. Don't worry about this. If you do everything right, you will get current version Android.
Potential risks
If you plan to flash your device yourself, without the help of specialists, then do not forget that there is always the possibility of certain problems:
- Loss of official warranty. Today, any change in the phone software will result in the loss of the warranty.
- Inability to turn on the device. This can happen for a variety of reasons. It is possible that something installed incorrectly or the user made a mistake. However, don't worry. As practice shows, the phone can almost always be reanimated without contacting a service center.
In order for the firmware to be successful, follow all the steps described above carefully and carefully. In addition, you can always find a tutorial video that shows the HTC flashing procedure step by step.
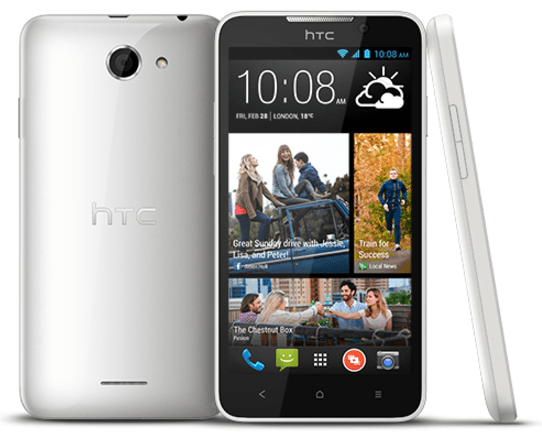
HTC Desire 516 Dual Sim is a smartphone that, like many other Android devices, can be flashed in several ways. Reinstalling system software is a necessity that occurs not so rarely among the owners of the model in question. Such manipulations allow, if done correctly and successfully, to some extent "refresh" the device in terms of software, as well as restore the performance lost as a result of failures and errors.
The success of the stitching procedures predetermines the correct preparation of the tools and files that will be needed in the process of work, as well as the clear implementation of instructions. In addition, the following should not be forgotten:
Responsibility for the result of manipulations with the device lies solely with the user who performs them. All the actions described below are performed by the owner of the smartphone at their own peril and risk!
The preparatory procedures preceding the direct process of transferring files to the device partitions can take quite a long time, but it is highly recommended to complete them in advance. Especially in the case of HTC Desire 516 Dual Sim - the model often creates problems for its users in the process of manipulating the system software.
Drivers
Installing drivers for pairing a device and software tools for firmware is usually straightforward. You just need to follow the instructions for Qualcomm devices from the article:

Just in case, the archive with drivers for manual installation is always available for download from the link:
Backup
In view of the possible need to restore the smartphone software, as well as the mandatory removal of user data from the device during the software installation process, you need to save all the valuable information contained in the phone's memory in a safe place. And it is also highly recommended to create a backup of all partitions using ADB Run. Instructions can be found in the material at the link:

Since several methods of installing software are applicable to the device in question, which are quite significantly different from each other, the download links required programs and files will be posted in the description of the methods. Before proceeding with the direct execution of the instructions, it is recommended that you familiarize yourself with all the steps that will have to be carried out, as well as download all the necessary files.

Firmware
Depending on the state of the device, as well as the goals set by the user performing the firmware, the procedure is chosen. The methods described below are sorted from simple to complex.
Method 1: MicroSD + Factory Recovery Environment
The first method by which you can try to install Android on HTC Desire 516 is to use the native recovery environment (recovery) capabilities provided by the manufacturer. This method is considered official, which means it is relatively safe and easy to implement. Download the software package for installation according to the instructions below, using the link:
As a result of the following steps, we get a smartphone with an installed official firmwarefor the European region version.
There is no Russian language in the package! The interface Russification will be described in an additional step of the instruction below.

Optional: Russification
For the Russification of the European version of the OS, you can use the Android application Morelocale 2. The program is available on Google Play.


Method 2: ADB Run

The result of following the instructions below will be a smartphone with the official firmware version 1.10.708.001 (the last existing for the model) containing the Russian language. You can download the archive with the firmware from the link:
- Download and unpack the archive with the firmware.
- In the resulting unpacked folder there is a multivolume archive containing the most important image for installation - "System"... It also needs to be extracted into the directory with the remaining image files.
- Install ADB Run.
- Open the directory with ADB Run in Explorer, which is located along the path C: / adb, and then go to the folder "Img".
- Copying files boot.img, system.img, recovery.imgobtained as a result of unpacking the firmware into folders with the corresponding names contained in the C: / adb / img / directory (that is, the file boot.img - to the C: \\ adb \\ img \\ boot folder and so on).
- Writing the above three image files to the corresponding sections of the HTC Desire 516 flash memory can be considered a complete system installation. The rest of the image files are usually not required to be installed, but if there is such a need, copy them to the C: \\ adb \\ img \\ all folder.
- Turn on USB debugging and connect the device to the PC.
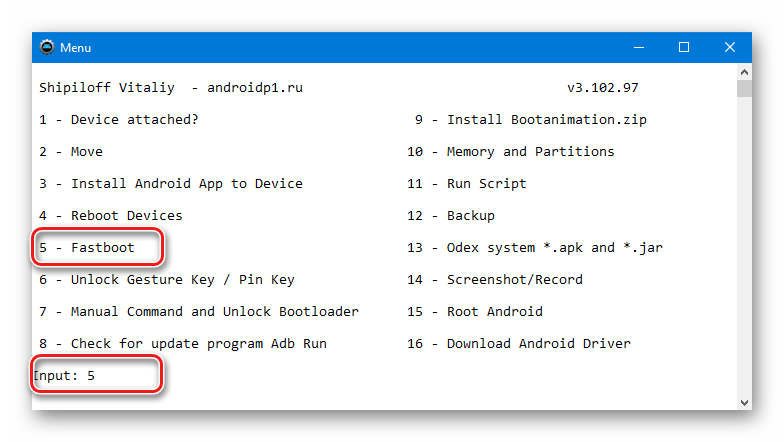
- Launch Adb Run and reboot the device into the mode "Fastboot"... To do this, first select item 4 "Reboot Devices" in the main menu of the application,

and then enter the number 3 from the keyboard - item "Reboot Bootloader"... Push "Enter".
- The smartphone will reboot into state "Download"what the frozen boot splash screen says "HTC" on white background.
- In ADB Run, press any key, and then return to the main menu of the program - item "10 - Back to Menu".

We choose "5-Fastboot".
- The next window is a menu for selecting a memory partition to which the image file will be transferred from the corresponding folder in the C: \\ adb \\ img directory.

- Optional but recommended procedure. We clean up the sections that we are going to record, as well as the section "Data"... We choose "E - Clear Partitions (erase)".

And then one by one we go to the items corresponding to the names of the sections:


"Modem" and "Splash1" DO NOT wash!
- We return to the image selection menu and write down the sections.


and "System" to the HTC Desire 516 memory.

Form "System"in fact, it is the Android OS, which is installed in the device in question. This section is the largest in volume and therefore it takes a long time to rewrite it. The process must not be interrupted!

And wait for the process to complete.

This will cause the smartphone to reboot, take a long time to start, and, as a result, the HTC Desire 516 initial setup screen will appear.

Method 3: Fastboot
If the method of flashing each section of HTC Desire 516's memory individually seems too complicated or time-consuming, you can use one of the Fastboot commands, which allows you to write the main part of the system without, in some cases, unnecessary user action.


fastboot devices

The system's response should be serial number 0123456789ABCDEF and inscription "Fastboot".


fastboot flash partition_name image_filename.img
For example, let's write the section "Modem"... By the way, for the device in question, writing the "modem" section is a procedure that may be needed after restoring the smartphone from a non-working state, if as a result the smartphone works as it should, but there is no connection.
Copy the required image (s) to the directory with Fastboot (1) and send the command (s) (2):
fastboot flash modem modem.img


Method 4: custom firmware
HTC Desire 516 has not gained wide popularity due to its hardware and software features, so, unfortunately, it is impossible to say that a lot of modified firmware is presented for the device.

One of the ways to transform and refresh the device in question in software terms is to install an Android shell modified by one of the users of the device, called Lolifox. You can download all the necessary files that will be needed when performing the steps of the instructions below using the links below.
In the proposed solution, its author has done serious work in terms of changing the OS interface (looks like Android 5.0), deodexed the firmware, removed unnecessary applications from HTC and Google, and also added an item to the settings that allows you to control the startup of applications. In general, the custom works quickly and stably.
Installing custom recovery.
To install a modified OS, you will need custom recovery capabilities. We will use ClockworkMod Recovery (CWM), although there is also a TWRP port for the device, which can be downloaded. In general, the installation in D516 and the work with different custom recovery is similar.


Installing custom Lolifox
After modified recovery installed on HTC Desire 516, custom software installation is straightforward. It is enough to follow the steps of the instruction from the lesson at the link below, which assume the installation of zip packages.
Let us dwell only on a few points recommended for implementation for the model under consideration.


Method 5: Recovering Inoperative HTC Desire 516
When operating and flashing any Android device, a nuisance can happen - as a result of various failures and errors, the device freezes at a certain stage, stops turning on, restarts endlessly, etc. Among users, the device in this state was called "brick". The way out of the situation may be the following.
The methodology of recovering ("scratching") HTC Desire 516 Dual Sim involves performing a fairly large number of actions and using several tools. Carefully, step by step, follow the instructions below.
Switching the smartphone to the "Qualcomm HS-USB QDLoader9008" mode
- Download and unpack the archive with all the necessary files and recovery tools.
As a result of unpacking, you should get the following:
- To recover, you need to put the smartphone into a special emergency mode QDLoader 9006. Remove the battery cover.
- We remove the battery, SIM cards and memory card. Then we unscrew 11 screws:
- Carefully remove the part of the case that covers the motherboard of the device.
- On motherboard we find two contacts marked "GND" and "DP"... Subsequently, they will need to be bridged before connecting the device to a PC.
- We install the QPST software package from the folder of the same name obtained as a result of unpacking the archive using the link above.
- Go to the directory with QPST (C: \\ Program Files \\ Qualcomm \\ QPST \\ bin \\) and run the file QPSTConfig.exe
- We open "Device Manager", we are preparing a cable connected to the USB port of the PC. Closing contacts "GND" and "DP" on the D516 motherboard and, without opening them, insert the cable into the MicroUSB connector of the phone.
- We remove the jumper and look out the window "Device Manager"... If everything is done correctly, the device will be defined as "Qualcomm HS-USB QDLoader9008".
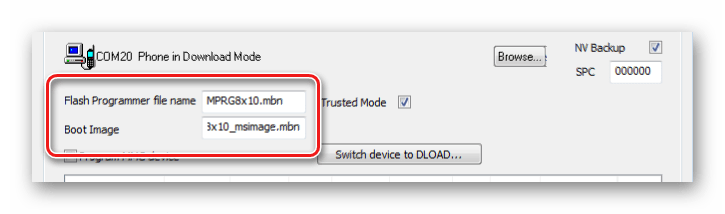
- Go to QPSTConfig and make sure that the device was detected correctly, as in the screenshot below. Do not close QPSTConfig!
- Reopen the folder with the QPST files and run the file emmcswdownload.exe on behalf of the Administrator.
- Add files to the fields of the window that opens:

- Press the buttons and tell the program the location of the files:

- We check the correctness of filling in all the fields (it should be like in the screenshot below) and click "Download".
- As a result of the operation, HTC Desire 516 Dual Sim will be put into a mode that is suitable for writing a dump to memory. In the Device Manager, the device should be defined as ... If, after manipulating through QPST, the device was determined somehow differently, we manually install the drivers from the folder "Qualcomm_USB_Drivers_Windows".


Additionally
In the event that errors occur during QPST operation and the smartphone switches to Qualcomm HS-USB Diagnostics9006 fails, we try to perform this manipulation through the MiFlash program. You can download the flasher version suitable for manipulation with HTC Desire 516 Dual Sim, as well as the necessary files from the link:
- Unpack the archive and install MiFlash.
- We follow steps 8-9 described above in the instructions, that is, we connect the device to the computer in a state when it is defined in the Device Manager as Qualcomm HS-USB QDLoader9008.
- Launch MiFlash.
- Push the button Browse in the program and specify the path to the directory "Files_for_miflash"located in the folder obtained by unpacking the archive downloaded from the link above.
- Push "Refresh", which will lead to the definition of the device by the program.
- Calling the list of button options Browseby clicking on the image of the triangle near the last

and choosing from the menu that opens "Advanced ...".
- In the window "Advanced" using buttons Browse add files from the folder to the fields "Files_for_miflash" in the following way:

After all the files have been added, click "OK".
- Next, mindfulness is required. Making the window visible "Device Manager".
- Push the button "Flash" in the flasher and observe the COM ports section in "Dispatcher".
- Immediately after the moment when the smartphone is defined as Qualcomm HS-USB Diagnostics9006, quit MiFlash without waiting for the end of manipulations in the program, and proceed to the next stage of HTC Desire 516 recovery.


Recovery file system

Thus, having studied the methods of installing system software in HTC Desire 516 Dual Sim, the user gets full control over the device and can simply restore the device's performance if necessary, as well as give the smartphone a “second life” using customization.
The HTC Desire communicator appeared in the vastness of Russia. And along with it, a lot of different firmware appeared, both native and alternative. Also, "gray" devices, which are tied to any operator, began to be imported into the country. Concerning firmwareHtcHtcDesire raises many questions for many.
I would like to note right away that if we compare the procedure associated with one or another device on WinMo, in our case there are significant differences. And they start with the fact that we are dealing with a device built on Google Android.
So let's start. If you have a device fully certified for Russia in your hands, then you have two ways. Flash using Wi-Fi, through the "Phone settings" menu, then "About phone", then "Phone update". The device will connect to the update server and download the firmware. The main thing is that the Wi-Fi connection is free. Or you can download the corresponding executable file from the company's website, run it on a computer under windows management and follow the instructions completely. There are no problems here, everything is similar to the procedures for standard WinMo firmware. But now, if you need to flash a non-standard firmware ?! You need to do the following.
Non-standard firmware HTC Desire - instructions
To firmwareHtcHtcDesire started, you need to determine the version of the bootloader. For this purpose, we press simultaneously two buttons: "Back" and "Shutdown", the boot menu appears on the screen, in which in the second line we are interested in information of the form: HBOOT - 0.xx.0000, where xx is the bootloader version. For version 0.75 you need to download this kit, and for 0.80 - this one.

Then we start the process itself. We write the file "update.zip" to the flash card. We will also interfere with the firmware there. Unpack the required kit there, depending on the version of the bootloader. We launch the console in this folder. Turn off the communicator and turn it on in Fastboot mode (for this we hold down "Back" and "Shutdown"). You will see FastBoot enclosed in a red square. We connect the USB cable to the communicator. In the terminal, depending on the system, enter: for Windows step1-windows.bat, for MAC - ./step1-mac.sh, for Linux - ./step1-linux.sh.

An error message appears, do not pay attention. We are waiting for the first step.

As soon as this happened, we translate in recovery mode... To do this, go to BootLoader, and from there to Recovery. For this purpose, use "Up", "Down" and "Off". Press "+ Volume" and "Shutdown" and go to the blue Recovery mode. In this menu, select the Apply sdcard: update.zip item and go to a new window. By the way, now the USB cable can be disconnected. Click on Wipe Data and confirm the deletion of the data. When finished, select install.zip from SDCard and indicate our zip file. Confirm by clicking on the trackball. FirmwareHtcHtcDesire started. At the end, we reboot the device.

For those who want to make a copy of the data, you need to select the nandroid - backup item before deleting the data, and then select restore - nandroid before the final reboot.

As you can see, if desired, this procedure is available to anyone. But still, if you are not confident in your abilities, I would not recommend doing this procedure yourself, but contacting specialists.
And in conclusion I would like to note that, firmwareHtcHtcDesire carried out in this way will allow you to install any update, firmware, radio module, etc. on the device.
How to flash HTC Desire?


HTC Desire is a communicator (smartphone) with an operating android system... It was developed by HTC. Let's talk in more detail about how to flash HTC Desire in different ways.
Preparing for firmware
Firmware is the replacement or update of the phone software with a new one. Phone firmware is the same as reinstall Windows on personal computer... For a successful flashing, you must complete the following steps:
- To obtain superuser rights (root-rights) on the site unrevoked.com download the program "Unrevoked". Root rights are a special account in UNIX systems. The owner of such an account can perform all operations without exception.
- Run the downloaded program and select the "Hboot Driver" file. Then follow the instructions to install the HBOOT driver. You can download the drivers for self-installation at unrevoked.com.
- Next, you need to disable Desire and enable it in the HBOOT system. This can be done with power buttons and Volume Down. Press them at the same time.
- Then the smartphone must be connected to the PC using USB cable... We are waiting for the inscription HBOOT USB PLUG to appear, and go to the "Device Manager". Right button mouse click on the Android 1.0 device and select the section "Update drivers".
- Click on "Search for drivers on this computer." Next, you need to select the folder into which the drivers were unpacked.
- Exit HBOOT menu. This will help you volume buttons Up, Volume Down (move through the menu items) and the Enter button.
- IN normal mode start up your smartphone and enable USB Debugging.
If you installed HTC Sync, uninstall it but keep the drivers. Next, launch Unrevoked and connect your device to your PC. Give your consent when requested information. Then wait. The device will reboot, and as a result, the message "Unrevoked 3 Painless root and reflash" should appear.
How to flash HTC Desire: the main part
The procedure will be as follows: first download the firmware. You can download it on the website w3bsit3-dns.com. Recommended firmwares are RuHD and InsertCoin.
Next, you need to clear all user data. To do this, select "Settings" -\u003e "Privacy" -\u003e "Reset data" in the device menu. You can also do this using the firmware recovery mode. To do this, go to the Recovery menu, select the "Wipe data / factory reset -\u003e" Yes "section. Due to this, the firmware modules will not match.
How to install the firmware file for HTC Desire?
- From the Recovery menu, select the "install zip from sd-card" file. Turn off or turn on signature verification (Clockwork) if necessary.
- Next, find the zip firmware, select it and run it.
- When the installation is complete, you will see “Installation completed”. Restart your smartphone and wait for the download to start.
The firmware usually takes about fifteen to thirty minutes. In the end, you should get new version Android.
How do I expand the memory for applications?
The phone firmware itself takes a lot free space... Your smartphone may not have enough free memory to download various applications. In this case, it will help you special program... For this:
- Download the "ROM Manager" program from the "Market" and run it.
- Next, find the item "Create partitions on the SD card". Select the size of the ext partition.
- The device should reboot and a partition will be created.
You can also read other articles on our site on similar topics: and.